cobbler 配置安装
先安装 epel-release 包
为后续内容做准备
[root@localhost ~]# yum -y install epel-release
Running transaction
  正在安装    : epel-release-7-11.noarch                                    1/1
  验证中      : epel-release-7-11.noarch                                    1/1

已安装:
  epel-release.noarch 0:7-11

完毕!
再安装 cobbler 包
使用 yum 会自动帮助你处理依赖关系
[root@localhost ~]# yum -y install cobbler
已安装:
  cobbler.x86_64 0:2.8.5-0.3.el7

作为依赖被安装:
  python-cheetah.x86_64 0:2.4.4-5.el7.centos
  python-pygments.noarch 0:1.4-10.el7
  python2-markdown.noarch 0:2.4.1-4.el7
  python2-pyyaml.noarch 0:3.10-0.el7
  python2-simplejson.x86_64 0:3.10.0-2.el7
  tftp-server.x86_64 0:5.2-22.el7

完毕!
接着再装一堆装机需要用的包
cobbler-web 网页形式去管理
dhcp dhcp服务
tftp-server 放压缩内核和引导文件
pykickstart 安装模板自动安装
httpd 需要用到检测
rsync 远程同步管理
xinetd 管理远程同步平台
[root@localhost ~]# yum -y install cobbler-web dhcp tftp-server pykickstart httpd rsync xinetd
已安装:
  cobbler-web.noarch 0:2.8.5-0.3.el7     dhcp.x86_64 12:4.2.5-79.el7.centos
  xinetd.x86_64 2:2.3.15-14.el7

作为依赖被安装:
  apr-util-openssl.x86_64 0:1.5.2-6.el7
  mod_ssl.x86_64 1:2.4.6-93.el7.centos
  python-django-bash-completion.noarch 0:1.11.27-1.el7
  python2-django.noarch 0:1.11.27-1.el7

更新完毕:
  httpd.x86_64 0:2.4.6-93.el7.centos         rsync.x86_64 0:3.1.2-10.el7

作为依赖被升级:
  dhclient.x86_64 12:4.2.5-79.el7.centos
  dhcp-common.x86_64 12:4.2.5-79.el7.centos
  dhcp-libs.x86_64 12:4.2.5-79.el7.centos
  httpd-tools.x86_64 0:2.4.6-93.el7.centos
  mod_session.x86_64 0:2.4.6-93.el7.centos

完毕!
修改 cobbler 主配置文件
先找到主配置文件位置,一般在 /etc 下
[root@localhost ~]# rpm -qc cobbler |grep /etc
……省略一堆
/etc/cobbler/rsync.exclude
/etc/cobbler/rsync.template
/etc/cobbler/secondary.template
/etc/cobbler/settings          #这个就是主配置文件了
/etc/cobbler/tftpd.template
/etc/cobbler/users.conf
/etc/cobbler/users.digest
/etc/cobbler/version
……再省略一堆
修改主配置文件
[root@localhost ~]# vim /etc/cobbler/settings
 末行模式分别搜索 next_server
                           server
                           manage_dhcp
 修改以下配置,服务指向本机,dchp改成1,表示开启
next_server: 20.0.0.140
server: 20.0.0.140
manage_dhcp: 1   ###这边一定一定一定一定一定记得空格,我这个一开始没加空格报错查了我一个小时
开启服务,关闭防护
[root@localhost ~]# systemctl stop firewalld
[root@localhost ~]# setenforce 0
[root@localhost ~]# iptables -F
[root@localhost ~]# systemctl start httpd
[root@localhost ~]# systemctl start cobblerd
修改tftp配置
 [root@localhost ~]# vim /etc/xinetd.d/tftp
        disable                 = no
修改 rsync 同步配置文件
让 rsync开机启动,之后重启 cobbler 服务,修改密码
[root@localhost ~]# systemctl enable rsyncd
Created symlink from /etc/systemd/system/multi-user.target.wants/rsyncd.service to /usr/lib/systemd/system/rsyncd.service.
[root@localhost ~]# systemctl restart cobblerd
[root@localhost ~]# openssl passwd -1 -salt '123123' '123123'
$1$123123$MAV.kVI/b3swmFLErPD2b0
上面的密码字符串记得要复制

[root@localhost ~]# vim /etc/cobbler/settings
搜索 /default_password,改成这样,删了本来的密码,把你的字符串黏贴上去
default_password_crypted: "$1$123123$MAV.kVI/b3swmFLErPD2b0"
修改 cobbler 中的dhcp配置
[root@localhost ~]# vim /etc/cobbler/dhcp.template
subnet 20.0.0.0 netmask 255.255.255.0 {
     option routers             20.0.0.2;
     option domain-name-servers 20.0.0.140;
     option subnet-mask         255.255.255.0;
     range dynamic-bootp        20.0.0.100 20.0.0.253;
[root@localhost ~]# cobbler sync    #同步
下载引导文件
记得开http服务,这边报错也查了我好久55555
[root@localhost ~]# cobbler get-loaders
启动 dhcp 服务
[root@localhost ~]# systemctl start dhcpd
顺手挂载一下光盘
[root@localhost ~]# systemctl start dhcpd
[root@localhost ~]# mount /dev/cdrom /mnt/
mount: /dev/sr0 写保护,将以只读方式挂载
导入镜像文件
[root@localhost /]# cobbler import --path=/mnt/ --name=Centos-7-x86_64 --arch=x86_64
task started: 2020-07-20_114606_import
task started (id=Media import, time=Mon Jul 20 11:46:06 2020)
Found a candidate signature: breed=redhat, version=rhel6
Found a candidate signature: breed=redhat, version=rhel7
Found a matching signature: breed=redhat, version=rhel7
Adding distros from path /var/www/cobbler/ks_mirror/Centos-7-x86_64:
creating new distro: Centos-7-x86_64
trying symlink: /var/www/cobbler/ks_mirror/Centos-7-x86_64 -> /var/www/cobbler/links/Centos-7-x86_64
creating new profile: Centos-7-x86_64
associating repos
checking for rsync repo(s)
checking for rhn repo(s)
checking for yum repo(s)
starting descent into /var/www/cobbler/ks_mirror/Centos-7-x86_64 for Centos-7-x86_64
processing repo at : /var/www/cobbler/ks_mirror/Centos-7-x86_64
need to process repo/comps: /var/www/cobbler/ks_mirror/Centos-7-x86_64
looking for /var/www/cobbler/ks_mirror/Centos-7-x86_64/repodata/*comps*.xml
Keeping repodata as-is :/var/www/cobbler/ks_mirror/Centos-7-x86_64/repodata
*** TASK COMPLETE ***
使用tree命令查看
[root@localhost /]# yum -y install tree
[root@localhost /]# tree /var/lib/tftpboot/images
/var/lib/tftpboot/images
└── Centos-7-x86_64
    ├── initrd.img
    └── vmlinuz

1 directory, 2 files
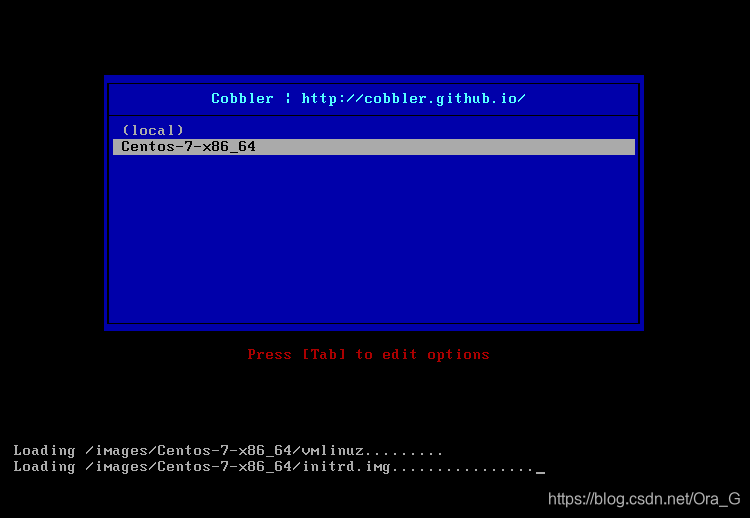
验证服务
systemctl start tftp 开启tftp
使用默认的认证方法配置
[root@localhost ~]# htdigest -c /etc/cobbler/users.digest Cobbler cbadmin
Adding password for cbadmin in realm Cobbler.
New password:
Re-type new password:
[root@localhost ~]# systemctl restart cobblerd
[root@localhost ~]# systemctl restart httpd
[root@localhost ~]#
打开浏览器输入
https://20.0.0.140/cobbler_web
