目录
前言
最近在接触一个项目,要用到语义分割,如果大家有什么问题,都可以跟我沟通交流。除了通过博客交流外,欢迎你加入我的QQ群,一起交流有关于区块链、机器学习、深度学习、计算机视觉有关内容。我现在处于广泛涉猎阶段,希望我们能够一起沟通。下图是我的群二维码:

一、DeepLab简述
Deeplab 是谷歌在FCN的基础上搞出来的。Google 研究团队开源在 Tensorflow 中进行语义图像分割(Semantic Image Segmentation)模型 DeepLab-v3+。
当然,因为主要是应用,不是深入研究,所以不会很详细的说明deeplab的各个版本。


论文下载:https://arxiv.org/pdf/1802.02611.pdf
代码下载:https://github.com/tensorflow/models/tree/master/research/deeplab
二、DeepLab怎么使用
1、配置
配置最重要,特别是我们要做的是深度学习与计算机视觉,不仅要求硬件,还要求软件。
在这里,我们不需要一个特别强大的GPU(有了最好),一个win7或者win10的电脑(win8也可以,但是win8现在很少使用,大多数程序员都偏爱win7)
这个代码是python写的,所以需要用到python,我使用的是python3.6,大家可以根据自己的需要去下载。软件用的是pycharm。
安装教程:请点击安装配置教程,即可查看。
pycharm设置教程:请点击pycharm设置教程,即可查看。
2、代码解析
全部代码如下
#!--*-- coding:utf-8 --*--

# Deeplab Demo

import os
import tarfile

from matplotlib import gridspec
import matplotlib.pyplot as plt
import numpy as np
from PIL import Image
import tempfile
from six.moves import urllib
import tensorflow as tf


class DeepLabModel(object):
    """
    加载 DeepLab 模型;
    推断 Inference.
    """
    INPUT_TENSOR_NAME = 'ImageTensor:0'
    OUTPUT_TENSOR_NAME = 'SemanticPredictions:0'
    INPUT_SIZE = 400
    FROZEN_GRAPH_NAME = 'frozen_inference_graph'

    def __init__(self, tarball_path):
        """
        加载预训练模型
        """
        self.graph = tf.Graph()

        graph_def = None
        # Extract frozen graph from tar archive.
        tar_file = tarfile.open(tarball_path)#得到模型中的文件
        for tar_info in tar_file.getmembers():
            if self.FROZEN_GRAPH_NAME in os.path.basename(tar_info.name):
                file_handle = tar_file.extractfile(tar_info)
                graph_def = tf.GraphDef.FromString(file_handle.read())
                break

        tar_file.close()

        if graph_def is None:
            raise RuntimeError('Cannot find inference graph in tar archive.')

        with self.graph.as_default():
            tf.import_graph_def(graph_def, name='')

        self.sess = tf.Session(graph=self.graph)


    def run(self, image):
        """

        Args:
        image:  转换为PIL.Image 类,不能直接用图片,原始图片

        Returns:
        resized_image: RGB image resized from original input image.
        seg_map: Segmentation map of `resized_image`.
        """
        width, height = image.size
        resize_ratio = 1.0 * self.INPUT_SIZE / max(width, height)
        target_size = (int(resize_ratio * width), int(resize_ratio * height))
        resized_image = image.convert('RGB').resize(target_size, Image.ANTIALIAS)
        batch_seg_map = self.sess.run(self.OUTPUT_TENSOR_NAME,
                                      feed_dict={self.INPUT_TENSOR_NAME: [np.asarray(resized_image)]})
        seg_map = batch_seg_map[0]
        return resized_image, seg_map

def create_pascal_label_colormap():
    """
    Creates a label colormap used in PASCAL VOC segmentation benchmark.

    Returns:
        A Colormap for visualizing segmentation results.
    """
    colormap = np.zeros((256, 3), dtype=int)# zeros:元素全为0的矩阵
    ind = np.arange(256, dtype=int) # 用于创建等差数组,range返回构成的list,而arange返回一个array对象

    for shift in reversed(range(8)): # reversed:返回的是一个把序列值经过反转之后的迭代器,通过遍历,List或者next()等方法,获取作用后的值;
        for channel in range(3):
            colormap[:, channel] |= ((ind >> channel) & 1) << shift
        ind >>= 3

    return colormap

def label_to_color_image(label):
    """
    Adds color defined by the dataset colormap to the label.

    Args:
        label: A 2D array with integer type, storing the segmentation label.

    Returns:
        result: A 2D array with floating type. The element of the array
        is the color indexed by the corresponding element in the input label
        to the PASCAL color map.

    Raises:
        ValueError: If label is not of rank 2 or its value is larger than color
        map maximum entry.
    """
    if label.ndim != 2:
        raise ValueError('Expect 2-D input label')

    colormap = create_pascal_label_colormap()

    if np.max(label) >= len(colormap):
        raise ValueError('label value too large.')

    return colormap[label]

def vis_segmentation(image, seg_map, imagefile):
    """可视化三种图像."""
    plt.figure(figsize=(15, 5))
    grid_spec = gridspec.GridSpec(1, 4, width_ratios=[6, 6, 6, 1])

    plt.subplot(grid_spec[0])
    plt.imshow(image)
    plt.axis('off')
    plt.title('input image')

    plt.subplot(grid_spec[1])
    seg_image = label_to_color_image(seg_map).astype(np.uint8)
    # seg_image = label_to_color_image(seg_map)
    # seg_image.save('/str(ss)+imagefile')
    plt.imshow(seg_image)
    plt.savefig('./'+imagefile+'.png')

    plt.axis('off')
    plt.title('segmentation map')

    plt.subplot(grid_spec[2])
    plt.imshow(image)
    plt.imshow(seg_image, alpha=0.7)
    plt.axis('off')
    plt.title('segmentation overlay') #添加标题
    """

    """

    unique_labels = np.unique(seg_map)
    ax = plt.subplot(grid_spec[3])
    plt.imshow(FULL_COLOR_MAP[unique_labels].astype(np.uint8), interpolation='nearest')
    ax.yaxis.tick_right()
    plt.yticks(range(len(unique_labels)), LABEL_NAMES[unique_labels])
    plt.xticks([], [])
    ax.tick_params(width=0.0)
    plt.grid('off')
    plt.show()


##标签名称

LABEL_NAMES = np.asarray(['background', 'aeroplane', 'bicycle', 'bird', 'boat', 'bottle', 'bus','car', 'cat', 'chair', 'cow', 'diningtable', 'dog', 'horse', 'motorbike','person', 'pottedplant', 'sheep', 'sofa', 'train', 'tv' ])


FULL_LABEL_MAP = np.arange(len(LABEL_NAMES)).reshape(len(LABEL_NAMES), 1)
FULL_COLOR_MAP = label_to_color_image(FULL_LABEL_MAP)

'''
## Tensorflow 提供的模型下载
MODEL_NAME = 'xception_coco_voctrainval'
# ['mobilenetv2_coco_voctrainaug', 'mobilenetv2_coco_voctrainval', 'xception_coco_voctrainaug', 'xception_coco_voctrainval']

_DOWNLOAD_URL_PREFIX = 'http://download.tensorflow.org/models/'
_MODEL_URLS = {'mobilenetv2_coco_voctrainaug': 'deeplabv3_mnv2_pascal_train_aug_2018_01_29.tar.gz',
               'mobilenetv2_coco_voctrainval': 'deeplabv3_mnv2_pascal_trainval_2018_01_29.tar.gz',
               'xception_coco_voctrainaug': 'deeplabv3_pascal_train_aug_2018_01_04.tar.gz',
               'xception_coco_voctrainval': 'deeplabv3_pascal_trainval_2018_01_04.tar.gz', }

_TARBALL_NAME = 'deeplab_model.tar.gz'

# model_dir = tempfile.mkdtemp()
model_dir = './'
# tf.gfile.MakeDirs(model_dir)

#
download_path = os.path.join(model_dir, _TARBALL_NAME)
print('downloading model, this might take a while...')
#
urllib.request.urlretrieve(_DOWNLOAD_URL_PREFIX + _MODEL_URLS[MODEL_NAME], download_path)
print('download completed! loading DeepLab model...')


'''

# model_dir = '/‘

# download_path = os.path.join(model_dir, _MODEL_URLS[MODEL_NAME])
MODEL = DeepLabModel('./deeplab_model.tar.gz') #修改这里更换模型

# MODEL = './deeplab_model.tar.gz'
print('model loaded successfully!')


##
def run_visualization(imagefile):
    """
    DeepLab 语义分割,并可视化结果.
    """
    # orignal_im = Image.open(imagefile)
    # print(type(orignal_im))
    # orignal_im.show()
    print('running deeplab on image %s...' % imagefile)
    resized_im, seg_map = MODEL.run(Image.open(imagefile))

    vis_segmentation(resized_im, seg_map,imagefile)

images_dir = './pictures' #修改这里更改图片路径
images = sorted(os.listdir(images_dir))
print(images)

for imgfile in images:

    run_visualization(os.path.join(images_dir, imgfile))

print('Done.')
1.引入包
我们需要引入一系列的包,当然,有些包是python自带的,有些需要自己安装,那什么的需要自己安装呢?
那些下面有红色下滑波浪线的,就是需要自己安装或配置的。
import os
import tarfile

from matplotlib import gridspec
import matplotlib.pyplot as plt
import numpy as np
from PIL import Image
import tempfile
from six.moves import urllib
import tensorflow as tf
我们直接利用Pycharm安装就好。以numpy为例:
1.依次点击File->Setting:

2.选择Project:(自己项目名称)->Project Interpreter。选择右面的 “+” 。

3.安装有如下几步:
(1)输入你要安装的包,
(2)选择你要安装的包,
(3)检查版本并查看信息,
(4)如果版本不对应自己选择版本,
(5)安装。

注:在安装PIL中可能出错。解决方案请点击:
2.模型类
代码中需要用到一个DeepLabModel类,做相关操作。
class DeepLabModel(object):
    """
    加载 DeepLab 模型;
    推断 Inference.
    """
    INPUT_TENSOR_NAME = 'ImageTensor:0'
    OUTPUT_TENSOR_NAME = 'SemanticPredictions:0'
    INPUT_SIZE = 400
    FROZEN_GRAPH_NAME = 'frozen_inference_graph'

    def __init__(self, tarball_path):
        """
        加载预训练模型
        """
        self.graph = tf.Graph()

        graph_def = None
        # Extract frozen graph from tar archive.
        tar_file = tarfile.open(tarball_path)#得到模型中的文件
        for tar_info in tar_file.getmembers():
            if self.FROZEN_GRAPH_NAME in os.path.basename(tar_info.name):
                file_handle = tar_file.extractfile(tar_info)
                graph_def = tf.GraphDef.FromString(file_handle.read())
                break

        tar_file.close()

        if graph_def is None:
            raise RuntimeError('Cannot find inference graph in tar archive.')

        with self.graph.as_default():
            tf.import_graph_def(graph_def, name='')

        self.sess = tf.Session(graph=self.graph)


    def run(self, image):
        """

        Args:
        image:  转换为PIL.Image 类,不能直接用图片,原始图片

        Returns:
        resized_image: RGB image resized from original input image.
        seg_map: Segmentation map of `resized_image`.
        """
        width, height = image.size
        resize_ratio = 1.0 * self.INPUT_SIZE / max(width, height)
        target_size = (int(resize_ratio * width), int(resize_ratio * height))
        resized_image = image.convert('RGB').resize(target_size, Image.ANTIALIAS)
        batch_seg_map = self.sess.run(self.OUTPUT_TENSOR_NAME,
                                      feed_dict={self.INPUT_TENSOR_NAME: [np.asarray(resized_image)]})
        seg_map = batch_seg_map[0]
        return resized_image, seg_map
3.函数实现1
我们创建了三个函数。
def create_pascal_label_colormap():
    """
    Creates a label colormap used in PASCAL VOC segmentation benchmark.

    Returns:
        A Colormap for visualizing segmentation results.
    """
    colormap = np.zeros((256, 3), dtype=int)# zeros:元素全为0的矩阵
    ind = np.arange(256, dtype=int) # 用于创建等差数组,range返回构成的list,而arange返回一个array对象

    for shift in reversed(range(8)): # reversed:返回的是一个把序列值经过反转之后的迭代器,通过遍历,List或者next()等方法,获取作用后的值;
        for channel in range(3):
            colormap[:, channel] |= ((ind >> channel) & 1) << shift
        ind >>= 3

    return colormap

def label_to_color_image(label):
    """
    Adds color defined by the dataset colormap to the label.

    Args:
        label: A 2D array with integer type, storing the segmentation label.

    Returns:
        result: A 2D array with floating type. The element of the array
        is the color indexed by the corresponding element in the input label
        to the PASCAL color map.

    Raises:
        ValueError: If label is not of rank 2 or its value is larger than color
        map maximum entry.
    """
    if label.ndim != 2:
        raise ValueError('Expect 2-D input label')

    colormap = create_pascal_label_colormap()

    if np.max(label) >= len(colormap):
        raise ValueError('label value too large.')

    return colormap[label]

def vis_segmentation(image, seg_map, imagefile):
    """可视化三种图像."""
    plt.figure(figsize=(15, 5))
    grid_spec = gridspec.GridSpec(1, 4, width_ratios=[6, 6, 6, 1])

    plt.subplot(grid_spec[0])
    plt.imshow(image)
    plt.axis('off')
    plt.title('input image')

    plt.subplot(grid_spec[1])
    seg_image = label_to_color_image(seg_map).astype(np.uint8)
    # seg_image = label_to_color_image(seg_map)
    # seg_image.save('/str(ss)+imagefile')
    plt.imshow(seg_image)
    plt.savefig('./'+imagefile+'.png')

    plt.axis('off')
    plt.title('segmentation map')

    plt.subplot(grid_spec[2])
    plt.imshow(image)
    plt.imshow(seg_image, alpha=0.7)
    plt.axis('off')
    plt.title('segmentation overlay') #添加标题
    """

    """

    unique_labels = np.unique(seg_map)
    ax = plt.subplot(grid_spec[3])
    plt.imshow(FULL_COLOR_MAP[unique_labels].astype(np.uint8), interpolation='nearest')
    ax.yaxis.tick_right()
    plt.yticks(range(len(unique_labels)), LABEL_NAMES[unique_labels])
    plt.xticks([], [])
    ax.tick_params(width=0.0)
    plt.grid('off')
    plt.show()
这三个函数用于图像的语义分割,并可视化。
4.设置标签
设置标签及其对应颜色,会调用我们上面写好的函数。
##标签名称

LABEL_NAMES = np.asarray(['background', 'aeroplane', 'bicycle', 'bird', 'boat', 'bottle', 'bus','car', 'cat', 'chair', 'cow', 'diningtable', 'dog', 'horse', 'motorbike','person', 'pottedplant', 'sheep', 'sofa', 'train', 'tv' ])

FULL_LABEL_MAP = np.arange(len(LABEL_NAMES)).reshape(len(LABEL_NAMES), 1)
FULL_COLOR_MAP = label_to_color_image(FULL_LABEL_MAP)
这三个函数用于图像的语义分割,并可视化。
5.下载模型
这部分要下载模型,第一次使用,要将下面多行注释取消,第二次使用,因为已经下载过模型,就无需再次下载,直接执行即可,所以把代码继续注释就好。
'''
## Tensorflow 提供的模型下载
MODEL_NAME = 'xception_coco_voctrainval'
# ['mobilenetv2_coco_voctrainaug', 'mobilenetv2_coco_voctrainval', 'xception_coco_voctrainaug', 'xception_coco_voctrainval']

_DOWNLOAD_URL_PREFIX = 'http://download.tensorflow.org/models/'
_MODEL_URLS = {'mobilenetv2_coco_voctrainaug': 'deeplabv3_mnv2_pascal_train_aug_2018_01_29.tar.gz',
               'mobilenetv2_coco_voctrainval': 'deeplabv3_mnv2_pascal_trainval_2018_01_29.tar.gz',
               'xception_coco_voctrainaug': 'deeplabv3_pascal_train_aug_2018_01_04.tar.gz',
               'xception_coco_voctrainval': 'deeplabv3_pascal_trainval_2018_01_04.tar.gz', }

_TARBALL_NAME = 'deeplab_model.tar.gz'

# model_dir = tempfile.mkdtemp()
model_dir = './'
# tf.gfile.MakeDirs(model_dir)

#
download_path = os.path.join(model_dir, _TARBALL_NAME)
print('downloading model, this might take a while...')
#
urllib.request.urlretrieve(_DOWNLOAD_URL_PREFIX + _MODEL_URLS[MODEL_NAME], download_path)
print('download completed! loading DeepLab model...')


'''

# model_dir = '/‘

# download_path = os.path.join(model_dir, _MODEL_URLS[MODEL_NAME])
MODEL = DeepLabModel('./deeplab_model.tar.gz') #修改这里更换模型
# MODEL = './deeplab_model.tar.gz'

print('model loaded successfully!')
6.函数实现2
再次创建一个函数,把语义分割可视化封装好。
def run_visualization(imagefile):
    """
    DeepLab 语义分割,并可视化结果.
    """
    # orignal_im = Image.open(imagefile)
    # print(type(orignal_im))
    # orignal_im.show()
    print('running deeplab on image %s...' % imagefile)
    resized_im, seg_map = MODEL.run(Image.open(imagefile))

    vis_segmentation(resized_im, seg_map,imagefile)
7.调用函数
最后就是调用函数,执行语义分割了。
images_dir = './pictures' #修改这里更改图片路径
images = sorted(os.listdir(images_dir))
print(images)
for imgfile in images:
run_visualization(os.path.join(images_dir, imgfile))
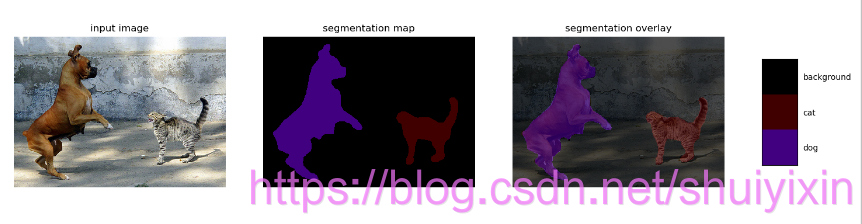
print('Done.')输出图像如下:

大家有什么问题可以在下面评论,我们一起相互交流。
