简介
本篇是摄像头云台的设计与使用方法,用树莓派进行控制,具体应用于我自制的多功能小车上边,目前整个小车也只是完成了摄像头部分,准备记录下来,摄像头云台一共两个自由度,分别为水平旋转和竖直旋转
三维模型的设计
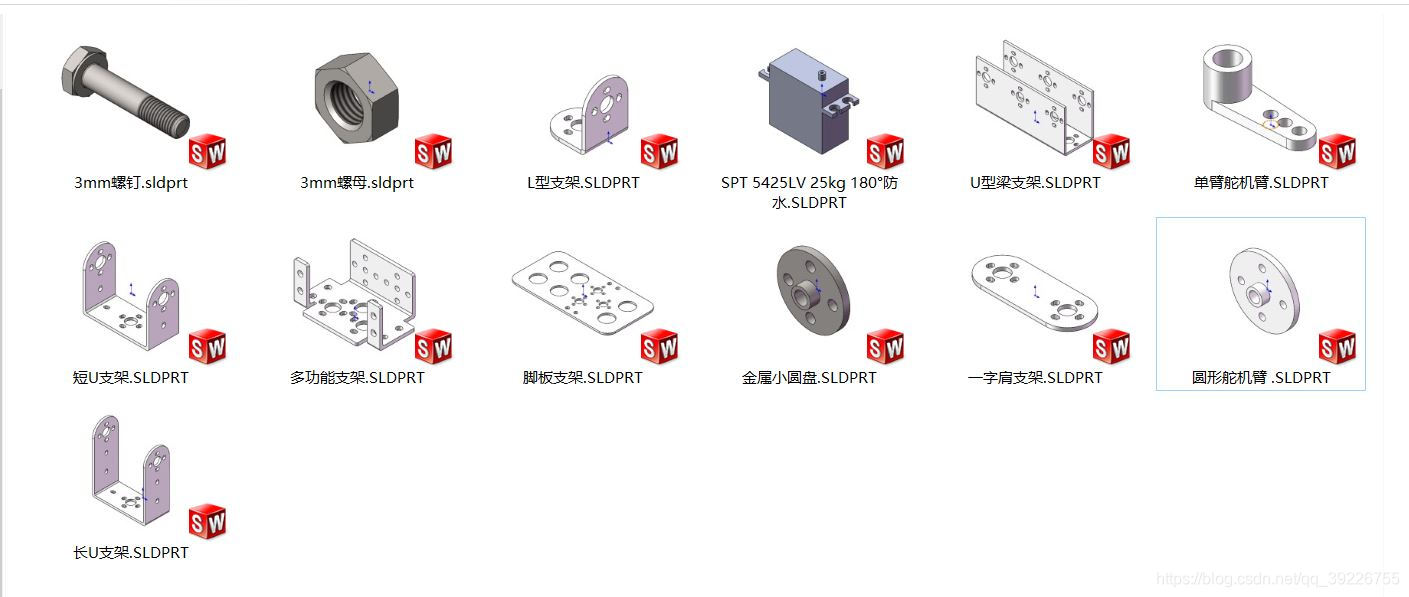
我的想法是直接用舵机,舵机支架,摄像头来完成舵机云台,因为舵机支架具有很多种结构,能保证我们的基本需求
设计三维模型肯定要有一个三维画图软件,我选的solidworks,因为电脑上恰好有这个软件,不过我现在更喜欢inventer,画起来很舒服,不过这都是小问题
我向淘宝商家要了常用舵机支架的尺寸,我觉得这些都是标准件,为了调用方便,我直接把他们都画了出来,有些孔的尺寸会有一些小误差,不过事实证明,实物是没问题的
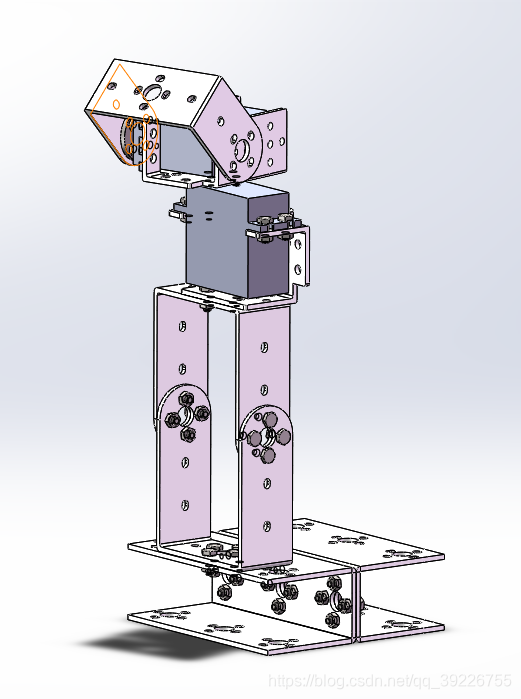
画完这些就是组装了,组装很简单,就像搭积木一样,把自己心里想的搭出来就好了,下边是我搭的相机云台
实物组装
做完这些就可以开始购物了,舵机支架很简单,想一想相机云台中的舵机应该不需要什么力气,所以买了便宜的舵机,结果舵机出乎我的意料,它不但力气小,还卡,还不稳定,所以大家看着买,我就不说在哪买的了
组装的时候一定要提前测好舵机角度,省的拆了重装,不要问我怎么知道的。
舵机云台实物如下:

看这个样子好像还不做,但是如果说这东西做完了,那想的就太简单了,这东西肯定不能用手转呀,我用的是树莓派进行控制,本来想着用树莓派供电着,结果又是让我惊喜,树莓派陷入了抽搐中,所以我们还需要一些东西,一个电源,一个控制器,因为以后要带机械臂什么的,树莓派小小的身躯肯定承受不住那么多舵机,所以控制器还是很有必要的
一个6V2300mA的电池,博主没钱,只能买玩具电池将就下了

一个具有16个接口,并且能拓展的pwm控制器

当然,线一定要自己配好,包括电源线,杜邦线,充电器什么的。另外杜邦线最好不要用来供电。
接线
插线还是挺简单的
GND -> RPi GND(9脚)
SCL -> RPi SCL1(5脚)
SDA -> RPi SDA1(3脚)
VCC -> RPi 3.3V (1脚)
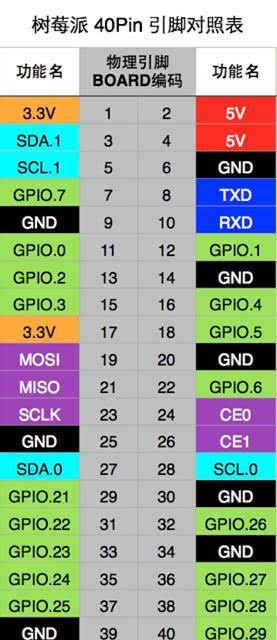
实际位置可以大概的参考一下,另外电源线接绿色接口那里

配置环境
用之前还需要导入一些东西,比如说一个PCA9685包,直接创建PCA9685.py,然后写进去就行了
# PCA9685.py
# ============================================================================
import time
import math

class PWM:
    _mode_adr              = 0x00
    _base_adr_low          = 0x08
    _base_adr_high         = 0x09
    _prescale_adr          = 0xFE

    def __init__(self, bus, address = 0x40):
        '''
        Creates an instance of the PWM chip at given i2c address.
        @param bus: the SMBus instance to access the i2c port (0 or 1).
        @param address: the address of the i2c chip (default: 0x40)
        '''
        self.bus = bus
        self.address = address
        self._writeByte(self._mode_adr, 0x00)

    def setFreq(self, freq):
        '''
        Sets the PWM frequency. The value is stored in the device.
        @param freq: the frequency in Hz (approx.)
        '''
        prescaleValue = 25000000.0    # 25MHz
        prescaleValue /= 4096.0       # 12-bit
        prescaleValue /= float(freq)
        prescaleValue -= 1.0
        prescale = math.floor(prescaleValue + 0.5)
        oldmode = self._readByte(self._mode_adr)
        if oldmode == None:
            return
        newmode = (oldmode & 0x7F) | 0x10
        self._writeByte(self._mode_adr, newmode)
        self._writeByte(self._prescale_adr, int(math.floor(prescale)))
        self._writeByte(self._mode_adr, oldmode)
        time.sleep(0.005)
        self._writeByte(self._mode_adr, oldmode | 0x80)

    def setDuty(self, channel, duty):
        '''
        Sets a single PWM channel. The value is stored in the device.
        @param channel: one of the channels 0..15
        @param duty: the duty cycle 0..100
        '''
        data = int(duty * 4996 / 100) # 0..4096 (included)
        self._writeByte(self._base_adr_low + 4 * channel, data & 0xFF)
        self._writeByte(self._base_adr_high + 4 * channel, data >> 8)

    def _writeByte(self, reg, value):
        try:
            self.bus.write_byte_data(self.address, reg, value)
        except:
            print("Error while writing to I2C device")

    def _readByte(self, reg):
        try:
            result = self.bus.read_byte_data(self.address, reg)
            return result
        except:
            print("Error while reading from I2C device")
            return None
同时还要打开I2C,因为我买的这个模块就是用这个通信的
树莓派中输入sudo raspi-config
找到Interfacing Options
打开I2C就行了
到这里就差不多了
编写程序
下边就是编写程序了,编写程序就是测试下相机云台能不能完成所需要的功能,我的逻辑是随机生成五次角度,让相机看过去,最后回到初始位置
from smbus import SMBus
from PCA9685 import PWM  # 从PCA9685引入PWM
import time
import random

fPWM = 50
i2c_address = 0x40  # (standard) 根据连接舵机的接口设置I2C地址
vertical_channel = 0  # 竖直舵机
horizontal_channel = 1 # 水平舵机 10(俯视)-90(仰视)
a = 10  # 与舵机相匹配
b = 2.5  # 与舵机相匹配


def setup():
    global pwm
    bus = SMBus(1)  # Raspberry Pi revision 2
    pwm = PWM(bus, i2c_address)
    pwm.setFreq(fPWM)


# def setDirection320(direction,channel):#0.5-2.5
#     duty = (direction / 320 * 10) + 2.5
#     pwm.setDuty(channel, duty)
#     time.sleep(1)

def setDirection180(direction,channel):#1-2
    duty = (direction / 180 * 5) + 5
    pwm.setDuty(channel, duty)
    time.sleep(0.1)


print("starting")
setup()
setDirection180(30,horizontal_channel)
setDirection180(90,vertical_channel)
time.sleep(1)
for i in range(5):
    hdirection = random.randint(0,180)
    vdirection = random.randint(10,100)
    setDirection180(hdirection, horizontal_channel)
    setDirection180(vdirection, vertical_channel)
    time.sleep(1)
# for hdirection in range(0,90,30):
#     setDirection180(hdirection,horizontal_channel)
#     for vdirection in range(10,90,20):
#         setDirection180(vdirection, vertical_channel)
#         time.sleep(0.5)
setDirection180(30,horizontal_channel)
setDirection180(90,vertical_channel)
print("done")
注释的部分是另一种测试方法,喜欢哪种用哪种
实物效果
csnd不能上传视频,只能看打码的了,等我有钱了,一定把摄像头换成蓝牙的