Goal
In this tutorial you will learn:
- What is Back Projection and why it is useful
- 什么是反投影以及它为什么是有用的
- How to use the OpenCV function cv::calcBackProject to calculate Back Projection
- 如何使用OpenCV函数cv :: calcBackProject来计算反投影
- How to mix different channels of an image by using the OpenCV function cv::mixChannels
- 如何通过使用OpenCV函数cv :: mixChannels来混合图像的不同通道
Theory
What is Back Projection?
- Back Projection is a way of recording how well the pixels of a given image fit the distribution of pixels in a histogram model.
- 反投影是一种记录给定图像的像素适合直方图模型中的像素分布程度的方式。
- To make it simpler: For Back Projection, you calculate the histogram model of a feature and then use it to find this feature in an image.
- 为了使其更简单:对于反投影,您可以计算特征的直方图模型,然后用它在图像中查找此特征。
- Application example: If you have a histogram of flesh color (say, a Hue-Saturation histogram ), then you can use it to find flesh color areas in an image:
- 应用示例:如果您有肤色直方图(例如H-S直方图),则可以使用它来查找图像中的肤色区
How does it work?
- We explain this by using the skin example:
- 我们通过使用皮肤示例来解释这一点:
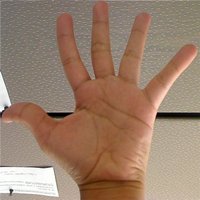
- Let's say you have gotten a skin histogram (Hue-Saturation) based on the image below. The histogram besides is going to be our model histogram (which we know represents a sample of skin tonality). You applied some mask to capture only the histogram of the skin area:
- 假设您根据以下图像获得了皮肤直方图(H-S)。直方图将成为我们的模型直方图(我们知道它代表了皮肤色调的一个样本)。使用掩码获得皮肤区域的直方图。
-
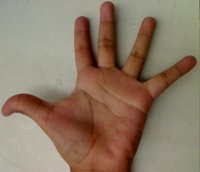
 T0Now, let's imagine that you get another hand image (Test Image) like the one below: (with its respective histogram):
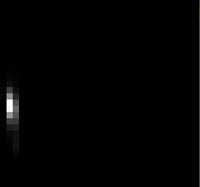 T1
T1 - 现在,让我们假设您获得另一只手图像(测试图像),如下所示:(使用其各自的直方图):
-
 T2What we want to do is to use our model histogram (that we know represents a skin tonality) to detect skin areas in our Test Image. Here are the steps
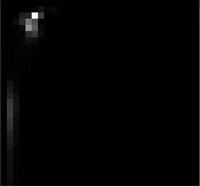 T3
T3 - 我们想要做的是使用我们的模型直方图(我们知道代表皮肤色调)来检测我们的测试图像中的皮肤区域。以下是步骤
- In each pixel of our Test Image (i.e. p(i,j) ), collect the data and find the correspondent bin location for that pixel (i.e. (hi,j,si,j) ).
- 对于测试图像中的每个像素,获取色调数据,并查找其在直方图中的位置
- Lookup the model histogram in the correspondent bin - (hi,j,si,j) - and read the bin value.
- 查找其对应的值。
- Store this bin value in a new image (BackProjection). Also, you may consider to normalize the model histogram first, so the output for the Test Image can be visible for you.
- 将该bin值存储在新图像中(BackProjection)。此外,您可以考虑首先对模型直方图进行归一化处理,以便测试图像的输出可以为您显示。
Applying the steps above, we get the following BackProjection image for our Test Image:
- 应用上述步骤,我们为我们的测试图像获得以下BackProjection图像:
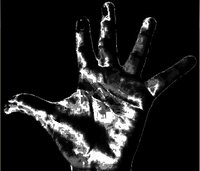
- In terms of statistics, the values stored in BackProjection represent the probability that a pixel in Test Image belongs to a skin area, based on the model histogram that we use. For instance in our Test image, the brighter areas are more probable to be skin area (as they actually are), whereas the darker areas have less probability (notice that these "dark" areas belong to surfaces that have some shadow on it, which in turns affects the detection).
- 用统计术语讲,存储在BackProjection中的值表示测试图像中的像素属于皮肤区域的概率。例如,在我们的测试图像中,较亮的区域更可能是皮肤区域(实际上是这样),而较暗的区域的可能性较小(请注意,表面上有一些阴影,影响检测)。
Code
- What does this program do?
- Loads an image(加载图像)
- Convert the original to HSV format and separate only Hue channel to be used for the Histogram (using the OpenCV function cv::mixChannels )(转化为HSV格式的图像,并且H通道用于计算直方图)
- Let the user to enter the number of bins to be used in the calculation of the histogram.
- 让用户输入用于计算直方图的bin数量。
- Calculate the histogram (and update it if the bins change) and the backprojection of the same image.
- 计算直方图(如果bin数量更改,则更新它)以及同一图像的反投影。
- Display the backprojection and the histogram in windows.
- 在窗口中显示反投影和直方图。
#include "opencv2/imgproc.hpp"
#include "opencv2/imgcodecs.hpp"
#include "opencv2/highgui.hpp"
#include <iostream>
using namespace cv;
using namespace std;
Mat src; Mat hsv; Mat hue;
int bins = 25;
void Hist_and_Backproj(int, void* );
int main( int, char** argv )
{
src = imread( "lena.jpg", IMREAD_COLOR );
if( src.empty() )
{
cout<<"Usage: ./calcBackProject_Demo1 <path_to_image>"<<endl;
return -1;
}
cvtColor( src, hsv, COLOR_BGR2HSV );//HSV
hue.create( hsv.size(), hsv.depth() );
int ch[] = { 0, 0 };
mixChannels( &hsv, 1, &hue, 1, ch, 1 );
//原始数据,原始数据的数量,目标数据,目标数据的数量,通道索引,索引对的数量
const char* window_image = "Source image";
namedWindow( window_image, WINDOW_AUTOSIZE );
createTrackbar("* Hue bins: ", window_image, &bins, 180, Hist_and_Backproj );
Hist_and_Backproj(0, 0);
imshow( window_image, src );
waitKey(0);
return 0;
}
void Hist_and_Backproj(int, void* )
{
MatND hist;
int histSize = MAX( bins, 2 );//大于等于2
float hue_range[] = { 0, 180 };
const float* ranges = { hue_range };
calcHist( &hue, 1, 0, Mat(), hist, 1, &histSize, &ranges, true, false );//计算直方图
normalize( hist, hist, 0, 255, NORM_MINMAX, -1, Mat() );//归一化
MatND backproj;
calcBackProject( &hue, 1, 0, hist, backproj, &ranges, 1, true );
//输入,输入图片的数量,通道,,直方图,输出,范围,缩放因子,直方图是否均匀
imshow( "BackProj", backproj );
int w = 400; int h = 400;
int bin_w = cvRound( (double) w / histSize );
//直方图
Mat histImg = Mat::zeros( w, h, CV_8UC3 );
for( int i = 0; i < bins; i ++ )
{
rectangle( histImg, Point( i*bin_w, h ), Point( (i+1)*bin_w, h - cvRound( hist.at<float>(i)*h/255.0 ) ), Scalar( 0, 0, 255 ), -1 );
}
imshow( "Histogram", histImg );
}

CMakeLists.txt
cmake_minimum_required(VERSION 2.8)
project( DisplayImage )
find_package( OpenCV REQUIRED )
include_directories( ${OpenCV_INCLUDE_DIRS} )
add_executable( DisplayImage main.cpp )
target_link_libraries( DisplayImage ${OpenCV_LIBS} )
install(TARGETS DisplayImage RUNTIME DESTINATION bin
Results
