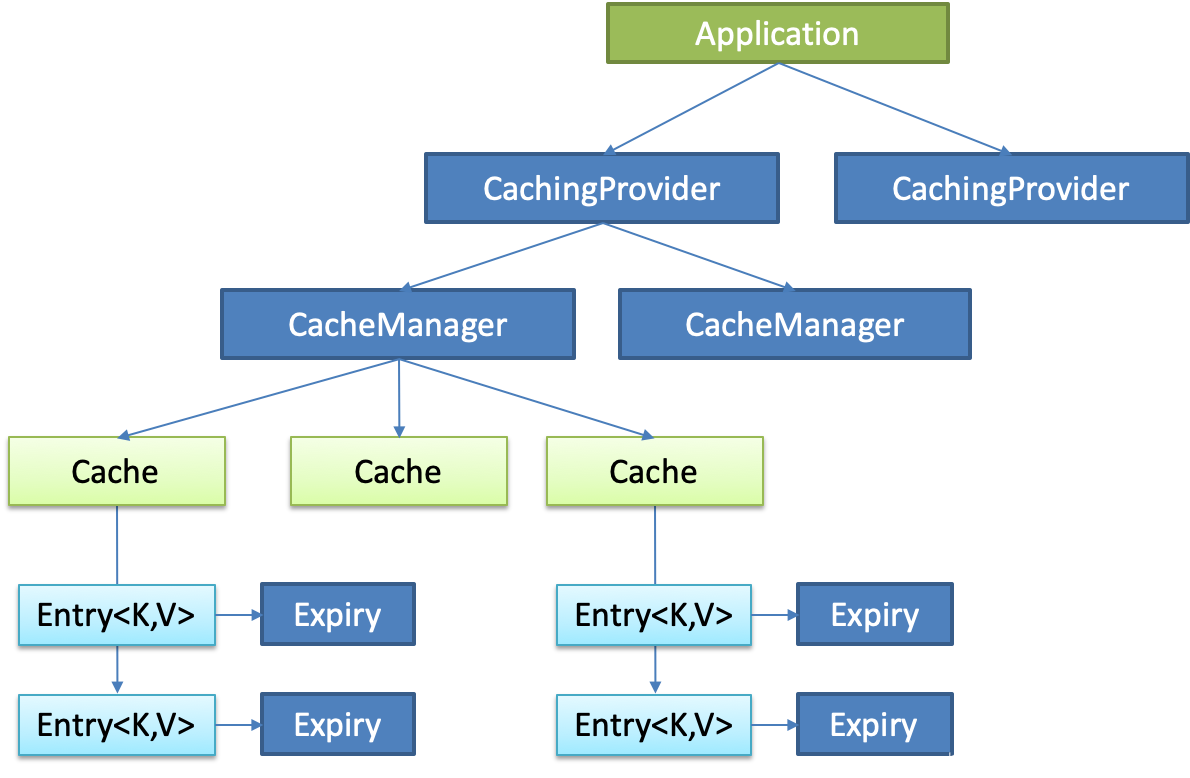
JSR107
Java Caching定义了5个核心接口,分别时CachingProvider,CacheManager,Cache,Entry和Expiry。
- CachingProvider定义了创建、配置、获取、管理和控制多个CacheManager。一个应用可以在运行期访问多个CachingProvider。
- CacheManager定义了创建、配置、获取、管理和控制多个唯一命名的Cache,这些Cache存在于Cachemanager的上下文中。一个CacheManager仅被一个CachingProvider所拥有的。
- Cache是一个类似Map的数据结构并临时存储以Key为索引的值。一个Cache仅被一个CacheManager所拥有。
- Entry是一个存储在Cache中的key-value对。
- Expiry每一个存储在Cache中的条目有一个定义的有效期。一旦超过这个时间,条目为过期的状态。一旦过期,条目讲不可访问、更新和删除。缓存有效期可以通过ExpiryPolicy设置。
Spring缓存抽象
Spring从3.1开始定义了org.springframework.cache.Cache和org.springframework.cache.CacheManager接口来统一不同的缓存技术,并支持使用JCache(JSR-107) 注解简化开发。
- Cache接口为缓存的组件规范定义,包含缓存的各种操作集合;
- Cache接口下Spring提供了各种xxxCache的实现;如RedisCache、EhCacheCache和ConcurrentMapCache等;
- 每次调用需要缓存功能的方法时,Spring会检查指定参数的指定的目标方法是否已经被调用过,如果有就直接从缓冲中获取方法调用后的结果,如果没有就调用方法并缓存结果后返回给用户。下次调用直接从缓存中获取。
- 使用Spring缓存抽象时需要关注以下两点:
- 确定方法需要被缓存以及他们的缓存策略
- 从缓存中读取之前存储的数据
几个重要概念&缓存注解:
| Cache | 缓存结构,定义缓存操作。实现有:RedisCache、EhCache、ConcurrentMapCache等 |
| CacheManager | 缓存管理器,管理各种缓存(Cache)组件 |
| @Cacheable | 主要针对方法配置,能够根据方法的请求参数对其结果进行缓存 |
| @CacheEvict | 清空缓存 |
| @CachePut | 保证方法被调用,又希望结果被调用 |
| @EnableCaching | 开启基于注解的缓存 |
| keyGenerator | 缓存数据时key生成策略 |
| serialize | 缓存数据时value序列化策略 |
@Cacheable、@CachePut和@CacheEvict主要的参数:
| value | 缓存的名称,在spring配置文件中定义,必须指定至少一个 | 例如: @Cacheable(value=“mycache”)或者 @Cacheable(value={“cache1”,“cache2”}) |
| key | 缓存的key,可以为空,如果指定要按照SpEL表达式编写,如果不指定,则缺省按照方法的所有参数进行组合 | 例如: @Cacheable(value=“testcache”, key="#userName") |
| condition | 缓存的条件,可以为空,使用SpEL编写,返回true或者false,只有为true才进行缓存/清除缓存,在调用方法之前之后都能判断 | 例如: @Cacheable(value=“testcache”,condition="#userName.length()>2") |
| allEntries(@CacheEvict) | 是否清空所有缓存内容,缺省为false,如果指定为true,则方法调用后将立即清空所有缓存 | 例如: @CacheEvict(value=“testcache”, allEntries=true) |
| beforeInvocation(@CacheEvict) | 是否在方法执行前就清空,缺省为false,如果指定为true,则在方法还没有执行的时候就清空缓存,缺省情况下,如果方法执行抛出异常,则不会清空缓存 | 例如: @CacheEvict(value=“testcache”,beforeInvocation=true) |
| unless(@CachePut)(@Cacheable) | 用于否决缓存的,不像condition,该表达式只存在方法执行之后判断,此时可以拿到返回值result进行判断。条件为true不会缓存,false才缓存 | 例如: @Cacheable(value=“testcache”,unless="#result==null") |
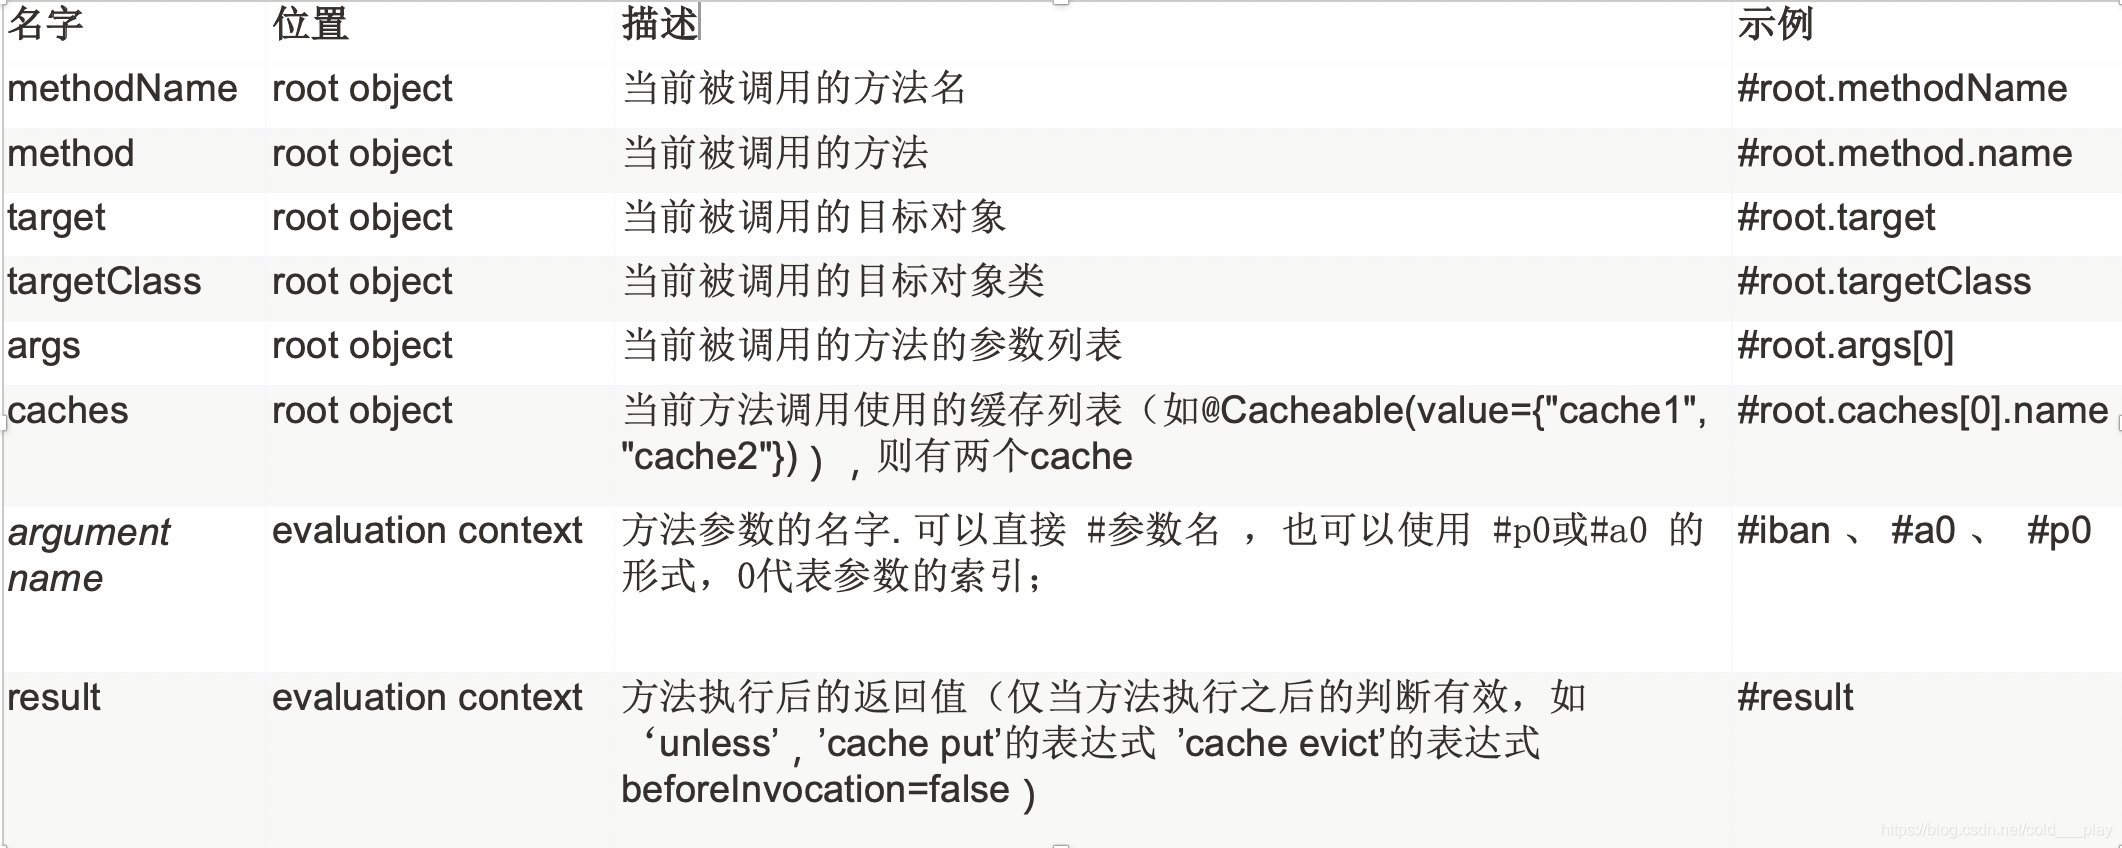
Cache SpEl available metadata:
实例
1. 创建工程,导入依赖:
<dependencies>
        <dependency>
            <groupId>org.springframework.boot</groupId>
            <artifactId>spring-boot-starter-cache</artifactId>
        </dependency>
        <dependency>
            <groupId>org.springframework.boot</groupId>
            <artifactId>spring-boot-starter-web</artifactId>
        </dependency>
        <dependency>
            <groupId>org.mybatis.spring.boot</groupId>
            <artifactId>mybatis-spring-boot-starter</artifactId>
            <version>2.1.1</version>
        </dependency>

        <dependency>
            <groupId>mysql</groupId>
            <artifactId>mysql-connector-java</artifactId>
            <scope>runtime</scope>
        </dependency>
        <dependency>
            <groupId>org.springframework.boot</groupId>
            <artifactId>spring-boot-starter-test</artifactId>
            <scope>test</scope>
        </dependency>
    </dependencies>
2. 创建实体类:
public class Employee implements Serializable {

	private Integer id;
	private String lastName;
	private String email;
	private Integer gender; //性别 1男  0女
	private Integer d_id;
	//省略getter和setter
}
3. service:
package pers.zhang.sb_cache.service;

import org.springframework.beans.factory.annotation.Autowired;
import org.springframework.cache.annotation.*;
import org.springframework.stereotype.Service;
import pers.zhang.sb_cache.bean.Employee;
import pers.zhang.sb_cache.mapper.EmployeeMapper;

/**
 * @Author: acton_zhang
 * @Date: 2020/2/5 6:38 下午
 * @Version 1.0
 */
//@CacheConfig(cacheNames = "emp") 配置公共缓存的配置信息
@Service
public class EmployeeService {

    @Autowired
    EmployeeMapper employeeMapper;


    /*
        Cachemannager管理多个Cache组件,对缓存真正的CRUD操作在Cache组件中,每一个缓存组件有自己唯一的一个名字。

        @Cacheable作用:将方法的运行结果进行缓存,以后再要相同的数据,从缓存中取
        属性:
            cacheNames/value: 指定缓存的名字;将方法的返回结果放在那个缓存中,数组的方式,可以指定多个缓存。
            key: 缓存数据使用的key,默认使用方法参数的值; 可以使用SpEL表达式,#id表示参数的值,等同于 #a0 #p0 #root.args[0]
            keyGenerator: key的生成器;也可以自己指定key的生成器的组件id  key/keyGenerator 二选一使用
            cacheManager: 指定缓存管理器;或者cacheResolver指定获取解析器 二选一使用
            condition:指定符合条件的情况下才缓存: condition="#a0>1" 第一个参数大于1才缓存
            unless: 否定缓存,当unless指定的条件为true,方法的返回值就不会缓存; 可以获取到结果进行判断
            sync: 是否使用异步模式

             key = "#id", condition = "#id>0", unless = "#result == null"
     */
    @Cacheable(cacheNames = "emp", key = "#id")
    public Employee getEmp(Integer id){
        System.out.println("查询" + id + "号员工");
        Employee emp = employeeMapper.getEmpById(id);
        return emp;
    }

    /*
       @Cacheable运行流程:
            1. 方法运行之前,查询Cache(缓存组件),按照cacheNames指定的name获取,CacheManager调用getCache(name)方法获取指定Cache
                (第一次)如果为null,创建一个Cache,放入CacheMap中
            2. 去Cache中查找缓存的内容,使用一个key(默认为方法参数)
                key是按照某种策略生成的:(默认使用keyGenerator(SimpleKeyGenerator))keyGenerator.generate(this.target, this.metadata.method, this.args)
                    SimpleKeyGenerator默认的key生成策略:
                        如果有没有参数,返回SimpleKey: key = new SimpleKey()
                        如果有一个参数:直接返回该参数: key = 参数值
                        如果有多个参数:多个参数包装后全部返回: key = new SimpleKey(params)
            3. 没有查到缓存,就调用目标方法;
            4. 将目标方法缓存的结果放入缓存中(默认ConcurrentMap)
     */


    /*
        @CachePut:既调用方法,又更新缓存数据;修改了数据库的某个数据,同时更新缓存
        运行时机:
            1. 先调用目标方法
            2. 将目标方法的结果缓存起来

            测试步骤:
                1、查询1号员工;查到的结果会放在缓存中;
                    key:1  value:lastName:张三
                2、以后查询还是之前的结果
                3、更新1号员工;【lastName:zhangsan;gender:0】
                    将方法的返回值也放进缓存了;
                    key:传入的employee对象  值:返回的employee对象;
                4、查询1号员工?
                    应该是更新后的员工;
                        key = "#employee.id":使用传入的参数的员工id;
                        key = "#result.id":使用返回后的id
     */
    @CachePut(cacheNames = "emp", key = "#employee.id")
    public Employee updateEmp(Employee employee){
        System.out.println("updateEmp:" + employee);
        employeeMapper.updateEmp(employee);
        return employee;
    }

    /*
        @CacheEvict: 缓存清除
            key:指定要清除的数据
            allEntries = true:指定清除这个缓存中所有的数据
            beforeInvocation = false:缓存的清除是否在方法之前执行
                默认代表缓存清除操作是在方法执行之后执行;如果出现异常缓存就不会清除
            beforeInvocation = true:
                 代表清除缓存操作是在方法运行之前执行,无论方法是否出现异常,缓存都清除

     */
    @CacheEvict(cacheNames = "emp", key = "#id")
    public void deleteEmp(Integer id){
        System.out.println("deleteEMp:" + id);
        // employeeMapper.deleteEmpById(id);
    }


    // @Caching 定义复杂的缓存规则
    @Caching(
            cacheable = {
                    @Cacheable(value="emp",key = "#lastName")
            },
            put = {
                    @CachePut(value="emp",key = "#result.id"),
                    @CachePut(value="emp",key = "#result.email")
            }
    )
    public Employee getEmpByLastName(String lastName){
        Employee employee =  employeeMapper.getEmpByLastName(lastName);
        return employee;
    }
}
4. controller:
package pers.zhang.sb_cache.controller;

import org.springframework.beans.factory.annotation.Autowired;
import org.springframework.web.bind.annotation.*;
import pers.zhang.sb_cache.bean.Employee;
import pers.zhang.sb_cache.service.EmployeeService;

/**
 * @Author: acton_zhang
 * @Date: 2020/2/5 6:40 下午
 * @Version 1.0
 */
@RestController
public class EmployeeController {

    @Autowired
    EmployeeService employeeService;

    @GetMapping("/emp/{id}")
    public Employee getEmployee(@PathVariable("id") Integer id){
        Employee emp = employeeService.getEmp(id);
        return emp;
    }

    @PostMapping("/emp")
    public Employee update(Employee employee){
        Employee emp = employeeService.updateEmp(employee);
        return emp;
    }

    @GetMapping("/deleteEmp/{id}")
    public String deleteEmp(@PathVariable("id") Integer id){
        employeeService.deleteEmp(id);
        return "success";
    }

    @GetMapping("/emp/lastname/{lastName}")
    public Employee getEmpByLastName(@PathVariable("lastName") String lastName){
        Employee emp = employeeService.getEmpByLastName(lastName);
        return emp;
    }
}
5. 测试:
使用PostMan模拟请求:
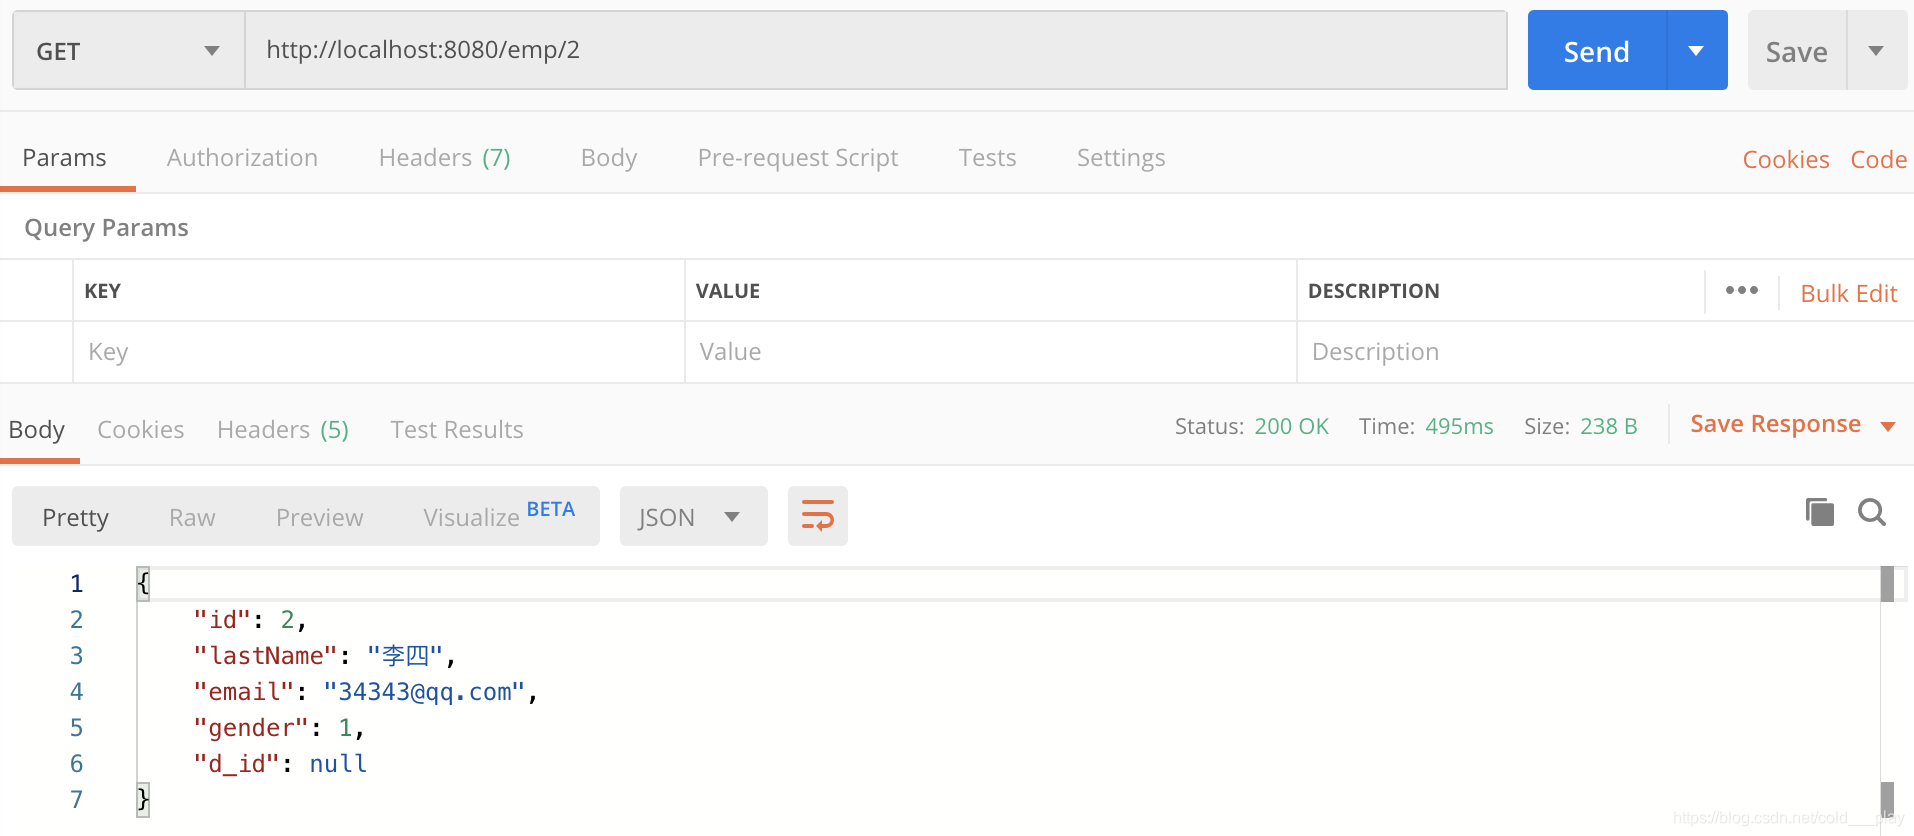
第一次请求:后台打印
查询2号员工
2020-02-05 21:38:37.987  INFO 1758 --- [nio-8080-exec-1] com.zaxxer.hikari.HikariDataSource       : HikariPool-1 - Starting...
2020-02-05 21:38:38.303  INFO 1758 --- [nio-8080-exec-1] com.zaxxer.hikari.HikariDataSource       : HikariPool-1 - Start completed.
2020-02-05 21:38:38.308 DEBUG 1758 --- [nio-8080-exec-1] p.z.s.mapper.EmployeeMapper.getEmpById   : ==>  Preparing: select * from employee where id = ?
2020-02-05 21:38:38.325 DEBUG 1758 --- [nio-8080-exec-1] p.z.s.mapper.EmployeeMapper.getEmpById   : ==> Parameters: 2(Integer)
2020-02-05 21:38:38.341 DEBUG 1758 --- [nio-8080-exec-1] p.z.s.mapper.EmployeeMapper.getEmpById   : <==      Total: 1
第二次请求:
后台无输出,直接从缓存中取数据
