Linux系统中进程的启动的创建分为创建和执行两个步骤,具体由fork()和exec()函数实现,首先fork()通过拷贝当前进程来创建一个子进程。然后exec()(该名字泛指系统调用,具体由execl,execv,execle和execve)函数负责读取可执行文件并将其载入进程的地址空间开始运行。
不带exec只是单纯的执行fork(),子进程会直接共享父进程的资源。具体可参考Linux操作系统相关知识。
进程的启动
下面回到Android的进程启动,Android的进程启动不是主动的,都是被动的启动,也就是启动组件时如果相应的进程未启动,则新创建进程并启动。
最明显的场景在于startActivity中,经过层层调用,最终会调用ActivityStackSupervisor.java中的startSpecificActivityLocked。
void startSpecificActivityLocked(ActivityRecord r,
            boolean andResume, boolean checkConfig) {
        // Is this activity's application already running?
        //每个进程都会对应一个ProcessRecord。
        ProcessRecord app = mService.getProcessRecordLocked(r.processName,
                r.info.applicationInfo.uid, true);

        getLaunchTimeTracker().setLaunchTime(r);

        if (app != null && app.thread != null) {
            //如果进程已经被启动,则可以启动组件
        }

        mService.startProcessLocked(r.processName, r.info.applicationInfo, true, 0,
                "activity", r.intent.getComponent(), false, false, true);
    }
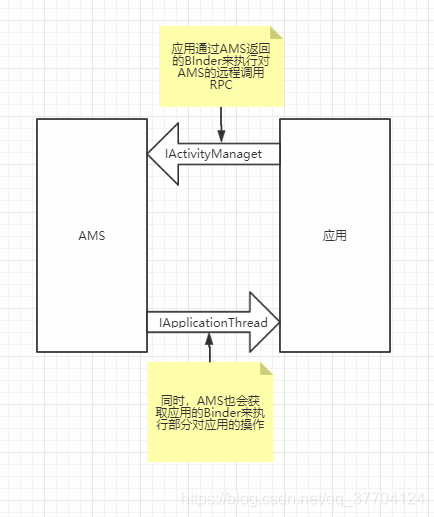
那这个app.thread又是什么,去ProcessRecord发现是一个IApplicationThread 类型的对象,然后这个IApplicationThread肯定也就是一个AIDL的实现接口了。
应用的进程创建后,便来到了熟悉的ActivityThread中启动main方法,这里只列出主要的步骤
ActivityThread.java
public static void main(String[] args){
	Looper.prepareMainLooper();
	ActivityThread thread = new ActivityThread();
	thread.attach(false);

	Looper.loop();

	throw new RuntimeException("Main thread loop unexpectedly exited");
}

attach()的部分步骤:
			final IActivityManager mgr = ActivityManager.getService();
            try {
                mgr.attachApplication(mAppThread, startSeq);//mAppThread也就是ApplicationThread,也就是AMS对Activity发起远程调用的Binder
            } catch (RemoteException ex) {
                throw ex.rethrowFromSystemServer();
            }
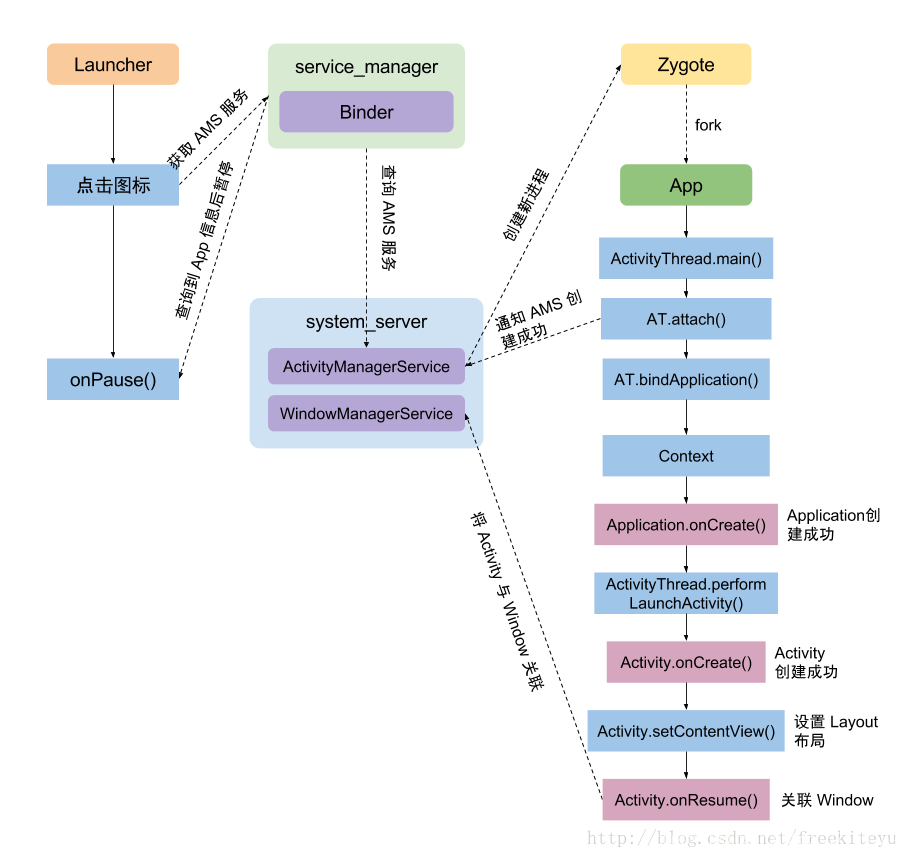
第一步:AMS向Zygote发起启动进程后,会返回进程的Pid给AMS;
第二部:应用进程启动完成后,会通知AMS启动完成,也就是attach()
这里也就是跨进程启动Activity的步骤了,具体可参考下图:详细可参考一篇文章看明白 Android 从点击应用图标到界面显示的过程
好了,继续回到上面startSpecificActivityLocked方法的 startProcessLocked的方法中,方法参数过多,就不全贴出来了,只列出部分
ActivityManagerService.java
		// We don't have to do anything more if:
        // (1) There is an existing application record; and
        // (2) The caller doesn't think it is dead, OR there is no thread
        //     object attached to it so we know it couldn't have crashed; and
        // (3) There is a pid assigned to it, so it is either starting or
        //     already running.
//	这个条件判断表示AMS向Zygote请求过创建进程,也就是app != null,并且进程创建完成,也就是app.pid > 0
        if (app != null && app.pid > 0) {
        // App进程创建完成后,会通过attach()向AMS发起attach(),参考上图的AT.attach(), app.thread == null,表示还未attach()AMS进程,等待attach。
            if ((!knownToBeDead && !app.killed) || app.thread == null) {
                // We already have the app running, or are waiting for it to
                // come up (we have a pid but not yet its thread), so keep it.
                if (DEBUG_PROCESSES) Slog.v(TAG_PROCESSES, "App already running: " + app);
                // If this is a new package in the process, add the package to the list
                app.addPackage(info.packageName, info.versionCode, mProcessStats);
                checkTime(startTime, "startProcess: done, added package to proc");
                return app;
            }

            // An application record is attached to a previous process,
            // clean it up now.
            if (DEBUG_PROCESSES || DEBUG_CLEANUP) Slog.v(TAG_PROCESSES, "App died: " + app);
            checkTime(startTime, "startProcess: bad proc running, killing");
            killProcessGroup(app.uid, app.pid);
            handleAppDiedLocked(app, true, true);
            checkTime(startTime, "startProcess: done killing old proc");
        }
组件的启动
下面来看看四大组件之一的Service的启动过程,调用startService后到ContextImpl的startServiceCommon。。。这里有点看晕了,先暂时缓缓。
startServiceCommon()的部分代码
			validateServiceIntent(service);
            service.prepareToLeaveProcess(this);
            ComponentName cn = ActivityManager.getService().startService(
                mMainThread.getApplicationThread(), service, service.resolveTypeIfNeeded(
                            getContentResolver()), requireForeground,
                            getOpPackageName(), user.getIdentifier());
	public static IActivityManager getService() {
        return IActivityManagerSingleton.get();
    }

    private static final Singleton<IActivityManager> IActivityManagerSingleton =
            new Singleton<IActivityManager>() {
                @Override
                protected IActivityManager create() {
                //这里便是通过ServiceManager获取名为"activity"的服务,因为服务都会注册到ServiceManager来统一管理
                    final IBinder b = ServiceManager.getService(Context.ACTIVITY_SERVICE);
                    //这里是返回ActivityManagerProxy,AMS提供的代理,这里ActivityManagerProxy是客户端,AMS是做为服务端。
                    final IActivityManager am = IActivityManager.Stub.asInterface(b);
                    return am;
                }
            };
ActivityManager的getService()是返回了IActivityManager对象,可以看到返回了一个Binder对象,IActivityManager的作用是提供了接口用于应用对AMS的调用,这是个相互的过程。
还是借用Gityuan大神的图片startService的启动过程分析
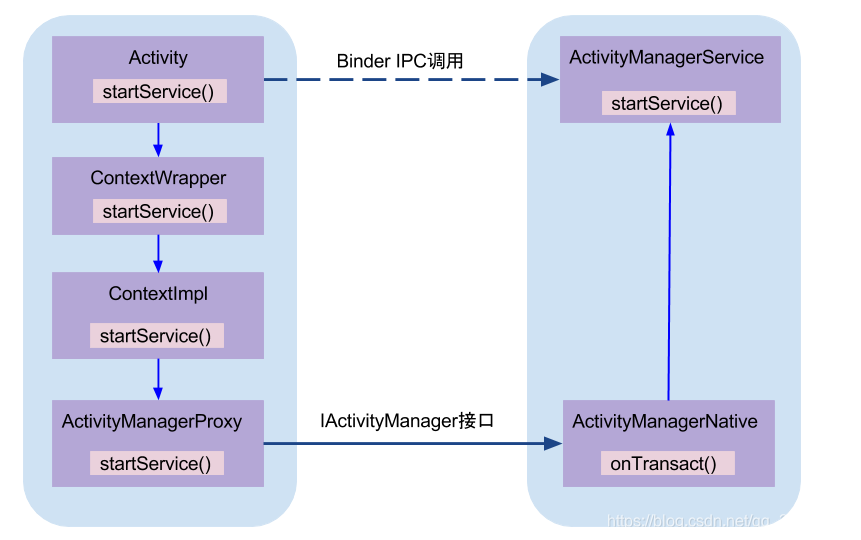
说实话硬是没找到IActivityManager的具体实现,估计是C++实现的吧,总之是通过AIDL也就是Binder的进程间通信的方式调用到了AMS中startService()方法.
AMS
public ComponentName startService(IApplicationThread caller, Intent service,
            String resolvedType, boolean requireForeground, String callingPackage, int userId)
            throws TransactionTooLargeException {
        enforceNotIsolatedCaller("startService");
        // Refuse possible leaked file descriptors
        if (service != null && service.hasFileDescriptors() == true) {
            throw new IllegalArgumentException("File descriptors passed in Intent");
        }

        if (callingPackage == null) {
            throw new IllegalArgumentException("callingPackage cannot be null");
        }

        if (DEBUG_SERVICE) Slog.v(TAG_SERVICE,
                "*** startService: " + service + " type=" + resolvedType + " fg=" + requireForeground);
        synchronized(this) {//注意这里加了锁
            final int callingPid = Binder.getCallingPid();
            final int callingUid = Binder.getCallingUid();
            final long origId = Binder.clearCallingIdentity();
            ComponentName res;
            //看的出主要流程在startServiceLocked中
            try {
                res = mServices.startServiceLocked(caller, service,
                        resolvedType, callingPid, callingUid,
                        requireForeground, callingPackage, userId);
            } finally {
                Binder.restoreCallingIdentity(origId);
            }
            return res;
        }
    }
因为startServiceLocked() 方法的流程过于长,就不贴出来了,其实也知道这个方法无非做一些启动前的准备工作,最好该方法调用到了startServiceInnerLocked()最终到bringUpServiceLocked()
ActiveServices.java 只截取部分,因为过于追究细节只会看得云里雾里的
private String bringUpServiceLocked(ServiceRecord r, int intentFlags, boolean execInFg,
            boolean whileRestarting, boolean permissionsReviewRequired)
            throws TransactionTooLargeException {
		//先获取进程相关的信息
        ProcessRecord app;
        if (!isolated) {
            app = mAm.getProcessRecordLocked(procName, r.appInfo.uid, false);
            if (DEBUG_MU) Slog.v(TAG_MU, "bringUpServiceLocked: appInfo.uid=" + r.appInfo.uid
                        + " app=" + app);
            if (app != null && app.thread != null) {//也就是获取到进程信息,即进程不仅启动了也向AMS注册过了
                try {
                    app.addPackage(r.appInfo.packageName, r.appInfo.longVersionCode, mAm.mProcessStats);
                    realStartServiceLocked(r, app, execInFg);//开始真正的启动
                    return null;
                } catch (TransactionTooLargeException e) {
                    throw e;
                } catch (RemoteException e) {
                    Slog.w(TAG, "Exception when starting service " + r.shortName, e);
                }

                // If a dead object exception was thrown -- fall through to
                // restart the application.
            }
        } else {
        }

        // Not running -- get it started, and enqueue this service record
        // to be executed when the app comes up.
        if (app == null && !permissionsReviewRequired) {//如果进程还未启动,需要先启动进程。
            if ((app=mAm.startProcessLocked(procName, r.appInfo, true, intentFlags,
                    hostingType, r.name, false, isolated, false)) == null) {
                String msg = "Unable to launch app "
                        + r.appInfo.packageName + "/"
                        + r.appInfo.uid + " for service "
                        + r.intent.getIntent() + ": process is bad";
                Slog.w(TAG, msg);
                bringDownServiceLocked(r);
                return msg;
            }
            if (isolated) {
                r.isolatedProc = app;
            }
        }
		//将Service加入mPendingServices列表当中
        if (!mPendingServices.contains(r)) {
            mPendingServices.add(r);
        }

        if (r.delayedStop) {
            // Oh and hey we've already been asked to stop!
            r.delayedStop = false;
            if (r.startRequested) {
                if (DEBUG_DELAYED_STARTS) Slog.v(TAG_SERVICE,
                        "Applying delayed stop (in bring up): " + r);
                stopServiceLocked(r);
            }
        }

        return null;
    }
这里当进程没有启动时,也就会调用startProcessLocked() 方法启动进程,也就回到了最上面的启动进程的方式,然后最终执行到AMS的attachApplicationLocked() 方法,这里便会先进行进程的创建,进程创建完成后,调用realStartServiceLocked() 开始Service的启动。这里便用沿用Gityuan的分析:startService启动过程分析
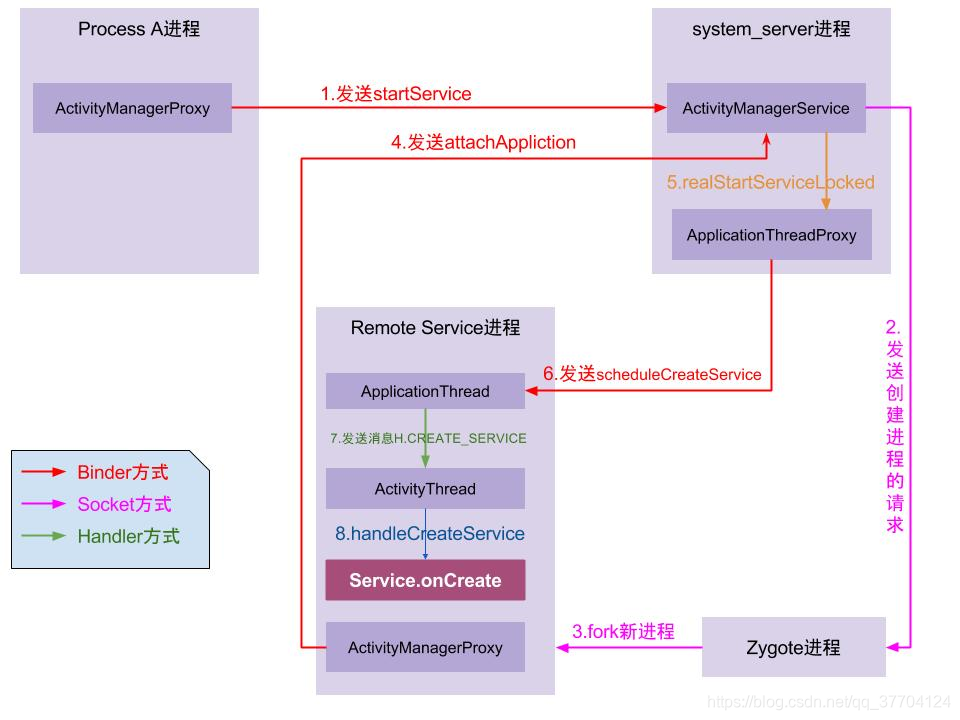
- Process A进程:也就是调用startService命令所在的进程,也就是启动服务的发起端进程,比如点击桌面App图标,此处Process A便是Launcher所在进程。
- system_server进程:系统进程,里面运行了大量的系统服务(系统服务会在此处注册以便能通过binder找到),比如这里提供ApplicationThreadProxy(简称ATP),ActivityManagerService(简称AMS),这个两个服务都运行在system_server进程的不同线程中,由于ATP和AMS都是基于IBinder接口,都是binder线程,binder线程的创建与销毁都是由binder驱动来决定的。
- Zygote进程:是由init进程孵化而来的,用于创建Java层进程的母体,所有的Java层进程都是由Zygote进程孵化而来;
- Remote Service进程:远程服务所在进程,是由Zygote进程孵化而来的用于运行Remote服务的进程。主线程主要负责Activity/Service等组件的生命周期以及UI相关操作都运行在这个线程; 另外,每个App进程中至少会有两个binder线程 ApplicationThread(简称AT)和ActivityManagerProxy(简称AMP),当然还有其他线程,这里不是重点就不提了。
具体的启动流程如下:
- Process A进程采用Binder IPC向system_server进程发起startService请求;
- system_server进程接收到请求后,通过Socket通信向zygote进程发送创建进程的请求;
- zygote进程fork出新的子进程也就是远程服务Remote Service进程;
- Remote Service进程,通过Binder IPC向sytem_server进程发起attachApplication请求;(也就是上面所说的注册到system_service中)
- system_server进程在收到请求后,进行一系列准备工作后,再通过binder IPC向remote Service进程发送scheduleCreateService请求;
- Remote Service进程的binder线程在收到请求后,通过handler向主线程发送CREATE_SERVICE消息;
- 主线程在收到Message后,通过发射机制创建目标Service,并回调Service.onCreate()方法。
Service的启动的流程也就到这结束了,发现其实和Activity的启动大同小异,都是由AMS进行管理,然后启动方通过IPC方式通知AMS,AMS进行调控启动过程。
这样的好处个人觉得是能够方便的对服务进行统一的管理吧。
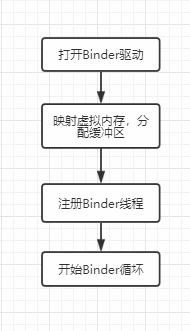
Binder启动流程
可以看到上面的进程启动与组件的启动,设置涉及到应用进程间交互的所有过程中都涉及到了Binder通信,可见Binder在Android的地位是如此之高,那么Binder又是如何启动的,总不能进程还没有启动Binder便已经启动了吧。
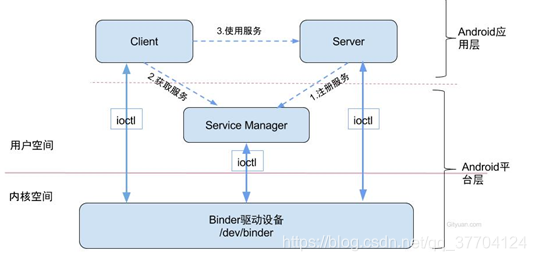
Binder的启动涉及到了Linux内核态与用户态的转换过程,因为我们知道内核态对于应用是无权访问的,而且内核态里的内存空间是共享的,用户态的内存空间其实是内核态的内存的一段映射,所有用户态之间的内存是不共享的。
虽然用户态无法访问内核态的内存,但是有时候还是需要的,比如IO操作,所有内核态提供了一个访问接口,叫系统调用,通过系统调用可以切换到内核态,这样便就可以间接的完成IPC。
具体的交互过程如下:ioctl也就是内核空间提供的一组系统调用
Application的角色
正式启动完进程后,便需要开始执行生命周期的流程了,Application的生命周期是与应用进程相关,横跨整个应用进程的生命周期,即与Activity无关,而且还长的多。
首先来看下Application是什么

它跟着应用进程走的,所有有几个应用进程便有几个Application,它的作用:
- 保存应用进程内的全局变量
- 提供初始化操作
- 通过应用上下文
它的生命周期:
构造函数 --> attachBaseContext --> onCreate
下面来具体看Application的创建过程。
先回想一下应用的创建,在ActivityThread里的main()方法里完成了应用进程的创建,然后通过attch函数通知AMS创建完成,所有就跟进到attach里面看。
ActivityThread.java
其中有这么一段
			final IActivityManager mgr = ActivityManager.getService();拿到AMS的binder对象
            try {
                mgr.attachApplication(mAppThread, startSeq);
            } catch (RemoteException ex) {
                throw ex.rethrowFromSystemServer();
            }
这里是与AMS建立联系,AMS收到了之后调用应用进程的bindApplication开始创建
ActivityThread.java
//因为这是AMS通过binder远程调用的方法,是处于Binder线程的。
public final void bindApplication{
			AppBindData data = new AppBindData();
            data.processName = processName;
            data.appInfo = appInfo;
			....
            data.compatInfo = compatInfo;
            data.initProfilerInfo = profilerInfo;
            data.buildSerial = buildSerial;
            data.autofillCompatibilityEnabled = autofillCompatibilityEnabled;
            sendMessage(H.BIND_APPLICATION, data); //封装data,发送Message切换到主线程处理
}
然后主线程的handleBindApplication()处理消息,从data提取相关信息创建Application,然后回调Application的生命周期onCreate()方法,流程如下
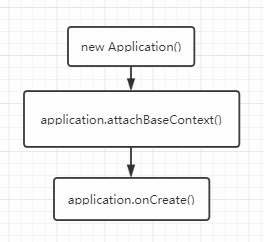
所以不能在Application的构造方法中使用到Application相关的操作,因为这个时候还没有赋值到Application。
同时也要注意不能在Application中执行耗时操作,因为组件的启动是在Application启动之后,所有这样会影响到组件的启动。
同时也要注意在Application使用静态变量可能会出现的问题:也就是另一个Activity给静态变量赋值后,如果进程被杀死然后重建,数据是会被重新初始化的,如果其他Activity使用到则会出错。
Context的角色
下面围绕这三点来了解Context在整个Android中充当的角色。
- Context的作用是什么
- Context是怎么被初始化的
- 不同组件间的Context之间的区别
首先直接来看Context的官方注释。read the fuck source code
Context.java
/**
* Interface to global information about an application environment. This is
* an abstract class whose implementation is provided by
* the Android system. It
* allows access to application-specific resources and classes, as well as
* up-calls for application-level operations such as launching activities,
* broadcasting and receiving intents, etc.
*/
//关于应用环境的全局信息接口,是一个由Android系统实现的抽象类。用来访问应用特定的资源和类,并且可以发起应用层面的调用,如启动Activity,广播,接收Intent等等。
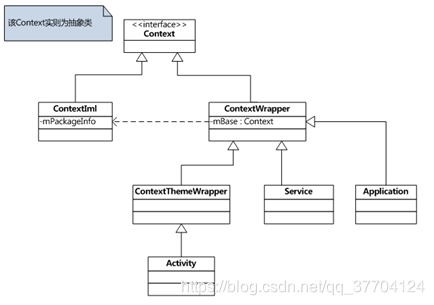
//注意这是一个抽象类,既然是个类,便说明具体的承载形式还是对象,也就是对对象的抽象化。
public abstract class Context {
public abstract Resources getResources();
public abstract Object getSystemServices(String name);
public abstract void startActivity(Intent intent);
public abstract void sendBroadcast(Intent intent);
...
}
下面来看它具体的实现类
ContextImpl.java
/**
 * Common implementation of Context API, which provides the base
 * context object for Activity and other application components.
 */
// Context公共的实现类,为Activity和其他应用组件提供基本的Context对象。
class ContextImpl extends Context {
	final ActivtiyThread mMainThread;	//应用的核心类
	final LoadedApk mPackageInfo;	//包括应用的安装包信息

	private final ResourcesManager mResourcesManager;
	private final Resources mResources;	//系统资源相关

	private Resources.Theme mTheme = null;	//主题相关
	private PackageManager mPackageManager;	//包相关

	final Object[]  mServiceCache = SystemServiceRegistry.createServiceCache();	//系统服务相关
}
再来看下哪些会持有Context。(注意广播是没有Context的),所有应用的整个Context的为Application+Activity+Service,不过应用可能是多进程的,所有Application可能会有多个,
Application、Context、Service,还是需要上面的图片
| Application创建 | 当Zygote进程fork出子进程后并创建完毕后,会通知AMS,然后AMS再在应用创建Application |
| Activity的Context的创建 | 在执行performLaunchActivity()方法中,会执行Activity的生命周期的回调,在onCreate之前便会执行attachBaseContext()进行Contect的创建 |
| Service的Context的创建 | 其实和Activity的差不多,在创建Context后执行生命周期的回调 |
| – | – |
| Broadcst | 广播比较特殊,分为静态注册和动态注册,动态注册则是注册广播传入的Context,静态注册则是以Application为mBase的Context |
| ContentProvicer | 和广播一样为ApplicationContext |
