Activity如何启动
Activity的跨应用的启动其本质还是启动另一个进程,所以和启动进程的流程一样的,都是涉及到与AMS,Zygote间的IPC来完成。
下面简单概述一下,当当前Activity调用startActivity()时,会调用AMS提供给每个Activitiy的Binder来进行远程调用到AMS的startActivity()方法。
这里就略过进程启动的部分细节,先提供示意图来自一篇文章看明白 Android 从点击应用图标到界面显示的过程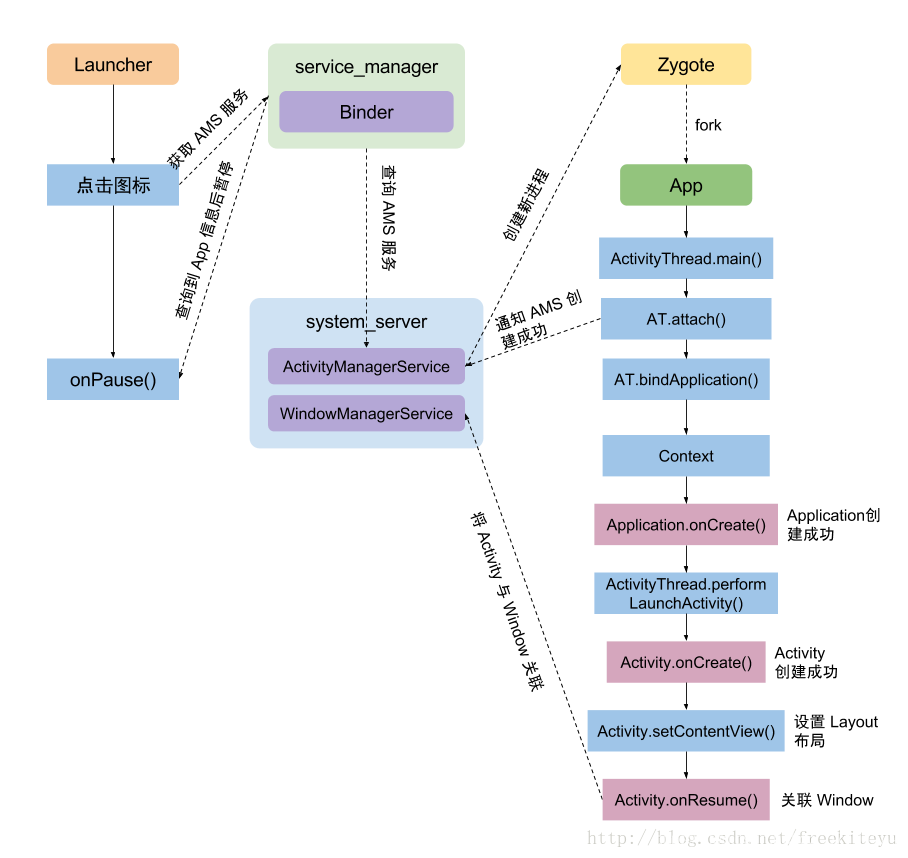
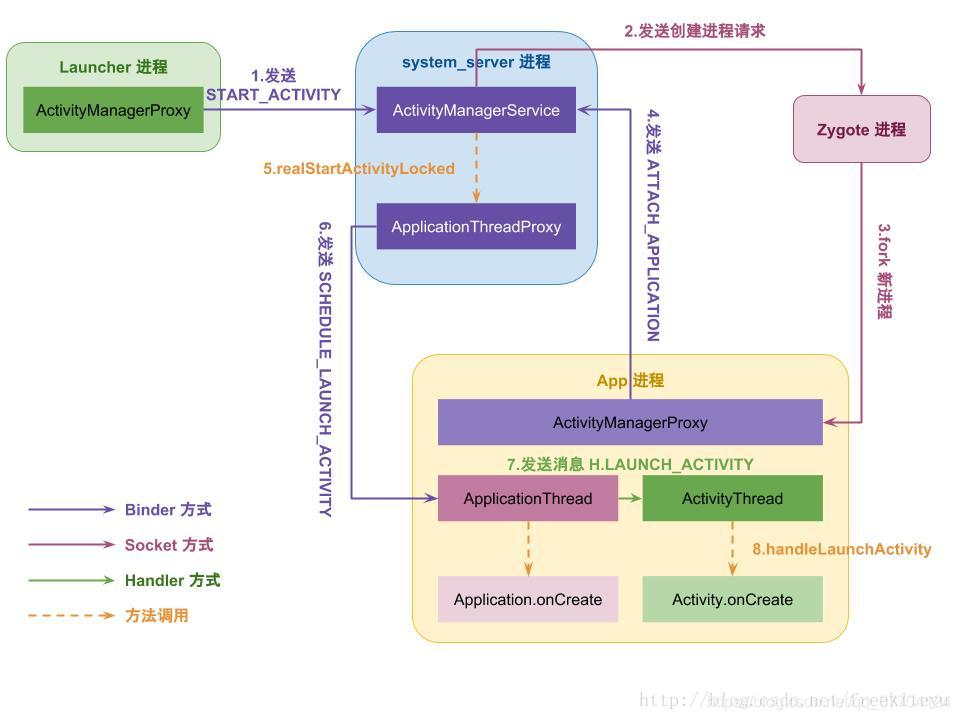
还有各部分之间的调用方式图:
ActivityStackSupervisor.java
   	//省略部分代码
    void startSpecificActivityLocked(ActivityRecord r,
            boolean andResume, boolean checkConfig) {
        // Is this activity's application already running?
        //首先查询对应的进程是否启动,也就是ProcessRecord 是否存在。
        ProcessRecord app = mService.getProcessRecordLocked(r.processName,
                r.info.applicationInfo.uid, true);

		//如果进程已经启动,而且也与AMS建立联系则可以正式启动Activity.
        if (app != null && app.thread != null) {
            try {
                    app.addPackage(r.info.packageName, r.info.applicationInfo.longVersionCode,
                            mService.mProcessStats);
                }
                realStartActivityLocked(r, app, andResume, checkConfig);
                return;
            }
            // If a dead object exception was thrown -- fall through to
            // restart the application.
        }
		//否则先启动进程,最后也会执行到realStartActivityLocked()方法中完成Activity的具体启动
        mService.startProcessLocked(r.processName, r.info.applicationInfo, true, 0,
                "activity", r.intent.getComponent(), false, false, true);
    }
ActivityStackSupervisor.java
final boolean realStartActivityLocked(ActivityRecord r, ProcessRecord app,
            boolean andResume, boolean checkConfig) throws RemoteException {
		//看参数app即ProcessRecord进程相关信息,app.thread也就是Application,开始加载Activity(这个流程是在应用端完成了,也就是不在AMS中完成)
		//这里再SDK 28中已经更改为通过clientTransaction来完成远程调用,不过具体的原理差别不大,所以继续沿用以前的,
        app.thread.scheduleLaunnchActivity(new Intent(r.intent), ...);

        ...

        return true;
    }
在scheduleLaunnchActivity()中会通过Handler发送消息到主线程启动Activity.
ActivityThread.java
public void handleMessage(Message msg) {
    switch (msg.what) {
        case LAUNCH_ACTIVITY: {
            final ActivityClientRecord r = (ActivityClientRecord) msg.obj;
            //生成loadApk对象,保存对象的Apk信息,因为通过ClassLoader区加载Apk的类的。
            r.packageInfo = getPackageInfoNoCheck(
                    r.activityInfo.applicationInfo, r.compatInfo);
            //开始生命周期
            handleLaunchActivity(r, null);
        } break;
        ...
    }
}
ActivityThread.java
public Activity handleLaunchActivity(ActivityClientRecord r,

        final Activity a = performLaunchActivity(r, customIntent);

        if (a != null) {
        //是不是很惊讶的发现,怎么和以前的SDK的代码不同了,其实这也是Google配合Jetpack所进行的更改,
        //通过ActivityClientRecord完成生命周期的监听。
           		// Create activity launch transaction.
                final ClientTransaction clientTransaction = ClientTransaction.obtain(app.thread,
                        r.appToken);
                clientTransaction.addCallback(LaunchActivityItem.obtain(new Intent(r.intent),
                        System.identityHashCode(r), r.info,
                        // TODO: Have this take the merged configuration instead of separate global
                        // and override configs.
                        mergedConfiguration.getGlobalConfiguration(),
                        mergedConfiguration.getOverrideConfiguration(), r.compat,
                        r.launchedFromPackage, task.voiceInteractor, app.repProcState, r.icicle,
                        r.persistentState, results, newIntents, mService.isNextTransitionForward(),
                        profilerInfo));

                // Set desired final state.
                //各种生命周期回调状态的监听
                final ActivityLifecycleItem lifecycleItem;
                if (andResume) {
                    lifecycleItem = ResumeActivityItem.obtain(mService.isNextTransitionForward());
                } else {
                    lifecycleItem = PauseActivityItem.obtain();
                }
                clientTransaction.setLifecycleStateRequest(lifecycleItem);

                // Schedule transaction.
                //通过ClientTransaction 事务的形式完成Activity的创建。
                mService.getLifecycleManager().scheduleTransaction(clientTransaction);

        } else {
            // If there was an error, for any reason, tell the activity manager to stop us.
            try {
                ActivityManager.getService()
                        .finishActivity(r.token, Activity.RESULT_CANCELED, null,
                                Activity.DONT_FINISH_TASK_WITH_ACTIVITY);
            } catch (RemoteException ex) {
                throw ex.rethrowFromSystemServer();
            }
        }

        return a;
    }
最终还是会执行到下面这个方法
ActivityThread.java
private Activity performLaunchActivity(ActivityClientRecord r, Intent customIntent) {
        ActivityInfo aInfo = r.activityInfo;
        if (r.packageInfo == null) {
            r.packageInfo = getPackageInfo(aInfo.applicationInfo, r.compatInfo,
                    Context.CONTEXT_INCLUDE_CODE);
        }
		//获取Activity的全路径名,因为是通过ClassLoader加载的,所以需要这个
        ComponentName component = r.intent.getComponent();
        if (component == null) {
            component = r.intent.resolveActivity(
                mInitialApplication.getPackageManager());
            r.intent.setComponent(component);
        }

        if (r.activityInfo.targetActivity != null) {
            component = new ComponentName(r.activityInfo.packageName,
                    r.activityInfo.targetActivity);
        }

        ContextImpl appContext = createBaseContextForActivity(r);
        Activity activity = null;
        try {
            java.lang.ClassLoader cl = appContext.getClassLoader();
            //创建出Activity实例
            activity = mInstrumentation.newActivity(
                    cl, component.getClassName(), r.intent);
            StrictMode.incrementExpectedActivityCount(activity.getClass());
            r.intent.setExtrasClassLoader(cl);
            r.intent.prepareToEnterProcess();
            if (r.state != null) {
                r.state.setClassLoader(cl);
            }
        } catch (Exception e) {
            if (!mInstrumentation.onException(activity, e)) {
                throw new RuntimeException(
                    "Unable to instantiate activity " + component
                    + ": " + e.toString(), e);
            }
        }

        try {
        	//这里其实是获取已经创建好的Application
            Application app = r.packageInfo.makeApplication(false, mInstrumentation);

            if (localLOGV) Slog.v(TAG, "Performing launch of " + r);
            if (localLOGV) Slog.v(
                    TAG, r + ": app=" + app
                    + ", appName=" + app.getPackageName()
                    + ", pkg=" + r.packageInfo.getPackageName()
                    + ", comp=" + r.intent.getComponent().toShortString()
                    + ", dir=" + r.packageInfo.getAppDir());

            if (activity != null) {
                CharSequence title = r.activityInfo.loadLabel(appContext.getPackageManager());
                Configuration config = new Configuration(mCompatConfiguration);
                if (r.overrideConfig != null) {
                    config.updateFrom(r.overrideConfig);
                }
                if (DEBUG_CONFIGURATION) Slog.v(TAG, "Launching activity "
                        + r.activityInfo.name + " with config " + config);
                Window window = null;
                if (r.mPendingRemoveWindow != null && r.mPreserveWindow) {
                    window = r.mPendingRemoveWindow;
                    r.mPendingRemoveWindow = null;
                    r.mPendingRemoveWindowManager = null;
                }
                appContext.setOuterContext(activity);
                //activity的初始化工作
                activity.attach(appContext, this, getInstrumentation(), r.token,
                        r.ident, app, r.intent, r.activityInfo, title, r.parent,
                        r.embeddedID, r.lastNonConfigurationInstances, config,
                        r.referrer, r.voiceInteractor, window, r.configCallback);

                if (customIntent != null) {
                    activity.mIntent = customIntent;
                }
                r.lastNonConfigurationInstances = null;
                checkAndBlockForNetworkAccess();
                activity.mStartedActivity = false;
                int theme = r.activityInfo.getThemeResource();
                if (theme != 0) {
                    activity.setTheme(theme);
                }

                activity.mCalled = false;
                //回调onCreate生命周期
                if (r.isPersistable()) {
                    mInstrumentation.callActivityOnCreate(activity, r.state, r.persistentState);
                } else {
                    mInstrumentation.callActivityOnCreate(activity, r.state);
                }
                if (!activity.mCalled) {
                    throw new SuperNotCalledException(
                        "Activity " + r.intent.getComponent().toShortString() +
                        " did not call through to super.onCreate()");
                }
                r.activity = activity;
            }
            r.setState(ON_CREATE);

            mActivities.put(r.token, r);

		} catch (SuperNotCalledException e) {
            throw e;

        } catch (Exception e) {
            if (!mInstrumentation.onException(activity, e)) {
                throw new RuntimeException(
                    "Unable to start activity " + component
                    + ": " + e.toString(), e);
            }
        }
        return activity;
    }
总的步骤如下:
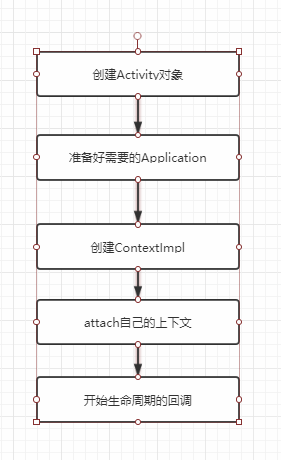
其实感觉都大同小异,无论是Service还是Application,只不过每个又有单独的特征部分,这也是继承的特性吧。
现在便可以回到上面的两个图示中了,再次看来便会感到异常的清晰。
Activity的显示机制
Activity已经成功创建并开始生命周期了,那下一步是要干嘛?当然是显示到界面上啊,所以便从onCreate中的setContentView()来入手。
setContentVIew是将视图加载到WIndow中,这里有必要提及到Window、Acitivty、View之间的关系了。
下面以一张简单的图来示意:
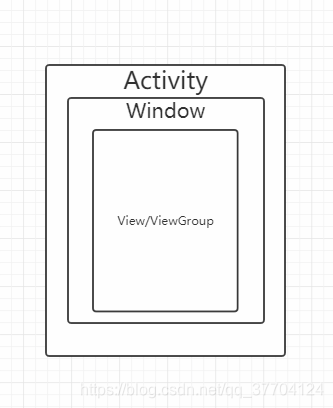
- Activity:是四大组件之一,是存放View对象的容器,也是我们界面的载体,用来展示界面。相当于中介控制单元
- Window:相当于一个窗体,承载着View
- View:则是一个个的视图,控件,Activity调控着View显示到Window上
每个Activity包含Window对象,该对象有PhoneWIndow实现。PhoneWindow将DecorView作为窗口的根View,且划分为状态栏和ContetnView,setContentView便是将xml布局加载到DecorView中,下面直接来看Window的唯一实现类PhoneWindow的setContentView方法
PhoneWindow.java
@Override
    public void setContentView(int layoutResID) {
        // Note: FEATURE_CONTENT_TRANSITIONS may be set in the process of installing the window
        // decor, when theme attributes and the like are crystalized. Do not check the feature
        // before this happens.
        if (mContentParent == null) {
            installDecor();
        } else if (!hasFeature(FEATURE_CONTENT_TRANSITIONS)) {
            mContentParent.removeAllViews();
        }

        if (hasFeature(FEATURE_CONTENT_TRANSITIONS)) {
            final Scene newScene = Scene.getSceneForLayout(mContentParent, layoutResID,
                    getContext());
            transitionTo(newScene);
        } else {
        	//这里便是加载布局文件,常用的inflate
            mLayoutInflater.inflate(layoutResID, mContentParent);
        }
        mContentParent.requestApplyInsets();
        final Callback cb = getCallback();
        if (cb != null && !isDestroyed()) {
            cb.onContentChanged();
        }
        mContentParentExplicitlySet = true;
    }
我们知道Activity是在onResume()才会可见,而setContentView()是在onCreate()方法,所以需要了解onResume()具体执行了什么才让Activity可见。
ActivityThread.java
public void handleResumeActivity(IBinder token, boolean finalStateRequest, boolean isForward,
            String reason) {
        // If we are getting ready to gc after going to the background, well
        // we are back active so skip it.
        unscheduleGcIdler();
        mSomeActivitiesChanged = true;

        // TODO Push resumeArgs into the activity for consideration
        final ActivityClientRecord r = performResumeActivity(token, finalStateRequest, reason);
        if (r == null) {
            // We didn't actually resume the activity, so skipping any follow-up actions.
            return;
        }

        final Activity a = r.activity;

        if (r.window == null && !a.mFinished && willBeVisible) {
            r.window = r.activity.getWindow();
            View decor = r.window.getDecorView();
            //因为还未加载完成,先设置为不可见,但是占据空间
            decor.setVisibility(View.INVISIBLE);
            ViewManager wm = a.getWindowManager();
            WindowManager.LayoutParams l = r.window.getAttributes();
            a.mDecor = decor;
            l.type = WindowManager.LayoutParams.TYPE_BASE_APPLICATION;
            l.softInputMode |= forwardBit;
            if (r.mPreserveWindow) {
                a.mWindowAdded = true;
                r.mPreserveWindow = false;
                // Normally the ViewRoot sets up callbacks with the Activity
                // in addView->ViewRootImpl#setView. If we are instead reusing
                // the decor view we have to notify the view root that the
                // callbacks may have changed.
                ViewRootImpl impl = decor.getViewRootImpl();
                if (impl != null) {
                    impl.notifyChildRebuilt();
                }
            }
            if (a.mVisibleFromClient) {
                if (!a.mWindowAdded) {
                    a.mWindowAdded = true;
                    //添加View到Window中
                    wm.addView(decor, l);
                } else {
                    // The activity will get a callback for this {@link LayoutParams} change
                    // earlier. However, at that time the decor will not be set (this is set
                    // in this method), so no action will be taken. This call ensures the
                    // callback occurs with the decor set.
                    a.onWindowAttributesChanged(l);
                }
            }

            // If the window has already been added, but during resume
            // we started another activity, then don't yet make the
            // window visible.
        } else if (!willBeVisible) {
            if (localLOGV) Slog.v(TAG, "Launch " + r + " mStartedActivity set");
            r.hideForNow = true;
        }

        // Get rid of anything left hanging around.
        cleanUpPendingRemoveWindows(r, false /* force */);

        // The window is now visible if it has been added, we are not
        // simply finishing, and we are not starting another activity.
        if (!r.activity.mFinished && willBeVisible && r.activity.mDecor != null && !r.hideForNow) {
            if (r.newConfig != null) {
                performConfigurationChangedForActivity(r, r.newConfig);
                if (DEBUG_CONFIGURATION) {
                    Slog.v(TAG, "Resuming activity " + r.activityInfo.name + " with newConfig "
                            + r.activity.mCurrentConfig);
                }
                r.newConfig = null;
            }
            if (localLOGV) Slog.v(TAG, "Resuming " + r + " with isForward=" + isForward);
            WindowManager.LayoutParams l = r.window.getAttributes();
            if ((l.softInputMode
                    & WindowManager.LayoutParams.SOFT_INPUT_IS_FORWARD_NAVIGATION)
                    != forwardBit) {
                l.softInputMode = (l.softInputMode
                        & (~WindowManager.LayoutParams.SOFT_INPUT_IS_FORWARD_NAVIGATION))
                        | forwardBit;
                if (r.activity.mVisibleFromClient) {
                    ViewManager wm = a.getWindowManager();
                    View decor = r.window.getDecorView();
                    wm.updateViewLayout(decor, l);
                }
            }

            r.activity.mVisibleFromServer = true;
            mNumVisibleActivities++;
            if (r.activity.mVisibleFromClient) {
            //加载已经全部完成设置可见
                r.activity.makeVisible();
            }
        }

        r.nextIdle = mNewActivities;
        mNewActivities = r;
        if (localLOGV) Slog.v(TAG, "Scheduling idle handler for " + r);
        Looper.myQueue().addIdleHandler(new Idler());
    }
先来看addView()方法,addView是ViewParent接口里的方法,具体的实现是在ViewGroup中
ViewGroup.java
public void addView(View child, int index, LayoutParams params) {
        if (DBG) {
            System.out.println(this + " addView");
        }

        if (child == null) {
            throw new IllegalArgumentException("Cannot add a null child view to a ViewGroup");
        }

        // addViewInner() will call child.requestLayout() when setting the new LayoutParams
        // therefore, we call requestLayout() on ourselves before, so that the child's request
        // will be blocked at our level
        //addViewInner()在设置新的LayoutParams时会调用child.requestLayout(),
        //所以在之前调用requestLayout(),子View的请求就会等待父View完成后再执行
        requestLayout();
        //invalidate会不断的对视图进行重绘
        invalidate(true);
        addViewInner(child, index, params, false);
    }
再来看invalidate方法,因为invalidate是子View的不断重绘,但是需要向上层级请求,最终到ViewRootImpl完成
View.java
	public void invalidate(boolean invalidateCache) {
        invalidateInternal(0, 0, mRight - mLeft, mBottom - mTop, invalidateCache, true);
    }

    void invalidateInternal(int l, int t, int r, int b, boolean invalidateCache,
            boolean fullInvalidate) {
        if (mGhostView != null) {
            mGhostView.invalidate(true);
            return;
        }

        if (skipInvalidate()) {
            return;
        }

        if ((mPrivateFlags & (PFLAG_DRAWN | PFLAG_HAS_BOUNDS)) == (PFLAG_DRAWN | PFLAG_HAS_BOUNDS)
                || (invalidateCache && (mPrivateFlags & PFLAG_DRAWING_CACHE_VALID) == PFLAG_DRAWING_CACHE_VALID)
                || (mPrivateFlags & PFLAG_INVALIDATED) != PFLAG_INVALIDATED
                || (fullInvalidate && isOpaque() != mLastIsOpaque)) {
            if (fullInvalidate) {
                mLastIsOpaque = isOpaque();
                mPrivateFlags &= ~PFLAG_DRAWN;
            }

            mPrivateFlags |= PFLAG_DIRTY;

            if (invalidateCache) {
                mPrivateFlags |= PFLAG_INVALIDATED;
                mPrivateFlags &= ~PFLAG_DRAWING_CACHE_VALID;
            }

            // Propagate the damage rectangle to the parent view.
            final AttachInfo ai = mAttachInfo;
            final ViewParent p = mParent;
            if (p != null && ai != null && l < r && t < b) {
                final Rect damage = ai.mTmpInvalRect;
                damage.set(l, t, r, b);
                //调用父View的invalidateChild,ViewGroup和ViewRootImpl都进行了实现,主要是通过do...while循坏不断的一层层
                //的计算出当前View的Rect再ViewRoot的位置
                p.invalidateChild(this, damage);
            }

            // Damage the entire projection receiver, if necessary.
            if (mBackground != null && mBackground.isProjected()) {
                final View receiver = getProjectionReceiver();
                if (receiver != null) {
                    receiver.damageInParent();
                }
            }
        }
    }
这里我们来看VIewRootImpl对invalidateChild的实现,因为我们是要加载根布局嘛。
ViewRootImpl.java
public void invalidateChild(View child, Rect dirty) {
        invalidateChildInParent(null, dirty);
    }

    @Override
    public ViewParent invalidateChildInParent(int[] location, Rect dirty) {
    //检查是否为UI线程,否则抛出异常
        checkThread();
        if (DEBUG_DRAW) Log.v(mTag, "Invalidate child: " + dirty);

        if (dirty == null) {
            invalidate();
            return null;
        } else if (dirty.isEmpty() && !mIsAnimating) {
            return null;
        }

        if (mCurScrollY != 0 || mTranslator != null) {
            mTempRect.set(dirty);
            dirty = mTempRect;
            if (mCurScrollY != 0) {
                dirty.offset(0, -mCurScrollY);
            }
            if (mTranslator != null) {
                mTranslator.translateRectInAppWindowToScreen(dirty);
            }
            if (mAttachInfo.mScalingRequired) {
                dirty.inset(-1, -1);
            }
        }

        invalidateRectOnScreen(dirty);

        return null;
    }
    void invalidate() {
        mDirty.set(0, 0, mWidth, mHeight);
        if (!mWillDrawSoon) {
            scheduleTraversals();
        }
    }

	void scheduleTraversals() {
        if (!mTraversalScheduled) {
            mTraversalScheduled = true;
            //这里设置了一个同步屏障,也就是发送一个target为null也就是没有handler对象的消息,
            //当取到改消息后,消息队列会跳过同步消息,因为handler默认发送的消息是同步消息
            //这也是保证了系统UI刷新的最高优先级
            mTraversalBarrier = mHandler.getLooper().getQueue().postSyncBarrier();
            //通过handler发送UI刷新的消息,mTraversalRunnable是实现了Runnable接口的类,执行doTraversal()方法
            mChoreographer.postCallback(
                    Choreographer.CALLBACK_TRAVERSAL, mTraversalRunnable, null);
            if (!mUnbufferedInputDispatch) {
                scheduleConsumeBatchedInput();
            }
            notifyRendererOfFramePending();
            pokeDrawLockIfNeeded();
        }
    }

	void doTraversal() {
        if (mTraversalScheduled) {
            mTraversalScheduled = false;
            //这里移除了同步屏障,恢复消息队列的正常执行
            mHandler.getLooper().getQueue().removeSyncBarrier(mTraversalBarrier);

            if (mProfile) {
                Debug.startMethodTracing("ViewAncestor");
            }

            performTraversals();

            if (mProfile) {
                Debug.stopMethodTracing();
                mProfile = false;
            }
        }
    }
下面来看具体的View的绘制流程,也就在performTraversals()中了,具体可以概括为以下步骤:
	private void performTraversals(){
	//用来向WindowManager申请Surface
		relayoutWindow(params, viewVisibility, insetsPending);
		...
		//递归完成子View和父View的测量
		performMeasure(childWidthMeasureSpec, childHeightMeasureSpec);
		...
		//递归完成子View和父View的布局
		performLayout(WindowManager.LayoutParams lp, int desiredWindowWidth,....);
		...
		//递归完成子View和父View的绘制
		performDraw();
	}
