一、几何变换原理
1.扩展缩放
只是改变图像的尺寸大小,cv2.resize()可以实现这个功能。在缩放时推荐cv2.INTER_AREA,在拓展时推荐cv2.INTER_CUBIC(慢)和cv2.INTER_LINEAR。默认情况下所有改变图像尺寸大小的操作使用的是插值法都是cv2.INTER_LINEAR。

import cv2

img = cv2.imread('image/1_test/1_1_mirror.jpg')
# 下面的None本应该是输出图像的尺寸,但是因为后面我们设置了缩放因子,所以,这里为None
res = cv2.resize(img, None, fx=2, fy=2, interpolation=cv2.INTER_CUBIC)
# or
# 这里直接设置输出图像的尺寸,所以不用设置缩放因子
height, width = img.shape[:2]
res = cv2.resize(img, (2 * width, 2 * height), interpolation=cv2.INTER_CUBIC)

while(1):
    cv2.imshow('res', res)
    cv2.imshow('img', img)

    if cv2.waitKey(1) & 0xFF == 27:
        break
cv2.destroyAllWindows()
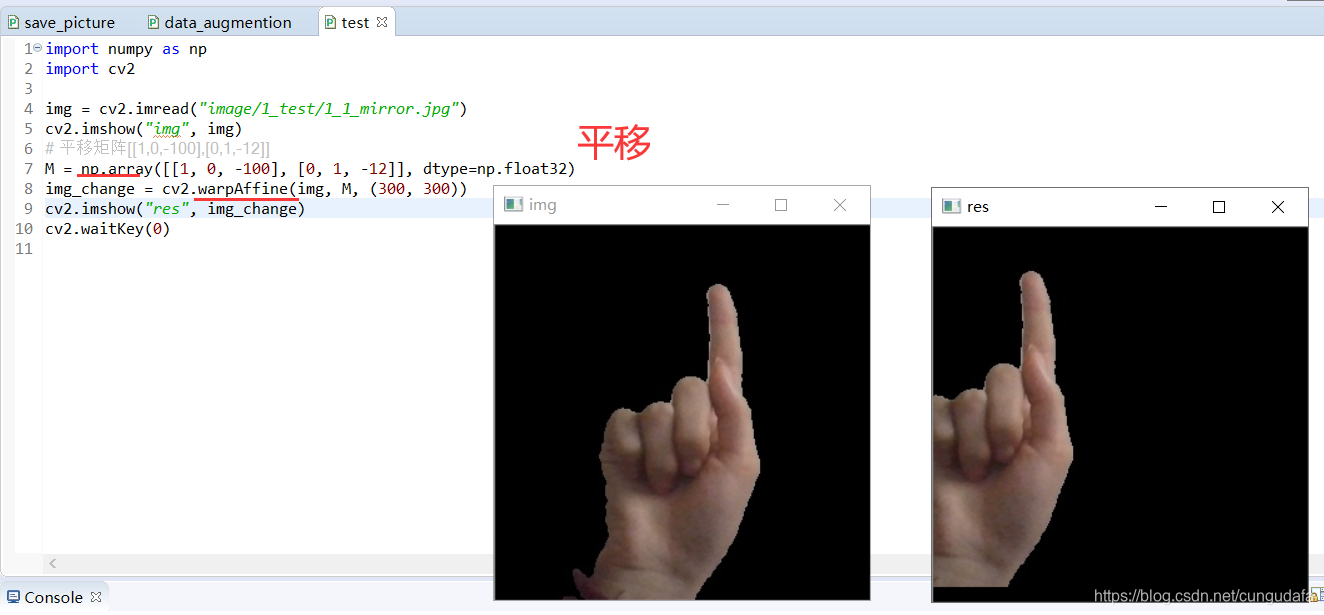
2.平移
如果想要沿(x,y)方向移动,移动的距离为(tx,ty)可以以下面方式构建移动矩阵。

可以使用Numpy数组构建矩阵,数据类型是np.float32,然后传给函数cv2.warpAffine();函数cv2.warpAffine() 的第三个参数的是输出图像的大小,它的格式应该是图像的(宽,高)。应该记住的是图像的宽对应的是列数,高对应的是行数。
import numpy as np
import cv2

img = cv2.imread("image/1_test/1_1_mirror.jpg")
cv2.imshow("img", img)
# 平移矩阵[[1,0,-100],[0,1,-12]]
M = np.array([[1, 0, -100], [0, 1, -12]], dtype=np.float32)
img_change = cv2.warpAffine(img, M, (300, 300))
cv2.imshow("res", img_change)
cv2.waitKey(0)
3.旋转
对一个图像旋转角度θ,需要使用下面的旋转矩阵。
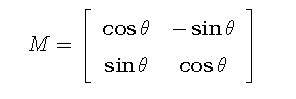
但OpenCVC允许在任意地方进行旋转,所以矩阵应该为
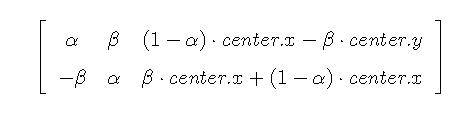
其中α = scale · cos θ为构建旋转矩阵,OpenCV提供了一个函数cv2.getRotationMatrix2D。

import numpy as np
import cv2

img = cv2.imread("image/1_test/1_1_mirror.jpg", 0)
cv2.imshow("img", img)

rows, cols = img.shape[:2]
# 这里的第一个参数为旋转中心,第二个为旋转角度,第三个为旋转后的缩放因子
# 可以通过设置旋转中心,缩放因子以及窗口大小来防止旋转后超出边界的问题。
M = cv2.getRotationMatrix2D((cols / 2, rows / 2), 45, 0.6)
# 第三个参数是输出图像的尺寸中心
dst = cv2.warpAffine(img, M, (cols, rows))
cv2.imshow('res', dst)
cv2.waitKey(0)
4.仿射变换
在仿射变换中,原图中所有平行线在结果图像中同样平行。为创建这个矩阵,需要从原图像中找到三个点以及他们在输出图像中的位置,

然后cv2.getAffineTransForm()会创建一个2X3的矩阵。

最后这个矩阵会被传给函数cv2.warpAffine()。

import numpy as np
import cv2

img = cv2.imread("image/1_test/1_1_mirror.jpg")

# 对图像进行变换(三点得到一个变换矩阵)
# 我们知道三点确定一个平面,我们也可以通过确定三个点的关系来得到转换矩阵
# 然后再通过warpAffine来进行变换
cv2.imshow("original", img)

rows, cols = img.shape[:2]

point1 = np.float32([[50, 50], [300, 50], [50, 200]])
point2 = np.float32([[10, 100], [300, 50], [100, 250]])

M = cv2.getAffineTransform(point1, point2)
dst = cv2.warpAffine(img, M, (cols, rows), borderValue=(255, 255, 255))

cv2.imshow("res", dst)
cv2.waitKey(0)
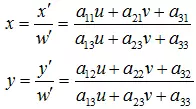
5.透视变换
对于视角变换,我们需要一个3x3变换矩阵。在变换前后直线还是直线。需要在原图上找到4个点,以及他们在输出图上对应的位置,

这四个点中任意三个都不能共线,可以有函数cv2.getPerspectiveTransform()构建,然后这个矩阵传给函数cv2.warpPerspective()。

透视变换基本公式:
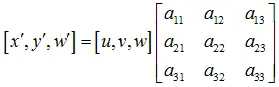
其中,

数学表达式:

测试图:(来源于网络)

import cv2
import numpy as np

img = cv2.imread('image/test.jpg')
result1 = img.copy()
result2 = img.copy()
result3 = img.copy()
# 图片高斯模糊加灰度化
img = cv2.GaussianBlur(img, (1, 1), 0)
gray = cv2.cvtColor(img, cv2.COLOR_BGR2GRAY)
# 边缘检测
edges = cv2.Canny(gray, 50, 150, apertureSize=3)
cv2.imshow("canny.jpg", edges)
# hough transform
lines = cv2.HoughLinesP(edges, 1, np.pi / 180, 50,
                        minLineLength=90, maxLineGap=10)
# 标注一条直线
for x1, y1, x2, y2 in lines[0]:
    cv2.line(result1, (x1, y1), (x2, y2), (0, 0, 255), 1)
    print(x1, y1)
    print(x2, y2)
# 圈出特殊点
cv2.circle(result2, (207, 152), 5, (0, 255, 0), 5)
cv2.circle(result2, (517, 285), 5, (0, 255, 0), 5)
cv2.circle(result2, (17, 600), 5, (0, 255, 0), 5)
cv2.circle(result2, (343, 731), 5, (0, 255, 0), 5)

cv2.imshow("result1.jpg", result1)
cv2.imshow("result2.jpg", result2)
# 仿射变换
src = np.float32([[207, 152], [517, 285], [17, 600], [343, 731]])
dst = np.float32([[0, 0], [337, 0], [0, 488], [337, 488]])
m = cv2.getPerspectiveTransform(src, dst)
result = cv2.warpPerspective(result3, m, (337, 488))

cv2.imshow("result", result)
cv2.waitKey(0)
仿射变换与透视变换的区别:


二、数据增强
1.批量增强数据
本次选取有效变换:
- 翻转变换 flip √
- 随机修剪 random crop √
- 色彩抖动 color jittering √
- 平移变换 shift
- 尺度变换 scale
- 对比度变换 contrast √
- 噪声扰动 noise √
- 旋转变换/反射变换 Rotation/reflection
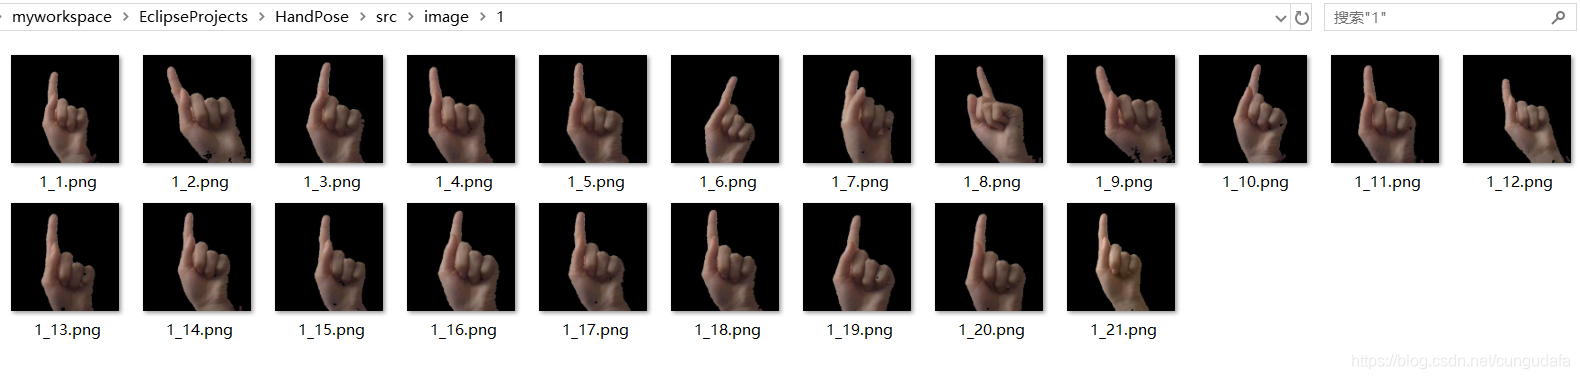
(现有手势“1”样本21张图,为了增加数据的泛化能力和鲁棒性,对每张图片进行色彩增强、高斯噪声、水平镜像、放大、旋转、剪切)。另外,多角度旋转能够得到更多图片,是较有效的增强数据集方法。
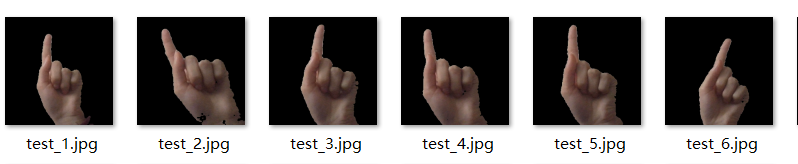
增强效果如图:
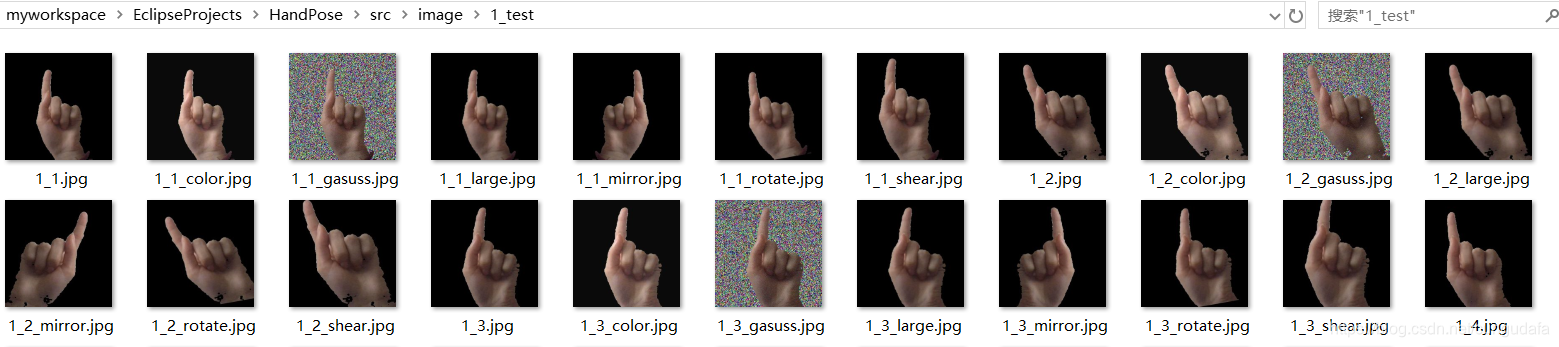 数据统计显示(由21张图增强到147张有效的数据集,增加了126张有效图):

import os
import shutil
import cv2
import numpy as np

'''opencv数据增强
    对图片进行色彩增强、高斯噪声、水平镜像、放大、旋转、剪切
'''


def contrast_brightness_image(src1, a, g, path_out):
    '''
        色彩增强(通过调节对比度和亮度)
    '''
    h, w, ch = src1.shape  # 获取shape的数值,height和width、通道
    # 新建全零图片数组src2,将height和width,类型设置为原图片的通道类型(色素全为零,输出为全黑图片)
    src2 = np.zeros([h, w, ch], src1.dtype)
    # addWeighted函数说明:计算两个图像阵列的加权和
    dst = cv2.addWeighted(src1, a, src2, 1 - a, g)
    cv2.imwrite(path_out, dst)


def gasuss_noise(image, path_out_gasuss, mean=0, var=0.001):
    '''
        添加高斯噪声
        mean : 均值
        var : 方差
    '''
    image = np.array(image / 255, dtype=float)
    noise = np.random.normal(mean, var ** 0.5, image.shape)
    out = image + noise
    if out.min() < 0:
        low_clip = -1.
    else:
        low_clip = 0.
    out = np.clip(out, low_clip, 1.0)
    out = np.uint8(out * 255)
    cv2.imwrite(path_out_gasuss, out)


def mirror(image, path_out_mirror):
    '''
        水平镜像
    '''
    h_flip = cv2.flip(image, 1)
    cv2.imwrite(path_out_mirror, h_flip)


def resize(image, path_out_large):
    '''
        放大两倍
    '''
    height, width = image.shape[:2]
    large = cv2.resize(image, (2 * width, 2 * height))
    cv2.imwrite(path_out_large, large)


def rotate(image, path_out_rotate):
    '''
        旋转
    '''
    rows, cols = image.shape[:2]
    M = cv2.getRotationMatrix2D((cols / 2, rows / 2), 10, 1)
    dst = cv2.warpAffine(image, M, (cols, rows))
    cv2.imwrite(path_out_rotate, dst)


def shear(image, path_out_shear):
    '''
        剪切
    '''
    height, width = image.shape[:2]
    cropped = image[int(height / 9):height, int(width / 9):width]
    cv2.imwrite(path_out_shear, cropped)


def main():
    image_path = './image/1'
    image_out_path = './image/1_test'
    if not os.path.exists(image_out_path):
        os.mkdir(image_out_path)
    list = os.listdir(image_path)
    print(list)
    print("----------------------------------------")
    print("The original data path:" + image_path)
    print("The original data set size:" + str(len(list)))
    print("----------------------------------------")

    imageNameList = [
        '_color.jpg',
        '_gasuss.jpg',
        '_mirror.jpg',
        '_large.jpg',
        '_rotate.jpg',
        '_shear.jpg',
        '.jpg']
    for i in range(0, len(list)):
        path = os.path.join(image_path, list[i])
        out_image_name = os.path.splitext(list[i])[0]
        for j in range(0, len(imageNameList)):
            path_out = os.path.join(
                image_out_path, out_image_name + imageNameList[j])
            image = cv2.imread(path)
            if j == 0:
                contrast_brightness_image(image, 1.2, 10, path_out)
            elif j == 1:
                gasuss_noise(image, path_out)
            elif j == 2:
                mirror(image, path_out)
            elif j == 3:
                resize(image, path_out)
            elif j == 4:
                rotate(image, path_out)
            elif j == 5:
                shear(image, path_out)
            else:
                shutil.copy(path, path_out)
        print(out_image_name + "success!", end='\t')
    print("----------------------------------------")
    print("The data augmention path:" + image_out_path)
    outlist = os.listdir(image_out_path)
    print("The data augmention sizes:" + str(len(outlist)))
    print("----------------------------------------")
    print("Rich sample for:" + str(len(outlist) - len(list)))


if __name__ == '__main__':
    main()
2.批量修改文件名
因为数据标注,给之前所有图片进行标注命名后缀;python批量修改文件名os.rename方法如下:

import os
#1获取重命名的文件夹
folder_name = './image/1_test'
test_id = 1
#2获取文件夹中的文件名
file_names = os.listdir(folder_name)

os.chdir(folder_name)
#3对获取的名字重命名
for name in file_names:
    os.rename(name,'test_'+str(test_id)+'.jpg')
    test_id += 1