• 学习对图像进行各种几个变换,例如缩放、平移、旋转,仿射变换以及透视变换等。
• 将要学到的函数有: cv2.getPerspectiveTransform等等。
• 学习部分关于参数解析器的应用。
OpenCV 提供了两个变换函数, cv2.warpAffine 和 cv2.warpPerspective,使用这两个函数你可以实现所有类型的变换。 cv2.warpAffine 接收的参数是2 × 3 的变换矩阵,而 cv2.warpPerspective 接收的参数是 3 × 3 的变换矩阵。
1、扩展缩放
扩展缩放只是改变图像的尺寸大小。 OpenCV 提供的函数 cv2.resize()可以实现这个功能。图像的尺寸可以自己手动设置,你也可以指定缩放因子。我们可以选择使用不同的插值方法。在缩放时我们推荐使用 cv2.INTER_AREA,在扩展时我们推荐使用 v2.INTER_CUBIC(慢) 和 v2.INTER_LINEAR。默认情况下所有改变图像尺寸大小的操作使用的插值方法都是 cv2.INTER_LINEAR。你可以使用下面任意一种方法改变图像的尺寸:
import cv2
import numpy as np
img=cv2.imread('test.png')

# 下面的 None 本应该是输出图像的尺寸,但是因为后边我们设置了缩放因子
# 因此这里为 None
res=cv2.resize(img,None,fx=2,fy=2,interpolation=cv2.INTER_CUBIC)
#OR
# 这里呢,我们直接设置输出图像的尺寸,所以不用设置缩放因子
height,width=img.shape[:2]
res=cv2.resize(img,(2*width,2*height),interpolation=cv2.INTER_CUBIC)

while(1):
    # cv2.namedWindow("res",cv2.WINDOW_NORMAL)
    cv2.imshow('res',res)
    cv2.imshow('img',img)
    if cv2.waitKey(1) & 0xFF == 27:
        break
cv2.destroyAllWindows()
运行结果:

或者:
# 导入库
import argparse
import cv2

# 定义缩放resize函数
def resize(image, width=None, height=None, inter=cv2.INTER_AREA):
    # 初始化缩放比例,并获取图像尺寸
    dim = None
    (h, w) = image.shape[:2]

    # 如果宽度和高度均为0,则返回原图
    if width is None and height is None:
        return image

    # 宽度是0
    if width is None:
        # 则根据高度计算缩放比例
        r = height / float(h)
        dim = (int(w * r), height)

    # 如果高度为0
    else:
        # 根据宽度计算缩放比例
        r = width / float(w)
        dim = (width, int(h * r))

    # 缩放图像
    resized = cv2.resize(image, dim, interpolation=inter)

    # 返回缩放后的图像
    return resized


# 构造参数解析器
# ap = argparse.ArgumentParser()
# ap.add_argument("-i", "--image", required=True, help="Path to the image")
# args = vars(ap.parse_args())

# 加载参数并显示(由于原图较大,我们先将原图缩小)
# image = cv2.imread(args["image"])
image = cv2.imread('test.png')
cv2.imshow("Original", image)

# 创建插值方法数组
methods = [
    ("cv2.INTER_NEAREST", cv2.INTER_NEAREST),
    ("cv2.INTER_LINEAR", cv2.INTER_LINEAR),
    ("cv2.INTER_AREA", cv2.INTER_AREA),
    ("cv2.INTER_CUBIC", cv2.INTER_CUBIC),
    ("cv2.INTER_LANCZOS4", cv2.INTER_LANCZOS4)]

# 循环执行插值方法数组中的各个方法
for (name, method) in methods:
    # 放大3倍
    resized = resize(image, width=image.shape[1] * 3, inter=method)
    cv2.imshow("ZoomIn Method: {}".format(name), resized)
    # 缩小2倍
    resized = resize(image, width=image.shape[1] //2, inter=method) #python3.5
    cv2.imshow("ZoomOut Method: {}".format(name), resized)
    cv2.waitKey(0)
运行结果:

2、平移
平移就是将对象换一个位置。如果你要沿(x,y)方向移动,移动的距离是(tx, ty),你可以以下面的方式构建移动矩阵:
# 导入库
import numpy as np
import argparse
import cv2

# 定义平移translate函数
def translate(image, x, y):
    # 定义平移矩阵
    M = np.float32([[1, 0, x], [0, 1, y]])
    shifted = cv2.warpAffine(image, M, (image.shape[1], image.shape[0]))

    # 返回转换后的图像
    return shifted


# # 构造参数解析器
# ap = argparse.ArgumentParser()
# ap.add_argument("-i", "--image", required=True, help="Path to the image")
# args = vars(ap.parse_args())

# 加载图像并显示
# image = cv2.imread(args["image"])
image = cv2.imread('test.png')
cv2.imshow("Original", image)

# 将原图分别做上、下、左、右平移操作
shifted = translate(image, 0, 100)
cv2.imshow("Shifted Down", shifted)
shifted = translate(image, 0, -100)
cv2.imshow("Shifted Up", shifted)
shifted = translate(image, 50, 0)
cv2.imshow("Shifted Right", shifted)
shifted = translate(image, -50, 0)
cv2.imshow("Shifted Left", shifted)
cv2.waitKey(0)
运行结果:

3、旋转

python代码:
import cv2
import numpy as np
img=cv2.imread('test.png',0)
rows,cols=img.shape
# 这里的第一个参数为旋转中心,第二个为旋转角度,第三个为旋转后的缩放因子
# 可以通过设置旋转中心,缩放因子,以及窗口大小来防止旋转后超出边界的问题
M=cv2.getRotationMatrix2D((cols/2,rows/2),45,0.6)
# 第三个参数是输出图像的尺寸中心
dst=cv2.warpAffine(img,M,(2*cols,2*rows))
while(1):
   cv2.imshow('img',dst)
   if cv2.waitKey(1)&0xFF==27:
      break
cv2.destroyAllWindows()
或者:
# 导入库
import numpy as np
import argparse
import cv2

# 定义旋转rotate函数
def rotate(image, angle, center=None, scale=1.0):
    # 获取图像尺寸
    (h, w) = image.shape[:2]

    # 若未指定旋转中心,则将图像中心设为旋转中心
    if center is None:
        center = (w / 2, h / 2)

    # 执行旋转
    M = cv2.getRotationMatrix2D(center, angle, scale)
    rotated = cv2.warpAffine(image, M, (w, h))

    # 返回旋转后的图像
    return rotated

# 构造参数解析器
# ap = argparse.ArgumentParser()
# ap.add_argument("-i", "--image", required=True, help="Path to the image")
# args = vars(ap.parse_args())

# 加载图像并显示
# image = cv2.imread(args["image"])
image = cv2.imread('test.png')
cv2.imshow("Original", image)

# 将原图旋转不同角度
rotated = rotate(image, 45)
cv2.imshow("Rotated by 45 Degrees", rotated)
rotated = rotate(image, -45)
cv2.imshow("Rotated by -45 Degrees", rotated)
rotated = rotate(image, 90)
cv2.imshow("Rotated by 90 Degrees", rotated)
rotated = rotate(image, -90)
cv2.imshow("Rotated by -90 Degrees", rotated)
rotated = rotate(image, 180)
cv2.imshow("Rotated by 180 Degrees", rotated)
cv2.waitKey(0)
运行结果:

4、仿射变换
在仿射变换中,原图中所有的平行线在结果图像中同样平行。为了创建这个矩阵我们需要从原图像中找到三个点以及他们在输出图像中的位置。然后cv2.getAffineTransform 会创建一个 2x3 的矩阵,最后这个矩阵会被传给函数 cv2.warpAffine。 参考博客:opencv for python(10)图像的仿射变换与透视变换。
import cv2
import numpy as np
from matplotlib import pyplot as plt

img = cv2.imread('test2.png')
rows,cols,ch = img.shape
pts1 = np.float32([[50,50],[200,50],[50,200]])
pts2 = np.float32([[10,100],[200,50],[100,250]])
M = cv2.getAffineTransform(pts1,pts2)
dst = cv2.warpAffine(img,M,(cols,rows))

plt.subplot(121)
plt.imshow(img)
plt.title('input')
plt.subplot(122)
plt.title('output')
plt.imshow(dst)
plt.show()
运行结果:
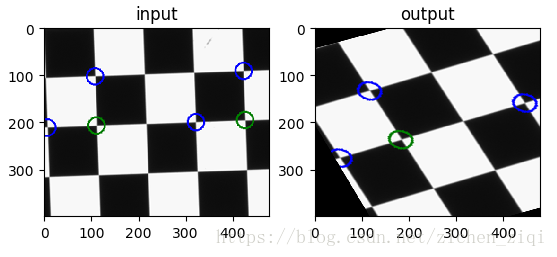
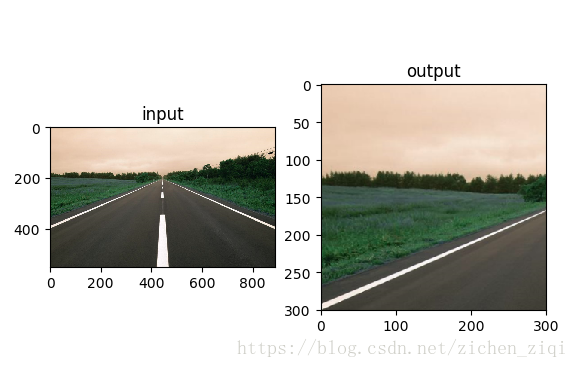
5、透视变换
对于视角变换,我们需要一个 3x3 变换矩阵。在变换前后直线还是直线。要构建这个变换矩阵,你需要在输入图像上找 4 个点,以及他们在输出图像上对应的位置。这四个点中的任意三个都不能共线。
这个变换矩阵可以有函数 cv2.getPerspectiveTransform() 构建。然后把这个矩阵传给函数cv2.warpPerspective。参考博客:https://blog.csdn.net/u011447369/article/details/53217237。
import cv2
import numpy as np
from matplotlib import pyplot as plt

img = cv2.imread('test.png')
rows,cols,ch = img.shape

pts1 = np.float32([[56,65],[368,52],[28,387],[389,398]])
pts2 = np.float32([[0,0],[300,0],[0,300],[300,300]])

M = cv2.getPerspectiveTransform(pts1,pts2)
dst = cv2.warpPerspective(img,M,(300,300))

plt.subplot(121)
plt.imshow(img)
plt.title('input')
plt.subplot(122)
plt.title('output')
plt.imshow(dst)
plt.show()
运行结果:
最后,补充世界坐标系变换顺序:缩放->旋转->平移。参考博客:世界坐标系变换顺序
原因:
(1)缩放变换不改变坐标轴的走向,也不改变原点的位置;
(2)旋转变换改变坐标轴的走向,但不改变原点位置;
(3)平移变换不改变坐标轴的走向,但改变原点位置。