简书资料地址
https://www.jianshu.com/p/f55467033146
https://www.jianshu.com/p/fc717b47b322
第一app的启动之Application的创建
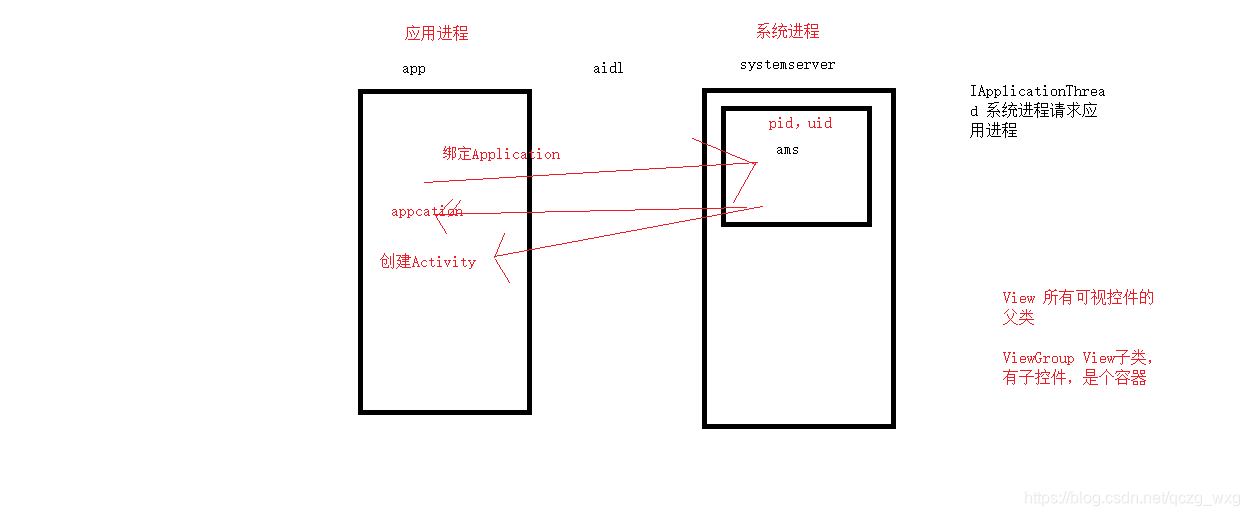
程序的启动就是应用进程(app)和系统进程(SystemServer)的通信。主要是跟系统进程中的AMS通信。应用进程中的四大组件(以Activity为例),系统进程(主要是AMS)会不断的调度Activity以及管理Activity的每个状态。
附:activity的状态
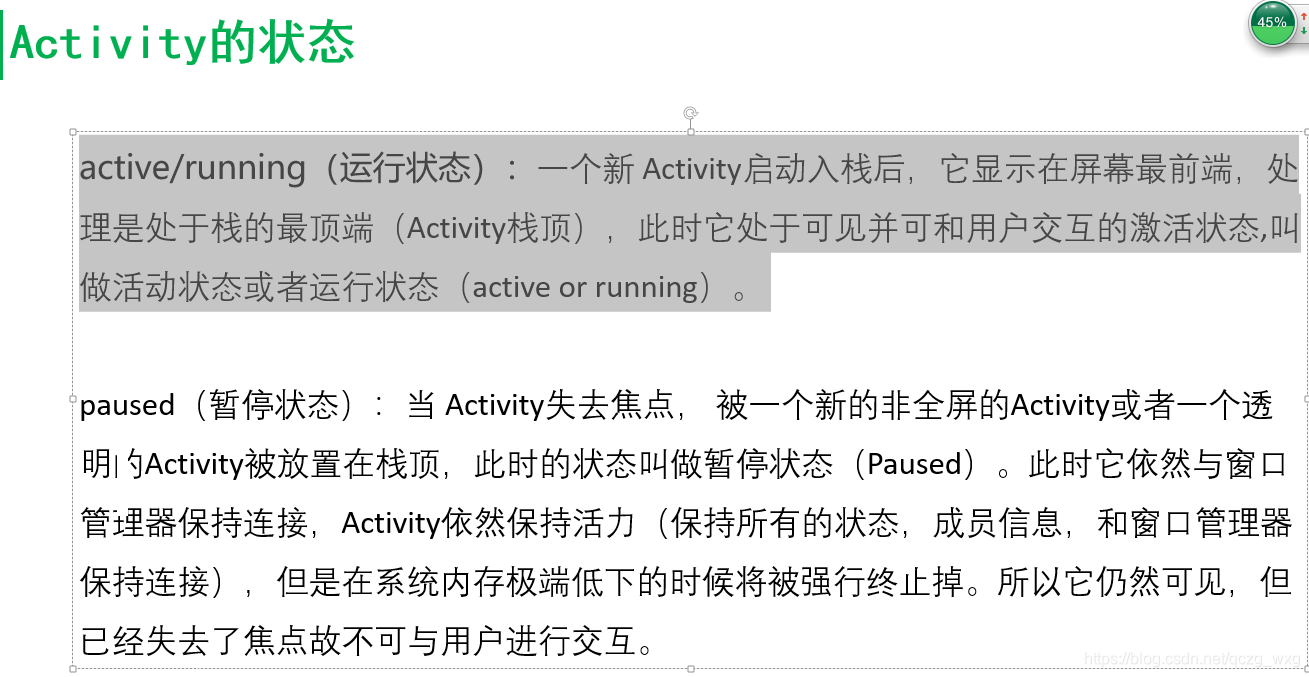

当APP启动的时候,应用进程会主动的向系统进程发送消息,当系统进程允许Activity的创建,系统进程会发送消息到应用进程。
Activity的创建会涉及到跨进程的调用。
Android 程序启动的入口是ActivityThread的main方法。注意ActivityThread不是一个线程
public static void main(String[] args) {
        Trace.traceBegin(Trace.TRACE_TAG_ACTIVITY_MANAGER, "ActivityThreadMain");
       AndroidOs.install();
         CloseGuard.setEnabled(false);
        Environment.initForCurrentUser();
       final File configDir = Environment.getUserConfigDirectory(UserHandle.myUserId());
        TrustedCertificateStore.setDefaultUserDirectory(configDir);
        Process.setArgV0("<pre-initialized>");
        Looper.prepareMainLooper();
        long startSeq = 0;
        if (args != null) {
            for (int i = args.length - 1; i >= 0; --i) {
                if (args[i] != null && args[i].startsWith(PROC_START_SEQ_IDENT)) {
                    startSeq = Long.parseLong(
                            args[i].substring(PROC_START_SEQ_IDENT.length()));
                }
            }
        }
        //自己new了自己,
        ActivityThread thread = new ActivityThread();
        //当前应用绑定了AMS
        thread.attach(false, startSeq);
        if (sMainThreadHandler == null) {
            sMainThreadHandler = thread.getHandler();
        }
        if (false) {
            Looper.myLooper().setMessageLogging(new
                    LogPrinter(Log.DEBUG, "ActivityThread"));
        }
       Trace.traceEnd(Trace.TRACE_TAG_ACTIVITY_MANAGER);
        Looper.loop();
        throw new RuntimeException("Main thread loop unexpectedly exited");
    }
在孵化器进程会调用main()方法,main()方法的调用标志着app进程的启动。
我们看下attach方法
 @UnsupportedAppUsage
    private void attach(boolean system, long startSeq) {
        sCurrentActivityThread = this;
        mSystemThread = system;
        if (!system) {
            android.ddm.DdmHandleAppName.setAppName("<pre-initialized>",
                    UserHandle.myUserId());
            RuntimeInit.setApplicationObject(mAppThread.asBinder());
            //获取IActivityManager,IActivityManager是AMS的代理对象。
            //AMS是系统进程,当前应用进程要与AMS进程通信,因为是两个不同的进程,所以要用到binder机制
            //IActivityManager就是AMS的一个代理类。
            final IActivityManager mgr = ActivityManager.getService();
            try {
                mgr.attachApplication(mAppThread, startSeq);
            } catch (RemoteException ex) {
                throw ex.rethrowFromSystemServer();
            }
            BinderInternal.addGcWatcher(new Runnable() {
                @Override public void run() {
                    if (!mSomeActivitiesChanged) {
                        return;
                    }
                    Runtime runtime = Runtime.getRuntime();
                    long dalvikMax = runtime.maxMemory();
                    long dalvikUsed = runtime.totalMemory() - runtime.freeMemory();
                    if (dalvikUsed > ((3*dalvikMax)/4)) {
                        if (DEBUG_MEMORY_TRIM) Slog.d(TAG, "Dalvik max=" + (dalvikMax/1024)
                                + " total=" + (runtime.totalMemory()/1024)
                                + " used=" + (dalvikUsed/1024));
                        mSomeActivitiesChanged = false;
                        try {
                            ActivityTaskManager.getService().releaseSomeActivities(mAppThread);
                        } catch (RemoteException e) {
                            throw e.rethrowFromSystemServer();
                        }
                    }
                }
            });
        } else {
            android.ddm.DdmHandleAppName.setAppName("system_process",
                    UserHandle.myUserId());
            try {
                mInstrumentation = new Instrumentation();
                mInstrumentation.basicInit(this);
                ContextImpl context = ContextImpl.createAppContext(
                        this, getSystemContext().mPackageInfo);
                mInitialApplication = context.mPackageInfo.makeApplication(true, null);
                mInitialApplication.onCreate();
            } catch (Exception e) {
                throw new RuntimeException(
                        "Unable to instantiate Application():" + e.toString(), e);
            }
        }
        ViewRootImpl.ConfigChangedCallback configChangedCallback
                = (Configuration globalConfig) -> {
            synchronized (mResourcesManager) {
                if (mResourcesManager.applyConfigurationToResourcesLocked(globalConfig,
                        null /* compat */)) {
                    updateLocaleListFromAppContext(mInitialApplication.getApplicationContext(),
                            mResourcesManager.getConfiguration().getLocales());
                    if (mPendingConfiguration == null
                            || mPendingConfiguration.isOtherSeqNewer(globalConfig)) {
                        mPendingConfiguration = globalConfig;
                        sendMessage(H.CONFIGURATION_CHANGED, globalConfig);
                    }
                }
            }
        };
        ViewRootImpl.addConfigCallback(configChangedCallback);
    }
我们点击final IActivityManager mgr = ActivityManager.getService();的getService方法。
进入ActivityManager的getService()方法。
public static IActivityManager getService() {
        return IActivityManagerSingleton.get();
    }
 @UnsupportedAppUsage
    private static final Singleton<IActivityManager> IActivityManagerSingleton =
            new Singleton<IActivityManager>() {
                @Override
                protected IActivityManager create() {
                    final IBinder b = ServiceManager.getService(Context.ACTIVITY_SERVICE);
                    final IActivityManager am = IActivityManager.Stub.asInterface(b);
                    //拿到AMS的代理
                    return am;
                }
            };
我们回到ActivityThread类
mgr.attachApplication(mAppThread, startSeq);
这个方法是跳到ActivityManagerService类,进入这个方法
   @Override
    public final void attachApplication(IApplicationThread thread) {
        synchronized (this) {
        //获取PID
            int callingPid = Binder.getCallingPid();
            final long origId = Binder.clearCallingIdentity();
            attachApplicationLocked(thread, callingPid);
            Binder.restoreCallingIdentity(origId);
        }
    }
这个方法获取到一大堆ID,这些ID的作用就是应用的唯一标识。这些ID是由系统生成并且分配的。
attachApplicationLocked(thread, callingPid);标识绑定了Application。点击 attachApplicationLocked(thread, callingPid);这个方法进入到下面代码
  private final boolean attachApplicationLocked(IApplicationThread thread,
                                                  int pid) {
        ProcessRecord app;
        if (pid != MY_PID && pid >= 0) {
            synchronized (mPidsSelfLocked) {
                app = mPidsSelfLocked.get(pid);
            }
        } else {
            app = null;
        }
通过pid拿到ProcessRecord对象,ProcessRecord是来维护进程运行时的状态信息,需要将应用进程绑定到ProcessRecord才能开始一个Application的构建。
继续往下看源码,看到下面这些代码
thread.bindApplication(processName, appInfo, providers, app.instrumentationClass,
                    profilerInfo, app.instrumentationArguments, app.instrumentationWatcher,
                    app.instrumentationUiAutomationConnection, testMode, enableOpenGlTrace,
                    isRestrictedBackupMode || !normalMode, app.persistent,
                    new Configuration(mConfiguration), app.compat, getCommonServicesLocked(),
                    mCoreSettingsObserver.getCoreSettingsLocked());
这些代码开始绑定App了。这里的thread就是IApplicationThread,IApplicationThread是在系统进程向应用进程发起通信时候用到的。
我们看下IApplicationThread,它是ActivityThread内部类
private class ApplicationThread extends IApplicationThread.Stub {}
我们可以发现,该内部类就是一个AIDL;该内部类有一个方法
 public final void bindApplication(String processName, ApplicationInfo appInfo,
                List<ProviderInfo> providers, ComponentName instrumentationName,
                ProfilerInfo profilerInfo, Bundle instrumentationArgs,
                IInstrumentationWatcher instrumentationWatcher,
                IUiAutomationConnection instrumentationUiConnection, int debugMode,
                boolean enableBinderTracking, boolean trackAllocation,
                boolean isRestrictedBackupMode, boolean persistent, Configuration config,
                CompatibilityInfo compatInfo, Map services, Bundle coreSettings,
                String buildSerial, AutofillOptions autofillOptions,
                ContentCaptureOptions contentCaptureOptions, long[] disabledCompatChanges) {
                }
该方法是绑定Application,绑定Application的时候会向Application传入各种信息。
注意下,我们源码现在从系统服务进程又回到我们应用进程了。
看下该方法的方法体
  AppBindData data = new AppBindData();
            data.processName = processName;
            data.appInfo = appInfo;
            data.providers = providers;
            data.instrumentationName = instrumentationName;
            data.instrumentationArgs = instrumentationArgs;
            data.instrumentationWatcher = instrumentationWatcher;
            data.instrumentationUiAutomationConnection = instrumentationUiConnection;
            data.debugMode = debugMode;
            data.enableBinderTracking = enableBinderTracking;
            data.trackAllocation = trackAllocation;
            data.restrictedBackupMode = isRestrictedBackupMode;
            data.persistent = persistent;
            data.config = config;
            data.compatInfo = compatInfo;
            data.initProfilerInfo = profilerInfo;
            data.buildSerial = buildSerial;
            data.autofillOptions = autofillOptions;
            data.contentCaptureOptions = contentCaptureOptions;
            data.disabledCompatChanges = disabledCompatChanges;
            sendMessage(H.BIND_APPLICATION, data);
该方法体是把传进来的信息保存在了AppBindData里面。最后发送一条消息,我们看下处理该消息的地方。
  case BIND_APPLICATION:
                    Trace.traceBegin(Trace.TRACE_TAG_ACTIVITY_MANAGER, "bindApplication");
                    AppBindData data = (AppBindData)msg.obj;
                    handleBindApplication(data);
                    Trace.traceEnd(Trace.TRACE_TAG_ACTIVITY_MANAGER);
                    break;
handleBindApplication(data);就是处理消息的绑定。我们看下 handleBindApplication(data)方法。在该方法体中有这句代码 dapp = data.info.makeApplication(data.restrictedBackupMode, null);这句代码就是创建Application。我们进入makeApplication()中查询该方法。makeApplication()方法在LoadedAPK类里面,我们打开该类。看下该方法方法体
  String appClass = mApplicationInfo.className;//获取类名,该类名就是我们自己定义的Application,
        if (forceDefaultAppClass || (appClass == null)) {
            appClass = "android.app.Application";//如果我们自己没有自定义Application,那么久自动获取系统的类名。
        }
接着看makeApplication()源码
  try {
  //获取类加载器
            java.lang.ClassLoader cl = getClassLoader();
            if (!mPackageName.equals("android")) {
                Trace.traceBegin(Trace.TRACE_TAG_ACTIVITY_MANAGER,
                        "initializeJavaContextClassLoader");
                initializeJavaContextClassLoader();
                Trace.traceEnd(Trace.TRACE_TAG_ACTIVITY_MANAGER);
            }
            //获取上下文
            ContextImpl appContext = ContextImpl.createAppContext(mActivityThread, this);
            //反射创建Application
            app = mActivityThread.mInstrumentation.newApplication(
                    cl, appClass, appContext);
            appContext.setOuterContext(app);
        } catch (Exception e) {
            if (!mActivityThread.mInstrumentation.onException(app, e)) {
                Trace.traceEnd(Trace.TRACE_TAG_ACTIVITY_MANAGER);
                throw new RuntimeException(
                    "Unable to instantiate application " + appClass
                    + ": " + e.toString(), e);
            }
        }
通过类加载器,加载文件。加载完后反射。
接着往下看makeApplication()源码
instrumentation.callApplicationOnCreate(app);
这个方法就是Application的onCreate()的创建。
我们看下Instrumentation类的callApplicationOnCreate方法
public void callApplicationOnCreate(Application app){
  app.onCreate();
}
我去,找了那么多代码,Application终于创建了。
第二创建Activity
我们现在再回到ActivityManagerService中。
 // See if the top visible activity is waiting to run in this process...
        if (normalMode) {
            try {
                if (mStackSupervisor.attachApplicationLocked(app)) {
                    didSomething = true;
                }
            } catch (Exception e) {
                Slog.wtf(TAG, "Exception thrown launching activities in " + app, e);
                badApp = true;
            }
        }
        // Find any services that should be running in this process...
        if (!badApp) {
            try {
                didSomething |= mServices.attachApplicationLocked(app, processName);
            } catch (Exception e) {
                Slog.wtf(TAG, "Exception thrown starting services in " + app, e);
                badApp = true;
            }
        }
查找是否有可用的Activity、Service、广播等。我们主要看Activity。这句代码(mStackSupervisor.attachApplicationLocked(app))就是创建Activity。我们进入ActivityStackSupervisor类的attachApplicationLocked();
我们看下attachApplicationLocked方法体这句代码
ActivityRecord hr = stack.topRunningActivityLocked(null);
ActivityRecord来维护Activity运行时的状态信息,需要将Activity绑定到AMS中,ActivityRecord才能开始Activity的生命周期。
接着看attachApplicationLocked的方法体
realStartActivityLocked(hr, app, true, true)这句代码是真正的解锁Activity。
我们看下这个方法的方法体
final ClientTransaction clientTransaction = ClientTransaction.obtain(app.thread, r.appToken);
 clientTransaction.addCallback(LaunchActivityItem.obtain(new Intent(r.intent),
 System.identityHashCode(r), r.info,mergedConfiguration.getGlobalConfiguration(),  mergedConfiguration.getOverrideConfiguration(), r.compat, r.launchedFromPackage, task.voiceInteractor, app.repProcState, r.icicle, r.persistentState, results, newIntents, mService.isNextTransitionForward(),profilerInfo));
obtain是开启了一个客户端事务。这个事务的工作就是创建Activity。 addCallback()是添加第一个创建Activity的回调。也就是LaunchActivityItem。这里的第一个创建Activity指的是添加
 <intent-filter>
                <action android:name="android.intent.action.MAIN" />
               <category android:name="android.intent.category.LAUNCHER" />
 </intent-filter>
的Activity。
继续向下看这个方法体
    if (andResume) {
         lifecycleItem = ResumeActivityItem.obtain(mService.isNextTransitionForward());
    } else {
        lifecycleItem = PauseActivityItem.obtain();
   }
这里设置所需的最终状态,
mService.getLifecycleManager().scheduleTransaction(clientTransaction);
这里的mService就是ActivitymanagerService,getLifecycleManager()是拿到生命周期的管理类,scheduleTransaction是执行事务。我们进入这个方法看看它的方法体会发现它是调用 transaction.schedule();执行事务。我们看下transaction这个类,这个类就是
ClientTransaction。我们看下相应的方法
 public void schedule() throws RemoteException {
     mClient.scheduleTransaction(this);
     }
mClient是private IApplicationThread mClient;
我们在ActivityTread中可以找到该内部类
private class ApplicationThread extends IApplicationThread.Stub{
  public void scheduleTransaction(ClientTransaction transaction) throws RemoteException {
              ActivityThread.this.scheduleTransaction(transaction);
         }
}
现在我们又回到了客户端。这次回到客户端的主要目的是创建Activity。该方法最终调用的是ActivityThread.this.scheduleTransaction(transaction);
在ActivityThread的父类ClientTransactionHandler中调用了该方法
 void scheduleTransaction(ClientTransaction transaction) {
           transaction.preExecute(this);
          sendMessage(ActivityThread.H.EXECUTE_TRANSACTION, transaction);
     }
发送一个消息,我们看下这个消息是如何处理的。
 final ClientTransaction transaction = (ClientTransaction) msg.obj;
                mTransactionExecutor.execute(transaction);
                     if (isSystem()) {
                        transaction.recycle();
                    }
把ClientTransaction传入到execute()中。看下mTransactionExecutor的成员变量
private final TransactionExecutor mTransactionExecutor = new TransactionExecutor(this);
我们进入TransactionExecutor 类看看该方法
public void execute(ClientTransaction transaction) {
65          final IBinder token = transaction.getActivityToken();
66          log("Start resolving transaction for client: " + mTransactionHandler + ", token: " + token);
67
68          executeCallbacks(transaction);
69
70          executeLifecycleState(transaction);
71          mPendingActions.clear();
72          log("End resolving transaction");
73      }
执行 executeCallbacks(transaction)方法
public void executeCallbacks(ClientTransaction transaction) {
78          final List<ClientTransactionItem> callbacks = transaction.getCallbacks();
79          if (callbacks == null) {
80              // No callbacks to execute, return early.
81              return;
82          }
83          log("Resolving callbacks");
84
85          final IBinder token = transaction.getActivityToken();
86          ActivityClientRecord r = mTransactionHandler.getActivityClient(token);
87
88          // In case when post-execution state of the last callback matches the final state requested
89          // for the activity in this transaction, we won't do the last transition here and do it when
90          // moving to final state instead (because it may contain additional parameters from server).
91          final ActivityLifecycleItem finalStateRequest = transaction.getLifecycleStateRequest();
92          final int finalState = finalStateRequest != null ? finalStateRequest.getTargetState()
93                  : UNDEFINED;
94          // Index of the last callback that requests some post-execution state.
95          final int lastCallbackRequestingState = lastCallbackRequestingState(transaction);
96
97          final int size = callbacks.size();
98          for (int i = 0; i < size; ++i) {
99              final ClientTransactionItem item = callbacks.get(i);
100              log("Resolving callback: " + item);
101              final int postExecutionState = item.getPostExecutionState();
102              final int closestPreExecutionState = mHelper.getClosestPreExecutionState(r,
103                      item.getPostExecutionState());
104              if (closestPreExecutionState != UNDEFINED) {
105                  cycleToPath(r, closestPreExecutionState);
106              }
107
108              item.execute(mTransactionHandler, token, mPendingActions);
109              item.postExecute(mTransactionHandler, token, mPendingActions);
110              if (r == null) {
111                  // Launch activity request will create an activity record.
112                  r = mTransactionHandler.getActivityClient(token);
113              }
114
115              if (postExecutionState != UNDEFINED && r != null) {
116                  // Skip the very last transition and perform it by explicit state request instead.
117                  final boolean shouldExcludeLastTransition =
118                          i == lastCallbackRequestingState && finalState == postExecutionState;
119                  cycleToPath(r, postExecutionState, shouldExcludeLastTransition);
120              }
121          }
122      }
final List callbacks = transaction.getCallbacks();拿到set的CallBack,
final ClientTransactionItem item = callbacks.get(i);这句代码拿到的就是LaunchActivityItem对象。
item.execute(mTransactionHandler, token, mPendingActions);方法被执行的时候会跳转到LaunchActivityItem类。我们看下LaunchActivityItem类的execute方法。
@Override
71 public void execute(ClientTransactionHandler client, IBinder token,
72 PendingTransactionActions pendingActions) {
73 Trace.traceBegin(TRACE_TAG_ACTIVITY_MANAGER, “activityStart”);
74 ActivityClientRecord r = new ActivityClientRecord(token, mIntent, mIdent, mInfo,
75 mOverrideConfig, mCompatInfo, mReferrer, mVoiceInteractor, mState, mPersistentState,
76 mPendingResults, mPendingNewIntents, mIsForward,
77 mProfilerInfo, client);
78 client.handleLaunchActivity(r, pendingActions, null /* customIntent /);
79 Trace.traceEnd(TRACE_TAG_ACTIVITY_MANAGER);
80 }
ClientTransactionHandler 是ActivityThread的父类,执行 client.handleLaunchActivity(r, pendingActions, null / customIntent */);的时候又会重新跳转到ActivityThread的handleLaunchActivity()方法。
  @Override
3062      public Activity handleLaunchActivity(ActivityClientRecord r,
3063              PendingTransactionActions pendingActions, Intent customIntent) {
3064          // If we are getting ready to gc after going to the background, well
3065          // we are back active so skip it.
3066          unscheduleGcIdler();
3067          mSomeActivitiesChanged = true;
3068
3069          if (r.profilerInfo != null) {
3070              mProfiler.setProfiler(r.profilerInfo);
3071              mProfiler.startProfiling();
3072          }
3073
3074          // Make sure we are running with the most recent config.
3075          handleConfigurationChanged(null, null);
3076
3077          if (localLOGV) Slog.v(
3078              TAG, "Handling launch of " + r);
3079
3080          // Initialize before creating the activity
3081          if (!ThreadedRenderer.sRendererDisabled) {
3082              GraphicsEnvironment.earlyInitEGL();
3083          }
3084          WindowManagerGlobal.initialize();
3085
3086          final Activity a = performLaunchActivity(r, customIntent);
3087
3088          if (a != null) {
3089              r.createdConfig = new Configuration(mConfiguration);
3090              reportSizeConfigurations(r);
3091              if (!r.activity.mFinished && pendingActions != null) {
3092                  pendingActions.setOldState(r.state);
3093                  pendingActions.setRestoreInstanceState(true);
3094                  pendingActions.setCallOnPostCreate(true);
3095              }
3096          } else {
3097              // If there was an error, for any reason, tell the activity manager to stop us.
3098              try {
3099                  ActivityManager.getService()
3100                          .finishActivity(r.token, Activity.RESULT_CANCELED, null,
3101                                  Activity.DONT_FINISH_TASK_WITH_ACTIVITY);
3102              } catch (RemoteException ex) {
3103                  throw ex.rethrowFromSystemServer();
3104              }
3105          }
3106
3107          return a;
3108      }
3109
final Activity a = performLaunchActivity(r, customIntent);这句代码就是得到一个Activity对象。我们进入performLaunchActivity会发现Activity的创建与Application相似,也是通过类加载器和反射创建的。我们可以看下这个方法的代码
   ContextImpl appContext = createBaseContextForActivity(r);
2866          Activity activity = null;
2867          try {
2868              java.lang.ClassLoader cl = appContext.getClassLoader();
2869              activity = mInstrumentation.newActivity(
2870                      cl, component.getClassName(), r.intent);
2871              StrictMode.incrementExpectedActivityCount(activity.getClass());
2872              r.intent.setExtrasClassLoader(cl);
2873              r.intent.prepareToEnterProcess();
2874              if (r.state != null) {
2875                  r.state.setClassLoader(cl);
2876              }
2877          } catch (Exception e) {
2878              if (!mInstrumentation.onException(activity, e)) {
2879                  throw new RuntimeException(
2880                      "Unable to instantiate activity " + component
2881                      + ": " + e.toString(), e);
2882              }
2883          }
2884
继续查看该方法,会发现下面这句代码
  if (r.isPersistable()) {
2929                      mInstrumentation.callActivityOnCreate(activity, r.state, r.persistentState);
2930                  } else {
2931                      mInstrumentation.callActivityOnCreate(activity, r.state);
2932                  }
我们进入callActivityOnCreate(activity, r.state, r.persistentState);方法。它是Instrumentation类的方法,我们看下方法体
 public void callActivityOnCreate(Activity activity, Bundle icicle) {
1270          prePerformCreate(activity);
1271          activity.performCreate(icicle);
1272          postPerformCreate(activity);
1273      }
activity.performCreate(icicle);就是调用Activity的perform方法。我们看下这个方法
final void performCreate(Bundle icicle, PersistableBundle persistentState) {
7139          mCanEnterPictureInPicture = true;
7140          restoreHasCurrentPermissionRequest(icicle);
7141          if (persistentState != null) {
7142              onCreate(icicle, persistentState);
7143          } else {
7144              onCreate(icicle);
7145          }
7146          writeEventLog(LOG_AM_ON_CREATE_CALLED, "performCreate");
7147          mActivityTransitionState.readState(icicle);
7148
7149          mVisibleFromClient = !mWindow.getWindowStyle().getBoolean(
7150                  com.android.internal.R.styleable.Window_windowNoDisplay, false);
7151          mFragments.dispatchActivityCreated();
7152          mActivityTransitionState.setEnterActivityOptions(this, getActivityOptions());
7153      }
7154
onCreate(icicle, persistentState);调用Activity的onCreate()。这样,我们的Activity终于创建成功了。
第三Activity其它的生命周期的加载
我们看下Activity其它的生命周期的加载。在ActivityThread中在调用mInstrumentation.callActivityOnCreate(activity, r.state, r.persistentState);方法之后可以设置状态。
 r.setState(ON_CREATE);


 r.setState(ON_START);


 r.setState(ON_RESUME);


r.setState(ON_PAUSE);


  r.setState(ON_STOP);


   r.setState(ON_DESTROY);
那这些状态有什么用呢?我们回到TransactionExecutor类,看下这个方法
 public void execute(ClientTransaction transaction) {
        if (DEBUG_RESOLVER) Slog.d(TAG, tId(transaction) + "Start resolving transaction");
        final IBinder token = transaction.getActivityToken();
        if (token != null) {
            final Map<IBinder, ClientTransactionItem> activitiesToBeDestroyed =
                    mTransactionHandler.getActivitiesToBeDestroyed();
            final ClientTransactionItem destroyItem = activitiesToBeDestroyed.get(token);
            if (destroyItem != null) {
                if (transaction.getLifecycleStateRequest() == destroyItem) {
                    // It is going to execute the transaction that will destroy activity with the
                    // token, so the corresponding to-be-destroyed record can be removed.
                    activitiesToBeDestroyed.remove(token);
                }
                if (mTransactionHandler.getActivityClient(token) == null) {
                    // The activity has not been created but has been requested to destroy, so all
                    // transactions for the token are just like being cancelled.
                    Slog.w(TAG, tId(transaction) + "Skip pre-destroyed transaction:\n"
                            + transactionToString(transaction, mTransactionHandler));
                    return;
                }
            }
        }
        if (DEBUG_RESOLVER) Slog.d(TAG, transactionToString(transaction, mTransactionHandler));
        executeCallbacks(transaction);
        executeLifecycleState(transaction);
        mPendingActions.clear();
        if (DEBUG_RESOLVER) Slog.d(TAG, tId(transaction) + "End resolving transaction");
    }
executeCallbacks(transaction);是创建Activity以及onCreate方法的调用;其它的生命周期的调用是在 executeLifecycleState(transaction);我们打开这个方法,查看它的方法体
  /** Transition to the final state if requested by the transaction. */
    private void executeLifecycleState(ClientTransaction transaction) {
        final ActivityLifecycleItem lifecycleItem = transaction.getLifecycleStateRequest();
        if (lifecycleItem == null) {
            // No lifecycle request, return early.
            return;
        }
        final IBinder token = transaction.getActivityToken();
        final ActivityClientRecord r = mTransactionHandler.getActivityClient(token);
        if (DEBUG_RESOLVER) {
            Slog.d(TAG, tId(transaction) + "Resolving lifecycle state: "
                    + lifecycleItem + " for activity: "
                    + getShortActivityName(token, mTransactionHandler));
        }
        if (r == null) {
            // Ignore requests for non-existent client records for now.
            return;
        }
        // Cycle to the state right before the final requested state.
        cycleToPath(r, lifecycleItem.getTargetState(), true /* excludeLastState */, transaction);
        // Execute the final transition with proper parameters.
        lifecycleItem.execute(mTransactionHandler, token, mPendingActions);
        lifecycleItem.postExecute(mTransactionHandler, token, mPendingActions);
    }
final ActivityLifecycleItem lifecycleItem = transaction.getLifecycleStateRequest();得到ActivityLifecycleItem 对象,这里有一个关键的方法cycleToPath();我们进入查看这个方法体
 private void cycleToPath(ActivityClientRecord r, int finish, boolean excludeLastState,
            ClientTransaction transaction) {
        final int start = r.getLifecycleState();
        if (DEBUG_RESOLVER) {
            Slog.d(TAG, tId(transaction) + "Cycle activity: "
                    + getShortActivityName(r.token, mTransactionHandler)
                    + " from: " + getStateName(start) + " to: " + getStateName(finish)
                    + " excludeLastState: " + excludeLastState);
        }
        final IntArray path = mHelper.getLifecyclePath(start, finish, excludeLastState);
        performLifecycleSequence(r, path, transaction);
    }
final int start = r.getLifecycleState();首先拿到getLifecycleState()的状态。打个断点第一次运行到这里,会发现start是1,1就是ON_CREATE(ON_START,ON_RESUME,ON_PAUSE,ON_STOP,ON_DESTROY,ON_RESTART依次是2、3、4、5、6、7);
然后执行这句代码 final IntArray path = mHelper.getLifecyclePath(start, finish, excludeLastState);我们看下TransactionExecutorHelper(mHelper是该类的一个对象)类的getLifecyclePath();
 @VisibleForTesting
    public IntArray getLifecyclePath(int start, int finish, boolean excludeLastState) {
        if (start == UNDEFINED || finish == UNDEFINED) {
            throw new IllegalArgumentException("Can't resolve lifecycle path for undefined state");
        }
        if (start == ON_RESTART || finish == ON_RESTART) {
            throw new IllegalArgumentException(
                    "Can't start or finish in intermittent RESTART state");
        }
        if (finish == PRE_ON_CREATE && start != finish) {
            throw new IllegalArgumentException("Can only start in pre-onCreate state");
        }
        mLifecycleSequence.clear();
        if (finish >= start) {
            // just go there
            for (int i = start + 1; i <= finish; i++) {
                mLifecycleSequence.add(i);
            }
        } else { // finish < start, can't just cycle down
            if (start == ON_PAUSE && finish == ON_RESUME) {
                // Special case when we can just directly go to resumed state.
                mLifecycleSequence.add(ON_RESUME);
            } else if (start <= ON_STOP && finish >= ON_START) {
                // Restart and go to required state.
                // Go to stopped state first.
                for (int i = start + 1; i <= ON_STOP; i++) {
                    mLifecycleSequence.add(i);
                }
                // Restart
                mLifecycleSequence.add(ON_RESTART);
                // Go to required state
                for (int i = ON_START; i <= finish; i++) {
                    mLifecycleSequence.add(i);
                }
            } else {
                // Relaunch and go to required state
                // Go to destroyed state first.
                for (int i = start + 1; i <= ON_DESTROY; i++) {
                    mLifecycleSequence.add(i);
                }
                // Go to required state
                for (int i = ON_CREATE; i <= finish; i++) {
                    mLifecycleSequence.add(i);
                }
            }
        }
        // Remove last transition in case we want to perform it with some specific params.
        if (excludeLastState && mLifecycleSequence.size() != 0) {
            mLifecycleSequence.remove(mLifecycleSequence.size() - 1);
        }
        return mLifecycleSequence;
    }
该方法需要传入start和finish 两个值,start我们在前面已经介绍过,那么finish又指的是3,即ON_RESUME。
经过一系列的判断,会执行下面的代码
     for (int i = start + 1; i <= finish; i++) {
                mLifecycleSequence.add(i);
            }
start+1,即进入下一个状态。 mLifecycleSequence.add(i);最终添加的是2和3。因为excludeLastState是true,会执行 mLifecycleSequence.remove(mLifecycleSequence.size() - 1);就是一出最后一个值,我们拿到的最终结果是2.
我们回到方法调用的地方
 private void cycleToPath(ActivityClientRecord r, int finish, boolean excludeLastState,
            ClientTransaction transaction) {
        final int start = r.getLifecycleState();
        if (DEBUG_RESOLVER) {
            Slog.d(TAG, tId(transaction) + "Cycle activity: "
                    + getShortActivityName(r.token, mTransactionHandler)
                    + " from: " + getStateName(start) + " to: " + getStateName(finish)
                    + " excludeLastState: " + excludeLastState);
        }
        final IntArray path = mHelper.getLifecyclePath(start, finish, excludeLastState);
        performLifecycleSequence(r, path, transaction);
    }
继续往下执行会执行TransactionExecutor类的performLifecycleSequence方法。
  private void performLifecycleSequence(ActivityClientRecord r, IntArray path,
            ClientTransaction transaction) {
        final int size = path.size();
        for (int i = 0, state; i < size; i++) {
            state = path.get(i);
            if (DEBUG_RESOLVER) {
                Slog.d(TAG, tId(transaction) + "Transitioning activity: "
                        + getShortActivityName(r.token, mTransactionHandler)
                        + " to state: " + getStateName(state));
            }
            switch (state) {
                case ON_CREATE:
                    mTransactionHandler.handleLaunchActivity(r, mPendingActions,
                            null /* customIntent */);
                    break;
                case ON_START:
                    mTransactionHandler.handleStartActivity(r, mPendingActions);
                    break;
                case ON_RESUME:
                    mTransactionHandler.handleResumeActivity(r.token, false /* finalStateRequest */,
                            r.isForward, "LIFECYCLER_RESUME_ACTIVITY");
                    break;
                case ON_PAUSE:
                    mTransactionHandler.handlePauseActivity(r.token, false /* finished */,
                            false /* userLeaving */, 0 /* configChanges */, mPendingActions,
                            "LIFECYCLER_PAUSE_ACTIVITY");
                    break;
                case ON_STOP:
                    mTransactionHandler.handleStopActivity(r.token, false /* show */,
                            0 /* configChanges */, mPendingActions, false /* finalStateRequest */,
                            "LIFECYCLER_STOP_ACTIVITY");
                    break;
                case ON_DESTROY:
                    mTransactionHandler.handleDestroyActivity(r.token, false /* finishing */,
                            0 /* configChanges */, false /* getNonConfigInstance */,
                            "performLifecycleSequence. cycling to:" + path.get(size - 1));
                    break;
                case ON_RESTART:
                    mTransactionHandler.performRestartActivity(r.token, false /* start */);
                    break;
                default:
                    throw new IllegalArgumentException("Unexpected lifecycle state: " + state);
            }
        }
    }
final int size = path.size();获取IntArray的大小, state = path.get(i);然后获取到状态。这里获取到的状态是2。会执行
mTransactionHandler.handleStartActivity(r, mPendingActions);mTransactionHandler是ClientTransactionHandler 对象,ClientTransactionHandler 是ActivityThread的父类,所以这里我们又回到了ActivityThread的代码。我们看下ActivityThread类的handleStartActivity();
  @Override
    public void handleStartActivity(ActivityClientRecord r,
            PendingTransactionActions pendingActions) {
        final Activity activity = r.activity;
        if (r.activity == null) {
            // TODO(lifecycler): What do we do in this case?
            return;
        }
        if (!r.stopped) {
            throw new IllegalStateException("Can't start activity that is not stopped.");
        }
        if (r.activity.mFinished) {
            // TODO(lifecycler): How can this happen?
            return;
        }
        // Start
        activity.performStart("handleStartActivity");
        r.setState(ON_START);
        if (pendingActions == null) {
            // No more work to do.
            return;
        }
        // Restore instance state
        if (pendingActions.shouldRestoreInstanceState()) {
            if (r.isPersistable()) {
                if (r.state != null || r.persistentState != null) {
                    mInstrumentation.callActivityOnRestoreInstanceState(activity, r.state,
                            r.persistentState);
                }
            } else if (r.state != null) {
                mInstrumentation.callActivityOnRestoreInstanceState(activity, r.state);
            }
        }
        // Call postOnCreate()
        if (pendingActions.shouldCallOnPostCreate()) {
            activity.mCalled = false;
            if (r.isPersistable()) {
                mInstrumentation.callActivityOnPostCreate(activity, r.state,
                        r.persistentState);
            } else {
                mInstrumentation.callActivityOnPostCreate(activity, r.state);
            }
            if (!activity.mCalled) {
                throw new SuperNotCalledException(
                        "Activity " + r.intent.getComponent().toShortString()
                                + " did not call through to super.onPostCreate()");
            }
        }
    }
activity.performStart(“handleStartActivity”);这个方法就是执行Activity的onStart()方法。然后修改下一个状态 r.setState(ON_START);
onResume()方法的执行原理也是一样的。我们下面看下onResume()方法是如何被调用的。
我们回到TransactionExecutor
private void performLifecycleSequence(ActivityClientRecord r, IntArray path) {
170          final int size = path.size();
171          for (int i = 0, state; i < size; i++) {
172              state = path.get(i);
173              log("Transitioning to state: " + state);
174              switch (state) {
175                  case ON_CREATE:
176                      mTransactionHandler.handleLaunchActivity(r, mPendingActions,
177                              null /* customIntent */);
178                      break;
179                  case ON_START:
180                      mTransactionHandler.handleStartActivity(r, mPendingActions);
181                      break;
182                  case ON_RESUME:
183                      mTransactionHandler.handleResumeActivity(r.token, false /* finalStateRequest */,
184                              r.isForward, "LIFECYCLER_RESUME_ACTIVITY");
185                      break;
186                  case ON_PAUSE:
187                      mTransactionHandler.handlePauseActivity(r.token, false /* finished */,
188                              false /* userLeaving */, 0 /* configChanges */, mPendingActions,
189                              "LIFECYCLER_PAUSE_ACTIVITY");
190                      break;
191                  case ON_STOP:
192                      mTransactionHandler.handleStopActivity(r.token, false /* show */,
193                              0 /* configChanges */, mPendingActions, false /* finalStateRequest */,
194                              "LIFECYCLER_STOP_ACTIVITY");
195                      break;
196                  case ON_DESTROY:
197                      mTransactionHandler.handleDestroyActivity(r.token, false /* finishing */,
198                              0 /* configChanges */, false /* getNonConfigInstance */,
199                              "performLifecycleSequence. cycling to:" + path.get(size - 1));
200                      break;
201                  case ON_RESTART:
202                      mTransactionHandler.performRestartActivity(r.token, false /* start */);
203                      break;
204                  default:
205                      throw new IllegalArgumentException("Unexpected lifecycle state: " + state);
206              }
207          }
208      }
这里执行这个方法。
179                  case ON_START:
180                      mTransactionHandler.handleStartActivity(r, mPendingActions);
181                      break;
我们看下他是如何在ActivityThread中调用的。
 @Override
3846      public void handleResumeActivity(IBinder token, boolean finalStateRequest, boolean isForward,
3847              String reason) {
3848          // If we are getting ready to gc after going to the background, well
3849          // we are back active so skip it.
3850          unscheduleGcIdler();
3851          mSomeActivitiesChanged = true;
3852
3853          // TODO Push resumeArgs into the activity for consideration
3854          final ActivityClientRecord r = performResumeActivity(token, finalStateRequest, reason);
3855          if (r == null) {
3856              // We didn't actually resume the activity, so skipping any follow-up actions.
3857              return;
3858          }
3859
3860          final Activity a = r.activity;
3861
3862          if (localLOGV) {
3863              Slog.v(TAG, "Resume " + r + " started activity: " + a.mStartedActivity
3864                      + ", hideForNow: " + r.hideForNow + ", finished: " + a.mFinished);
3865          }
3866
3867          final int forwardBit = isForward
3868                  ? WindowManager.LayoutParams.SOFT_INPUT_IS_FORWARD_NAVIGATION : 0;
3869
3870          // If the window hasn't yet been added to the window manager,
3871          // and this guy didn't finish itself or start another activity,
3872          // then go ahead and add the window.
3873          boolean willBeVisible = !a.mStartedActivity;
3874          if (!willBeVisible) {
3875              try {
3876                  willBeVisible = ActivityManager.getService().willActivityBeVisible(
3877                          a.getActivityToken());
3878              } catch (RemoteException e) {
3879                  throw e.rethrowFromSystemServer();
3880              }
3881          }
3882          if (r.window == null && !a.mFinished && willBeVisible) {
3883              r.window = r.activity.getWindow();
3884              View decor = r.window.getDecorView();
3885              decor.setVisibility(View.INVISIBLE);
3886              ViewManager wm = a.getWindowManager();
3887              WindowManager.LayoutParams l = r.window.getAttributes();
3888              a.mDecor = decor;
3889              l.type = WindowManager.LayoutParams.TYPE_BASE_APPLICATION;
3890              l.softInputMode |= forwardBit;
3891              if (r.mPreserveWindow) {
3892                  a.mWindowAdded = true;
3893                  r.mPreserveWindow = false;
3894                  // Normally the ViewRoot sets up callbacks with the Activity
3895                  // in addView->ViewRootImpl#setView. If we are instead reusing
3896                  // the decor view we have to notify the view root that the
3897                  // callbacks may have changed.
3898                  ViewRootImpl impl = decor.getViewRootImpl();
3899                  if (impl != null) {
3900                      impl.notifyChildRebuilt();
3901                  }
3902              }
3903              if (a.mVisibleFromClient) {
3904                  if (!a.mWindowAdded) {
3905                      a.mWindowAdded = true;
3906                      wm.addView(decor, l);
3907                  } else {
3908                      // The activity will get a callback for this {@link LayoutParams} change
3909                      // earlier. However, at that time the decor will not be set (this is set
3910                      // in this method), so no action will be taken. This call ensures the
3911                      // callback occurs with the decor set.
3912                      a.onWindowAttributesChanged(l);
3913                  }
3914              }
3915
3916              // If the window has already been added, but during resume
3917              // we started another activity, then don't yet make the
3918              // window visible.
3919          } else if (!willBeVisible) {
3920              if (localLOGV) Slog.v(TAG, "Launch " + r + " mStartedActivity set");
3921              r.hideForNow = true;
3922          }
3923
3924          // Get rid of anything left hanging around.
3925          cleanUpPendingRemoveWindows(r, false /* force */);
3926
3927          // The window is now visible if it has been added, we are not
3928          // simply finishing, and we are not starting another activity.
3929          if (!r.activity.mFinished && willBeVisible && r.activity.mDecor != null && !r.hideForNow) {
3930              if (r.newConfig != null) {
3931                  performConfigurationChangedForActivity(r, r.newConfig);
3932                  if (DEBUG_CONFIGURATION) {
3933                      Slog.v(TAG, "Resuming activity " + r.activityInfo.name + " with newConfig "
3934                              + r.activity.mCurrentConfig);
3935                  }
3936                  r.newConfig = null;
3937              }
3938              if (localLOGV) Slog.v(TAG, "Resuming " + r + " with isForward=" + isForward);
3939              WindowManager.LayoutParams l = r.window.getAttributes();
3940              if ((l.softInputMode
3941                      & WindowManager.LayoutParams.SOFT_INPUT_IS_FORWARD_NAVIGATION)
3942                      != forwardBit) {
3943                  l.softInputMode = (l.softInputMode
3944                          & (~WindowManager.LayoutParams.SOFT_INPUT_IS_FORWARD_NAVIGATION))
3945                          | forwardBit;
3946                  if (r.activity.mVisibleFromClient) {
3947                      ViewManager wm = a.getWindowManager();
3948                      View decor = r.window.getDecorView();
3949                      wm.updateViewLayout(decor, l);
3950                  }
3951              }
3952
3953              r.activity.mVisibleFromServer = true;
3954              mNumVisibleActivities++;
3955              if (r.activity.mVisibleFromClient) {
3956                  r.activity.makeVisible();
3957              }
3958          }
3959
3960          r.nextIdle = mNewActivities;
3961          mNewActivities = r;
3962          if (localLOGV) Slog.v(TAG, "Scheduling idle handler for " + r);
3963          Looper.myQueue().addIdleHandler(new Idler());
3964      }
3965
执行的是这个方法。 final ActivityClientRecord r = performResumeActivity(token, finalStateRequest, reason);
 @VisibleForTesting
3775      public ActivityClientRecord performResumeActivity(IBinder token, boolean finalStateRequest,
3776              String reason) {
3777          final ActivityClientRecord r = mActivities.get(token);
3778          if (localLOGV) {
3779              Slog.v(TAG, "Performing resume of " + r + " finished=" + r.activity.mFinished);
3780          }
3781          if (r == null || r.activity.mFinished) {
3782              return null;
3783          }
3784          if (r.getLifecycleState() == ON_RESUME) {
3785              if (!finalStateRequest) {
3786                  final RuntimeException e = new IllegalStateException(
3787                          "Trying to resume activity which is already resumed");
3788                  Slog.e(TAG, e.getMessage(), e);
3789                  Slog.e(TAG, r.getStateString());
3790                  // TODO(lifecycler): A double resume request is possible when an activity
3791                  // receives two consequent transactions with relaunch requests and "resumed"
3792                  // final state requests and the second relaunch is omitted. We still try to
3793                  // handle two resume requests for the final state. For cases other than this
3794                  // one, we don't expect it to happen.
3795              }
3796              return null;
3797          }
3798          if (finalStateRequest) {
3799              r.hideForNow = false;
3800              r.activity.mStartedActivity = false;
3801          }
3802          try {
3803              r.activity.onStateNotSaved();
3804              r.activity.mFragments.noteStateNotSaved();
3805              checkAndBlockForNetworkAccess();
3806              if (r.pendingIntents != null) {
3807                  deliverNewIntents(r, r.pendingIntents);
3808                  r.pendingIntents = null;
3809              }
3810              if (r.pendingResults != null) {
3811                  deliverResults(r, r.pendingResults, reason);
3812                  r.pendingResults = null;
3813              }
3814              r.activity.performResume(r.startsNotResumed, reason);
3815
3816              r.state = null;
3817              r.persistentState = null;
3818              r.setState(ON_RESUME);
3819          } catch (Exception e) {
3820              if (!mInstrumentation.onException(r.activity, e)) {
3821                  throw new RuntimeException("Unable to resume activity "
3822                          + r.intent.getComponent().toShortString() + ": " + e.toString(), e);
3823              }
3824          }
3825          return r;
3826      }
这个方法就是执行onResume()。 r.activity.performResume(r.startsNotResumed, reason);我们看下在Activity中是如何调用的。
  final void performResume(boolean followedByPause, String reason) {
7282          performRestart(true /* start */, reason);
7283
7284          mFragments.execPendingActions();
7285
7286          mLastNonConfigurationInstances = null;
7287
7288          if (mAutoFillResetNeeded) {
7289              // When Activity is destroyed in paused state, and relaunch activity, there will be
7290              // extra onResume and onPause event,  ignore the first onResume and onPause.
7291              // see ActivityThread.handleRelaunchActivity()
7292              mAutoFillIgnoreFirstResumePause = followedByPause;
7293              if (mAutoFillIgnoreFirstResumePause && DEBUG_LIFECYCLE) {
7294                  Slog.v(TAG, "autofill will ignore first pause when relaunching " + this);
7295              }
7296          }
7297
7298          mCalled = false;
7299          // mResumed is set by the instrumentation
7300          mInstrumentation.callActivityOnResume(this);
7301          writeEventLog(LOG_AM_ON_RESUME_CALLED, reason);
7302          if (!mCalled) {
7303              throw new SuperNotCalledException(
7304                  "Activity " + mComponent.toShortString() +
7305                  " did not call through to super.onResume()");
7306          }
7307
7308          // invisible activities must be finished before onResume() completes
7309          if (!mVisibleFromClient && !mFinished) {
7310              Log.w(TAG, "An activity without a UI must call finish() before onResume() completes");
7311              if (getApplicationInfo().targetSdkVersion
7312                      > android.os.Build.VERSION_CODES.LOLLIPOP_MR1) {
7313                  throw new IllegalStateException(
7314                          "Activity " + mComponent.toShortString() +
7315                          " did not call finish() prior to onResume() completing");
7316              }
7317          }
7318
7319          // Now really resume, and install the current status bar and menu.
7320          mCalled = false;
7321
7322          mFragments.dispatchResume();
7323          mFragments.execPendingActions();
7324
7325          onPostResume();
7326          if (!mCalled) {
7327              throw new SuperNotCalledException(
7328                  "Activity " + mComponent.toShortString() +
7329                  " did not call through to super.onPostResume()");
7330          }
7331      }
7332
mInstrumentation.callActivityOnResume(this);这句代码就是调用onResume();我们现在回到ActivityThread类。有一个大家都比较感兴趣的东东。那就是我们UI的绘制,写了那么多,终于到我们本文的主题了。
我们下面的代码,在Activity执行完onCreate(),onStart(),onResume()后,就会执行这些代码
@Override
3846      public void handleResumeActivity(IBinder token, boolean finalStateRequest, boolean isForward,
3847              String reason) {
3848          // If we are getting ready to gc after going to the background, well
3849          // we are back active so skip it.
3850          unscheduleGcIdler();
3851          mSomeActivitiesChanged = true;
3852
3853          // TODO Push resumeArgs into the activity for consideration
3854          final ActivityClientRecord r = performResumeActivity(token, finalStateRequest, reason);
3855          if (r == null) {
3856              // We didn't actually resume the activity, so skipping any follow-up actions.
3857              return;
3858          }
3859
3860          final Activity a = r.activity;
3861
3862          if (localLOGV) {
3863              Slog.v(TAG, "Resume " + r + " started activity: " + a.mStartedActivity
3864                      + ", hideForNow: " + r.hideForNow + ", finished: " + a.mFinished);
3865          }
3866
3867          final int forwardBit = isForward
3868                  ? WindowManager.LayoutParams.SOFT_INPUT_IS_FORWARD_NAVIGATION : 0;
3869
3870          // If the window hasn't yet been added to the window manager,
3871          // and this guy didn't finish itself or start another activity,
3872          // then go ahead and add the window.
3873          boolean willBeVisible = !a.mStartedActivity;
3874          if (!willBeVisible) {
3875              try {
3876                  willBeVisible = ActivityManager.getService().willActivityBeVisible(
3877                          a.getActivityToken());
3878              } catch (RemoteException e) {
3879                  throw e.rethrowFromSystemServer();
3880              }
3881          }
3882          if (r.window == null && !a.mFinished && willBeVisible) {
3883              r.window = r.activity.getWindow();
3884              View decor = r.window.getDecorView();
3885              decor.setVisibility(View.INVISIBLE);
3886              ViewManager wm = a.getWindowManager();
3887              WindowManager.LayoutParams l = r.window.getAttributes();
3888              a.mDecor = decor;
3889              l.type = WindowManager.LayoutParams.TYPE_BASE_APPLICATION;
3890              l.softInputMode |= forwardBit;
3891              if (r.mPreserveWindow) {
3892                  a.mWindowAdded = true;
3893                  r.mPreserveWindow = false;
3894                  // Normally the ViewRoot sets up callbacks with the Activity
3895                  // in addView->ViewRootImpl#setView. If we are instead reusing
3896                  // the decor view we have to notify the view root that the
3897                  // callbacks may have changed.
3898                  ViewRootImpl impl = decor.getViewRootImpl();
3899                  if (impl != null) {
3900                      impl.notifyChildRebuilt();
3901                  }
3902              }
3903              if (a.mVisibleFromClient) {
3904                  if (!a.mWindowAdded) {
3905                      a.mWindowAdded = true;
3906                      wm.addView(decor, l);
3907                  } else {
3908                      // The activity will get a callback for this {@link LayoutParams} change
3909                      // earlier. However, at that time the decor will not be set (this is set
3910                      // in this method), so no action will be taken. This call ensures the
3911                      // callback occurs with the decor set.
3912                      a.onWindowAttributesChanged(l);
3913                  }
3914              }
3915
3916              // If the window has already been added, but during resume
3917              // we started another activity, then don't yet make the
3918              // window visible.
3919          } else if (!willBeVisible) {
3920              if (localLOGV) Slog.v(TAG, "Launch " + r + " mStartedActivity set");
3921              r.hideForNow = true;
3922          }
3923
3924          // Get rid of anything left hanging around.
3925          cleanUpPendingRemoveWindows(r, false /* force */);
3926
3927          // The window is now visible if it has been added, we are not
3928          // simply finishing, and we are not starting another activity.
3929          if (!r.activity.mFinished && willBeVisible && r.activity.mDecor != null && !r.hideForNow) {
3930              if (r.newConfig != null) {
3931                  performConfigurationChangedForActivity(r, r.newConfig);
3932                  if (DEBUG_CONFIGURATION) {
3933                      Slog.v(TAG, "Resuming activity " + r.activityInfo.name + " with newConfig "
3934                              + r.activity.mCurrentConfig);
3935                  }
3936                  r.newConfig = null;
3937              }
3938              if (localLOGV) Slog.v(TAG, "Resuming " + r + " with isForward=" + isForward);
3939              WindowManager.LayoutParams l = r.window.getAttributes();
3940              if ((l.softInputMode
3941                      & WindowManager.LayoutParams.SOFT_INPUT_IS_FORWARD_NAVIGATION)
3942                      != forwardBit) {
3943                  l.softInputMode = (l.softInputMode
3944                          & (~WindowManager.LayoutParams.SOFT_INPUT_IS_FORWARD_NAVIGATION))
3945                          | forwardBit;
3946                  if (r.activity.mVisibleFromClient) {
3947                      ViewManager wm = a.getWindowManager();
3948                      View decor = r.window.getDecorView();
3949                      wm.updateViewLayout(decor, l);
3950                  }
3951              }
3952
3953              r.activity.mVisibleFromServer = true;
3954              mNumVisibleActivities++;
3955              if (r.activity.mVisibleFromClient) {
3956                  r.activity.makeVisible();
3957              }
3958          }
3959
3960          r.nextIdle = mNewActivities;
3961          mNewActivities = r;
3962          if (localLOGV) Slog.v(TAG, "Scheduling idle handler for " + r);
3963          Looper.myQueue().addIdleHandler(new Idler());
3964      }
跟UI相关的逻辑在这里。
     r.window = r.activity.getWindow();
3884              View decor = r.window.getDecorView();
3885              decor.setVisibility(View.INVISIBLE);
3886              ViewManager wm = a.getWindowManager();
3887              WindowManager.LayoutParams l = r.window.getAttributes();
3888              a.mDecor = decor;
3889              l.type = WindowManager.LayoutParams.TYPE_BASE_APPLICATION;
3890              l.softInputMode |= forwardBit;
第四应用中启动Activity
我们上面写的是如何在屏幕中启动Activity,即点击手机屏幕中的app图标启动Activity,但是我们启动Activity不止是这一种方法,还可以在应用中启动Activity,比如常见的有startActivty();
我们点击startActivity();发现它是调用ContextWrapper类的
377      @Override
378      public void startActivity(Intent intent) {
379          mBase.startActivity(intent);
380      }
我们发现 mBase是Context对象;我们继续跟踪,来到Context类。
               public abstract void startActivity(@RequiresPermission Intent intent,
1738              @Nullable Bundle options);
1739
1740      /**
这个方法最终调用是在Activity中的startActivity。因为activity实现了Context
4872      @Override
4873      public void startActivity(Intent intent) {
4874          this.startActivity(intent, null);
4875      }
继续往下跟踪,
 public void startActivity(Intent intent, @Nullable Bundle options) {
4901          if (options != null) {
4902              startActivityForResult(intent, -1, options);
4903          } else {
4904              // Note we want to go through this call for compatibility with
4905              // applications that may have overridden the method.
4906              startActivityForResult(intent, -1);
4907          }
4908      }
4909
我们可以发现startActivityForResult()也可以启动Activity。startActivity最终也是调用的startActivityForResult();我们看下Activity的startActivityForResult()的方法。
 public void startActivityForResult(@RequiresPermission Intent intent, int requestCode,
4583              @Nullable Bundle options) {
4584          if (mParent == null) {
4585              options = transferSpringboardActivityOptions(options);
4586              Instrumentation.ActivityResult ar =
4587                  mInstrumentation.execStartActivity(
4588                      this, mMainThread.getApplicationThread(), mToken, this,
4589                      intent, requestCode, options);
4590              if (ar != null) {
4591                  mMainThread.sendActivityResult(
4592                      mToken, mEmbeddedID, requestCode, ar.getResultCode(),
4593                      ar.getResultData());
4594              }
4595              if (requestCode >= 0) {
4596                  // If this start is requesting a result, we can avoid making
4597                  // the activity visible until the result is received.  Setting
4598                  // this code during onCreate(Bundle savedInstanceState) or onResume() will keep the
4599                  // activity hidden during this time, to avoid flickering.
4600                  // This can only be done when a result is requested because
4601                  // that guarantees we will get information back when the
4602                  // activity is finished, no matter what happens to it.
4603                  mStartedActivity = true;
4604              }
4605
4606              cancelInputsAndStartExitTransition(options);
4607              // TODO Consider clearing/flushing other event sources and events for child windows.
4608          } else {
4609              if (options != null) {
4610                  mParent.startActivityFromChild(this, intent, requestCode, options);
4611              } else {
4612                  // Note we want to go through this method for compatibility with
4613                  // existing applications that may have overridden it.
4614                  mParent.startActivityFromChild(this, intent, requestCode);
4615              }
4616          }
4617      }
4618
看下这句代码
  Instrumentation.ActivityResult ar =
4587                  mInstrumentation.execStartActivity(
4588                      this, mMainThread.getApplicationThread(), mToken, this,
4589                      intent, requestCode, options);
我们跟踪下,会走到Instrumentation类的execStartActivity方法
 public ActivityResult execStartActivity(
1636              Context who, IBinder contextThread, IBinder token, Activity target,
1637              Intent intent, int requestCode, Bundle options) {
1638          IApplicationThread whoThread = (IApplicationThread) contextThread;
1639          Uri referrer = target != null ? target.onProvideReferrer() : null;
1640          if (referrer != null) {
1641              intent.putExtra(Intent.EXTRA_REFERRER, referrer);
1642          }
1643          if (mActivityMonitors != null) {
1644              synchronized (mSync) {
1645                  final int N = mActivityMonitors.size();
1646                  for (int i=0; i<N; i++) {
1647                      final ActivityMonitor am = mActivityMonitors.get(i);
1648                      ActivityResult result = null;
1649                      if (am.ignoreMatchingSpecificIntents()) {
1650                          result = am.onStartActivity(intent);
1651                      }
1652                      if (result != null) {
1653                          am.mHits++;
1654                          return result;
1655                      } else if (am.match(who, null, intent)) {
1656                          am.mHits++;
1657                          if (am.isBlocking()) {
1658                              return requestCode >= 0 ? am.getResult() : null;
1659                          }
1660                          break;
1661                      }
1662                  }
1663              }
1664          }
1665          try {
1666              intent.migrateExtraStreamToClipData();
1667              intent.prepareToLeaveProcess(who);
1668              int result = ActivityManager.getService()
1669                  .startActivity(whoThread, who.getBasePackageName(), intent,
1670                          intent.resolveTypeIfNeeded(who.getContentResolver()),
1671                          token, target != null ? target.mEmbeddedID : null,
1672                          requestCode, 0, null, options);
1673              checkStartActivityResult(result, intent);
1674          } catch (RemoteException e) {
1675              throw new RuntimeException("Failure from system", e);
1676          }
1677          return null;
1678      }
看这句代码
  int result = ActivityManager.getService()
1669                  .startActivity(whoThread, who.getBasePackageName(), intent,
1670                          intent.resolveTypeIfNeeded(who.getContentResolver()),
1671                          token, target != null ? target.mEmbeddedID : null,
1672                          requestCode, 0, null, options);
又是通过AMS调用。调用了AMS的StartActivity的方法,我们进入 ActivityManagerService 类看下startActivity方法。
public final int startActivity(IApplicationThread caller, String callingPackage,
5089              Intent intent, String resolvedType, IBinder resultTo, String resultWho, int requestCode,
5090              int startFlags, ProfilerInfo profilerInfo, Bundle bOptions) {
5091          return startActivityAsUser(caller, callingPackage, intent, resolvedType, resultTo,
5092                  resultWho, requestCode, startFlags, profilerInfo, bOptions,
5093                  UserHandle.getCallingUserId());
我们接着看下startActivityAsUser方法。
public final int startActivityAsUser(IApplicationThread caller, String callingPackage,
5106              Intent intent, String resolvedType, IBinder resultTo, String resultWho, int requestCode,
5107              int startFlags, ProfilerInfo profilerInfo, Bundle bOptions, int userId,
5108              boolean validateIncomingUser) {
5109          enforceNotIsolatedCaller("startActivity");
5110
5111          userId = mActivityStartController.checkTargetUser(userId, validateIncomingUser,
5112                  Binder.getCallingPid(), Binder.getCallingUid(), "startActivityAsUser");
5113
5114          // TODO: Switch to user app stacks here.
5115          return mActivityStartController.obtainStarter(intent, "startActivityAsUser")
5116                  .setCaller(caller)
5117                  .setCallingPackage(callingPackage)
5118                  .setResolvedType(resolvedType)
5119                  .setResultTo(resultTo)
5120                  .setResultWho(resultWho)
5121                  .setRequestCode(requestCode)
5122                  .setStartFlags(startFlags)
5123                  .setProfilerInfo(profilerInfo)
5124                  .setActivityOptions(bOptions)
5125                  .setMayWait(userId)
5126                  .execute();
5127
5128      }
5129
这里最终调用的是 mActivityStartController.obtainStarter(intent, “startActivityAsUser”),我们继续跟踪mActivityStartController是ActivityStartController的对象,我们看下ActivityStartController类的obtainStarter()方法。
     ActivityStarter obtainStarter(Intent intent, String reason) {
138          return mFactory.obtain().setIntent(intent).setReason(reason);
139      }
我们继续追踪代码,查看ActivityStarter的execute();执行的方法在这里
 int execute() {
486          try {
487              // TODO(b/64750076): Look into passing request directly to these methods to allow
488              // for transactional diffs and preprocessing.
489              if (mRequest.mayWait) {
490                  return startActivityMayWait(mRequest.caller, mRequest.callingUid,
491                          mRequest.callingPackage, mRequest.intent, mRequest.resolvedType,
492                          mRequest.voiceSession, mRequest.voiceInteractor, mRequest.resultTo,
493                          mRequest.resultWho, mRequest.requestCode, mRequest.startFlags,
494                          mRequest.profilerInfo, mRequest.waitResult, mRequest.globalConfig,
495                          mRequest.activityOptions, mRequest.ignoreTargetSecurity, mRequest.userId,
496                          mRequest.inTask, mRequest.reason,
497                          mRequest.allowPendingRemoteAnimationRegistryLookup,
498                          mRequest.originatingPendingIntent);
499              } else {
500                  return startActivity(mRequest.caller, mRequest.intent, mRequest.ephemeralIntent,
501                          mRequest.resolvedType, mRequest.activityInfo, mRequest.resolveInfo,
502                          mRequest.voiceSession, mRequest.voiceInteractor, mRequest.resultTo,
503                          mRequest.resultWho, mRequest.requestCode, mRequest.callingPid,
504                          mRequest.callingUid, mRequest.callingPackage, mRequest.realCallingPid,
505                          mRequest.realCallingUid, mRequest.startFlags, mRequest.activityOptions,
506                          mRequest.ignoreTargetSecurity, mRequest.componentSpecified,
507                          mRequest.outActivity, mRequest.inTask, mRequest.reason,
508                          mRequest.allowPendingRemoteAnimationRegistryLookup,
509                          mRequest.originatingPendingIntent);
510              }
511          } finally {
512              onExecutionComplete();
513          }
514      }
mRequest.mayWait为true,所以会执行startActivityMayWait()方法。
我们看下startActivityMayWait()方法
                private int startActivityMayWait(IApplicationThread caller, int callingUid,
1002              String callingPackage, Intent intent, String resolvedType,
1003              IVoiceInteractionSession voiceSession, IVoiceInteractor voiceInteractor,
1004              IBinder resultTo, String resultWho, int requestCode, int startFlags,
1005              ProfilerInfo profilerInfo, WaitResult outResult,
1006              Configuration globalConfig, SafeActivityOptions options, boolean ignoreTargetSecurity,
1007              int userId, TaskRecord inTask, String reason,
1008              boolean allowPendingRemoteAnimationRegistryLookup,
1009              PendingIntentRecord originatingPendingIntent) {}
这个方法的方法体里有这样的代码
 final ActivityRecord[] outRecord = new ActivityRecord[1];
1156              int res = startActivity(caller, intent, ephemeralIntent, resolvedType, aInfo, rInfo,
1157                      voiceSession, voiceInteractor, resultTo, resultWho, requestCode, callingPid,
1158                      callingUid, callingPackage, realCallingPid, realCallingUid, startFlags, options,
1159                      ignoreTargetSecurity, componentSpecified, outRecord, inTask, reason,
1160                      allowPendingRemoteAnimationRegistryLookup, originatingPendingIntent);
我们进入startActivity()代码,发现它会调用到 result = startActivityUnchecked(r, sourceRecord, voiceSession, voiceInteractor,
startFlags, doResume, options, inTask, outActivity);
我们在看下startActivityUnchecked();会执行这个方法 mSupervisor.resumeFocusedStackTopActivityLocked();然后我们看下这个方法
额,追踪到这里追踪不下去了,这里暂时不写了。抱歉……
第五布局的加载
我们让当前activity继承Activity,点击setContentView();会进入Activity类,查看源码
 public void setContentView(@LayoutRes int layoutResID) {
2772          getWindow().setContentView(layoutResID);
2773          initWindowDecorActionBar();
2774      }
getWindow()拿到的是一个Window对象,我们看下它的源码
 public Window getWindow() {
939          return mWindow;
940      }
Window对象是再attach中创建的,我们看下源码
final void attach(Context context, ActivityThread aThread,
 ……
7063
7064          mWindow = new PhoneWindow(this, window, activityConfigCallback);
7065          mWindow.setWindowControllerCallback(this);
7066          mWindow.setCallback(this);
7067          mWindow.setOnWindowDismissedCallback(this);
7068          mWindow.getLayoutInflater().setPrivateFactory(this);
……
}
我们在看下PhoneWindow对象的setContentVIew();
  @Override
405      public void setContentView(int layoutResID) {
406          // Note: FEATURE_CONTENT_TRANSITIONS may be set in the process of installing the window
407          // decor, when theme attributes and the like are crystalized. Do not check the feature
408          // before this happens.
409          if (mContentParent == null) {
410              installDecor();
411          } else if (!hasFeature(FEATURE_CONTENT_TRANSITIONS)) {
412              mContentParent.removeAllViews();
413          }
414
415          if (hasFeature(FEATURE_CONTENT_TRANSITIONS)) {
416              final Scene newScene = Scene.getSceneForLayout(mContentParent, layoutResID,
417                      getContext());
418              transitionTo(newScene);
419          } else {
420              mLayoutInflater.inflate(layoutResID, mContentParent);
421          }
422          mContentParent.requestApplyInsets();
423          final Callback cb = getCallback();
424          if (cb != null && !isDestroyed()) {
425              cb.onContentChanged();
426          }
427          mContentParentExplicitlySet = true;
428      }
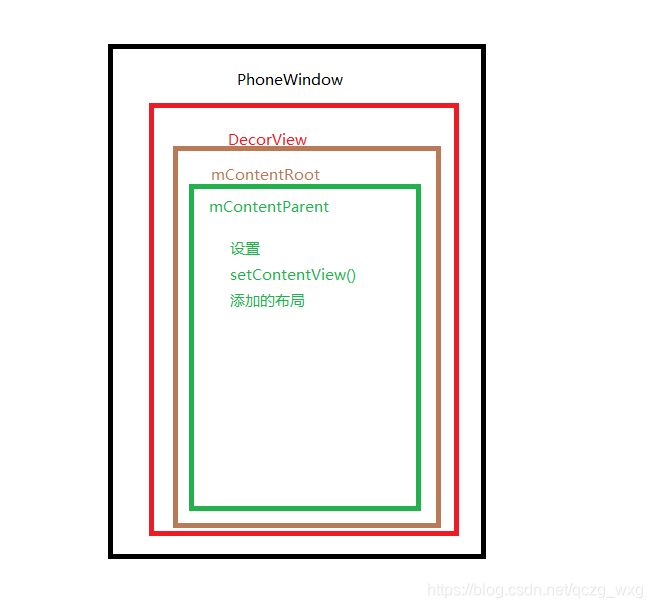
我们这里讲解下mContentParent ,首先一个界面是分为好多层的,我这里有一张图
if (mContentParent == null) {
installDecor();
}
这句代码就是创建DecorView,该方法依旧在PhoneWindow中,我们看下installDecor()方法的方法体中的两行代码。
mDecor = generateDecor(-1);这句代码是创建DecorView;
mContentParent = generateLayout(mDecor);这句代码是创建ContentParent ;
我们看下DecorView的创建
  protected DecorView generateDecor(int featureId) {
2293          // System process doesn't have application context and in that case we need to directly use
2294          // the context we have. Otherwise we want the application context, so we don't cling to the
2295          // activity.
2296          Context context;
2297          if (mUseDecorContext) {
2298              Context applicationContext = getContext().getApplicationContext();
2299              if (applicationContext == null) {
2300                  context = getContext();
2301              } else {
2302                  context = new DecorContext(applicationContext, getContext());
2303                  if (mTheme != -1) {
2304                      context.setTheme(mTheme);
2305                  }
2306              }
2307          } else {
2308              context = getContext();
2309          }
2310          return new DecorView(context, featureId, this, getAttributes());
2311      }
代码很简单,获取上下文后直接new DecorView();通过以上代码我们可以发现一个Activity对应一个Window,还对应一个DecorView。一个应用会有多个界面,每一个界面都对应一个Activity,每一个Activity对象都会有自己对应的window对象和DecorView对象。
我们现在看下,如何创建mContentParent,mContentParent是一个ViewGroup。我们看下PhoneWindow中如何获取mContentParent的代码。
 private void installDecor() {
2660          mForceDecorInstall = false;
2661          if (mDecor == null) {
2662              mDecor = generateDecor(-1);
2663              mDecor.setDescendantFocusability(ViewGroup.FOCUS_AFTER_DESCENDANTS);
2664              mDecor.setIsRootNamespace(true);
2665              if (!mInvalidatePanelMenuPosted && mInvalidatePanelMenuFeatures != 0) {
2666                  mDecor.postOnAnimation(mInvalidatePanelMenuRunnable);
2667              }
2668          } else {
2669              mDecor.setWindow(this);//若果已经有了,直接设置,不需要在创建
2670          }
2671          if (mContentParent == null) {
2672              mContentParent = generateLayout(mDecor);
mContentParent = generateLayout(mDecor);这段代码就是创建mContentParent,我们进入PhoneWindow这个类的方法。这个方法很长,就不全贴出来了。
ViewGroup contentParent = (ViewGroup)findViewById(ID_ANDROID_CONTENT);在这里设置布局。然后return这个contentParent。
现在PhoneWindow类的setContentView方法中的installDecor();就分析完了,我们继续往下走。会执行到这个方法
mLayoutInflater.inflate(layoutResID, mContentParent);使用布局加载器把layoutResID添加到mContentParent中。
最后来张图总结下
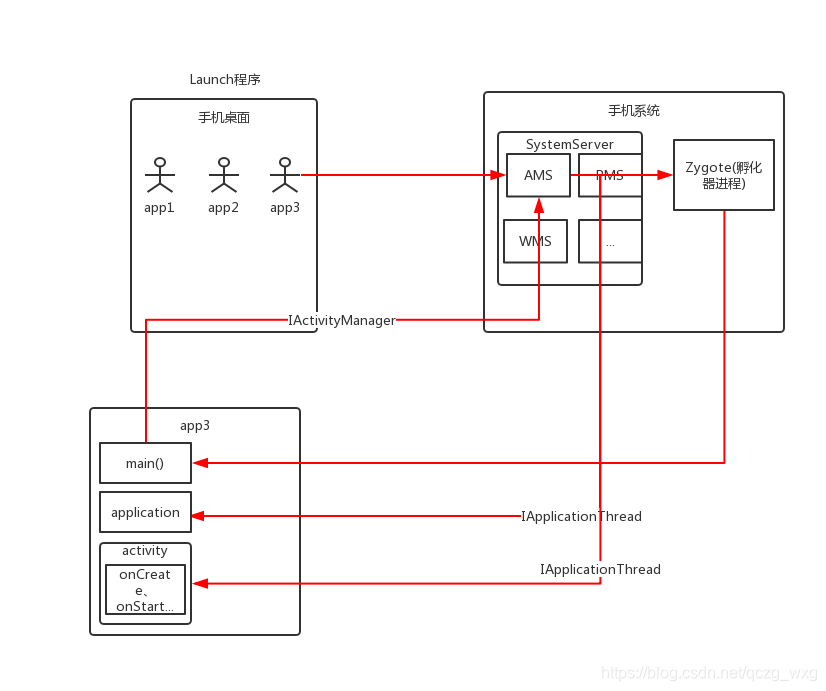
首先是一个手机桌面,是一个一个的应用app,点击打开app应用,就启动了一个Launch程序,Launch程序是系统里面的一个app(该app主要是用来显示已安装的其它app的界面,也是其它App启动的一个入口),现在我们打开app3(打开的app3是在launch里面,不是在app3里面),当用户点击app3的时候,就会发送一条消息到SystemSever里面的SMS,它们中间是通过binder机制来传送消息的。然后再由AMS向孵化器发送一条消息,开启一个新的进程,这个新的进程就是我们的app3。孵化器会调用到app3进程的main方法。应用进程会使用IActivityManager发送一条消息到AMS,AMS会拿到我们当前进程的一个PID,UID等信息,然后通过IApplicationThread发送一条消息给app3,创建Application,并创建Application的生命周期,Activity的创建依旧如此。
