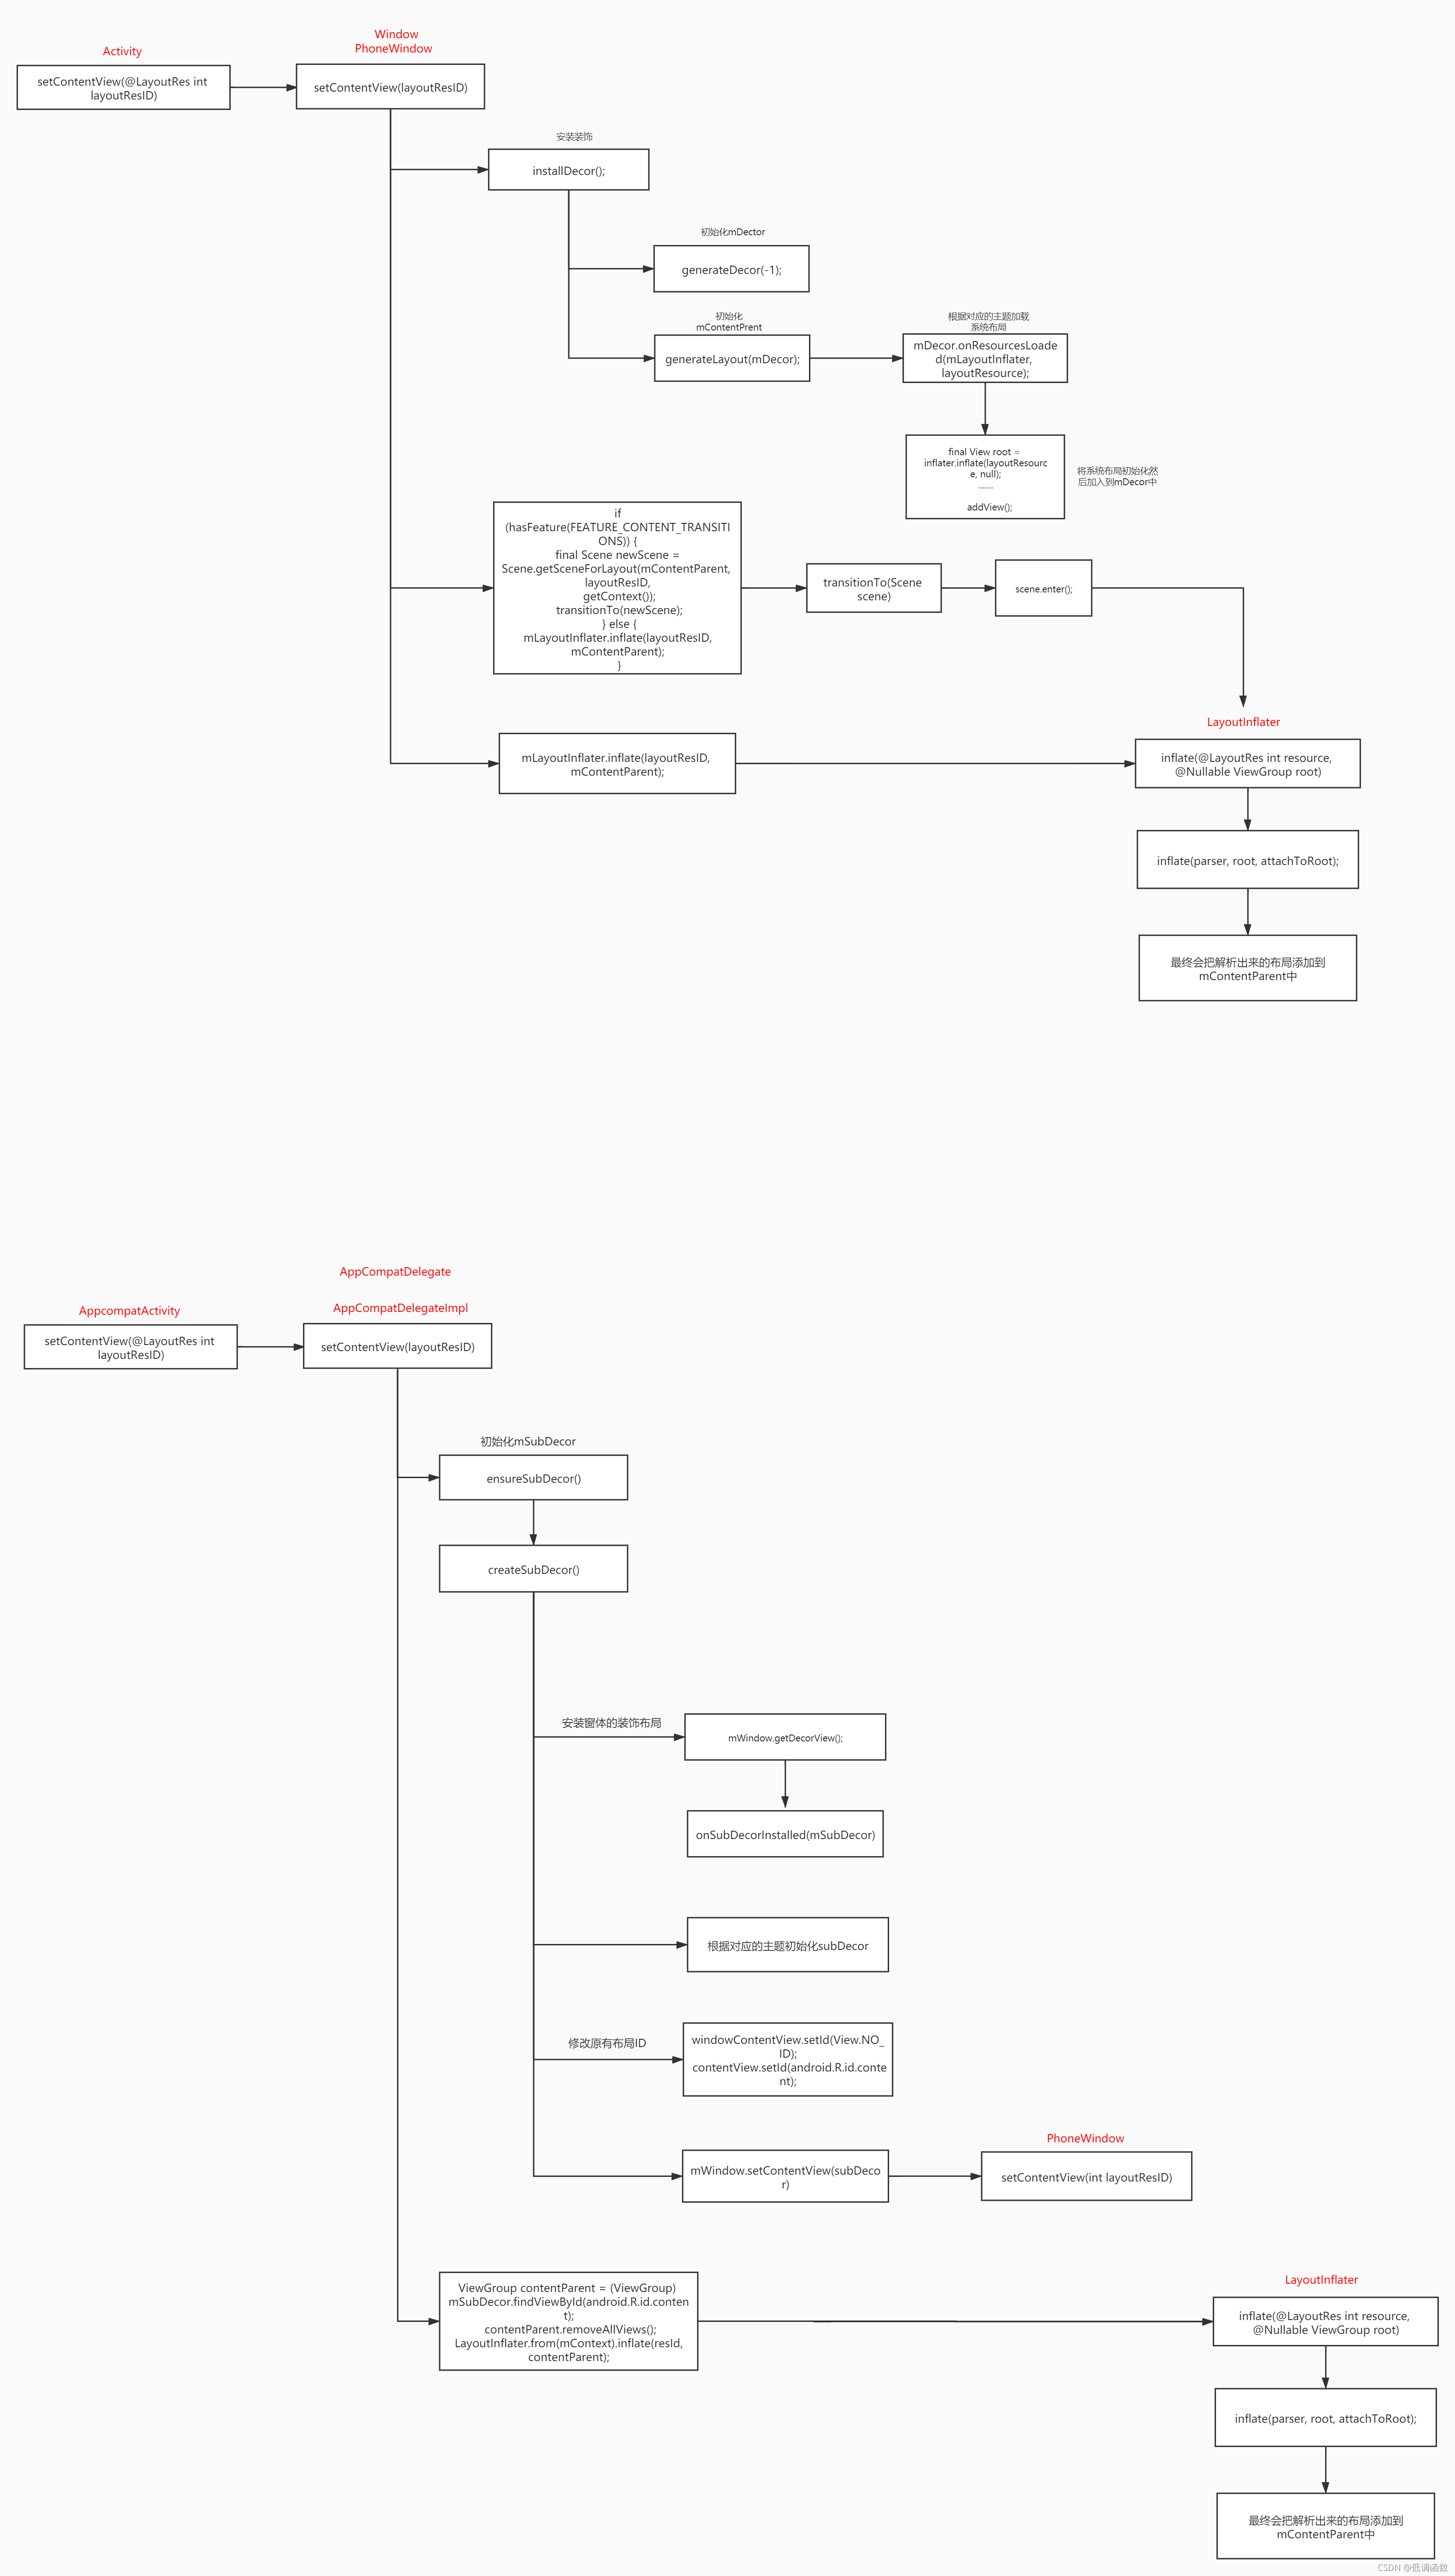
一 setContentView( )源码解析
我们都知道,在Activity的onCreate()方法里,通常会调用setContentView()这个方法,这个方法其实就是UI绘制的入口,我们来看一下这个方法的源码。
Activity.setContentView()
   public void setContentView(@LayoutRes int layoutResID) {


   		//getWindow返回的其实就是Window,它是一个抽象类,唯一实现它的是PhoneWindow
        getWindow().setContentView(layoutResID);
        initWindowDecorActionBar();
    }
PhoneWindow.setContentView( )
PhoneWindow有两个十分重要的变量
mDecor :这个就是我们都知道的DecorView,它是我们顶层视图
mContentParent:这个就是DecorView里的内容,也可以说是Decorview里的子集view
   @Override
    public void setContentView(int layoutResID) {


			//创建Decorview,初始化mContentParent
           installDecor();
           //加载我们自己的布局到mContentParent
            mLayoutInflater.inflate(layoutResID, mContentParent);

    }
installDecor()
      private void installDecor() {


      	  //创建DecorView的实例
         mDecor = generateDecor(-1);
         //初始化mContentParent ,这里主要确认窗体的样式和主题,然后根据主题去加载不同的布局xml
		 mContentParent = generateLayout(mDecor);
}
generateDecor()这个方法我们不用看了,就是new了一个DecorView,我们重点来看一下generateLayout( ) 这个方法
protected ViewGroup generateLayout(DecorView decor) {
//获取窗口的样式,然后根据样式属性,来判断是否有title,actionbar或者是否是全屏等,这些不重要,我们省略掉
TypedArray a = getWindowStyle();
......
// Inflate the window decor.
//然后到这里,根据前面的主题样式,选中合适的xml布局填充
int layoutResource; //布局xml的资源ID
int features = getLocalFeatures();
......
//这里选择来看一下就简单常规的screen_simpl.xml
else {
layoutResource = R.layout.screen_simple;
}
//将layoutResource和布局填充器传入onResourcesLoaded中,很显然,将布局填充进Decorview中去
mDecor.onResourcesLoaded(mLayoutInflater, layoutResource){
final View root = inflater.inflate(layoutResource, null);
if (mDecorCaptionView != null) {
if (mDecorCaptionView.getParent() == null) {
addView(mDecorCaptionView,
new ViewGroup.LayoutParams(MATCH_PARENT, MATCH_PARENT));
}
mDecorCaptionView.addView(root,
new ViewGroup.MarginLayoutParams(MATCH_PARENT, MATCH_PARENT));
} else {
// Put it below the color views.
//将
addView(root, 0, new ViewGroup.LayoutParams(MATCH_PARENT, MATCH_PARENT));
}
};
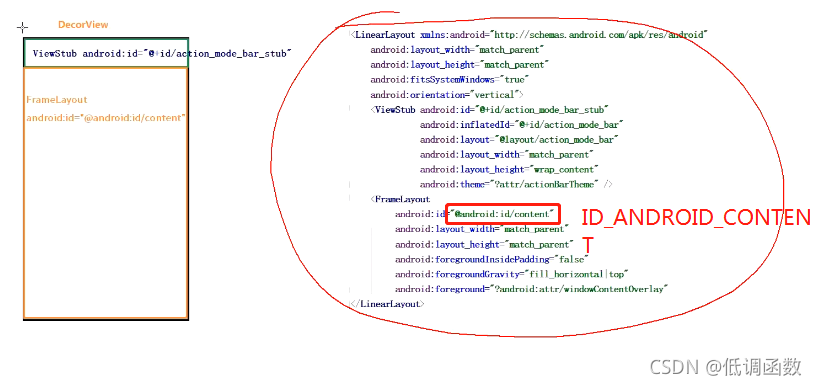
// 然后给contentParent初始化后,返回赋值,这个ID_ANDROID_CONTENT其实就是simple_content.xml里的一个子view,具体可以看下下面那张图
ViewGroup contentParent = (ViewGroup)findViewById(ID_ANDROID_CONTENT);
return contentParent;
}
Ok,现在我们就创建了DecorView已经初始化了这个布局,接下来就是加载我们自己的布局了,也就是setContentView()传入的资源ID里的布局。我们再回到setContentView()方法中的第二个调用
mLayoutInflater.inflate(layoutResID, mContentParent);
  public View inflate(@LayoutRes int resource, @Nullable ViewGroup root) {


        return inflate(resource, root, root != null);
    }


 public View inflate(@LayoutRes int resource, @Nullable ViewGroup root, boolean attachToRoot) {


        final Resources res = getContext().getResources();
        if (DEBUG) {


            Log.d(TAG, "INFLATING from resource: \"" + res.getResourceName(resource) + "\" ("
                    + Integer.toHexString(resource) + ")");
        }
		//解析xml
        final XmlResourceParser parser = res.getLayout(resource);
        try {


            return inflate(parser, root, attachToRoot);
        } finally {


            parser.close();
        }
    }


public View inflate(XmlPullParser parser, @Nullable ViewGroup root, boolean attachToRoot) {


 //最终把解析到的布局添加到mContentParent中去
 root.addView(temp, params);
}
二 具有兼容性的AppCompatActivity的setContentView
现在的android版本我们创建的是AppCompatActivity,并不是Activtiy,其实它们本质上都是一样的,只是AppCompatActivity解决了一些兼容性的问题,mContentParent对应的布局有所变化,但是对应的资源ID因为在源码中进行了替换,所以资源ID还是R.id.content,这里简单的看一下源码:
AppCompatActivity.setContentView( )
   @Override
    public void setContentView(@LayoutRes int layoutResID) {


    	//调用了AppCompatDelegateImpl的setContentView()
        getDelegate().setContentView(layoutResID);
    }
*AppCompatDelegateImpl.setContentView()
@Override
public void setContentView(View v, ViewGroup.LayoutParams lp) {


	//我们重点来看这个方法,里面实例化了Decorview(mSuDecor),同时上面说的ID的替换也在这里
    ensureSubDecor();
    ViewGroup contentParent = (ViewGroup)   mSubDecor.findViewById(android.R.id.content);
    contentParent.removeAllViews();
    contentParent.addView(v, lp);
    mOriginalWindowCallback.onContentChanged();
}
AppCompatDelegateImpl.ensureSubDecor()
    private void ensureSubDecor() {


     mSubDecor = createSubDecor();
}
AppCompatDelegateImpl.createSubDecor()
//这个方法也是根据主题和样式加载不同的布局给mSubDecor最终返回,不过因为做了兼容性,所以此时的contentParent对应的ID并不是R.id.content,所以做了替换
    private ViewGroup createSubDecor() {


    //找到decorView对应的contentparent布局
 final ContentFrameLayout contentView = (ContentFrameLayout) subDecor.findViewById(
                R.id.action_bar_activity_content);
    //这里找到原先R.id.content对应的布局
      final ViewGroup windowContentView = (ViewGroup) mWindow.findViewById(android.R.id.content);
        if (windowContentView != null) {


            while (windowContentView.getChildCount() > 0) {


                final View child = windowContentView.getChildAt(0);
                windowContentView.removeViewAt(0);
                contentView.addView(child);
            }
			//将原来R.id.content对应的布局的ID设置为-1
            windowContentView.setId(View.NO_ID);
            //此时R.id.content对应的布局是空的,正好把这个ID设置给
            //contentParent,之后我们就可以通过R.id.content找到contentView,我们可以去试验一下,
            //打印一下这个contentview是什么,肯定是R.id.action_bar_activity_content对应的布局
            contentView.setId(android.R.id.content);
}
三 流程图
ok,此时Decorview算是正式把我们的布局添加到里面去了,但是只是添加,并没有进行我们熟悉的测量,布局,绘制这三个步骤,下一篇我们重点来讲一下UI绘制最重要的这三个步骤。下图为上面的流程图: