我们平时打开一个activity的时候,设置我们的视图都是在onCreate的setContentView方法开始,那我们就从这个方法开始看源码。
这里我们继承的是AppCompatActivity
 public void setContentView(@LayoutRes int layoutResID) {
        this.getDelegate().setContentView(layoutResID);
    }
 public void setContentView(View view) {
        this.getDelegate().setContentView(view);
    }

 public void setContentView(View view, LayoutParams params) {
        this.getDelegate().setContentView(view, params);
    }
这里有三个重载的方法,原理都一样,我们平时最常用的就是放入一个xml文件了,所以从第一个往下看。调用了getDelegate()的setContentView方法
   public AppCompatDelegate getDelegate() {
        if (this.mDelegate == null) {
            this.mDelegate = AppCompatDelegate.create(this, this);
        }
        return this.mDelegate;
    }
   public static AppCompatDelegate create(Activity activity, AppCompatCallback callback) {
        return new AppCompatDelegateImpl(activity, activity.getWindow(), callback);
    }
可以看到getDelegate最后返回了AppCompatDelegateImpl实例传入了activity window和callback,所以也就是调用了它的setContentView方法。
  public void setContentView(int resId) {
        //确保mSubDecor已经创建
        this.ensureSubDecor();
        //找到contentParent
        ViewGroup contentParent = (ViewGroup)this.mSubDecor.findViewById(android.R.id.content);
        contentParent.removeAllViews();
        //把我们的view放入contentParent中
        LayoutInflater.from(this.mContext).inflate(resId, contentParent);
        this.mOriginalWindowCallback.onContentChanged();
    }
首先调用了ensureSubDecor()方法,从名字来看感觉是确保某个view已经创建。然后从mSubDecor这个ViewGroup中通过id找到contentParent,可以猜测这个mSubDecor应该就是从前面的方法中创建的。然后把我们的view放进去。先看ensureSubDecor()方法。
   private void ensureSubDecor() {
        if (!this.mSubDecorInstalled) {
        //果然是从这里创建的
            this.mSubDecor = this.createSubDecor();
            CharSequence title = this.getTitle();
            if (!TextUtils.isEmpty(title)) {
                if (this.mDecorContentParent != null) {
                    this.mDecorContentParent.setWindowTitle(title);
                } else if (this.peekSupportActionBar() != null) {
                    this.peekSupportActionBar().setWindowTitle(title);
                } else if (this.mTitleView != null) {
                    this.mTitleView.setText(title);
                }
            }

            this.applyFixedSizeWindow();
            //回调此view
            this.onSubDecorInstalled(this.mSubDecor);
            //标记已经创建完
            this.mSubDecorInstalled = true;
            AppCompatDelegateImpl.PanelFeatureState st = this.getPanelState(0, false);
            if (!this.mIsDestroyed && (st == null || st.menu == null)) {
                this.invalidatePanelMenu(108);
            }
        }

    }
上面这段代码主要就是调用了createSubDecor()方法创建了mSubDecor这个ViewGroup,并回调和标记已创建。所以createSubDecor()是个关键方法
private ViewGroup createSubDecor() {
        //获取属性
        TypedArray a = this.mContext.obtainStyledAttributes(styleable.AppCompatTheme);
        if (!a.hasValue(styleable.AppCompatTheme_windowActionBar)) {
            a.recycle();
            //如果不设置AppCompat相关的主题就报错
            throw new IllegalStateException("You need to use a Theme.AppCompat theme (or descendant) with this activity.");
        } else {
            //根据拿到的主题属性来设置相应的主题风格
            if (a.getBoolean(styleable.AppCompatTheme_windowNoTitle, false)) {
                this.requestWindowFeature(Window.FEATURE_NO_TITLE);
            } else if (a.getBoolean(styleable.AppCompatTheme_windowActionBar, false)) {
                this.requestWindowFeature(FEATURE_SUPPORT_ACTION_BAR);
            }

            if (a.getBoolean(styleable.AppCompatTheme_windowActionBarOverlay, false)) {
                this.requestWindowFeature(FEATURE_SUPPORT_ACTION_BAR_OVERLAY);
            }

            if (a.getBoolean(styleable.AppCompatTheme_windowActionModeOverlay, false)) {
                this.requestWindowFeature(FEATURE_ACTION_MODE_OVERLAY);
            }

            this.mIsFloating = a.getBoolean(styleable.AppCompatTheme_android_windowIsFloating, false);
            a.recycle();
            //获取DecorView
            this.mWindow.getDecorView();
            LayoutInflater inflater = LayoutInflater.from(this.mContext);
            //
            ViewGroup subDecor = null;
            //根据前面设置的不同的主题风格性创建出subDecor,比如FEATURE_NO_TITLE,FEATURE_SUPPORT_ACTION_BAR_OVERLAY
            if (!this.mWindowNoTitle) {
                if (this.mIsFloating) {
                    subDecor = (ViewGroup)inflater.inflate(layout.abc_dialog_title_material, (ViewGroup)null);
                    this.mHasActionBar = this.mOverlayActionBar = false;
                } else if (this.mHasActionBar) {
                    TypedValue outValue = new TypedValue();
                    this.mContext.getTheme().resolveAttribute(attr.actionBarTheme, outValue, true);
                    Object themedContext;
                    if (outValue.resourceId != 0) {
                        themedContext = new ContextThemeWrapper(this.mContext, outValue.resourceId);
                    } else {
                        themedContext = this.mContext;
                    }

                    subDecor = (ViewGroup)LayoutInflater.from((Context)themedContext).inflate(layout.abc_screen_toolbar, (ViewGroup)null);
                    this.mDecorContentParent = (DecorContentParent)subDecor.findViewById(id.decor_content_parent);
                    this.mDecorContentParent.setWindowCallback(this.getWindowCallback());
                    if (this.mOverlayActionBar) {
                        this.mDecorContentParent.initFeature(109);
                    }

                    if (this.mFeatureProgress) {
                        this.mDecorContentParent.initFeature(2);
                    }

                    if (this.mFeatureIndeterminateProgress) {
                        this.mDecorContentParent.initFeature(5);
                    }
                }
            } else {
                if (this.mOverlayActionMode) {
                    subDecor = (ViewGroup)inflater.inflate(layout.abc_screen_simple_overlay_action_mode, (ViewGroup)null);
                } else {
                    subDecor = (ViewGroup)inflater.inflate(layout.abc_screen_simple, (ViewGroup)null);
                }

                if (VERSION.SDK_INT >= 21) {
                    ViewCompat.setOnApplyWindowInsetsListener(subDecor, new OnApplyWindowInsetsListener() {
                        public WindowInsetsCompat onApplyWindowInsets(View v, WindowInsetsCompat insets) {
                            int top = insets.getSystemWindowInsetTop();
                            int newTop = AppCompatDelegateImpl.this.updateStatusGuard(top);
                            if (top != newTop) {
                                insets = insets.replaceSystemWindowInsets(insets.getSystemWindowInsetLeft(), newTop, insets.getSystemWindowInsetRight(), insets.getSystemWindowInsetBottom());
                            }

                            return ViewCompat.onApplyWindowInsets(v, insets);
                        }
                    });
                } else {
                    ((FitWindowsViewGroup)subDecor).setOnFitSystemWindowsListener(new OnFitSystemWindowsListener() {
                        public void onFitSystemWindows(Rect insets) {
                            insets.top = AppCompatDelegateImpl.this.updateStatusGuard(insets.top);
                        }
                    });
                }
            }

            if (subDecor == null) {
                throw new IllegalArgumentException("AppCompat does not support the current theme features: { windowActionBar: " + this.mHasActionBar + ", windowActionBarOverlay: " + this.mOverlayActionBar + ", android:windowIsFloating: " + this.mIsFloating + ", windowActionModeOverlay: " + this.mOverlayActionMode + ", windowNoTitle: " + this.mWindowNoTitle + " }");
            } else {
                if (this.mDecorContentParent == null) {
                    this.mTitleView = (TextView)subDecor.findViewById(id.title);
                }
                //选择适合系统窗口的装饰
                ViewUtils.makeOptionalFitsSystemWindows(subDecor);
                //获取布局的父容器中的ContentFrameLayout
                ContentFrameLayout contentView = (ContentFrameLayout)subDecor.findViewById( R.id.action_bar_activity_content);
                //找到PhoneWindow中的ContentView 如果看activity中的setContentView方法我们知道android.R.id.content就是我们设置的view的父view
                ViewGroup windowContentView = (ViewGroup)this.mWindow.findViewById(android.R.id.content);
                if (windowContentView != null) {
                    while(windowContentView.getChildCount() > 0) {
                        View child = windowContentView.getChildAt(0);
                        windowContentView.removeViewAt(0);
                        contentView.addView(child);
                    }
                   //把PhoneWindow中的ContentView设置成没有id
                    windowContentView.setId(View.NO_ID);
                    //把从我们的主题xml中找到的contentView的id设置成android.R.id.content,其实就是以前的PhoneWindow中的ContentView中的id
                    contentView.setId(android.R.id.content);
                    if (windowContentView instanceof FrameLayout) {
                        ((FrameLayout)windowContentView).setForeground((Drawable)null);
                    }
                }
                //把subDecor设置给window,mWindow是个Window对象,它只有一个子类就是PhoneWindow
                this.mWindow.setContentView(subDecor);
                contentView.setAttachListener(new OnAttachListener() {
                    public void onAttachedFromWindow() {
                    }

                    public void onDetachedFromWindow() {
                        AppCompatDelegateImpl.this.dismissPopups();
                    }
                });
                return subDecor;
            }
        }
    }
通过上面的源码我们可以知道,通过不同的主题创建出不同的subDecor这个ViewGroup容器,然后把从PhoneWindow中通过android.R.id.content找出原来的contentview然后把它设置成没有id,然后把subDecor中通过R.id.action_bar_activity_content找到的这个view的id重新设置为android.R.id.content来个偷天换日,最后把这个subDecor设置回PhoneWindow中。
我们知道subDecor是通过inflate一个布局文件创建出来的,下面先来看看这个subDecor的布局文件长啥样,源码位置
/frameworks/support/v7/appcompat/res/layout/abc_screen_simple.xml
<androidx.appcompat.widget.FitWindowsLinearLayout
18    xmlns:android="http://schemas.android.com/apk/res/android"
19    android:id="@+id/action_bar_root"
20    android:layout_width="match_parent"
21    android:layout_height="match_parent"
22    android:orientation="vertical"
23    android:fitsSystemWindows="true">
24
25    <androidx.appcompat.widget.ViewStubCompat
26        android:id="@+id/action_mode_bar_stub"
27        android:inflatedId="@+id/action_mode_bar"
28        android:layout="@layout/abc_action_mode_bar"
29        android:layout_width="match_parent"
30        android:layout_height="wrap_content" />
31
32    <include layout="@layout/abc_screen_content_include" />
33
34</androidx.appcompat.widget.FitWindowsLinearLayout>
//abc_screen_content_include
<merge xmlns:android="http://schemas.android.com/apk/res/android">
18
19    <androidx.appcompat.widget.ContentFrameLayout
20            android:id="@id/action_bar_activity_content"
21            android:layout_width="match_parent"
22            android:layout_height="match_parent"
23            android:foregroundGravity="fill_horizontal|top"
24            android:foreground="?android:attr/windowContentOverlay" />
25
26</merge>
可以看到subDecor其实是个FitWindowsLinearLayout。
小插曲:requestWindowFeature,我们以前都用过这个方法, requestWindowFeature(Window.FEATURE_NO_TITLE);用的时候要求我们要放到setContentView()方法之前,为什么呢,前面的代码中我们看到了requestWindowFeature这个方法,跟进去之后,看到调用了this.throwFeatureRequestIfSubDecorInstalled();这个方法
  private void throwFeatureRequestIfSubDecorInstalled() {
        if (this.mSubDecorInstalled) {
            throw new AndroidRuntimeException("Window feature must be requested before adding content");
        }
    }
如果mSubDecorInstalled为true就报错,而mSubDecorInstalled这个标志位我们前面的ensureSubDecor()方法中就给他设置为true了。所以此方法要在setContentView()方法之前调用。
OK前面我们很多次提到了mWindow这个成员变量,最终subDecor也是被设置到mWindow中,前面createSubDecor()方法中有两个很重要的指令mWindow.getDecorView();和mWindow.setContentView(subDecor);
进入Window类,它是一个抽象类,看类上面的注释,可以知道它只有一个子类PhoneWindow,所以上面的两个方法都是在PhoneWindow中实现的。
   public final View getDecorView() {
        if (mDecor == null || mForceDecorInstall) {
            installDecor();
        }
        return mDecor;
    }
如果mDecor是空就创建一个,最后返回mDecor。
private void installDecor() {
      mForceDecorInstall = false;
        if (mDecor == null) {
            mDecor = generateDecor(-1);
            ...
        } else {
            mDecor.setWindow(this);
        }
      if (mContentParent == null) {
            mContentParent = generateLayout(mDecor);
          ...
      }
      ...
}
这个类很长,只看主要的,如果mDecor为null就调用generateDecor方法创建,否则就直接把当前window对象设置为mDecor,mDecor这个成员变量点过去可以看到是DecorView对象。mContentParent这个成员变量点过去可以看到它是一个ViewGroup,如果是null就创建,传入了mDecor。
  protected DecorView generateDecor(int featureId) {
        Context context;
        if (mUseDecorContext) {
            Context applicationContext = getContext().getApplicationContext();
            if (applicationContext == null) {
                context = getContext();
            } else {
                context = new DecorContext(applicationContext, getContext());
                if (mTheme != -1) {
                    context.setTheme(mTheme);
                }
            }
        } else {
            context = getContext();
        }
        return new DecorView(context, featureId, this, getAttributes());
    }
下面看一下DecorView
public class DecorView extends FrameLayout implements RootViewSurfaceTaker, WindowCallbacks {
    ...
}
可以看到它就是一个FrameLayout,然后在看一下 generateLayout(mDecor)
protected ViewGroup generateLayout(DecorView decor) {
    //获取属性数组
    TypedArray a = getWindowStyle();
    ...
    //是不是悬浮
    mIsFloating = a.getBoolean(R.styleable.Window_windowIsFloating, false);
    ...
    //设置一堆标志位,通过TypedArray获取各种属性
    ...
    //给窗口充气
    int layoutResource;
    int features = getLocalFeatures();
    //根据不同的标志位选择不同的布局文件
    //布局文件位置/frameworks/base/core/res/res/layout/
    ...
    //开始更新decor
    mDecor.startChanging();
    //加载 layoutResource 到 decor 中
    mDecor.onResourcesLoaded(mLayoutInflater, layoutResource);
    //ID_ANDROID_CONTENT就是R.id.content
    ViewGroup contentParent = (ViewGroup)findViewById(ID_ANDROID_CONTENT);

    ...
    //getContainer()返回的是一个Window对象,它是父activity中的window
        if (getContainer() == null) {
            final Drawable background;
            if (mBackgroundResource != 0) {
                background = getContext().getDrawable(mBackgroundResource);
            } else {
                background = mBackgroundDrawable;
            }
            mDecor.setWindowBackground(background);

            final Drawable frame;
            if (mFrameResource != 0) {
                frame = getContext().getDrawable(mFrameResource);
            } else {
                frame = null;
            }
            mDecor.setWindowFrame(frame);

            mDecor.setElevation(mElevation);
            mDecor.setClipToOutline(mClipToOutline);

            if (mTitle != null) {
                setTitle(mTitle);
            }

            if (mTitleColor == 0) {
                mTitleColor = mTextColor;
            }
            setTitleColor(mTitleColor);
        }
    //结束更新
    mDecor.finishChanging();

    return contentParent;
}
上面的代码中根据不同的风格加载不同的布局,这些布局中都有一个id为@android:id/content的控件,比如screen_simple.xml。布局源码位置在/frameworks/base/core/res/res/layout/。然后把加载出来的布局放到mDecor中。
OK到这里mWindow.getDecorView()我们就看完了,它就是创建一个DecorView,然后根据不同的风格加载不同的布局文件,把这些布局文件放到DecorView中。下面我们看一下mWindow.setContentView(subDecor)前面我们知道mWindow就是PhoneWindow所以调用了PhoneWindow中的setContentView方法
     public void setContentView(View view) {
        setContentView(view, new ViewGroup.LayoutParams(MATCH_PARENT, MATCH_PARENT));
    }
     public void setContentView(View view, ViewGroup.LayoutParams params) {
        //mContentParent在mWindow.getDecorView()已经创建了
        if (mContentParent == null) {
            installDecor();
        } else if (!hasFeature(FEATURE_CONTENT_TRANSITIONS)) {
            mContentParent.removeAllViews();
        }
        //是否有转场动画 transitions
        if (hasFeature(FEATURE_CONTENT_TRANSITIONS)) {
            view.setLayoutParams(params);
            final Scene newScene = new Scene(mContentParent, view);
            transitionTo(newScene);
        } else {
        //  把subDecor也就是前面的FitWindowsLinearLayout添加到mContentParent中
            mContentParent.addView(view, params);
        }
        mContentParent.requestApplyInsets();
        final Callback cb = getCallback();
        if (cb != null && !isDestroyed()) {
            cb.onContentChanged();
        }
        mContentParentExplicitlySet = true;
    }
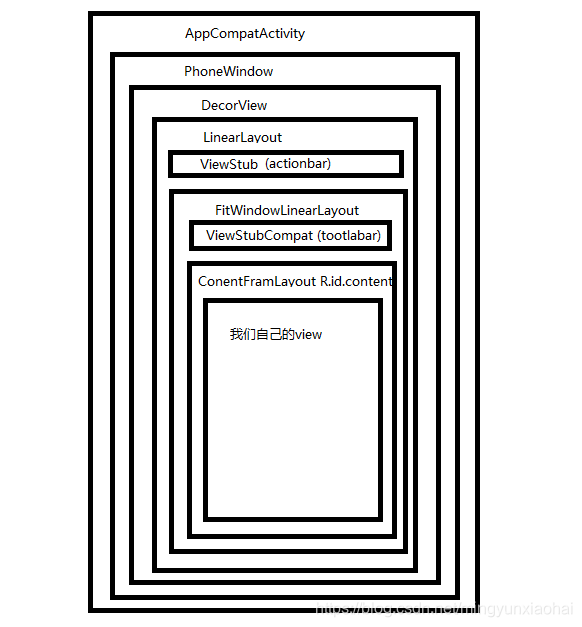
mWindow.getDecorView()创建了DecorView和mContentParent,上面的代码吧subDecor放入mContentParent中。最后回到AppCompatDelegateImpl中,找到R.id.content这个容器,把我们的view放到这个容器中。这时候我们可以知道整个activity的布局从外到内:AppCompatActivity->PhoneWindow->DecorView->LinearLayout->FitWindowLinearLayout->ViewStubCompat->ConentFramLayout->我们的view。
最后来一张奇丑无比的图片