singleton的,非lazy的bean,在IOC容器初始化的时候就被加载了,像基本的servlet有生命周期一样,spring的bean,也是有生命周期的。这也是spring的bean与java中的class不一样的地方,它远比class丰富。
今天,我们就介绍与spring的bean的lifeCycle有关的几个注解。
preparation:
我们有个Customer.java(package com.ocean.bean),
CustomerService.java(package com.ocean.service),
MainConfig(package com.ocean.config),
以及一个测试类SpringTest.java(package com.ocean.test)。
配置类很简单,主要提供了包的自动扫描:
package com.ocean.config;

import com.ocean.service.CustomerService;
import org.springframework.context.annotation.Bean;
import org.springframework.context.annotation.ComponentScan;
import org.springframework.context.annotation.Configuration;

@ComponentScan("com.ocean")
@Configuration
public class MainConfig {

//    @Bean(initMethod = "customInitBean",destroyMethod = "customDestroyBean")
//    public CustomerService customerService(){
//        return new CustomerService();
//    }

}
Customer这个bean给它注入个属性值“Jack”:
package com.ocean.bean;


import org.springframework.beans.factory.annotation.Value;

import org.springframework.stereotype.Component;

@Component
public class Customer{

    @Value("Jack")
    private String name;

    public String getName() {
        return name;
    }

    public void setName(String name) {
        this.name = name;
    }


}
然后是CustomerService类,我们主要考察这个类的生命周期。
我们在里面放入Customer并自动注入,因为我们需要观察属性注入的时机。
    @Autowired
    private Customer customer;

    public Customer getCustomer() {
        return customer;
    }

    public void setCustomer(Customer customer) {
        this.customer = customer;

    }

    public CustomerService() {
        System.out.println("CustomerService's empty constructor...");
    }
我们的预期是先调用构造方法,因为没有类的实例什么都做不了,所以构造器的日志一定会打印。但是,我们不知道属性是什么时候有值的。
我们接下来自定义初始化方法和销毁方法:
        public void customInitBean(){
        System.out.println("CustomerService's customInitBean...");
    }

    public void customDestroyBean(){
        System.out.println("CustomerService's customDestroyBean...");
    }
为了让这两个自定义方法生效,我们要用@Bean的方式为spring容器注册CustomerService:

 @Bean(initMethod = "customInitBean",destroyMethod = "customDestroyBean")
    public CustomerService customerService(){
        return new CustomerService();
    }
我的测试类:
package com.ocean.test;

import com.ocean.config.MainConfig;
import com.ocean.service.CustomerService;
import org.junit.Test;
import org.springframework.context.annotation.AnnotationConfigApplicationContext;
import org.springframework.context.support.AbstractApplicationContext;

public class SpringTest {

    @Test
    public void test01() {
        AbstractApplicationContext applicationContext
                = new AnnotationConfigApplicationContext(MainConfig.class);

        System.out.println("Context has been initialized..");

//        CustomerService customerService = applicationContext.getBean(CustomerService.class);

//        System.out.println("Already retrieved bean from context,next,show the bean data");
//
//
//        System.out.println(customerService.getCustomer().getName());
        applicationContext.close();
    }
}
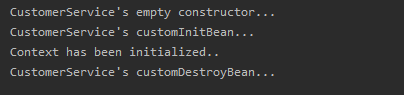
一切都很好。
现在我们就不再用自定义的初始化和销毁方法了,因为这样太麻烦了,而且spring和javax给了我们方便的接口和注解。
把配置类中通过@Bean方式注册bean的代码注掉。
把CustomerService中自定义的初始化和销毁方法删掉。
因为我们要观测属性注入的时机,我们要提供一个有参构造。
然后,我们使用
@Documented
@Retention (RUNTIME)
@Target(METHOD)
public @interface PostConstruct {
}
注解标注初始化方法,
用
@Documented
@Retention (RUNTIME)
@Target(METHOD)
public @interface PreDestroy {
}
标注销毁方法。
    @Autowired
    private Customer customer;

    public Customer getCustomer() {
        return customer;
    }

    public void setCustomer(Customer customer) {
        this.customer = customer;

    }

    public CustomerService(Customer customer) {
        this.customer = customer;
        System.out.println("CustomerService's constructor...");
        System.out.println("Property set:" + customer);
    }

    @PostConstruct
    public void postContruct(){
        System.out.println("postContruct() performs some initialization after all the setter methods have been called");
    }

    @PreDestroy
    public void predestroy(){
        System.out.println("predestroy() the method that's called back before bean is destroyed");
    }
来看一下此时的结果:

实例化–>属性注入–>初始化–>销毁,这就是我们的lifeCycle了。
另一种初始化和销毁的方式是通过两个接口:
public class CustomerService implements InitializingBean ,DisposableBean
我们实现里面的抽象方法:
 @Override
    public void afterPropertiesSet() throws Exception {
        System.out.println("CustomerService's afterPropertiesSet...");
    }

    @Override
    public void destroy() throws Exception {
        System.out.println("CustomerService's destroy");
    }
从名字就可以直观的看出,一个的作用时机是属性设置好之后,另一个的时机是销毁的时候。
我们再走一边测试:

这也是没有问题的。
在测试类中,当我们拿到了bean对象,我们也可以去取出里面的值:
 AbstractApplicationContext applicationContext
                = new AnnotationConfigApplicationContext(MainConfig.class);

        System.out.println("Context has been initialized..");

        CustomerService customerService = applicationContext.getBean(CustomerService.class);

        System.out.println("Already retrieved bean from context,next,show the bean data");

        System.out.println(customerService.getCustomer().getName());

        applicationContext.close();

与bean的生命周期息息相关的,还有一个在spring中常用的处理器,叫做BeanPostProcessor。
我们手动写一个后置处理器,spring会自动探测到。
package com.ocean.bean;

import com.ocean.service.CustomerService;
import org.springframework.beans.BeansException;
import org.springframework.beans.factory.config.BeanPostProcessor;
import org.springframework.stereotype.Component;

@Component
public class MyBeanPostProcessor implements BeanPostProcessor {
    @Override
    public Object postProcessBeforeInitialization(Object o, String s) throws BeansException {
        System.out.println("postProcessBeforeInitialization:" + s + "-->" + o);
        return o;
    }

    @Override
    public Object postProcessAfterInitialization(Object o, String s) throws BeansException {
        System.out.println("postProcessAfterInitialization:" + s + "-->" + o);
        return o;
    }
}
我们想知道postProcessBeforeInitialization,postProcessAfterInitialization这两个方法出现的时机。

spring自己的bean都探测到了我们自定义的后置处理器,这说明在bean的生命周期中,后置处理器是躲不开的一环。
我们看看我们自己写的bean:

后置处理器中两个方法的时机就是在初始化前后。
关于后置处理器,以后肯定还会深入,但我们先debug一下看看他们的存在吧。
在加载spring自己bean的时候,我们有看到大量的后置处理器:

有一个是我们写的。
其他的,各有用途,比如解析@Resource注解的,就是CommonAnnotationBeanPostProcessor,
解析@Autowired注解的,就是AutowiredAnnotationBeanPostProcessor。
再看一下后置处理器中两个方法出现的时机:

在利用反射invoke初始化方法的前后,分别调用了
postProcessBeforeInitialization,postProcessAfterInitialization。
