Spring容器中bean的生命周期
1、Spring生命周期
-
所谓生命周期就是一个对象从初始化到销毁的过程,在Spring容器中bean的生命周期可以总结为:
- 初始化(实例化);
- 属性注入(我们平时new对象还不是一样要set属性);
- 如果bean实现BeanNameAuthorware接口,则执行setBeanName的方法(作用是给bean设置一个独有的id方面我们获取实例并使用);
- 如果bean实现了BeanFactoryAware接口,spring将会调用setBeanFactory()方法将BeanFactory容器传入;
- 如果bean实现了ApplicationContextAware接口,spring将调用setApplication()方法,将bean所在的应用上下文的引用传入进来;
- 如果bean实现了BeanPostProcessor接口,Spring将调用所有bean的postProcessBeforeInitialization()方法;
- 如果bean实现了InitializingBean接口,spring将调用它们的afterPropertiesSet()方法,类似的,如果bean使用init-method声明了初始化方法,该方法也会调用,或者使用注解@PostConstruct都一样的效果。
- 跟第6条对应,同样的接口 ,调用所有bean的postProcessAfterInitialization()方法
- 调用@PreDestroy标注的方法;
- 如果bean实现接DisposableBean接口,会调用它的destroy()方法
-
图解
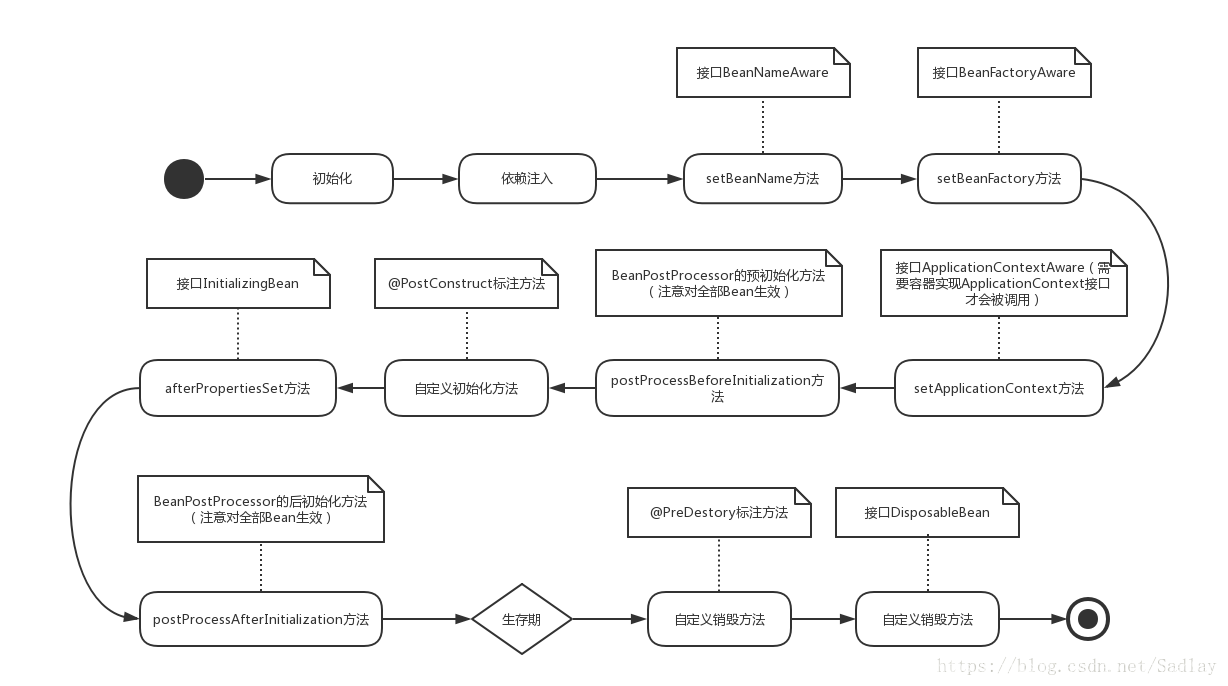
在这里安利一本书:spring实战第四版,这个图就跟书上的一模一样,看完了个人感觉对于spring的理解非常到位(个人感觉前面的几章写得非常好)
2、演示bean生命周期
- 搭建一个springboot项目(spring或者springboot都可以演示,主要是用了springboot就不会再想玩spring了)
- 写三个类:
- TestBean:
package com.example.demo.bean;

import org.springframework.beans.BeansException;
import org.springframework.beans.factory.*;
import org.springframework.context.ApplicationContext;
import org.springframework.context.ApplicationContextAware;
import javax.annotation.PreDestroy;


public class TestBean implements BeanNameAware, BeanFactoryAware, ApplicationContextAware, InitializingBean, DisposableBean {


    @Override
    public void setBeanFactory(BeanFactory beanFactory) throws BeansException {


        System.out.println("执行了:setBeanFactory");
    }

    @Override
    public void setBeanName(String s) {


        System.out.println("执行了:setBeanName");
    }

    @Override
    public void destroy() throws Exception {


        System.out.println("执行了:destroy");
    }
    @PreDestroy
    public void annodestroy(){


        System.out.println("执行了:@PreDestroy标注的方法");
    }

    @Override
    public void afterPropertiesSet() throws Exception {


        System.out.println("执行了:afterPropertiesSet");
    }


    @Override
    public void setApplicationContext(ApplicationContext applicationContext) throws BeansException {


        System.out.println("执行了:setApplicationContext");
    }
}
太长了?其实大部分都不用看,只用看实现了什么接口,对照着图看就好了,实际自己写起来理解也很方便。
- TestPostProcessorBean:
package com.example.demo.bean;

import org.springframework.beans.BeansException;
import org.springframework.beans.factory.config.BeanPostProcessor;


public class TestPostProcessorBean implements BeanPostProcessor {


    @Override
    public Object postProcessBeforeInitialization(Object bean, String beanName) throws BeansException {


        System.out.println("执行了:postProcessBeforeInitialization");
        return null;
    }

    @Override
    public Object postProcessAfterInitialization(Object bean, String beanName) throws BeansException {


        System.out.println("执行了:postProcessAfterInitialization");
        return null;
    }
}
这里要注意,BeanPostProcessor接口的两个方法所有的bean都会执行的,这里为什么要单独拎出来,BeanPostProcessor类是为了让创建其他类的时候进行创建前后的一些操作,如果写在TestBean上实现的话一般是不会调用postProcessBeforeInitialization()和postProcessAfterInitialization()方法的。原因就是,在容器初始化定义的bean创建之前,容器会自己去查找所有的BeanPostProcessor进行创建自定义的类,由于是实现了BeanPostProcessor接口,因此这时候会进行BeanPostProcessor的创建和注册,源码中,在注册BeanPostProcessor会进行getBean操作,即创建自定义的bean。由于默认的是单例模式,因此后面再次进行获取就不会再次调用postProcessBeforeInitialization()和postProcessAfterInitialization()方法,因为已经放入了spring缓存,直接获取,不需要实例,因此没有调用。
- TestConfig:
package com.example.demo.config;

import com.example.demo.bean.TestBean;
import com.example.demo.bean.TestPostProcessorBean;
import org.springframework.context.annotation.Bean;
import org.springframework.context.annotation.Configuration;

@Configuration
public class TestConfig {


   @Bean("TestBean")
   public TestBean getTestBean(){


       return new TestBean();
   }

   @Bean("TestPostProcessorBean")
   public TestPostProcessorBean getPostProcessorBean(){


       return new TestPostProcessorBean();
   }
}
3、代码测试
package com.example.demo;

import com.example.demo.bean.TestBean;
import com.example.demo.config.TestConfig;
import org.springframework.context.annotation.AnnotationConfigApplicationContext;


public class TestMain {


    public static void main(String[] args) {


        AnnotationConfigApplicationContext ap=new AnnotationConfigApplicationContext(TestConfig.class);
        ap.getBean("TestBean", TestBean.class);
        ap.close();
    }
}
结果:
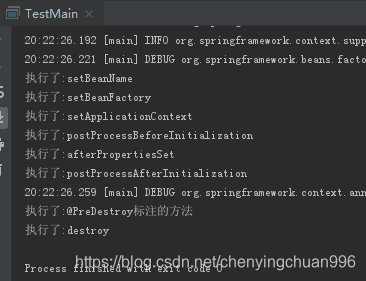
注意main方法要记得销毁上下文哦,不然destroy方法是走不到的