本人的python是3.5,由于3.0后用的是pymysql,就不能用tornado自带的torndb来进行简单的连接操作。
Application这个类是初始化一些全局变量,按照道理说里边的self.db 也应该能够被其他类或者派生类调用的,但是
db这个属性就是不行,无奈只好创建了一个全局的db句柄,然后在HouseHandler类中根据这个db初始化一个实例。
当然要在Aplication中传入这个字典参数:dict(db=db)
# -*- coding: utf-8 -*-
"""
Created on Wed Mar 21 16:49:24 2018


@author: ming
"""


# coding:utf-8
import os
import tornado.web
import tornado.ioloop
import tornado.httpserver
import tornado.options
from tornado.options import options, define
from tornado.web import RequestHandler
#import torndb
import pymysql
'''
python 2用torndb
'''


define("port", default=8000, type=int, help="run server on the given port.")
db =  pymysql.Connection(host='127.0.0.1', database='mysql', user='root', password='0000',charset='utf8')
class HouseHandler(RequestHandler):
    def initialize(self, db):
        self.db = db
        print(1)
    def get(self):
        #db = self.db
        cur=db.cursor()
        print(type(cur))
        try:
             cur.execute("insert into houses(title, position, price, score, comments) values(%s, %s, %s, %s, %s)", ('独立装修小别 墅', '紧邻文津街', 280, 4, 128) )
        except Exception as e:
            return self.write('cuo wu')
        db.commit()
        print("success")
        cur.close()
	    # db.close()

		  #self.write({"error":0,"errmsg":"db ok","data":[]})
#这个类把登录信息进行了绑定,保证连接的时候只实例化一次
class Application(tornado.web.Application):
    def _init_(self,*args,**kwargs):
        self.a =1;

        super(Application,self)._init_(*args,**kwargs)
        #img_files = files.get('img')
        '''try:
            self.db =  pymysql.Connection(host='127.0.0.1', database='mysql', user='root', password='0000')

        except Exception as e:
            #发生错误就不往下执行,而是向前端返回出错信息
    	      return self.write("haha")'''
        print("hahaaa")


settings = dict(
          template_path=os.path.join(os.path.dirname(__file__), "templates"),
          static_path=os.path.join(os.path.dirname(__file__), "statics"),
          debug=True,
          )
if __name__ == "__main__":
    tornado.options.parse_command_line()
    app = Application([
        #(r"/", IndexHandler),
        (r"/house", HouseHandler,dict(db=db)),
    ],**settings)
    http_server = tornado.httpserver.HTTPServer(app)
    http_server.listen(options.port)
    tornado.ioloop.IOLoop.current().start()
二:pymysql的简单操作
(1)网上有个模拟注入攻击的例子

在这个实例中不是创建一个全局的连接,而是在post方法中创建一个连接,这种做法不提倡。
一、搭建环境
1、服务端的tornado主程序app.py如下:
#!/usr/bin/env python3
# -*- coding: utf-8 -*-

import tornado.ioloop
import tornado.web
import pymysql

class LoginHandler(tornado.web.RequestHandler):
    def get(self):
        self.render('login.html')

    def post(self, *args, **kwargs):
        username = self.get_argument('username',None)
        pwd = self.get_argument('pwd', None)

        # 创建数据库连接
        conn = pymysql.connect(host='127.0.0.1', port=3306, user='root', passwd='123456', db='shop')
        cursor = conn.cursor()

        # %s 要加上'' 否则会出现KeyboardInterrupt的错误
        temp = "select name from userinfo where name='%s' and password='%s'" % (username, pwd)
        effect_row = cursor.execute(temp)
        result = cursor.fetchone()
        conn.commit()
        cursor.close()
        conn.close()

        if result:
            self.write('登录成功!')
        else:
            self.write('登录失败!')


settings = {
    'template_path':'template',
}


application = tornado.web.Application([
    (r"/login", LoginHandler),
],**settings)

if __name__ == "__main__":
    application.listen(8000)
    tornado.ioloop.IOLoop.instance().start()
2、在template文件夹下,放入login.html文件:
<!DOCTYPE html>
<html lang="en">
<head>
    <meta charset="UTF-8">
    <title>Title</title>
</head>
<body>
    <form method="post" action="/login">
        <input type="text" name="username" placeholder="用户名"/>
        <input type="text" name="pwd" placeholder="密码"/>
        <input type="submit" value="提交" />
    </form>
</body>
</html>
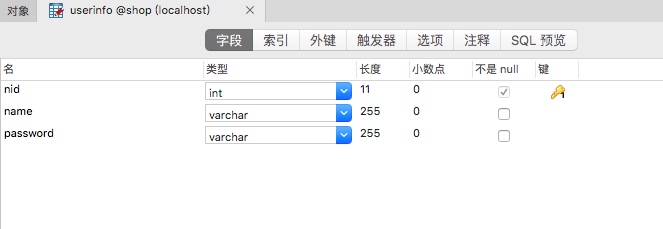
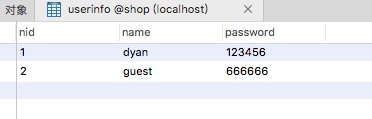
3、在shop数据库中建立userinfo数据表,并填入数据:

随便添加两条就好,明文就明文吧:

二、模拟登录
1、正常登录
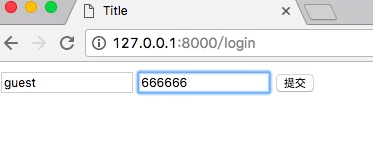 
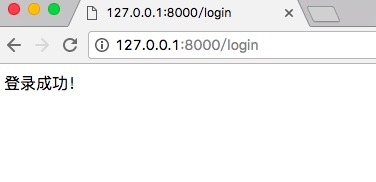 
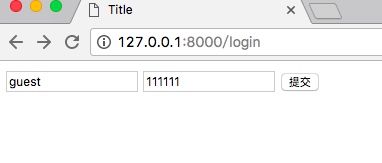 

以上都是“好用户”的正常登录,我们看一下“坏家伙”怎么做。
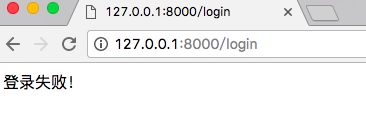
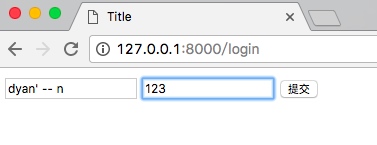
2、非法登录
密码不对也能登录:
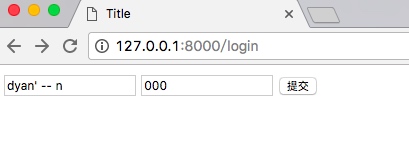 
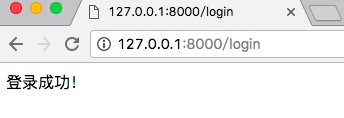 

看一下服务端执行的SQL语句,就不难理解了,密码部分被注释掉了:
select name from userinfo where name='dyan' -- n' and password='000'
账户密码都不对照样登录成功:
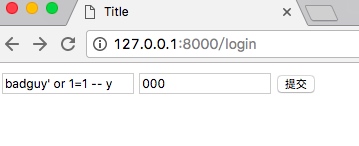 

看执行的SQL语句:
select name from userinfo where name='badguy' or 1=1 -- y' and password='000'
三、使用cursor.execute方式防止注入
使用字符串拼接的方式会导致SQL注入。在cursor.execute方法中对'导致注入的符号做了转义。
将app.py中下面两行代码改为:
 # 导致SQL注入
 temp = "select name from userinfo where name='%s' and password='%s'" % (username, pwd)
 effect_row = cursor.execute(temp)
 # 防止SQL注入
 effect_row = cursor.execute("select name from userinfo where name='%s' and password='%s'",(username, pwd,))
再次尝试注入:
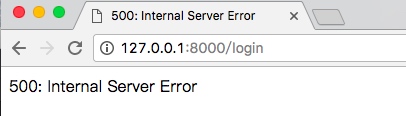 

错误原因,巴拉巴拉就是语法不对:
ymysql.err.ProgrammingError: (1064, "You have an error in your SQL syntax;
看看内部执行的语句,主要是对'符号做了转义防止注入:
select name from userinfo where name=''dyan\' -- n'' and password=''123''二、使用操作
1. 执行SQL
#!/usr/bin/env python
# _*_ coding:utf-8 _*_
__author__ = 'junxi'

import pymysql

# 创建连接
conn = pymysql.connect(host='127.0.0.1', port=3306, user='blog', passwd='123456', db='blog', charset='utf8')

# 创建游标, 查询数据默认为元组类型
cursor = conn.cursor()


# 执行SQL,并返回收影响行数
row1 = cursor.execute("update users set password = '123'")
print(row1)
# 执行SQL,并返回受影响行数
row2 = cursor.execute("update users set password = '456' where id > %s", (1,))
print(row2)
# 执行SQL,并返回受影响行数(使用pymysql的参数化语句防止SQL注入)
row3 = cursor.executemany("insert into users(username, password, email)values(%s, %s, %s)", [("ceshi3", '333', '[email protected]'), ("ceshi4", '444', '[email protected]')])
print(row3)

# 提交,不然无法保存新建或者修改的数据
conn.commit()
# 关闭游标
cursor.close()
# 关闭连接
conn.close()
提示:存在中文的时候,连接需要添加charset='utf8',否则中文显示乱码。
2、获取查询数据
#!/usr/bin/env python
# _*_ coding:utf-8 _*_
__author__ = 'junxi'

import pymysql

# 创建连接
conn = pymysql.connect(host='127.0.0.1', port=3306, user='blog', passwd='123456', db='blog', charset='utf8')

# 创建游标, 查询数据默认为元组类型
cursor = conn.cursor()
cursor.execute("select * from users")

# 获取第一行数据
row_1 = cursor.fetchone()
print(row_1)
# 获取前n行数据
row_n = cursor.fetchmany(3)
print(row_n)
# 获取所有数据
row_3 = cursor.fetchall()
print(row_3)


# 提交,不然无法保存新建或者修改的数据
conn.commit()
# 关闭游标
cursor.close()
# 关闭连接
conn.close()
3、获取新创建数据自增ID
可以获取到最新自增的ID,也就是最后插入的一条数据ID
#!/usr/bin/env python
# _*_ coding:utf-8 _*_
__author__ = 'junxi'

import pymysql

# 创建连接
conn = pymysql.connect(host='127.0.0.1', port=3306, user='blog', passwd='123456', db='blog', charset='utf8')

# 创建游标, 查询数据默认为元组类型
cursor = conn.cursor()

cursor.executemany("insert into users(username, password, email)values(%s, %s, %s)", [("ceshi3", '333', '[email protected]'), ("ceshi4", '444', '[email protected]')])
new_id = cursor.lastrowid
print(new_id)


# 提交,不然无法保存新建或者修改的数据
conn.commit()
# 关闭游标
cursor.close()
# 关闭连接
conn.close()
4、移动游标
操作都是靠游标,那对游标的控制也是必须的
注:在fetch数据时按照顺序进行,可以使用cursor.scroll(num,mode)来移动游标位置,如:

cursor.scroll(1,mode='relative') # 相对当前位置移动
cursor.scroll(2,mode='absolute') # 相对绝对位置移动
5、fetch数据类型
关于默认获取的数据是元组类型,如果想要或者字典类型的数据,即:
import pymysql

# 创建连接
conn = pymysql.connect(host='127.0.0.1', port=3306, user='blog', passwd='123456', db='blog', charset='utf8')

# 游标设置为字典类型
cursor = conn.cursor(cursor=pymysql.cursors.DictCursor)
# 左连接查询
r = cursor.execute("select * from users as u left join articles as a on u.id = a.user_id where a.user_id = 2")
result = cursor.fetchall()
print(result)

# 查询一个表的所有字段名
c = cursor.execute("SHOW FULL COLUMNS FROM users FROM blog")
cc = cursor.fetchall()


# 提交,不然无法保存新建或者修改的数据
conn.commit()
# 关闭游标
cursor.close()
# 关闭连接
conn.close()
查看运行结果:
[{'user_id': 2, 'id': 2, 'password': '456', 'email': '[email protected]', 'a.id': 2, 'content': '成名之路', 'title': '星光大道', 'username': 'tangtang'}]
6、调用存储过程
a、调用无参存储过程
#! /usr/bin/env python
# -*- coding:utf-8 -*-

import pymysql

conn = pymysql.connect(host='127.0.0.1', port=3306, user='blog', passwd='123456', db='blog', charset='utf8')
#游标设置为字典类型
cursor = conn.cursor(cursor=pymysql.cursors.DictCursor)
#无参数存储过程
cursor.callproc('p2')  #等价于cursor.execute("call p2()")

row_1 = cursor.fetchone()
print row_1


conn.commit()
cursor.close()
conn.close()
b、调用有参存储过程
#! /usr/bin/env python
# -*- coding:utf-8 -*-

import pymysql

conn = pymysql.connect(host='127.0.0.1', port=3306, user='blog', passwd='123456', db='blog', charset='utf8')
cursor = conn.cursor(cursor=pymysql.cursors.DictCursor)

cursor.callproc('p1', args=(1, 22, 3, 4))
#获取执行完存储的参数,参数@开头
cursor.execute("select @p1,@_p1_1,@_p1_2,@_p1_3")
# {u'@_p1_1': 22, u'@p1': None, u'@_p1_2': 103, u'@_p1_3': 24}
row_1 = cursor.fetchone()
print row_1


conn.commit()
cursor.close()
conn.close()
三、关于pymysql防注入
1、字符串拼接查询,造成注入
正常查询语句:
#! /usr/bin/env python
# -*- coding:utf-8 -*-

import pymysql

conn = pymysql.connect(host='127.0.0.1', port=3306, user='blog', passwd='123456', db='blog', charset='utf8')
cursor = conn.cursor()
username = "ceshi1"
password = "ceshi1passwd"
# 正常构造语句的情况
sql = "select username, password from users where user='%s' and pass='%s'" % (username, password)
# sql = select username, password from users where user='ceshi1' and pass='ceshi1passwd'
row_count = cursor.execute(sql)
row_1 = cursor.fetchone()
print row_count, row_1

conn.commit()
cursor.close()
conn.close()
构造注入语句:
#! /usr/bin/env python
# -*- coding:utf-8 -*-

import pymysql

conn = pymysql.connect(host='127.0.0.1', port=3306, user='blog', passwd='123456', db='blog', charset='utf8')
cursor = conn.cursor()

username = "u1' or '1'-- "
password = "u1pass"
sql="select username, password from users where username='%s' and password='%s'" % (username, password)

# 拼接语句被构造成下面这样,永真条件,此时就注入成功了。因此要避免这种情况需使用pymysql提供的参数化查询。
# select user,pass from tb7 where user='u1' or '1'-- ' and pass='u1pass'

row_count = cursor.execute(sql)
row_1 = cursor.fetchone()
print row_count,row_1


conn.commit()
cursor.close()
conn.close()
2、避免注入,使用pymysql提供的参数化语句
正常参数化查询
#! /usr/bin/env python
# -*- coding:utf-8 -*-


import pymysql

conn = pymysql.connect(host='127.0.0.1', port=3306, user='blog', passwd='123456', db='blog', charset='utf8')
cursor = conn.cursor()
username="u1"
password="u1pass"
#执行参数化查询
row_count=cursor.execute("select username,password from tb7 where username=%s and password=%s",(username,password))
row_1 = cursor.fetchone()
print row_count,row_1

conn.commit()
cursor.close()
conn.close()
构造注入,参数化查询注入失败。
#! /usr/bin/env python
# -*- coding:utf-8 -*-

import pymysql

conn = pymysql.connect(host='127.0.0.1', port=3306, user='blog', passwd='123456', db='blog', charset='utf8')
cursor = conn.cursor()

username="u1' or '1'-- "
password="u1pass"
#执行参数化查询
row_count=cursor.execute("select username,password from users where username=%s and password=%s",(username,password))
#内部执行参数化生成的SQL语句,对特殊字符进行了加\转义,避免注入语句生成。
# sql=cursor.mogrify("select username,password from users where username=%s and password=%s",(username,password))
# print sql
#select username,password from users where username='u1\' or \'1\'-- ' and password='u1pass'被转义的语句。

row_1 = cursor.fetchone()
print row_count,row_1

conn.commit()
cursor.close()
conn.close()
结论:excute执行SQL语句的时候,必须使用参数化的方式,否则必然产生SQL注入漏洞。
3、使用存mysql储过程动态执行SQL防注入
使用MYSQL存储过程自动提供防注入,动态传入SQL到存储过程执行语句。
delimiter \\
DROP PROCEDURE IF EXISTS proc_sql \\
CREATE PROCEDURE proc_sql (
  in nid1 INT,
  in nid2 INT,
  in callsql VARCHAR(255)
  )
BEGIN
  set @nid1 = nid1;
  set @nid2 = nid2;
  set @callsql = callsql;
    PREPARE myprod FROM @callsql;
--   PREPARE prod FROM 'select * from users where nid>? and nid<?';  传入的值为字符串,?为占位符
--   用@p1,和@p2填充占位符
    EXECUTE myprod USING @nid1,@nid2;
  DEALLOCATE prepare myprod;

END\\
delimiter ;
set @nid1=12;
set @nid2=15;
set @callsql = 'select * from users where nid>? and nid<?';
CALL proc_sql(@nid1,@nid2,@callsql)
pymsql中调用
#! /usr/bin/env python
# -*- coding:utf-8 -*-

import pymysql

conn = pymysql.connect(host='127.0.0.1', port=3306, user='blog', passwd='123456', db='blog', charset='utf8')
cursor = conn.cursor()
sql1="select * from users where nid>? and nid<?"
cursor.callproc('proc_sql', args=(11, 15, sql1))

rows = cursor.fetchall()
print rows
conn.commit()
cursor.close()
conn.close()
四、使用with简化连接过程
# 使用with简化连接过程,每次都连接关闭很麻烦,使用上下文管理,简化连接过程
import pymysql
import contextlib


# 定义上下文管理器,连接后自动关闭连接
@contextlib.contextmanager
def mysql(host='127.0.0.1', port=3306, user='blog', passwd='123456', db='blog', charset='utf8'):
    conn = pymysql.connect(host=host, port=port, user=user, passwd=passwd, db=db, charset=charset)
    cursor = conn.cursor(cursor=pymysql.cursors.DictCursor)
    try:
        yield cursor
    finally:
        conn.commit()
        cursor.close()
        conn.close()

# 执行sql
with mysql() as cursor:
    # 左连接查询
    r = cursor.execute("select * from users as u left join articles as a on u.id = a.user_id where a.user_id = 2")
    result = cursor.fetchall()
    print(result)
查看运行结果:
[{'title': '星光大道', 'username': 'tangtang', 'user_id': 2, 'email': '[email protected]', 'a.id': 2, 'content': '成名之路', 'password': '456', 'id': 2}]