pymysql模块使用---Python连接MySQL数据库
浏览目录
-
pymysql介绍
-
连接数据库
-
execute( ) 之 sql 注入
-
增删改查操作
-
进阶用法
一、pymysql介绍
1、介绍
PyMySQL 是在 Python3.x 版本中用于连接 MySQL 服务器的一个库,Python2中则使用mysqldb。
Django中也可以使用PyMySQL连接MySQL数据库。
2、安装
|
1
|
pip install pymysql
|
二、连接数据库
1、注意事项
在进行本文以下内容之前需要注意:
- 你有一个MySQL数据库,并且已经启动。
- 你有可以连接该数据库的用户名和密码
- 你有一个有权限操作的database
2、基本使用
|
1
2
3
4
5
6
7
8
9
10
11
12
13
14
15
16
17
18
19
20
|
# 导入pymysql模块
import
pymysql
# 连接database
conn
=
pymysql.connect(host
=
“你的数据库地址”, user
=
“用户名”,password
=
“密码”,database
=
“数据库名”,charset
=
“utf8”)
# 得到一个可以执行SQL语句的光标对象
cursor
=
conn.cursor()
# 定义要执行的SQL语句
sql
=
"""
CREATE TABLE USER1 (
id INT auto_increment PRIMARY KEY ,
name CHAR(10) NOT NULL UNIQUE,
age TINYINT NOT NULL
)ENGINE=innodb DEFAULT CHARSET=utf8;
"""
# 执行SQL语句
cursor.execute(sql)
# 关闭光标对象
cursor.close()
# 关闭数据库连接
conn.close()
|
返回字典格式数据:
|
1
2
3
4
5
6
7
8
9
10
11
12
13
14
15
16
17
18
19
20
|
# 导入pymysql模块
import
pymysql
# 连接database
conn
=
pymysql.connect(host
=
“你的数据库地址”, user
=
“用户名”,password
=
“密码”,database
=
“数据库名”,charset
=
“utf8”)
# 得到一个可以执行SQL语句并且将结果作为字典返回的游标
cursor
=
conn.cursor(cursor
=
pymysql.cursors.DictCursor)
# 定义要执行的SQL语句
sql
=
"""
CREATE TABLE USER1 (
id INT auto_increment PRIMARY KEY ,
name CHAR(10) NOT NULL UNIQUE,
age TINYINT NOT NULL
)ENGINE=innodb DEFAULT CHARSET=utf8;
"""
# 执行SQL语句
cursor.execute(sql)
# 关闭光标对象
cursor.close()
# 关闭数据库连接
conn.close()
|
注意:
port端口为Int数据类型。
charset=“utf8”,编码不要写成"utf-8"。
三、execute( ) 之 sql 注入
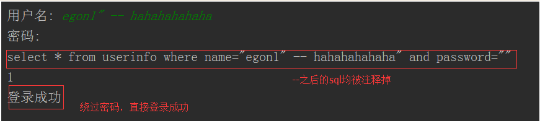
注意:符号--会注释掉它之后的sql,正确的语法:--后至少有一个任意字符
根本原理:就根据程序的字符串拼接name='%s',我们输入一个xxx' -- haha,用我们输入的xxx加'在程序中拼接成一个判断条件name='xxx' -- haha'
|
1
2
3
4
5
6
7
8
|
最后那一个空格,在一条sql语句中如果遇到select
*
from
t1 where
id
>
3
-
-
and
name
=
'egon'
;则
-
-
之后的条件被注释掉了
#1、sql注入之:用户存在,绕过密码
egon'
-
-
任意字符
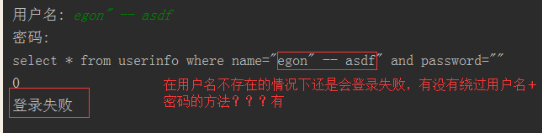
#2、sql注入之:用户不存在,绕过用户与密码
xxx'
or
1
=
1
-
-
任意字符
|

解决注入:
|
1
2
3
4
5
6
7
8
9
10
|
# 原来是我们对sql进行字符串拼接
# sql="select * from userinfo where name='%s' and password='%s'" %(user,pwd)
# print(sql)
# rows=cursor.execute(sql)
#改写为(execute帮我们做字符串拼接,我们无需且一定不能再为%s加引号了)
sql
=
"select
*
from
userinfo where name
=
%
s
and
password
=
%
s"
#!!!注意%s需要去掉引号,因为pymysql会自动为我们加上
rows
=
cursor.execute(sql,[user,pwd])
#pymysql模块自动帮我们解决sql注入的问题,只要我们按照pymysql的规矩来。
|
四、增删改查操作
1、增
|
1
2
3
4
5
6
7
8
9
10
11
12
13
14
15
|
# 导入pymysql模块
import
pymysql
# 连接database
conn
=
pymysql.connect(host
=
“你的数据库地址”, user
=
“用户名”,password
=
“密码”,database
=
“数据库名”,charset
=
“utf8”)
# 得到一个可以执行SQL语句的光标对象
cursor
=
conn.cursor()
sql
=
"INSERT INTO USER1(name, age) VALUES (%s, %s);"
username
=
"Alex"
age
=
18
# 执行SQL语句
cursor.execute(sql, [username, age])
# 提交事务
conn.commit()
cursor.close()
conn.close()
|
插入数据回滚
|
1
2
3
4
5
6
7
8
9
10
11
12
13
14
15
16
17
18
19
|
# 导入pymysql模块
import
pymysql
# 连接database
conn
=
pymysql.connect(host
=
“你的数据库地址”, user
=
“用户名”,password
=
“密码”,database
=
“数据库名”,charset
=
“utf8”)
# 得到一个可以执行SQL语句的光标对象
cursor
=
conn.cursor()
sql
=
"INSERT INTO USER1(name, age) VALUES (%s, %s);"
username
=
"Alex"
age
=
18
try
:
# 执行SQL语句
cursor.execute(sql, [username, age])
# 提交事务
conn.commit()
except
Exception as e:
# 有异常,回滚事务
conn.rollback()
cursor.close()
conn.close()
|
获取插入数据的ID(关联操作时会用到)
|
1
2
3
4
5
6
7
8
9
10
11
12
13
14
15
16
17
18
19
20
21
|
# 导入pymysql模块
import
pymysql
# 连接database
conn
=
pymysql.connect(host
=
“你的数据库地址”, user
=
“用户名”,password
=
“密码”,database
=
“数据库名”,charset
=
“utf8”)
# 得到一个可以执行SQL语句的光标对象
cursor
=
conn.cursor()
sql
=
"INSERT INTO USER1(name, age) VALUES (%s, %s);"
username
=
"Alex"
age
=
18
try
:
# 执行SQL语句
cursor.execute(sql, [username, age])
# 提交事务
conn.commit()
# 提交之后,获取刚插入的数据的ID
last_id
=
cursor.lastrowid
except
Exception as e:
# 有异常,回滚事务
conn.rollback()
cursor.close()
conn.close()
|
批量执行
|
1
2
3
4
5
6
7
8
9
10
11
12
13
14
15
16
17
18
|
# 导入pymysql模块
import
pymysql
# 连接database
conn
=
pymysql.connect(host
=
“你的数据库地址”, user
=
“用户名”,password
=
“密码”,database
=
“数据库名”,charset
=
“utf8”)
# 得到一个可以执行SQL语句的光标对象
cursor
=
conn.cursor()
sql
=
"INSERT INTO USER1(name, age) VALUES (%s, %s);"
data
=
[(
"Alex"
,
18
), (
"Egon"
,
20
), (
"Yuan"
,
21
)]
try
:
# 批量执行多条插入SQL语句
cursor.executemany(sql, data)
# 提交事务
conn.commit()
except
Exception as e:
# 有异常,回滚事务
conn.rollback()
cursor.close()
conn.close()
|
2、删
|
1
2
3
4
5
6
7
8
9
10
11
12
13
14
15
16
|
# 导入pymysql模块
import
pymysql
# 连接database
conn
=
pymysql.connect(host
=
“你的数据库地址”, user
=
“用户名”,password
=
“密码”,database
=
“数据库名”,charset
=
“utf8”)
# 得到一个可以执行SQL语句的光标对象
cursor
=
conn.cursor()
sql
=
"DELETE FROM USER1 WHERE id=%s;"
try
:
cursor.execute(sql, [
4
])
# 提交事务
conn.commit()
except
Exception as e:
# 有异常,回滚事务
conn.rollback()
cursor.close()
conn.close()
|
3、改
|
1
2
3
4
5
6
7
8
9
10
11
12
13
14
15
16
17
18
19
20
|
# 导入pymysql模块
import
pymysql
# 连接database
conn
=
pymysql.connect(host
=
“你的数据库地址”, user
=
“用户名”,password
=
“密码”,database
=
“数据库名”,charset
=
“utf8”)
# 得到一个可以执行SQL语句的光标对象
cursor
=
conn.cursor()
# 修改数据的SQL语句
sql
=
"UPDATE USER1 SET age=%s WHERE name=%s;"
username
=
"Alex"
age
=
80
try
:
# 执行SQL语句
cursor.execute(sql, [age, username])
# 提交事务
conn.commit()
except
Exception as e:
# 有异常,回滚事务
conn.rollback()
cursor.close()
conn.close()
|
4、查
查询单条数据
|
1
2
3
4
5
6
7
8
9
10
11
12
13
14
15
16
|
# 导入pymysql模块
import
pymysql
# 连接database
conn
=
pymysql.connect(host
=
“你的数据库地址”, user
=
“用户名”,password
=
“密码”,database
=
“数据库名”,charset
=
“utf8”)
# 得到一个可以执行SQL语句的光标对象
cursor
=
conn.cursor()
# 查询数据的SQL语句
sql
=
"SELECT id,name,age from USER1 WHERE id=1;"
# 执行SQL语句
cursor.execute(sql)
# 获取单条查询数据
ret
=
cursor.fetchone()
cursor.close()
conn.close()
# 打印下查询结果
print
(ret)
|
查询多条数据
|
1
2
3
4
5
6
7
8
9
10
11
12
13
14
15
16
|
# 导入pymysql模块
import
pymysql
# 连接database
conn
=
pymysql.connect(host
=
“你的数据库地址”, user
=
“用户名”,password
=
“密码”,database
=
“数据库名”,charset
=
“utf8”)
# 得到一个可以执行SQL语句的光标对象
cursor
=
conn.cursor()
# 查询数据的SQL语句
sql
=
"SELECT id,name,age from USER1;"
# 执行SQL语句
cursor.execute(sql)
# 获取多条查询数据
ret
=
cursor.fetchall()
cursor.close()
conn.close()
# 打印下查询结果
print
(ret)
|
进阶用法
|
1
2
3
4
5
6
|
# 可以获取指定数量的数据
cursor.fetchmany(
3
)
# 光标按绝对位置移动1
cursor.scroll(
1
, mode
=
"absolute"
)
# 光标按照相对位置(当前位置)移动1
cursor.scroll(
1
, mode
=
"relative"
)
|
浏览目录
-
pymysql介绍
-
连接数据库
-
execute( ) 之 sql 注入
-
增删改查操作
-
进阶用法
一、pymysql介绍
1、介绍
PyMySQL 是在 Python3.x 版本中用于连接 MySQL 服务器的一个库,Python2中则使用mysqldb。
Django中也可以使用PyMySQL连接MySQL数据库。
2、安装
|
1
|
pip install pymysql
|
二、连接数据库
1、注意事项
在进行本文以下内容之前需要注意:
- 你有一个MySQL数据库,并且已经启动。
- 你有可以连接该数据库的用户名和密码
- 你有一个有权限操作的database
2、基本使用
|
1
2
3
4
5
6
7
8
9
10
11
12
13
14
15
16
17
18
19
20
|
# 导入pymysql模块
import
pymysql
# 连接database
conn
=
pymysql.connect(host
=
“你的数据库地址”, user
=
“用户名”,password
=
“密码”,database
=
“数据库名”,charset
=
“utf8”)
# 得到一个可以执行SQL语句的光标对象
cursor
=
conn.cursor()
# 定义要执行的SQL语句
sql
=
"""
CREATE TABLE USER1 (
id INT auto_increment PRIMARY KEY ,
name CHAR(10) NOT NULL UNIQUE,
age TINYINT NOT NULL
)ENGINE=innodb DEFAULT CHARSET=utf8;
"""
# 执行SQL语句
cursor.execute(sql)
# 关闭光标对象
cursor.close()
# 关闭数据库连接
conn.close()
|
返回字典格式数据:
|
1
2
3
4
5
6
7
8
9
10
11
12
13
14
15
16
17
18
19
20
|
# 导入pymysql模块
import
pymysql
# 连接database
conn
=
pymysql.connect(host
=
“你的数据库地址”, user
=
“用户名”,password
=
“密码”,database
=
“数据库名”,charset
=
“utf8”)
# 得到一个可以执行SQL语句并且将结果作为字典返回的游标
cursor
=
conn.cursor(cursor
=
pymysql.cursors.DictCursor)
# 定义要执行的SQL语句
sql
=
"""
CREATE TABLE USER1 (
id INT auto_increment PRIMARY KEY ,
name CHAR(10) NOT NULL UNIQUE,
age TINYINT NOT NULL
)ENGINE=innodb DEFAULT CHARSET=utf8;
"""
# 执行SQL语句
cursor.execute(sql)
# 关闭光标对象
cursor.close()
# 关闭数据库连接
conn.close()
|
注意:
port端口为Int数据类型。
charset=“utf8”,编码不要写成"utf-8"。
三、execute( ) 之 sql 注入
注意:符号--会注释掉它之后的sql,正确的语法:--后至少有一个任意字符
根本原理:就根据程序的字符串拼接name='%s',我们输入一个xxx' -- haha,用我们输入的xxx加'在程序中拼接成一个判断条件name='xxx' -- haha'
|
1
2
3
4
5
6
7
8
|
最后那一个空格,在一条sql语句中如果遇到select
*
from
t1 where
id
>
3
-
-
and
name
=
'egon'
;则
-
-
之后的条件被注释掉了
#1、sql注入之:用户存在,绕过密码
egon'
-
-
任意字符
#2、sql注入之:用户不存在,绕过用户与密码
xxx'
or
1
=
1
-
-
任意字符
|
解决注入:
|
1
2
3
4
5
6
7
8
9
10
|
# 原来是我们对sql进行字符串拼接
# sql="select * from userinfo where name='%s' and password='%s'" %(user,pwd)
# print(sql)
# rows=cursor.execute(sql)
#改写为(execute帮我们做字符串拼接,我们无需且一定不能再为%s加引号了)
sql
=
"select
*
from
userinfo where name
=
%
s
and
password
=
%
s"
#!!!注意%s需要去掉引号,因为pymysql会自动为我们加上
rows
=
cursor.execute(sql,[user,pwd])
#pymysql模块自动帮我们解决sql注入的问题,只要我们按照pymysql的规矩来。
|
四、增删改查操作
1、增
|
1
2
3
4
5
6
7
8
9
10
11
12
13
14
15
|
# 导入pymysql模块
import
pymysql
# 连接database
conn
=
pymysql.connect(host
=
“你的数据库地址”, user
=
“用户名”,password
=
“密码”,database
=
“数据库名”,charset
=
“utf8”)
# 得到一个可以执行SQL语句的光标对象
cursor
=
conn.cursor()
sql
=
"INSERT INTO USER1(name, age) VALUES (%s, %s);"
username
=
"Alex"
age
=
18
# 执行SQL语句
cursor.execute(sql, [username, age])
# 提交事务
conn.commit()
cursor.close()
conn.close()
|
插入数据回滚
|
1
2
3
4
5
6
7
8
9
10
11
12
13
14
15
16
17
18
19
|
# 导入pymysql模块
import
pymysql
# 连接database
conn
=
pymysql.connect(host
=
“你的数据库地址”, user
=
“用户名”,password
=
“密码”,database
=
“数据库名”,charset
=
“utf8”)
# 得到一个可以执行SQL语句的光标对象
cursor
=
conn.cursor()
sql
=
"INSERT INTO USER1(name, age) VALUES (%s, %s);"
username
=
"Alex"
age
=
18
try
:
# 执行SQL语句
cursor.execute(sql, [username, age])
# 提交事务
conn.commit()
except
Exception as e:
# 有异常,回滚事务
conn.rollback()
cursor.close()
conn.close()
|
获取插入数据的ID(关联操作时会用到)
|
1
2
3
4
5
6
7
8
9
10
11
12
13
14
15
16
17
18
19
20
21
|
# 导入pymysql模块
import
pymysql
# 连接database
conn
=
pymysql.connect(host
=
“你的数据库地址”, user
=
“用户名”,password
=
“密码”,database
=
“数据库名”,charset
=
“utf8”)
# 得到一个可以执行SQL语句的光标对象
cursor
=
conn.cursor()
sql
=
"INSERT INTO USER1(name, age) VALUES (%s, %s);"
username
=
"Alex"
age
=
18
try
:
# 执行SQL语句
cursor.execute(sql, [username, age])
# 提交事务
conn.commit()
# 提交之后,获取刚插入的数据的ID
last_id
=
cursor.lastrowid
except
Exception as e:
# 有异常,回滚事务
conn.rollback()
cursor.close()
conn.close()
|
批量执行
|
1
2
3
4
5
6
7
8
9
10
11
12
13
14
15
16
17
18
|
# 导入pymysql模块
import
pymysql
# 连接database
conn
=
pymysql.connect(host
=
“你的数据库地址”, user
=
“用户名”,password
=
“密码”,database
=
“数据库名”,charset
=
“utf8”)
# 得到一个可以执行SQL语句的光标对象
cursor
=
conn.cursor()
sql
=
"INSERT INTO USER1(name, age) VALUES (%s, %s);"
data
=
[(
"Alex"
,
18
), (
"Egon"
,
20
), (
"Yuan"
,
21
)]
try
:
# 批量执行多条插入SQL语句
cursor.executemany(sql, data)
# 提交事务
conn.commit()
except
Exception as e:
# 有异常,回滚事务
conn.rollback()
cursor.close()
conn.close()
|
2、删
|
1
2
3
4
5
6
7
8
9
10
11
12
13
14
15
16
|
# 导入pymysql模块
import
pymysql
# 连接database
conn
=
pymysql.connect(host
=
“你的数据库地址”, user
=
“用户名”,password
=
“密码”,database
=
“数据库名”,charset
=
“utf8”)
# 得到一个可以执行SQL语句的光标对象
cursor
=
conn.cursor()
sql
=
"DELETE FROM USER1 WHERE id=%s;"
try
:
cursor.execute(sql, [
4
])
# 提交事务
conn.commit()
except
Exception as e:
# 有异常,回滚事务
conn.rollback()
cursor.close()
conn.close()
|
3、改
|
1
2
3
4
5
6
7
8
9
10
11
12
13
14
15
16
17
18
19
20
|
# 导入pymysql模块
import
pymysql
# 连接database
conn
=
pymysql.connect(host
=
“你的数据库地址”, user
=
“用户名”,password
=
“密码”,database
=
“数据库名”,charset
=
“utf8”)
# 得到一个可以执行SQL语句的光标对象
cursor
=
conn.cursor()
# 修改数据的SQL语句
sql
=
"UPDATE USER1 SET age=%s WHERE name=%s;"
username
=
"Alex"
age
=
80
try
:
# 执行SQL语句
cursor.execute(sql, [age, username])
# 提交事务
conn.commit()
except
Exception as e:
# 有异常,回滚事务
conn.rollback()
cursor.close()
conn.close()
|
4、查
查询单条数据
|
1
2
3
4
5
6
7
8
9
10
11
12
13
14
15
16
|
# 导入pymysql模块
import
pymysql
# 连接database
conn
=
pymysql.connect(host
=
“你的数据库地址”, user
=
“用户名”,password
=
“密码”,database
=
“数据库名”,charset
=
“utf8”)
# 得到一个可以执行SQL语句的光标对象
cursor
=
conn.cursor()
# 查询数据的SQL语句
sql
=
"SELECT id,name,age from USER1 WHERE id=1;"
# 执行SQL语句
cursor.execute(sql)
# 获取单条查询数据
ret
=
cursor.fetchone()
cursor.close()
conn.close()
# 打印下查询结果
print
(ret)
|
查询多条数据
|
1
2
3
4
5
6
7
8
9
10
11
12
13
14
15
16
|
# 导入pymysql模块
import
pymysql
# 连接database
conn
=
pymysql.connect(host
=
“你的数据库地址”, user
=
“用户名”,password
=
“密码”,database
=
“数据库名”,charset
=
“utf8”)
# 得到一个可以执行SQL语句的光标对象
cursor
=
conn.cursor()
# 查询数据的SQL语句
sql
=
"SELECT id,name,age from USER1;"
# 执行SQL语句
cursor.execute(sql)
# 获取多条查询数据
ret
=
cursor.fetchall()
cursor.close()
conn.close()
# 打印下查询结果
print
(ret)
|
进阶用法
|
1
2
3
4
5
6
|
# 可以获取指定数量的数据
cursor.fetchmany(
3
)
# 光标按绝对位置移动1
cursor.scroll(
1
, mode
=
"absolute"
)
# 光标按照相对位置(当前位置)移动1
cursor.scroll(
1
, mode
=
"relative"
)
|