1. virsh命令实战应用:
1. 列出有状态的虚拟机
[root@kvm01 ~]# virsh list
 Id    Name                           State
----------------------------------------------------

2. 列出所有的虚拟机
[root@kvm01 ~]# virsh list --all
 Id    Name                           State
----------------------------------------------------
 -     centos7                        shut off

3. 启动虚拟机
[root@kvm01 ~]# virsh start centos7
Domain centos7 started

查看正在运行的虚拟机
[root@kvm01 ~]# virsh list
 Id    Name                           State
----------------------------------------------------
 2     centos7                        running

4. 关闭虚拟机
[root@kvm01 ~]# virsh shutdown centos7
Domain centos7 is being shutdown

[root@kvm01 ~]# virsh list --all
 Id    Name                           State
----------------------------------------------------
 -     centos7                        shut off

5. 强制关机虚拟机
[root@kvm01 ~]# virsh destroy centos7
Domain centos7 destroyed

6. 重启虚拟机
[root@kvm01 ~]# virsh reboot centos7
Domain centos7 is being rebooted

7. 再安装一台虚拟机进行测试:
[root@kvm01 ~]# virt-install --virt-type kvm --os-type=linux --os-variant rhel7 --name centos7_1 --memory 1024 --vcpus 1 --disk /opt/centos7_1.raw,format=raw,size=10 --cdrom /opt/CentOS-7-x86_64-Minimal-1908.iso  --network network=default --graphics vnc,listen=0.0.0.0 --noautoconsole

Starting install...
Allocating 'centos7_1.raw'                                                                     |  10 GB  00:00:00
Domain installation still in progress. You can reconnect to
the console to complete the installation process.
[root@kvm01 ~]# virsh list
 Id    Name                           State
----------------------------------------------------
 4     centos7                        running
 5     centos7_1                      running

[root@kvm01 ~]# virsh destroy centos7_1
Domain centos7_1 destroyed

[root@kvm01 ~]# virsh start centos7_1
Domain centos7_1 started
总结:没有正常安装的话,你启动虚拟机之后它会选择从硬盘启动;对应kvm虚拟机而言,安装系统只有一次机会,当你错过了,只能强制关机–>删除,重新安装!
1. 强制关机
[root@kvm01 ~]# virsh destroy centos7_1
Domain centos7_1 destroyed

2. 删除虚拟机(处于运行的虚拟机无法进行删除操作)
[root@kvm01 ~]# virsh undefine centos7_1
Domain centos7_1 has been undefined
2. kvm虚拟机配置文件
[root@kvm01 opt]# virsh dumpxml centos7
<domain type='kvm' id='4'>
  <name>centos7</name>
  <uuid>02afbeeb-dd98-41e4-936a-f360ef361255</uuid>
  <memory unit='KiB'>1048576</memory>
  <currentMemory unit='KiB'>1048576</currentMemory>
  <vcpu placement='static'>1</vcpu>
  <resource>
    <partition>/machine</partition>
  </resource>
  <os>
    <type arch='x86_64' machine='pc-i440fx-rhel7.0.0'>hvm</type>
    <boot dev='hd'/>
  </os>
  <features>
    <acpi/>
    <apic/>
  </features>
  <cpu mode='custom' match='exact' check='full'>
    <model fallback='forbid'>Broadwell-IBRS</model>
    <feature policy='require' name='ssbd'/>
    <feature policy='disable' name='hle'/>
    <feature policy='disable' name='rtm'/>
    <feature policy='require' name='spec-ctrl'/>
    <feature policy='require' name='hypervisor'/>
    <feature policy='disable' name='erms'/>
    <feature policy='require' name='xsaveopt'/>
  </cpu>
  <clock offset='utc'>
    <timer name='rtc' tickpolicy='catchup'/>
    <timer name='pit' tickpolicy='delay'/>
    <timer name='hpet' present='no'/>
  </clock>
  <on_poweroff>destroy</on_poweroff>
  <on_reboot>restart</on_reboot>
  <on_crash>destroy</on_crash>
  <pm>
    <suspend-to-mem enabled='no'/>
    <suspend-to-disk enabled='no'/>
  </pm>
  <devices>
    <emulator>/usr/libexec/qemu-kvm</emulator>
    <disk type='file' device='disk'>
      <driver name='qemu' type='raw'/>
      <source file='/opt/centos2.raw'/>
      <backingStore/>
      <target dev='vda' bus='virtio'/>
      <alias name='virtio-disk0'/>
      <address type='pci' domain='0x0000' bus='0x00' slot='0x06' function='0x0'/>
    </disk>
    <disk type='file' device='cdrom'>
      <driver name='qemu'/>
      <target dev='hda' bus='ide'/>
      <readonly/>
      <alias name='ide0-0-0'/>
      <address type='drive' controller='0' bus='0' target='0' unit='0'/>
    </disk>
    <controller type='usb' index='0' model='ich9-ehci1'>
      <alias name='usb'/>
      <address type='pci' domain='0x0000' bus='0x00' slot='0x04' function='0x7'/>
    </controller>
    <controller type='usb' index='0' model='ich9-uhci1'>
      <alias name='usb'/>
      <master startport='0'/>
      <address type='pci' domain='0x0000' bus='0x00' slot='0x04' function='0x0' multifunction='on'/>
    </controller>
    <controller type='usb' index='0' model='ich9-uhci2'>
      <alias name='usb'/>
      <master startport='2'/>
      <address type='pci' domain='0x0000' bus='0x00' slot='0x04' function='0x1'/>
    </controller>
    <controller type='usb' index='0' model='ich9-uhci3'>
      <alias name='usb'/>
      <master startport='4'/>
      <address type='pci' domain='0x0000' bus='0x00' slot='0x04' function='0x2'/>
    </controller>
    <controller type='pci' index='0' model='pci-root'>
      <alias name='pci.0'/>
    </controller>
    <controller type='ide' index='0'>
      <alias name='ide'/>
      <address type='pci' domain='0x0000' bus='0x00' slot='0x01' function='0x1'/>
    </controller>
    <controller type='virtio-serial' index='0'>
      <alias name='virtio-serial0'/>
      <address type='pci' domain='0x0000' bus='0x00' slot='0x05' function='0x0'/>
    </controller>
    <interface type='network'>
      <mac address='52:54:00:f5:bc:c3'/>
      <source network='default' bridge='virbr0'/>
      <target dev='vnet0'/>
      <model type='virtio'/>
      <alias name='net0'/>
      <address type='pci' domain='0x0000' bus='0x00' slot='0x03' function='0x0'/>
    </interface>
    <serial type='pty'>
      <source path='/dev/pts/1'/>
      <target type='isa-serial' port='0'>
        <model name='isa-serial'/>
      </target>
      <alias name='serial0'/>
    </serial>
    <console type='pty' tty='/dev/pts/1'>
      <source path='/dev/pts/1'/>
      <target type='serial' port='0'/>
      <alias name='serial0'/>
    </console>
    <channel type='unix'>
      <source mode='bind' path='/var/lib/libvirt/qemu/channel/target/domain-4-centos7/org.qemu.guest_agent.0'/>
      <target type='virtio' name='org.qemu.guest_agent.0' state='disconnected'/>
      <alias name='channel0'/>
      <address type='virtio-serial' controller='0' bus='0' port='1'/>
    </channel>
    <input type='tablet' bus='usb'>
      <alias name='input0'/>
      <address type='usb' bus='0' port='1'/>
    </input>
    <input type='mouse' bus='ps2'>
      <alias name='input1'/>
    </input>
    <input type='keyboard' bus='ps2'>
      <alias name='input2'/>
    </input>
    <graphics type='vnc' port='5900' autoport='yes' listen='0.0.0.0'>
      <listen type='address' address='0.0.0.0'/>
    </graphics>
    <video>
      <model type='cirrus' vram='16384' heads='1' primary='yes'/>
      <alias name='video0'/>
      <address type='pci' domain='0x0000' bus='0x00' slot='0x02' function='0x0'/>
    </video>
    <memballoon model='virtio'>
      <alias name='balloon0'/>
      <address type='pci' domain='0x0000' bus='0x00' slot='0x07' function='0x0'/>
    </memballoon>
    <rng model='virtio'>
      <backend model='random'>/dev/urandom</backend>
      <alias name='rng0'/>
      <address type='pci' domain='0x0000' bus='0x00' slot='0x08' function='0x0'/>
    </rng>
  </devices>
  <seclabel type='dynamic' model='dac' relabel='yes'>
    <label>+107:+107</label>
    <imagelabel>+107:+107</imagelabel>
  </seclabel>
</domain>

备份kvm虚拟机配置文件
[root@kvm01 opt]# virsh dumpxml centos7 >vm_centos7.xml

删除虚拟机(只删除配置文件)
[root@kvm01 opt]# virsh undefine centos7
Domain centos7 has been undefined

导入配置文件
[root@kvm01 opt]# virsh define vm_centos7.xml
Domain centos7 defined from vm_centos7.xml

查看虚拟机列表
[root@kvm01 opt]# virsh list --all
 Id    Name                           State
----------------------------------------------------
 -     centos7                        shut off

模拟一次真实恶作剧:
[root@kvm01 opt]# virsh undefine centos7
Domain centos7 has been undefined

[root@kvm01 opt]# virsh list --all
 Id    Name                           State
----------------------------------------------------
 7     centos7                        running

[root@kvm01 opt]# ls /etc/libvirt/qemu
networks
[root@kvm01 opt]# virsh shutdown centos7
Domain centos7 is being shutdown

[root@kvm01 opt]# virsh list --all
 Id    Name                           State
----------------------------------------------------
关一台kvm虚拟机,就少一台;

解决方案:
[root@kvm01 opt]# virt-install --virt-type kvm --os-type=linux --os-variant rhel7 \
--name centos7 --memory 1024 --vcpus 1 --disk /opt/centos2.raw,format=raw,size=10 \
--boot hd  --network network=default --graphics vnc,listen=0.0.0.0 --noautoconsole

Starting install...
Domain creation completed.

[root@kvm01 opt]# virsh list --all
 Id    Name                           State
----------------------------------------------------
 8     centos7                        running

这时,会自动生成一个配置文件
[root@kvm01 opt]# ls /etc/libvirt/qemu
centos7.xml  networks
3. kvm虚拟机重命名
1. 先关机虚拟机
[root@kvm01 opt]# virsh destroy centos7
Domain centos7 destroyed

2.在关机状态下重命名
[root@kvm01 opt]# virsh domrename centos7 web01
Domain successfully renamed

[root@kvm01 opt]# virsh list --all
 Id    Name                           State
----------------------------------------------------
 -     web01                          shut off

重命名磁盘名称
[root@kvm01 opt]# mv centos2.raw web01.raw

启动失败
[root@kvm01 opt]# virsh start web01
error: Failed to start domain web01
error: Cannot access storage file '/opt/centos2.raw': No such file or directory

解决方案:
修改web01虚拟机配置文件
[root@kvm01 opt]# virsh edit web01

    <disk type='file' device='disk'>
      <driver name='qemu' type='raw'/>
      <source file='/opt/web01.raw'/>		#修改磁盘路径

[root@kvm01 opt]# virsh start web01
Domain web01 started

[root@kvm01 opt]# virsh list --all
 Id    Name                           State
----------------------------------------------------
 10    web01                          running
4. kvm虚拟机挂起
[root@kvm01 opt]# virsh suspend web01
Domain web01 suspended

[root@kvm01 opt]# virsh list
 Id    Name                           State
----------------------------------------------------
 10    web01                          paused
5. kvm虚拟机恢复
[root@kvm01 opt]# virsh resume web01
Domain web01 resumed

[root@kvm01 opt]# virsh list
 Id    Name                           State
----------------------------------------------------
 10    web01                          running

[root@kvm01 opt]# date
Sun Jan 19 17:19:59 CST 2020

[root@kvm01 ~]# ssh 192.168.122.32
The authenticity of host '192.168.122.32 (192.168.122.32)' can't be established.
ECDSA key fingerprint is SHA256:NB22csJyV8Y93dtV52ktnqfUov6e38iIPYY7K45qjjo.
ECDSA key fingerprint is MD5:17:ed:74:fa:48:cf:27:b3:6d:7e:c4:80:da:b5:20:56.
Are you sure you want to continue connecting (yes/no)? yes
Warning: Permanently added '192.168.122.32' (ECDSA) to the list of known hosts.
[email protected]'s password:
Last login: Sun Jan 19 17:17:33 2020
[root@localhost ~]# date
Sun Jan 19 17:17:59 CST 2020

发现挂起后的虚拟机和宿主机时间不同步;

解决方案:配置定时同步任务
[root@localhost ~]# yum install ntpdate -y
[root@localhost ~]# ntpdate ntp6.aliyun.com
19 Jan 17:23:03 ntpdate[1224]: step time server 203.107.6.88 offset 116.724327 sec

[root@localhost ~]# crontab -l
*/30 * * * * ntpdate ntp6.aliyun.com &>/dev/null
6. 查看vnc端口号

7. 设置kvm开机自启
1.设置开机自启
[root@kvm01 opt]# virsh autostart web01
Domain web01 marked as autostarted

[root@kvm01 opt]# virsh list --all
 Id    Name                           State
----------------------------------------------------
 10    web01                          running

[root@kvm01 opt]# systemctl restart libvirtd.service
[root@kvm01 opt]# virsh list --all
 Id    Name                           State
----------------------------------------------------
 10    web01                          running

2.关闭开机自启
[root@kvm01 opt]# virsh autostart --disable web01
Domain web01 unmarked as autostarted

3.通过软链接设置开机自启
[root@kvm01 opt]# ln -s /etc/libvirt/qemu/web01.xml /etc/libvirt/qemu/autostart/
[root@kvm01 opt]# virsh destroy web01
Domain web01 destroyed

[root@kvm01 opt]# virsh list --all
 Id    Name                           State
----------------------------------------------------
 -     web01                          shut off

[root@kvm01 opt]# systemctl restart libvirtd.service
[root@kvm01 opt]# virsh list --all
 Id    Name                           State
----------------------------------------------------
 1     web01                          running
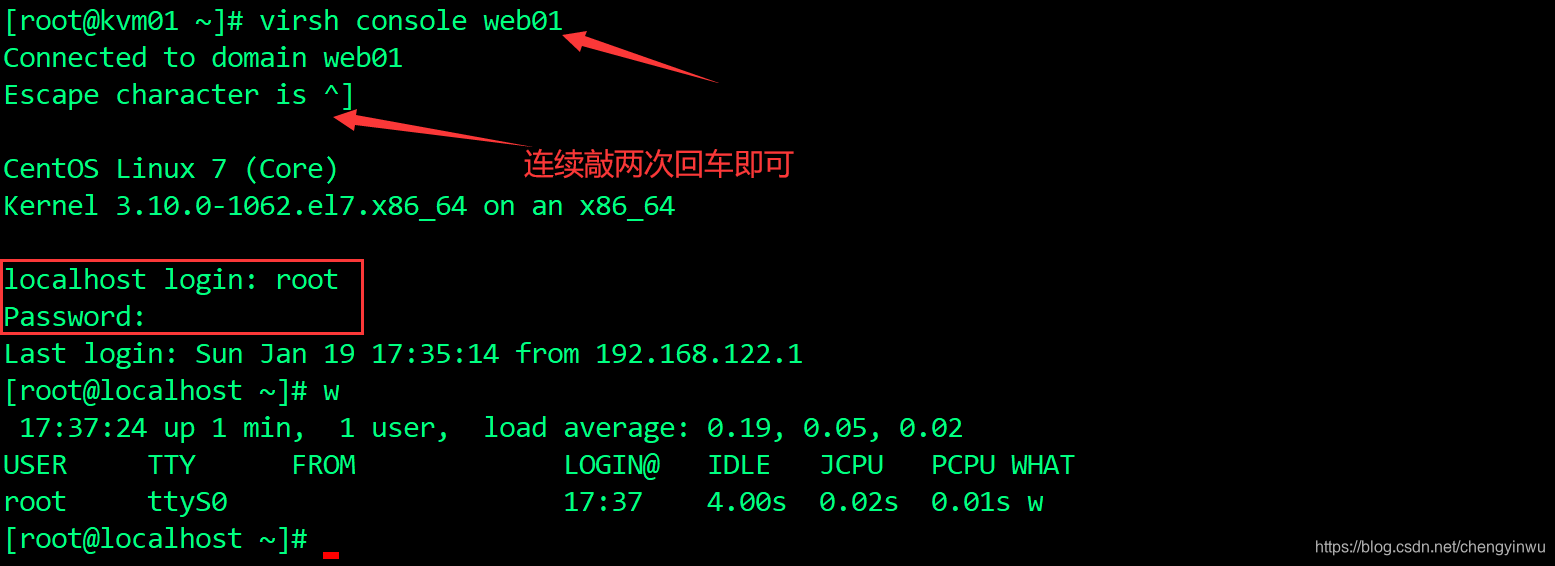
8. 虚拟机开启console控制台 登录
痛点:因为VNC连接的kvm虚拟机无法进行命令行复制粘贴,并且必须在网络互通的情况下才能连接;console控制台可以解决此痛点;
1. 连接kvm虚拟机
[root@kvm01 ~]# ssh 192.168.122.32
root@192.168.122.32's password:
Last login: Sun Jan 19 17:17:57 2020 from 192.168.122.1

2.修改linux系统内核(先备份)
[root@localhost ~]# cp /boot/grub2/grub.cfg /tmp/

[root@localhost ~]# grubby --update-kernel=ALL --args="console=ttyS0,115200n8"
[root@localhost ~]# reboot
Connection to 192.168.122.32 closed by remote host.
Connection to 192.168.122.32 closed.
PS:
1、宿主机请勿挂起!!!切记

2、console控制台退出:
ctrl + ]