vue中使用百度编辑器
1、yarn add vue-ueditor-wrap //下载此包可实现双向绑定功能
2、将去官网下载百度编辑器包(jsp版本),将名字改为UEditor放在项目的static文件夹下
3、在components文件夹下新建文件Ueditor.vue并写入以下代码(提醒:注意下方代码中的UEDITOR_HOME_URL: '/static/UEditor/',这个路径一般情况下是这样的,但是有时候如果因为跨域问题做了代理,项目地址改变了,这时候这个地址就得换,具体换成什么样的要去控制台审查过后才能得知。比如这一次我的项目地址代理后成了http://localhost/hs/.....这种,多了个hs,所以我就得把此地址改成UEDITOR_HOME_URL: '/hs/static/UEditor/'。没换之前百度编辑器请求地址http://localhost/static/UEditor/...因此很多文件请求不到,疯狂报错。换了之后百度编辑器请求地址是http://localhost/hs/static/UEdior/...就可以了。另外static/UEditor/ueditor.config.js文件里也有一处是这个地址,也需要同步换。还有一点值得注意,项目上线后没有跨域问题了。因此项目上线后这两处地址还得再换成原来的static/UEditor。总之根据项目灵活配置路径是一个关键)
以下代码可实现图片上传功能,这里的图片上传功能(点击左边图片图标即可上传)是自己定义的而非百度编辑器自带的。百度编辑器自带的单图和多图上传已被注释。
<template>
<div>
<vue-ueditor-wrap v-model="content" :config="myConfig" @beforeInit="addCustomButtom"></vue-ueditor-wrap>
<a-modal
title="图片上传"
:visible="dialogVisible"
@ok="insertImage"
@cancel="handleCancel"
okText="确定"
cancelText="取消"
:centered='true'
>
<div class="uploadContent">
<a-upload
name="file"
listType="picture-card"
class="uploader"
:showUploadList="false"
accept="image/png, image/jpeg"
:action="uploadBase"
@change="handleChange"
>
<img class="personImg" v-if="imageUrl" :src="imageUrl" alt="avatar" />
<div v-else>
<a-icon :type="loading ? 'loading' : 'plus'" />
<div class="ant-upload-text">上传图片</div>
</div>
</a-upload>
</div>
</a-modal>
</div>
</template>
<script>
import common from '../api/common.js'
import '../../static/UEditor/ueditor.config.js'
import '../../static/UEditor/ueditor.all.js'
import '../../static/UEditor/lang/zh-cn/zh-cn.js'
import VueUeditorWrap from 'vue-ueditor-wrap'
function getBase64(img, callback) {
const reader = new FileReader();
reader.addEventListener('load', () => callback(reader.result));
reader.readAsDataURL(img);
}
export default {
name: "Ueditor",
components: {
VueUeditorWrap,
},
props: {
value: {
type: String,
default: ''
},
myConfig: {
type: Object,
default: () => ({
// 编辑器不自动被内容撑高
autoHeightEnabled: false,
// 初始容器高度
initialFrameHeight: 400,
// 初始容器宽度
initialFrameWidth: '100%',
// UEditor 资源文件的存放路径,如果你使用的是 vue-cli 生成的项目,通常不需要设置该选项,vue-ueditor-wrap 会自动处理常见的情况,如果需要特殊配置,参考下方的常见问题2
UEDITOR_HOME_URL: '/static/UEditor/'
}
)
}
},
data(){
return{
loading: false,
uploadBase: `${common.base}/uploadimg`,//图片上传地址
dialogVisible: false,
imageList: [],
editorHandler: null,
content: this.value,
imageUrl:'', //upload框里图片的url
loading: false, //图片上传加载
contentImg:'', //转换过后的url链接
}
},
watch: {
value (newValue) {
this.content = newValue
},
content (newValue) {
this.$emit('input', newValue)
}
},
methods:{
handleCancel(){
this.dialogVisible=false
this.imageUrl=''
this.contentImg=''
},
handleChange(info) {
if (info.file.status === 'uploading') {
this.loading = true;
return;
}
if (info.file.status === 'done') {
getBase64(info.file.originFileObj, imageUrl => {
this.imageUrl = imageUrl;
this.loading = false;
});
// console.log(info.file)
if(info.file.response.code==200){
this.contentImg=info.file.response.msg
}else if(info.file.response.code==401){
this.$message.warning("登录超时,请重新登录!")
this.$router.push({name:'Login'})
}
}
},
insertImage () {
if(this.contentImg==''){
this.$message.warning("您还未上传图片!")
return
}
let imgUrl = this.contentImg;
let imageHtml = "";
imageHtml = imageHtml + "<p><img src=\"" + imgUrl + "\"/></p>";
if (imageHtml != "") {
this.editorHandler.execCommand('inserthtml', imageHtml);
}
this.dialogVisible = false;
this.imageUrl=''
this.contentImg=''
},
addCustomButtom (editorId) {
let _this = this;
window.UE.registerUI('test-button', function (editor, uiName) {
// 注册按钮执行时的 command 命令,使用命令默认就会带有回退操作
editor.registerCommand(uiName, {
execCommand: () => {
_this.imageList = [];
_this.dialogVisible = true;
_this.editorHandler = editor;
//editor.execCommand('inserthtml', `<span>这是一段由自定义按钮添加的文字</span>`)
}
})
// 创建一个 button
var btn = new window.UE.ui.Button({
// 按钮的名字
name: uiName,
// 提示
title: '鼠标悬停时的提示文字',
// 需要添加的额外样式,可指定 icon 图标,图标路径参考常见问题 2
cssRules: "background-position: -380px 0;",
// 点击时执行的命令
onclick: function () {
// 这里可以不用执行命令,做你自己的操作也可
editor.execCommand(uiName)
}
})
// 当点到编辑内容上时,按钮要做的状态反射
editor.addListener('selectionchange', function () {
var state = editor.queryCommandState(uiName)
if (state === -1) {
btn.setDisabled(true)
btn.setChecked(false)
} else {
btn.setDisabled(false)
btn.setChecked(state)
}
})
// 因为你是添加 button,所以需要返回这个 button
return btn
}, 47 /* 指定添加到工具栏上的哪个位置,默认时追加到最后 */, editorId /* 指定这个 UI 是哪个编辑器实例上的,默认是页面上所有的编辑器都会添加这个按钮 */)
}
},
}
</script>
<style scoped>
.uploadContent{
width:100%;
text-align: center;
}
.uploader{
display: inline-block;
}
.personImg{
width:200px;
}
</style>
4、在main.js中全局注册组件
import Ueditor from './components/Ueditor.vue' //百度编辑器组件
Vue.component('Ueditor',Ueditor)
5、使用
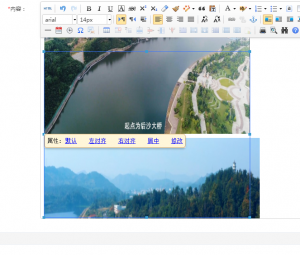
<Ueditor v-model="intro"></Ueditor>解决百度图片伸缩框错位的问题
1、找到\static\UEditor\index.html并将其<script type="text/javascript" charset="utf-8" src="ueditor.all.min.js"> </script>改为<script type="text/javascript" charset="utf-8" src="ueditor.all.js"> </script>
2、找到api\ueditor\ueditor.all.js(视后台编辑器引入文件进行修改),查找attachTo: function (targetObj)字段
3、将
attachTo: function (targetObj) {
var me = this,
target = me.target = targetObj,
resizer = this.resizer,
imgPos = domUtils.getXY(target),
iframePos = domUtils.getXY(me.editor.iframe),
editorPos = domUtils.getXY(resizer.parentNode);
domUtils.setStyles(resizer, {
'width': target.width + 'px',
'height': target.height + 'px',
'left': iframePos.x + imgPos.x - me.editor.document.body.scrollLeft - editorPos.x - parseInt(resizer.style.borderLeftWidth) + 'px',
'top': iframePos.y + imgPos.y - me.editor.document.body.scrollTop - editorPos.y - parseInt(resizer.style.borderTopWidth) + 'px'
})
}
修改为
attachTo: function (a) {
var b = this,
c = b.target = a,
d = this.resizer,
e = domUtils.getXY(c),
f = domUtils.getXY(b.editor.iframe),
g = domUtils.getXY(d.parentNode),
h = b.editor.document;
domUtils.setStyles(d, {
width: c.width + "px",
height: c.height + "px",
left: f.x + e.x - (h.documentElement.scrollLeft || h.body.scrollLeft || 0) - g.x - parseInt(d.style.borderLeftWidth) + "px",
top: f.y + e.y - (h.documentElement.scrollTop || h.body.scrollTop || 0) - g.y - parseInt(d.style.borderTopWidth) + "px"
})
}
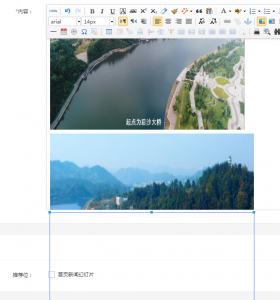
4、重新加载项目,大功告成