tab选项卡的布局在项目中是很常见的,在后台管理系统中左边是导航栏固定,右边是对应的页面,每次点击左边的标题,只有右面的对应页面在切换,而vue要做tab选项卡,推荐使用实现a标签的效果,然后使用实现插槽的效果,把对应的页面 “塞” 进去,具体实现看下面的案例:
- vue文件
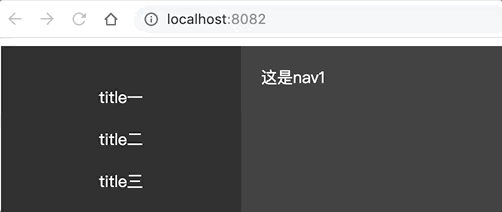
<template> <div class="box"> <!-- nav标题,路由指向 --> <div class="left"> <router-link :to="item.src" v-for="(item,index) in navData" :key="index">{{item.title}}</router-link> </div> <div class="right"> <!-- 路由跳转的位置 --> <router-view></router-view> </div> </div> </template> <script> export default { name:"Index", data(){ return{ navData:[ { title:"title一", src:"/" }, { title:"title二", src:"/nav2" }, { title:"title三", src:"/nav3" } ] } } } </script> <style scoped> .box{ width: 100%; height: 100%; display: flex; background: rgba(0,0,0,.8) } .left{ width:200px; height: 100%; text-align: center; background: rgba(0,0,0,.4); padding: 20px; } .left a{ text-decoration: none; display: block; margin-top: 20px; width: 100%; color: #fff; } .right{ flex: 1; padding: 20px; color: #fff; } </style> - router.js
import Vue from 'vue'
import Router from 'vue-router'
import Index from './views/Index.vue'
import nav1 from './components/Index/nav1.vue'
import nav2 from './components/Index/nav2.vue'
import nav3 from './components/Index/nav3.vue'
Vue.use(Router)

export default new Router({
//去掉#
  mode: 'history',
  base: process.env.BASE_URL,
  routes: [
    {
      path: '/',
      //name: 'Index',
      component: Index,
      children:[
        {
          path:'',
          name:'nav1',
          component:nav1
        },
        {
          path:'nav2',
          name:'nav2',
          component:nav2
        },
        {
          path:'nav3',
          name:'nav3',
          component:nav3
        }
      ]
    }
  ]
})
注意:当在router.js中的routes中写上
name: 'Index',时在控制台会有下面的警告,所以可以删掉此句。

- 右边要显示页面的内容
<!-- nav1.vue--> <template> <div> 这是nav1 </div> </template> <!-- nav2.vue--> <template> <div> 这是nav2 </div> </template> <!-- nav3.vue--> <template> <div> 这是nav3 </div> </template> - 效果图
简单的子路由跳转实现tab选项卡效果就实现啦,若有更好的方法欢迎贴出来哦!❤️❤️❤️
