目录
1、Vue是什么
vue是什么,是一套构建用户界面的渐进式框架。
vue两大核心思想,组件化和数据驱动,组件化就是把一个整体拆分个一个一个的组件,组件可重复使用。数据驱动是前端未来的发展方向,释放了对DOM的操作,让DOM随着数据的变化而自然的变化,不必过多的关注DOM,只需要将数组组织好即可。
2、node安装
windows环境下的node安装是很方便的,登录官网http://nodejs.org/,找到对应的系统版本直接下载就行.
- 下载安装包
LTS:追求稳定的开发用户,可以下载这个版本,只需要每年十月一个版本的时候,进行升级。
Current:热衷尝试新特性,或者不在生产环境中的实现性项目可以下载这个版本。更新比较频繁,切不保证兼容性。

- 安装过程
安装的时候直接next即可,window按照过程会提示添加path的系统变量,变量是你的安装路径,例如C:\Program Files\nodejs
- 测试
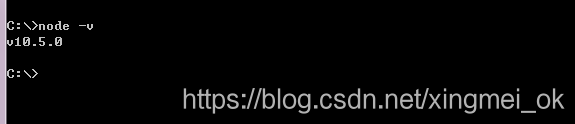
cmd输入node -v 测试是否安装成功,如果成功,会出现版本号
3、NPM
在用vue构建大型应用的时候,推荐使用npm安装,npm能很好的喝webpack等打包工具进行配合。可以将npm镜像设置为淘宝npm镜像,可以大幅度提升下载速度。详情参考https://npm.taobao.org/。
- npm安装
刚才安装了node,最新版本的node安装包已经集成了npm,所以安装node的同时也已经成功安装了npm,测试npm是否安装成功

- 安装淘宝镜像
$ npm install -g cnpm --registry=https://registry.npm.taobao.org- 安装模块
$ cnpm install [name]- 同步模块
$ cnpm sync connect- 其他命令
$ cnpm info connect4、cli安装
Vue提供了的官方cli(命令行工具),为单页面应用(SPA)快速搭建繁杂的脚手架。可以几分钟之内快速构建一个项目运行起来
- 全局安装cli
npm install --global vue-cli

5、快速构建项目
- 安装node,npm,cli参考上文,同时在C:\Users\Andminster\AppData\Roaming\npm目录下为会生成几个vue相关的文件
- 创建自己的项目,使用命令

在运行安装命令以后,需要输入一些命令,下面一个一个来解释一下
- Project name 项目名称,可以自己指定,也可以直接回车使用默认的名称。注意这里的名称不能有大写字母
- projuect description (A Vue.js project),项目描述,可以随意写,也可以不写
- Author... 作者,随意输入吧
- 选择题:
4.1、Runtime + Compiler: recommended for most users 运行加编译,既然已经说了推荐,就选它了
4.2、Runtime-only: about 6KB lighter min+gzip, but templates (or any Vue-specificHTML) are ONLY allowed in .vue files - render functions are required elsewhere 仅运行时,已经有推荐了就选择第一个了 -
Install vue-router? (Y/n) 是否安装vue-router 这是官方的路由,输入y,使用官方路由
-
Use ESLint to lint your code? (Y/n) 是否使用ESLint管理代码,是一个代码风格管理工具,统一整体代码风格,不会影响整体运行
-
Pick an ESLint preset (Use arrow keys) 选择一个ESLint预设,编写vue项目的代码风格
-
选择代码标准
8.1、Standard (https://github.com/feross/standard) 标准,有些看不明白,什么标准呢,去给提示的standardgithub地址 看一下, 原来时js的标准风格
8.2、AirBNB (https://github.com/airbnb/javascript) JavaScript最合理的方法,这个github地址说的是JavaScript最合理的 方法
8.3、none (configure it yourself) 这个不用说,自己定义风格
-
Setup unit tests with Karma + Mocha? (Y/n) 是否安装单元测试,我选择安装
-
Setup e2e tests with Nightwatch(Y/n)? 是否安装e2e测试 ,我选择安装
-
安装成功

这几个配置选择yes 或者 no 对于我们项目最大的影响就是,如果选择了yes 则生成的项目会自动有相关的配置,有一些loader我们就要配套下载。所以如果我们确定不用的话最好不要yes,要么下一步要下很多没有用的loader
6、vue-test目录解析
新建项目目录结构如图所示:
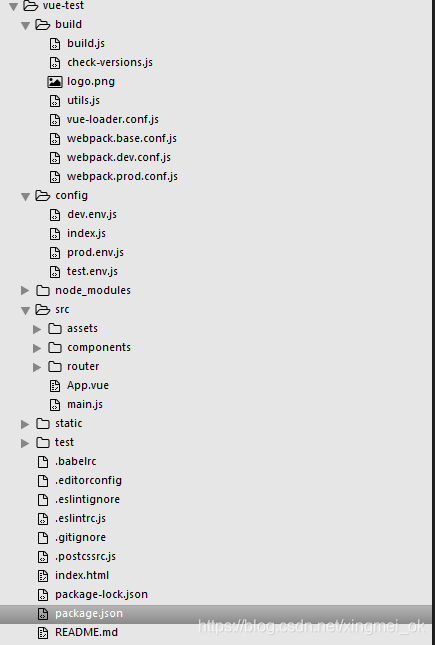
- build 里面是一些操作文件,使用npm run * 执行的都是这里面的文件,主要是进行webpack的一些配置。对我们最有用并且可能会使用的就是webpack.base.config.js、webpack.dev.config.js、webpack.prod.config.js三个webpack的配置文件,分别是基本webpack配置、开发环境配置、生产环境配置。实际上这些文件里面的内容,一些简单的配置都已经有了,包括入口文件、插件、loader、热更新等都已经配置好了。我们要做的只是根据自己的项目有什么loader需要增加的,比如生成环境需要加上UglifyJsPlugin插件等可以自行配置,或者一些插件增加或者不需要的删除,其实都是和业务相关了,其他的都可以不需要动
- config 配置文件,执行文件需要的配置信息,最主要的就是index.js 这个文件进行配置代理服务器,这个地方和我们息息相关,和后台联调就是在这里设置一个地址就可以了。打开index.js 找到“proxyTable“这个属性,然后在里面加上对应的后台地址即可
- node_modules,安装的的模块文件,npm install会把所有的模块安装下载,
- src资源文件,所有的组件和所用的图片都是放在这里,assets资源文件夹,放图片之类的资源;components,组件文件夹,写的所有的组件放在这个下面;router路由文件夹,这个也决定了页面的跳转规则;APP.vue应用组件,所有自己写的组件,都是在这个里面运行,vue文件入口界面;main.js,对应App.vue 创建vue实例,也是入口文件,对应webpack.base.config.js里的入口配置,webpack四大特性entry入口、output输出、loader加载器、plugins插件。
- static,存放的文件不会经过webpack处理,可以直接引用,
- test 单元测试和e2e测试的文件在此下面
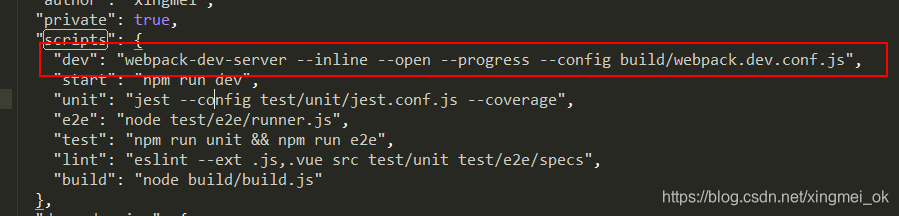
- package.json, 这个文件很重要,有2部分很有用。script里面设置命令,例如设置了dev用于调试,执行命令npm run dev,就是执行dev对应的命令,;设置了build,执行npm run build 用于打包;另外一部分,可以看到我们的依赖包,在dependencies和devDependencies中,分别对应全局下载和局部下载的依赖包

在其他博客看到更好更直观更详细的的目录解析,记录下来,加深记忆,方便查阅。
|-- build                            // 项目构建(webpack)相关代码
|   |-- build.js                     // 生产环境构建代码
|   |-- check-version.js             // 检查node、npm等版本
|   |-- utils.js                     // 构建工具相关
|   |-- vue-loader.conf.js           // webpack loader配置
|   |-- webpack.base.conf.js         // webpack基础配置
|   |-- webpack.dev.conf.js          // webpack开发环境配置,构建开发本地服务器
|   |-- webpack.prod.conf.js         // webpack生产环境配置
|-- config                           // 项目开发环境配置
|   |-- dev.env.js                   // 开发环境变量
|   |-- index.js                     // 项目一些配置变量
|   |-- prod.env.js                  // 生产环境变量
|-- src                              // 源码目录
|   |-- components                   // vue公共组件
|   |-- router                       // vue的路由管理
|   |-- App.vue                      // 页面入口文件
|   |-- main.js                      // 程序入口文件,加载各种公共组件
|-- static                           // 静态文件,比如一些图片,json数据等
|-- .babelrc                         // ES6语法编译配置
|-- .editorconfig                    // 定义代码格式
|-- .gitignore                       // git上传需要忽略的文件格式
|-- .postcsssrc                       // postcss配置文件
|-- README.md                        // 项目说明
|-- index.html                       // 入口页面
|-- package.json                     // 项目基本信息,包依赖信息等
---------------------
重点描述几个重要文件
1、package.json文件
package.json文件是项目的配置文件,定义了项目的基本信息和相关依赖包,npm运行命令等
2. dependencies VS devDependencies
dependencies 是运行时依赖(生产环境)       npm install --save  **(package name)
devDependencies 是开发时的依赖(开发环境)  npm install --save-dev  **(package name)
dependencies是运行时候的依赖(生产环境),devDependencies是开发时候的依赖(开发环境),相应的npm install在安装npm包的时候,有两种命令参数可以把他们的信息写入package.json文件,-save会把依赖包名添加到package.json文件dependencies 下面,–save-dev 则添加到 package.json 文件 devDependencies 键下。
举个例子比如我们项目要引用jQuery,因为jQuery部署到线上环境也要使用(生产环境),所以安装jQuery的命令为
npm install jQuery --save这时候 dependencies 键下就会多了一个jQuery包。
3、基础配置文件webpack.base.config.js
基础的webpack配置文件主要根据模式定义了入口出口,以及处理vue.babel等模块,是最为基础的部分,其他模式的配置文件以此为基础,通过webpck-merge合并。
'use strict'
const path = require('path')
const utils = require('./utils')
const config = require('../config')
const vueLoaderConfig = require('./vue-loader.conf')
// 获取绝对路径
function resolve (dir) {
  return path.join(__dirname, '..', dir)
}
// 定义一下代码检测的规则
const createLintingRule = () => ({
  test: /\.(js|vue)$/,
  loader: 'eslint-loader',
  enforce: 'pre',
  include: [resolve('src'), resolve('test')],
  options: {
    formatter: require('eslint-friendly-formatter'),
    emitWarning: !config.dev.showEslintErrorsInOverlay
  }
})

module.exports = {
  context: path.resolve(__dirname, '../'),//基础目录
  entry: {
    app: './src/main.js'//webpack入口文件
  },
  output: {
    path: config.build.assetsRoot,//输出目录
    filename: '[name].js',//输出文件名称
    publicPath: process.env.NODE_ENV === 'production'
      ? config.build.assetsPublicPath//生产模式
      : config.dev.assetsPublicPath//开发模式
  },
  /**
  *当webpack试图去加载模块的时候,他默认是查找.js结尾的文件的,
  *并不知道.vue结尾的文件是什么鬼玩意儿
  *遇到.vue结尾的文件也要去加载
  *进行如下配置
  */
  resolve: {
    extensions: ['.js', '.vue', '.json'],
    alias: {//创建别名
      'vue$': 'vue/dist/vue.esm.js',
      '@': resolve('src'),// 如 '@/components/HelloWorld'
    }
  },
  //模块相应的配置,包括Loader,plugin等。不同模块的处理规则,用不同的loader处理不同的文件
  module: {
    rules: [
      ...(config.dev.useEslint ? [createLintingRule()] : []),
      {
        test: /\.vue$/,//vue要在babel之前,对所有的.vue文件使用vue-loader进行编译,
        loader: 'vue-loader',//vue转普通的html
        options: vueLoaderConfig//可选项:vue-loader选项配置
      },
      {
        test: /\.js$/,//babel
        loader: 'babel-loader',//es6 转es5
        include: [resolve('src'), resolve('test'), resolve('node_modules/webpack-dev-server/client')]// url-loader 文件大小低于指定的限制时,可返回 DataURL,即base64
      },
      {
        test: /\.(png|jpe?g|gif|svg)(\?.*)?$/,//url-loader 图片 对图片资源使用url-loader
        loader: 'url-loader',
        options: {// 小于10K的图片转成base64编码的dataURL字符串写到代码中
          limit: 10000,// 默认无限制
          name: utils.assetsPath('img/[name].[hash:7].[ext]') //其他的图片转移到静态资源文件夹
        }
      },
      {
        test: /\.(mp4|webm|ogg|mp3|wav|flac|aac)(\?.*)?$/,// 对多媒体资源文件使用url-loader
        loader: 'url-loader',
        options: {
          limit: 10000,
          name: utils.assetsPath('media/[name].[hash:7].[ext]')
        }
      },
      {
        test: /\.(woff2?|eot|ttf|otf)(\?.*)?$/,//对字体资源文件使用url-loader
        loader: 'url-loader',
        options: {
          limit: 10000,
          name: utils.assetsPath('fonts/[name].[hash:7].[ext]')
        }
      }
    ]
  },
  node: {// 是否 polyfill 或 mock
    // prevent webpack from injecting useless setImmediate polyfill because Vue
    // source contains it (although only uses it if it's native).
    setImmediate: false,
    // prevent webpack from injecting mocks to Node native modules
    // that does not make sense for the client
    dgram: 'empty',
    fs: 'empty',
    net: 'empty',
    tls: 'empty',
    child_process: 'empty'
  }
}
4、开发环境配置文件,webpack.dev.config.js
启动项目的时候就要用到这个文件,非常重要哦
// webpack开发环境配置
'use strict'
const utils = require('./utils')
const webpack = require('webpack')
const config = require('../config')//基本配置的参数
const merge = require('webpack-merge')//webpack-merge是一个可以合并数组和对象的插件
const path = require('path')
const baseWebpackConfig = require('./webpack.base.conf')//webpack基本配置文件,开发和运行时候公用
const CopyWebpackPlugin = require('copy-webpack-plugin')

/**
* HtmlWebpackPlugin description
* 这个插件的作用是依据一个简单模板,帮你生成最终的html5文件
* 这个文件中自动引用了打包以后的js文件,每次编译都在文件名中插入了一个不同的哈希值
* 即在index.html里面加上<link>和<script>标签引用webpack打包后的文件
*/
const HtmlWebpackPlugin = require('html-webpack-plugin')
//能够更好的再终端看到webpack运行时候的错误和警告
const FriendlyErrorsPlugin = require('friendly-errors-webpack-plugin')
//自动检索下一个可用的端口
const portfinder = require('portfinder')
// 读取系统环境变量的host
const HOST = process.env.HOST
// 读取系统环境变量的port
const PORT = process.env.PORT && Number(process.env.PORT)
//合并baseWebpackConfig配置
const devWebpackConfig = merge(baseWebpackConfig, {
  module: {
    rules: utils.styleLoaders({ sourceMap: config.dev.cssSourceMap, usePostCSS: true })
  },
  // cheap-module-eval-source-map is faster for development 添加元信息(meta info)增强调试
  devtool: config.dev.devtool,

  // these devServer options should be customized in /config/index.js
  ///webpack-dev-server服务器配置
  devServer: {
    clientLogLevel: 'warning',//console控制台显示的消息,
    historyApiFallback: {
      rewrites: [
        { from: /.*/, to: path.posix.join(config.dev.assetsPublicPath, 'index.html') },
      ],
    },
    hot: true,//开启热加载
    contentBase: false, // since we use CopyWebpackPlugin.
    compress: true,//开启压缩
    host: HOST || config.dev.host,//HOST 优先
    port: PORT || config.dev.port,//PORT 优先
    open: config.dev.autoOpenBrowser,//自动打开浏览器,这里是默认是false,所以不会自动打开
    overlay: config.dev.errorOverlay// warning 和 error 都要显示
      ? { warnings: false, errors: true }
      : false,
    publicPath: config.dev.assetsPublicPath,
    proxy: config.dev.proxyTable,//设置代理,用于前后端分离,
    quiet: true, // necessary for FriendlyErrorsPlugin
    watchOptions: {//启用watch模式,在初始构建之后,webpack将继续监听任何已解析的文件的更改
      poll: config.dev.poll,//通过传递true,开启polling.或者指定毫秒为单位进行轮询
    }
  },
  plugins: [//webpack一些构建用到的插件
    new webpack.DefinePlugin({
      'process.env': require('../config/dev.env')
    }),
    //模块热替换,运行再运行的时候更新模块,无需进行全部刷新
    new webpack.HotModuleReplacementPlugin(),
    // 热加载时,直接返回更新的文件名,而不是id
    new webpack.NamedModulesPlugin(), // HMR shows correct file names in console on update.
    // 跳过编译时出错的代码并记录下来,主要作用是使编译后运行时的包不出错
    new webpack.NoEmitOnErrorsPlugin(),
    // https://github.com/ampedandwired/html-webpack-plugin
    new HtmlWebpackPlugin({
      // 指定编译后生成的html文件
      filename: 'index.html',
      // 需要处理的模板
      template: 'index.html',
      // 打包过程中输出的js、css的路径添加到html文件中
      // css文件插入到head中
      // js文件插入到body中,可能的选项有 true, 'head', 'body', false
      inject: true
    }),
    // copy custom static assets
    new CopyWebpackPlugin([
      {
        from: path.resolve(__dirname, '../static'),
        to: config.dev.assetsSubDirectory,
        ignore: ['.*']
      }
    ])
  ]
})

module.exports = new Promise((resolve, reject) => {
  portfinder.basePort = process.env.PORT || config.dev.port //获取当前设定的端口
  portfinder.getPort((err, port) => {
    if (err) {
      reject(err)
    } else {
      // publish the new Port, necessary for e2e tests 发布新的端口,对于e2e进行测试
      process.env.PORT = port
      // add port to devServer config 设置devServer端口
      devWebpackConfig.devServer.port = port

      // Add FriendlyErrorsPlugin
      devWebpackConfig.plugins.push(new FriendlyErrorsPlugin({
        compilationSuccessInfo: {
          messages: [`Your application is running here: http://${devWebpackConfig.devServer.host}:${port}`],
        },
        onErrors: config.dev.notifyOnErrors
        ? utils.createNotifierCallback()
        : undefined
      }))

      resolve(devWebpackConfig)
    }
  })
})
5、生产模式配置文件webpack.prod.conf.js
// webpack生产环境配置
'use strict'
const path = require('path')
const utils = require('./utils')
const webpack = require('webpack')
const config = require('../config')
const merge = require('webpack-merge')
const baseWebpackConfig = require('./webpack.base.conf')
// copy-webpack-plugin ,用于static的静态资源文件夹复制到产品文件夹dist.
const CopyWebpackPlugin = require('copy-webpack-plugin')
const HtmlWebpackPlugin = require('html-webpack-plugin')
const ExtractTextPlugin = require('extract-text-webpack-plugin')
// optimize-css-assets-webpack-plugin 优化和最小化css文件
const OptimizeCSSPlugin = require('optimize-css-assets-webpack-plugin')
// uglifyJs 混淆js插件
const UglifyJsPlugin = require('uglifyjs-webpack-plugin')

const env = process.env.NODE_ENV === 'testing'
  ? require('../config/test.env')
  : require('../config/prod.env')

const webpackConfig = merge(baseWebpackConfig, {
  module: {
    /**
    *样式文件的处理规则,对css sass scss等不同内容使用相应的styleloaders
    *utile配置出各种预处理语言使用的loader
    */
    rules: utils.styleLoaders({
      sourceMap: config.build.productionSourceMap,//production 下生成 sourceMap
      extract: true,//util 中 styleLoaders 方法内的 generateLoaders 函数
      usePostCSS: true
    })
  },
  devtool: config.build.productionSourceMap ? config.build.devtool : false,
   // webpack输出路径和命名规则
  output: {
    path: config.build.assetsRoot,
    filename: utils.assetsPath('js/[name].[chunkhash].js'),
    chunkFilename: utils.assetsPath('js/[id].[chunkhash].js')
  },
  plugins: [
    // http://vuejs.github.io/vue-loader/en/workflow/production.html
    new webpack.DefinePlugin({
      'process.env': env
    }),
    new UglifyJsPlugin({//js 代码压缩还可配置 include, cache 等,也可用 babel-minify 丑化压缩JS代码
      uglifyOptions: {
        compress: {
          warnings: false
        }
      },
      sourceMap: config.build.productionSourceMap,
      parallel: true// 充分利用多核cpu
    }),
    // extract css into its own file 提取文件中的css 将css提取到单独的文件
    new ExtractTextPlugin({
      filename: utils.assetsPath('css/[name].[contenthash].css'),
      // Setting the following option to `false` will not extract CSS from codesplit chunks.
      // Their CSS will instead be inserted dynamically with style-loader when the codesplit chunk has been loaded by webpack.
      // It's currently set to `true` because we are seeing that sourcemaps are included in the codesplit bundle as well when it's `false`,
      // increasing file size: https://github.com/vuejs-templates/webpack/issues/1110
      allChunks: true,
    }),
    // Compress extracted CSS. We are using this plugin so that possible
    // duplicated CSS from different components can be deduped.
    // 优化、最小化css代码,如果只简单使用extract-text-plugin可能会造成css重复
    //  具体原因可以看npm上面optimize-css-assets-webpack-plugin的介绍
    new OptimizeCSSPlugin({
      cssProcessorOptions: config.build.productionSourceMap
        ? { safe: true, map: { inline: false } }
        : { safe: true }
    }),
    // generate dist index.html with correct asset hash for caching.
    // you can customize output by editing /index.html
    // see https://github.com/ampedandwired/html-webpack-plugin
    //  将产品文件的引用注入到index.html
    new HtmlWebpackPlugin({
      filename: process.env.NODE_ENV === 'testing'
        ? 'index.html'
        : config.build.index,
      template: 'index.html',
      inject: true,
      minify: {
        // 删除inde.html文件中的注释
        removeComments: true,
        //删除index.html里面 空格
        collapseWhitespace: true,
        // 删除各种html标签属性值的双引号
        removeAttributeQuotes: true
        // more options:
        // https://github.com/kangax/html-minifier#options-quick-reference
      },
      // necessary to consistently work with multiple chunks via CommonsChunkPlugin
      // 注入依赖的时候按照依赖先后顺序进行注入,比如,需要先注入vendor.js,再注入app.js
      chunksSortMode: 'dependency'
    }),
    // keep module.id stable when vendor modules does not change  按 dependency 的顺序引入
    new webpack.HashedModuleIdsPlugin(),
    // enable scope hoisting
    new webpack.optimize.ModuleConcatenationPlugin(),
    // split vendor js into its own file
     // 从vendor中提取出manifest,原因如上
    new webpack.optimize.CommonsChunkPlugin({
      name: 'vendor',
      minChunks (module) {
        // any required modules inside node_modules are extracted to vendor
        return (
          module.resource &&
          /\.js$/.test(module.resource) &&
          module.resource.indexOf(
            path.join(__dirname, '../node_modules')
          ) === 0
        )
      }
    }),
    // extract webpack runtime and module manifest to its own file in order to
    // prevent vendor hash from being updated whenever app bundle is updated
    new webpack.optimize.CommonsChunkPlugin({
      name: 'manifest',
      minChunks: Infinity
    }),
    // This instance extracts shared chunks from code splitted chunks and bundles them
    // in a separate chunk, similar to the vendor chunk
    // see: https://webpack.js.org/plugins/commons-chunk-plugin/#extra-async-commons-chunk
    new webpack.optimize.CommonsChunkPlugin({
      name: 'app',
      async: 'vendor-async',
      children: true,
      minChunks: 3
    }),

    // copy custom static assets
    // 将static文件夹里面的静态资源复制到dist/static
    new CopyWebpackPlugin([
      {
        from: path.resolve(__dirname, '../static'),
        to: config.build.assetsSubDirectory,
        ignore: ['.*']
      }
    ])
  ]
})
// 如果开启了产品gzip压缩,则利用插件将构建后的产品文件进行压缩
if (config.build.productionGzip) {
  // 一个用于压缩的webpack插件
  const CompressionWebpackPlugin = require('compression-webpack-plugin')
  webpackConfig.plugins.push(
    new CompressionWebpackPlugin({
      asset: '[path].gz[query]',
      algorithm: 'gzip', // 压缩算法
      test: new RegExp(
        '\\.(' +
        config.build.productionGzipExtensions.join('|') +
        ')$'
      ),
      threshold: 10240,
      minRatio: 0.8
    })
  )
}
// 如果启动了report,则通过插件给出webpack构建打包后的产品文件分析报告
if (config.build.bundleAnalyzerReport) {
  const BundleAnalyzerPlugin = require('webpack-bundle-analyzer').BundleAnalyzerPlugin
  webpackConfig.plugins.push(new BundleAnalyzerPlugin())
}

module.exports = webpackConfig
6、build.js编译入口
'use strict'
require('./check-versions')()

process.env.NODE_ENV = 'production'//设置当前环境为生产环境

const ora = require('ora')//loading.. 进度条
const rm = require('rimraf')//删除文件
const path = require('path')
const chalk = require('chalk')//颜色设置
const webpack = require('webpack')
const config = require('../config')
const webpackConfig = require('./webpack.prod.conf')

const spinner = ora('building for production...')
spinner.start()

// 清空文件夹
rm(path.join(config.build.assetsRoot, config.build.assetsSubDirectory), err => {
  if (err) throw err
    // 删除完成回调函数内,执行编译
   webpack(webpackConfig, (err, stats) => {
    spinner.stop()
    if (err) throw err
        // 编译完成,输出文件
    process.stdout.write(stats.toString({
      colors: true,
      modules: false,
      children: false, // If you are using ts-loader, setting this to true will make TypeScript errors show up during build.
      chunks: false,
      chunkModules: false
    }) + '\n\n')
   //失败
    if (stats.hasErrors()) {
      console.log(chalk.red('  Build failed with errors.\n'))
      process.exit(1)
    }
// 成功
    console.log(chalk.cyan('  Build complete.\n'))
    console.log(chalk.yellow(
      '  Tip: built files are meant to be served over an HTTP server.\n' +
      '  Opening index.html over file:// won\'t work.\n'
    ))
  })
})
7. 实用代码段 utils.js
'use strict'
const path = require('path')
const config = require('../config')
const ExtractTextPlugin = require('extract-text-webpack-plugin')
const packageConfig = require('../package.json')

exports.assetsPath = function (_path) {
  const assetsSubDirectory = process.env.NODE_ENV === 'production'
    ? config.build.assetsSubDirectory
    : config.dev.assetsSubDirectory

  return path.posix.join(assetsSubDirectory, _path)//posix方法修正路径
}
/**
* options
* 示例: ({ sourceMap: config.dev.cssSourceMap, usePostCSS: true })
*/
exports.cssLoaders = function (options) {
  options = options || {}

  const cssLoader = {
    loader: 'css-loader',
    options: {
      sourceMap: options.sourceMap
    }
  }

  const postcssLoader = {
    loader: 'postcss-loader',
    options: {
      sourceMap: options.sourceMap
    }
  }

  // generate loader string to be used with extract text plugin
  function generateLoaders (loader, loaderOptions) {
    const loaders = options.usePostCSS ? [cssLoader, postcssLoader] : [cssLoader]

    if (loader) {
      loaders.push({
        loader: loader + '-loader',
        options: Object.assign({}, loaderOptions, {
          sourceMap: options.sourceMap
        })
      })
    }

    // Extract CSS when that option is specified  生产模式中提取css
    // (which is the case during production build)
    if (options.extract) {
      return ExtractTextPlugin.extract({
        use: loaders,
        fallback: 'vue-style-loader'
      })
    } else {
      return ['vue-style-loader'].concat(loaders)
    }
  }

  // https://vue-loader.vuejs.org/en/configurations/extract-css.html
  // 返回各种 loaders 对象
  return {
    css: generateLoaders(),
    postcss: generateLoaders(),
    less: generateLoaders('less'),
    sass: generateLoaders('sass', { indentedSyntax: true }),
    scss: generateLoaders('sass'),
    stylus: generateLoaders('stylus'),
    styl: generateLoaders('stylus')
  }
}

// Generate loaders for standalone style files (outside of .vue)
exports.styleLoaders = function (options) {
  const output = []
  const loaders = exports.cssLoaders(options)

  for (const extension in loaders) {
    const loader = loaders[extension]
    output.push({
      test: new RegExp('\\.' + extension + '$'),
      use: loader
    })
  }

  return output
}
// 配合 friendly-errors-webpack-plugin
exports.createNotifierCallback = () => {
  // 基本用法:notifier.notify('message');
  const notifier = require('node-notifier')
   // 当前设定是只有出现 error 错误时触发 notifier 发送通知
  return (severity, errors) => {
    if (severity !== 'error') return //严重程度可以是 'error' 或 'warning'

    const error = errors[0]
    const filename = error.file && error.file.split('!').pop()

    notifier.notify({
      title: packageConfig.name,
      message: severity + ': ' + error.name,
      subtitle: filename || '',
      icon: path.join(__dirname, 'logo.png')
    })
  }
}
8、babel配置文件.babelrc
{//设定转码规则
  "presets": [
    ["env", {
      "modules": false,
      //对BABEL_ENV或者NODE_ENV指定的不同的环境变量,进行不同的编译操作
      "targets": {
        "browsers": ["> 1%", "last 2 versions", "not ie <= 8"]
      }
    }],
    "stage-2"
  ],
  //转码用的插件
  "plugins": ["transform-vue-jsx", "transform-runtime"],
  "env": {
    "test": {
      "presets": ["env", "stage-2"],
      "plugins": ["transform-vue-jsx", "transform-es2015-modules-commonjs", "dynamic-import-node"]
    }
  }
}
9、编码规范.editorconfig
root = true

[*]    // 对所有文件应用下面的规则
charset = utf-8                    // 编码规则用utf-8
indent_style = space               // 缩进用空格
indent_size = 2                    // 缩进数量为2个空格
end_of_line = lf                   // 换行符格式
insert_final_newline = true        // 是否在文件的最后插入一个空行
trim_trailing_whitespace = true    // 是否删除行尾的空格
10、 .src/main.js文件解读
main.js是整个项目的入口文件
// The Vue build version to load with the `import` command
// (runtime-only or standalone) has been set in webpack.base.conf with an alias.
import Vue from 'vue'
import App from './App'
import router from './router'

//生产环境提示,这里设置成了false
Vue.config.productionTip = false

/* eslint-disable no-new */
new Vue({
  el: '#app',
  router,
  components: { App },
  template: '<App/>' ///引入App组件
})
11、.src/app.vue文件解读
<template>
  <div id="app">
    <img src="./assets/logo.png">
    <router-view/>
  </div>
</template>

<script>
export default {
  name: 'App'
}
</script>

<style>
#app {
  font-family: 'Avenir', Helvetica, Arial, sans-serif;
  -webkit-font-smoothing: antialiased;
  -moz-osx-font-smoothing: grayscale;
  text-align: center;
  color: #2c3e50;
  margin-top: 60px;
}
</style>
template标签包裹的内容:模板htmldom的结构
script标签包含的js内容,可以在这里写一些页面的js逻辑代码
style样式文件
12、 src/router/index.js 路由文件
import Vue from 'vue'
import Router from 'vue-router'
import HelloWorld from '@/components/HelloWorld'

Vue.use(Router)

export default new Router({
  routes: [//配置路由
    {
      path: '/',//访问路径
      name: 'HelloWorld',//访问名称
      component: HelloWorld//路由需要的组件
    }
  ]
})
7 、项目运行详解
创建好项目以后,进入到vue-test目录,运行如下命令,启动项目。
cd vue-test
npm run dev
浏览器输入地址:localhost:8081 打开页面(默认端口:8080)
启动成功以后没有默认打开浏览器,木关系,修改一下配置文件。找到根目录文件package.json-->script-->dev,在命令行中增加open命令,默认启动的时候打开浏览器

8、总结
构建项目总结起来一共只有四步
- 安装node、npm
- npm install --global vue-cli 下载vue-cil脚手架
- vue init webpack vue-test 生成项目,形成基本结构
- npm run dev 运行
