ROS笔记(40) 通讯节点
1. 节点分析
1.1. 建立仿真
首先在hhbot_bringup功能包建立一个简单的移动小车fake_hhbot_bringup.launch仿真文件
相比fake_hhbot_laser.launch就换了个模型hhbot.xacro而已
<launch>

    <arg name="urdf_file" default="$(find xacro)/xacro --inorder '$(find hhbot_description)/urdf/hhbot.xacro'" />

    ...
</launch>
然后建立一个hhbot_play文件夹,用于整合需要运行的文件
把刚刚建立的移动小车fake_hhbot_bringup.launch仿真文件和导航的fake_nav_demo.launch仿真文件
整合成fake_hhbot_play.launch:
<launch>

    <!-- 运行机身驱动 -->
    <include file="$(find hhbot_bringup)/launch/fake_hhbot_bringup.launch" />

    <!-- 运行导航驱动 -->
    <include file="$(find hhbot_navigation)/launch/fake_nav_demo.launch" />

</launch>
运行该文件:
$ roslaunch hhbot_play fake_hhbot_play.launch

这样就启动了就有可导航移动的仿真小车了
1.2. 仿真分析
新的终端使用rqt_graph查看当前系统运行情况的动态图形
$ rqt_graph

在新的终端使用 rqt_tf_tree 查看当前系统运行的TF树
$ rosrun rqt_tf_tree rqt_tf_tree
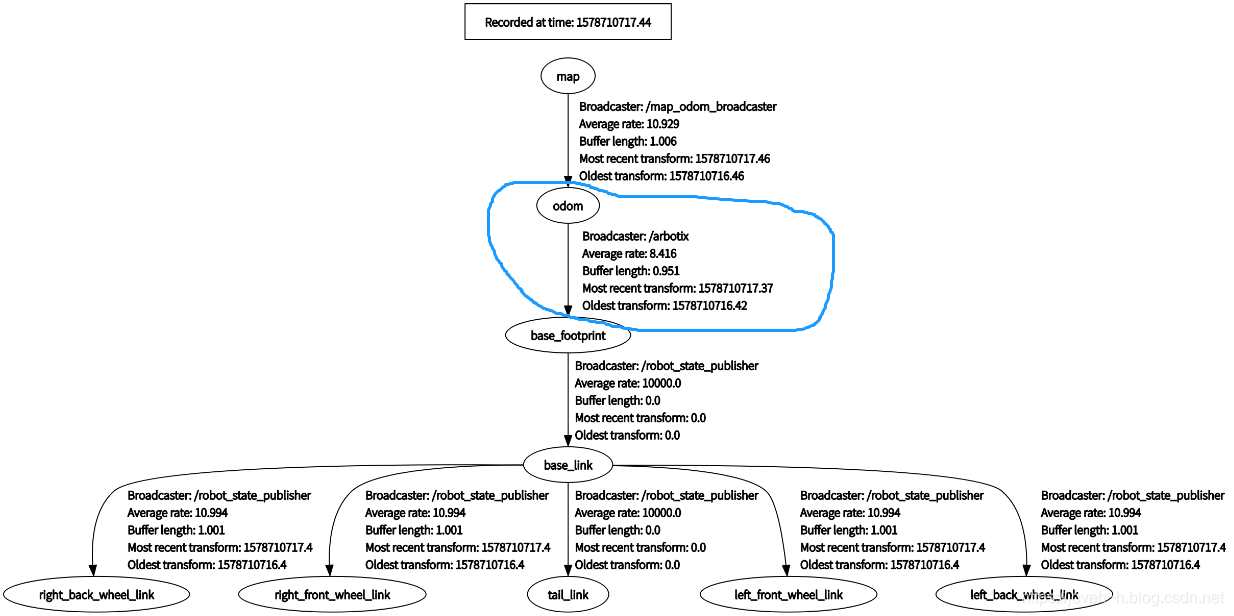
看到arbotix订阅了运动控制指令cmd_vel,发布了odom,tf,joint_states
那么接下来需要做的就是,建立一个节点hhbot_bsp_node代替arbotix
并通过与下层执行器控实时串口通讯,实现实时采集和控制车轮速度,以控制移动小车
2. 建立节点(C++)
2.1. 节点配置
2.1.1 hhbot_bsp_serial_conf
首先在/hhbot_bringup/src/建立hhbot_bsp_serial_conf.cpp文件
定义一下所需的变量,通讯协议,初始化串口和消息
const unsigned char header[2] = {0x88, 0x88};   // 帧头
const unsigned char ender[2] = {0x66, 0x66};    // 帧尾
const double ROBOT_RADIUS = 0.025;              // 车轮的半径
const double ROBOT_LENGTH = 0.140;              // 车轮的距离
serial::Serial ser;                             // 声明串口对象
using namespace boost::asio;                    // 定义一个命名空间,用于后面的读写操作
boost::asio::io_service iosev;

// 姿势协方差
boost::array<double, 36> odom_pose_covariance = {
  {1e-3, 0, 0, 0, 0, 0,
   0, 1e-3, 0, 0, 0, 0,
   0, 0, 1e6, 0, 0, 0,
   0, 0, 0, 1e6, 0, 0,
   0, 0, 0, 0, 1e6, 0,
   0, 0, 0, 0, 0, 1e-3}};

// 转动协方差
boost::array<double, 36> odom_twist_covariance = {
  {1e-3, 0, 0, 0, 0, 0,
   0, 1e-3, 0, 0, 0, 0,
   0, 0, 1e6, 0, 0, 0,
   0, 0, 0, 1e6, 0, 0,
   0, 0, 0, 0, 1e6, 0,
   0, 0, 0, 0, 0, 1e-3}};

// 声明里程联合体
union odometry {
  float odoemtry_float;
  unsigned char odometry_char[4];
} vel_left, vel_right;

// 声明车轮驱动发送数据联合体
union sendData {
  float data_float;
  unsigned char data_char[4];
} leftdata, rightdata;

// 初始化变量
HHbot::HHbot() : x_(0.0), y_(0.0), th_(0.0),
                vx_(0.0), vy_(0.0), vth_(0.0)
{
}

HHbot::~HHbot()
{
}

bool HHbot::init()
{
  // 默认配置端口hhbot_bsp(已绑定),波特率115200,连接超时0.01秒
  ser.setPort("/dev/hhbot_bsp");
  ser.setBaudrate(115200);
  serial::Timeout to = serial::Timeout::simpleTimeout(10);
  ser.setTimeout(to);

  // 打开串口
  ser.open();

  // 检测串口是否已经打开,并给出提示信息
  if (ser.isOpen())
  {
    ROS_INFO_STREAM("BSP serial init ok");
  }
  else
  {
    ROS_ERROR("BSP serial init error");
    return -1;
  }

  ros::Time::init();
  current_time_ = ros::Time::now();
  last_time_ = ros::Time::now();

  // 定义发布消息的名称
  odom_pub = n.advertise<nav_msgs::Odometry>("odom", 500);

  return true;
}
接下来,定义 串口读取数据的函数
bool HHbot::readSpeed()
{
  int i, length = 13;
  unsigned char checkSum;
  unsigned char buf[13] = {0};

  // 读取缓存区长度
  if (ser.available() >= length)
  {
    // 读取串口数据
    ser.read(buf, length);

    // 清空缓存区
    ser.flushInput();

    // 检查信息头
    if (buf[0] != header[0] || buf[1] != header[1])
    {
      ROS_ERROR("Received message header error!");
      return false;
    }

    // 检查信息尾
    if (buf[length - 2] != ender[0] || buf[length - 1] != ender[1])
    {
      ROS_ERROR("Received message ender error!");
      return false;
    }

    // 转换校验
    checkSum = getCrc8(buf, length - 3);

    // 检查信息校验值
    if (checkSum != buf[length - 3])
    {
      ROS_ERROR("Received data check sum error!");
      return false;
    }

    // 读取速度值
    for (i = 0; i < 4; i++)
    {
      vel_left.odometry_char[i] = buf[i + 2];
      vel_right.odometry_char[i] = buf[i + 6];
    }

    // 积分计算里程计信息
    vx_ = (vel_right.odoemtry_float + vel_left.odoemtry_float) / 2;
    vth_ = (vel_right.odoemtry_float - vel_left.odoemtry_float) / ROBOT_LENGTH;

    // 记录实时时间戳
    ros::Time curr_time;
    curr_time = ros::Time::now();

    // 参数运算
    double dt = (curr_time - last_time_).toSec();
    double delta_x = (vx_ * cos(th_) - vy_ * sin(th_)) * dt;
    double delta_y = (vx_ * sin(th_) + vy_ * cos(th_)) * dt;
    double delta_th = vth_ * dt;

    x_ += delta_x;
    y_ += delta_y;
    th_ += delta_th;
    last_time_ = curr_time;
  }
  return true;
}
读取的数据长度为13,前两位是帧头header,最后两位是帧尾ender
最后第三位是CRC校验位
数据读取经过3层校验后,确认数据准确,开始读取数据
再根据读取的左右轮速度数据进行两轮差速模型的里程计信息运算和运动分析
接下来,定义 串口发送数据的函数
void HHbot::writeSpeed(double RobotV, double YawRate)
{
  int i, length = 13;
  unsigned char buf[13] = {0};

  // 计算左右轮期望速度
  if (RobotV == 0)
   {
     leftdata.data_float = -YawRate * ROBOT_LENGTH / 2.0;
     rightdata.data_float = -leftdata.d;
   }
   else if (YawRate == 0)
   {
     leftdata.data_float = RobotV;
     rightdata.data_float = RobotV;
   }
   else
   {
     leftdata.data_float = RobotV - YawRate * ROBOT_LENGTH / 2.0;
     rightdata.data_float = RobotV + YawRate * ROBOT_LENGTH / 2.0;
   }

  // 设置帧头
  for (i = 0; i < 2; i++)
    buf[i] = header[i];

  // 设置数据
  for (i = 0; i < 4; i++)
  {
    buf[i + 2] = leftdata.data_char[i];
    buf[i + 6] = rightdata.data_char[i];
  }

  // 转换校验
  buf[10] = getCrc8(buf, length - 3);

  // 设置帧尾
  for (i = 0; i < 2; i++)
    buf[11 + i] = ender[i];

  // 通过串口下发数据
  ser.write(buf, 13);
}
获取运动控制参数,解析后加于必要的协议,发送于下层执行器
接下来,定义 定期调用的函数
bool HHbot::spinOnce(double RobotV, double YawRate)
{
  // 下发机器人期望速度
  writeSpeed(RobotV, YawRate);

  // 读取机器人实际速度
  readSpeed();

  // 记录实时时间戳
  current_time_ = ros::Time::now();

  // 发布TF
  geometry_msgs::TransformStamped odom_trans;
  odom_trans.header.stamp = current_time_;
  odom_trans.header.frame_id = "odom";
  odom_trans.child_frame_id = "base_footprint";
  geometry_msgs::Quaternion odom_quat;
  odom_quat = tf::createQuaternionMsgFromYaw(th_);
  odom_trans.transform.translation.x = x_;
  odom_trans.transform.translation.y = y_;
  odom_trans.transform.translation.z = 0.0;
  odom_trans.transform.rotation = odom_quat;
  odom_broadcaster_.sendTransform(odom_trans);

  // 发布里程计消息
  nav_msgs::Odometry msgl;
  msgl.header.stamp = current_time_;
  msgl.header.frame_id = "odom";
  msgl.pose.pose.position.x = x_;
  msgl.pose.pose.position.y = y_;
  msgl.pose.pose.position.z = 0.0;
  msgl.pose.pose.orientation = odom_quat;
  msgl.pose.covariance = odom_pose_covariance;
  msgl.child_frame_id = "base_footprint";
  msgl.twist.twist.linear.x = vx_;
  msgl.twist.twist.linear.y = vy_;
  msgl.twist.twist.angular.z = vth_;
  msgl.twist.covariance = odom_twist_covariance;
  odom_pub.publish(msgl);
}
首先向下层执行器发送期望速度,然后读取下层执行器反馈的实际速度
然后发布TF和odom
这样就完全代替了arbotix,以真实的数据去运行
最后建立一个头文件/include/include/bsp/hhbot_bsp.h 以供调用
2.1.2 hhbot_bsp_node
然后建立hhbot_bsp_node.cpp文件
#include "bsp/hhbot_bsp.h"

double RobotV_ = 0;
double YawRate_ = 0;

// 速度控制消息的回调函数
void cmdCallback(const geometry_msgs::Twist &msg)
{
    RobotV_ = msg.linear.x;
    YawRate_ = msg.angular.z;
}

int main(int argc, char **argv)
{
    // 初始化节点
    ros::init(argc, argv, "hhbot_bsp_node");
    ros::NodeHandle n;

    // 初始化HHbot
    hhbot_bsp::HHbot robot;
    if (!robot.init())
        ROS_ERROR("HHbot initialized failed.");
    ROS_INFO("HHbot initialized successful.");

    // 创建一个Subscriber,订阅名为cmd_vel的topic,注册回调函数cmdCallback
    ros::Subscriber cmd_vel_sub = n.subscribe("cmd_vel", 1000, cmdCallback);

    // 循环运行 50Hz
    ros::Rate loop_rate(50);

    while (ros::ok())
    {
        robot.spinOnce(RobotV_, YawRate_);
        ros::spinOnce();
        loop_rate.sleep();
    }
    return 0;
}
初始化节点和串口,订阅cmd_vel,定义回调函数,设置运行频率50Hz
2.2. 文件编译
在 ROS笔记(39) 串口配置 的基础上增加编译
add_executable(hhbot_bsp_node src/hhbot_bsp_node.cpp src/hhbot_bsp_serial_conf.cpp)
target_link_libraries(hhbot_bsp_node ${catkin_LIBRARIES})
编译功能包:
$ catkin_make -DCATKIN_WHITELIST_PACKAGES="hhbot_bringup"

2.3. 启动节点
在新的终端启动roscore
$ roscore
然后运行该节点
$ rosrun hhbot_bringup hhbot_bsp_node

启动该节点正常
2.4. 测试
建立一个简单的移动小车hhbot_bringup.launch真实启动文件
<launch>

    <!-- 使用实际时间 -->
    <param name="/use_sim_time" value="false" />

    <!-- 加载机器人URDF/Xacro模型 -->
    <param name="robot_description" command="$(find xacro)/xacro --inorder '$(find hhbot_description)/urdf/hhbot.xacro'" />

    <!-- 运行joint_state_publisher节点,发布机器人的关节状态  -->
    <node name="joint_state_publisher" pkg="joint_state_publisher" type="joint_state_publisher" />

    <!-- 运行robot_state_publisher节点 -->
    <node name="robot_state_publisher" pkg="robot_state_publisher" type="robot_state_publisher" />

    <!-- 加载下层执行器串口通讯功能包 -->
    <node name="hhbot_bsp_node" pkg="hhbot_bringup" type="hhbot_bsp_node" />

</launch>
相比fake_hhbot_bringup.launch文件,使用hhbot_bsp_node代替arbotix节点
再在hhbot_play功能包中建立hhbot_play.launch文件
<launch>

    <!-- 运行机身驱动 -->
    <include file="$(find hhbot_bringup)/launch/hhbot_bringup.launch" />

    <!-- 运行导航驱动 -->
    <include file="$(find hhbot_navigation)/launch/nav_simple_demo.launch" />

</launch>
而nav_simple_demo.launch相比之前的nav_demo.launch只是用虚拟定位代替了AMCL
<!-- 运行AMCL节点 -->
<!-- <include file="$(find hhbot_navigation)/launch/amcl.launch" /> -->

<!-- 运行虚拟定位,兼容AMCL输出 -->
<node pkg="fake_localization" type="fake_localization" name="fake_localization" output="screen" />

<!-- 对于虚拟定位,需要设置一个/odom与/map之间的静态坐标变换 -->
<node pkg="tf" type="static_transform_publisher" name="map_odom_broadcaster" args="0 0 0 0 0 0 /map /odom 100" />
运行hhbot_play.launch文件
$ roslaunch hhbot_play hhbot_play.launch

真实的小车也会一样运动
3. 建立节点(Python)
3.1. 节点配置
3.1.1 初始化
在/hhbot_bringup/src/建立hhbot_bsp_node.py文件
定义一下所需的变量,初始化串口和消息
#!/usr/bin/env python
# coding=utf-8

import rospy  # 导入rospy模块 ROS的python客户端
from std_msgs.msg import String  # 导入std_msgs.msg模块的String消息类型
from nav_msgs.msg import Odometry  # 导入nav_msgs.msg模块的Odometry消息类型
from geometry_msgs.msg import Twist  # 导入geometry_msgs.msg模块的Twist消息类型
import hhbot_bsp_serial as bsp_serial  # 导入hhbot_bsp_serial模块 串口配置
import struct  # 导入struct模块 数据类型转换
import math  # 导入math模块 数据运算
import tf  # 导入tf模块 坐标转换

leftdata, rightdata = 0.0, 0.0  # 车轮驱动发送数据
vel_left, vel_right = 0.0, 0.0  # 车轮速度读取数据
ROBOT_RADIUS = 0.025  # 车轮的半径
ROBOT_LENGTH = 0.140  # 车轮的距离
last_time_ = 0.0  # 计算使用的时间戳
x_, y_, th_, vx_, vy_, vth_ = 0.0, 0.0, 0.0, 0.0, 0.0, 0.0  # 参数运算数值
RobotV_, YawRate_ = 0.0, 0.0  # 读取运动控制数值

# 姿势协方差
odom_pose_covariance = (1e-3, 0, 0, 0, 0, 0, 0, 1e-3, 0, 0, 0, 0, 0, 0, 1e6, 0,
                        0, 0, 0, 0, 0, 1e6, 0, 0, 0, 0, 0, 0, 1e6, 0, 0, 0, 0,
                        0, 0, 1e-3)

# 转动协方差
odom_twist_covariance = (1e-3, 0, 0, 0, 0, 0, 0, 1e-3, 0, 0, 0, 0, 0, 0, 1e6,
                         0, 0, 0, 0, 0, 0, 1e6, 0, 0, 0, 0, 0, 0, 1e6, 0, 0, 0,
                         0, 0, 0, 1e-3)
3.1.2 主函数
主函数先初始化hhbot_bsp_node节点,初始化串口通信
发布 odom 和 订阅cmd_vel
在循环中,先发送数据到下层执行器
接着读取执行器反馈的数据
然后解析并更新数据
if __name__ == '__main__':
    try:
        # 初始化节点hhbot_bsp_node
        rospy.init_node('hhbot_bsp_node', anonymous=True)

        # 串口通信初始化
        bsp_ser = bsp_serial.SerialInit()

        # 定义发布器 odom_pub 发布 odom
        odom_pub = rospy.Publisher('odom', Odometry, queue_size=100)

        # 初始化订阅器 订阅cmd_vel
        rospy.Subscriber("cmd_vel", Twist, callback)

        # 初始化循环频率50HZ的对象rate
        rate = rospy.Rate(50)

        # 在程序没退出的情况下
        while not rospy.is_shutdown():
            # 串口通信数据发送
            SerialWrite(bsp_ser, RobotV_, YawRate_)

            # 串口通信数据读取
            SerialRead(bsp_ser)

            # 数据更新函数
            DataUpdating()

            # 休眠
            rate.sleep()

        # 关闭串口通信并显示测试结束
        bsp_ser.close()
    except rospy.ROSInterruptException:
        pass
3.1.3 回调函数
订阅cmd_vel时触发回调函数callback
读取平面的线速度和角速度
def callback(msg):
    global RobotV_, YawRate_
    RobotV_ = msg.linear.x
    YawRate_ = msg.angular.z
3.1.4 数据发送函数
根据回调函数读取平面的线速度和角速度,计算左右轮期望速度,加上协议之后发送数据
def SerialWrite(ser, RobotV, YawRate):
    global ROBOT_LENGTH
    global leftdata, rightdata

    # 计算左右轮期望速度
    if RobotV == 0:
        leftdata = -YawRate * ROBOT_LENGTH / 2.0
        rightdata = -leftdata
    elif YawRate == 0:
        leftdata = RobotV
        rightdata = RobotV
    else:
        leftdata = RobotV - YawRate * ROBOT_LENGTH / 2.0
        rightdata = RobotV + YawRate * ROBOT_LENGTH / 2.0

    # 显示读取速度数据
    rospy.loginfo("Send vel:%f,%f", leftdata, rightdata)

    # 编辑发送的数据
    FH, FT = 0x88, 0X66
    data = chr(FH) + chr(FH)
    data = data + struct.pack("<f", leftdata)
    data = data + struct.pack("<f", rightdata)
    data = data + chr(getCrc8(data, 10))
    data = chr(FT) + chr(FT)

    # 发送数据
    ser.write(data)
3.1.5 数据读取函数
读取下层执行器反馈的数据,进过协议解析,读取小车左右轮实际速度,进行运动参数运算
def SerialRead(ser):
    global vel_left, vel_right, last_time_
    global x_, y_, th_, vx_, vy_, vth_
    global leftdata, rightdata
    data_FH, data_FT = 0x88, 0x66
    data_LEN = 13

    # 读取数据
    data = ser.read(data_LEN)

    # 接受到数据的情况下
    if len(data) == data_LEN:
        # 检查信息头
        if (ord(data[0]) != data_FH or ord(data[1]) != data_FH):
            rospy.logerr("Received message header error!")
	        return 0

        # 检查信息尾
        if (ord(data[data_LEN - 2]) != data_FT
                or ord(data[data_LEN - 1]) != data_FT):
            rospy.logerr("Received message ender error!")
	        return 0

        # 检查信息校验值
        if (ord(data[data_LEN - 3]) != getCrc8(data, data_LEN - 3)):
            rospy.logerr("Received data check sum error!")
	        return 0

        # 获取数据
        vel_left = struct.unpack('<f', data[2:6])[0]
        vel_right = struct.unpack('<f', data[6:10])[0]

        # 显示读取速度数据
        rospy.loginfo("Read vel:%f,%f", vel_left, vel_right)

        # 积分计算里程计信息
        vx_ = (vel_right + vel_left) / 2
        vth_ = (vel_right - vel_left) / ROBOT_LENGTH

        # 运动参数运算
        dt = rospy.get_time() - last_time_
        delta_x = (vx_ * math.cos(th_) - vy_ * math.sin(th_)) * dt
        delta_y = (vx_ * math.sin(th_) + vy_ * math.cos(th_)) * dt
        delta_th = vth_ * dt
        x_ = x_ + delta_x
        y_ = y_ + delta_y
        th_ = th_ + delta_th
        last_time_ = rospy.get_time()
3.1.6 数据更新函数
数据更新函数中:
- 发布
odom到的base_footprint的TF - 发布里程计消息
odom
def DataUpdating():
    # 记录实时时间戳
    current_time_ = rospy.Time.now()

    # 定义广播器
    br = tf.TransformBroadcaster()

    # 发布TF
    odom_quat = tf.transformations.quaternion_from_euler(0, 0, th_)
    br.sendTransform((x_, y_, 0), odom_quat, current_time_, "base_footprint",
                     "odom")

    # 创建并发布里程计消息
    odometry = Odometry()
    odometry.header.stamp = current_time_
    odometry.header.frame_id = "odom"
    odometry.pose.pose.position.x = x_
    odometry.pose.pose.position.y = y_
    odometry.pose.pose.position.z = 0.0
    odometry.pose.pose.orientation.x = odom_quat[0]
    odometry.pose.pose.orientation.y = odom_quat[1]
    odometry.pose.pose.orientation.z = odom_quat[2]
    odometry.pose.pose.orientation.w = odom_quat[3]
    odometry.pose.covariance = odom_pose_covariance
    odometry.child_frame_id = "base_footprint"
    odometry.twist.twist.linear.x = vx_
    odometry.twist.twist.linear.y = vy_
    odometry.twist.twist.angular.z = vth_
    odometry.twist.covariance = odom_twist_covariance
    odom_pub.publish(odometry)
3.2. 启动节点
启动节点前需要在在 ROS笔记(39) 串口配置 的基础上对CMakeLists.txt中添加编译选项
find_package(catkin REQUIRED COMPONENTS
  ...
  std_msgs
  nav_msgs
)
在新的终端启动roscore
$ roscore
然后运行该节点
$ rosrun hhbot_bringup hhbot_bsp_node.py

启动该节点正常
3.3. 测试
建立一个简单的移动小车hhbot_bringup_py.launch真实启动文件
<launch>

    <!-- 使用实际时间 -->
    <param name="/use_sim_time" value="false" />

    <!-- 加载机器人URDF/Xacro模型 -->
    <param name="robot_description" command="$(find xacro)/xacro --inorder '$(find hhbot_description)/urdf/hhbot.xacro'" />

    <!-- 运行joint_state_publisher节点,发布机器人的关节状态  -->
    <node name="joint_state_publisher" pkg="joint_state_publisher" type="joint_state_publisher" />

    <!-- 运行robot_state_publisher节点 -->
    <node name="robot_state_publisher" pkg="robot_state_publisher" type="robot_state_publisher" />

    <!-- 加载下层执行器串口通讯功能包 -->
    <node name="hhbot_bsp_node" pkg="hhbot_bringup" type="hhbot_bsp_node.py" />

</launch>
相比fake_hhbot_bringup.launch文件,使用hhbot_bsp_node.py代替arbotix节点
相比hhbot_bringup.launch文件,使用hhbot_bsp_node.py代替hhbot_bsp_node
再在hhbot_play功能包中建立hhbot_play_py.launch文件
<launch>

    <!-- 运行机身驱动 -->
    <include file="$(find hhbot_bringup)/launch/hhbot_bringup_py.launch" />

    <!-- 运行导航驱动 -->
    <include file="$(find hhbot_navigation)/launch/nav_simple_demo.launch" />

</launch>
运行hhbot_play_py.launch文件
$ roslaunch hhbot_play hhbot_play_py.launch

参考:
相关推荐:
ROS笔记(39) 串口配置
ROS笔记(38) Xbox360手柄控制移动
ROS笔记(37) 抓取和放置
ROS笔记(36) 避障运动规划
ROS笔记(35) 笛卡尔运动规划
谢谢!
