1介绍
这篇文章的目的是使用Spring Integration HTTP入站适配器实现HTTP Restful API 。本教程分为两部分:
- XML配置示例(同一篇文章)。
- Java DSL示例。这将在本教程的下一部分中进行解释,展示如何使用Spring Integration Java DSL配置应用程序,并提供包含Java 7和Java 8的示例。
在查看代码之前,让我们看一下下图,该图显示了应用程序公开的不同服务:
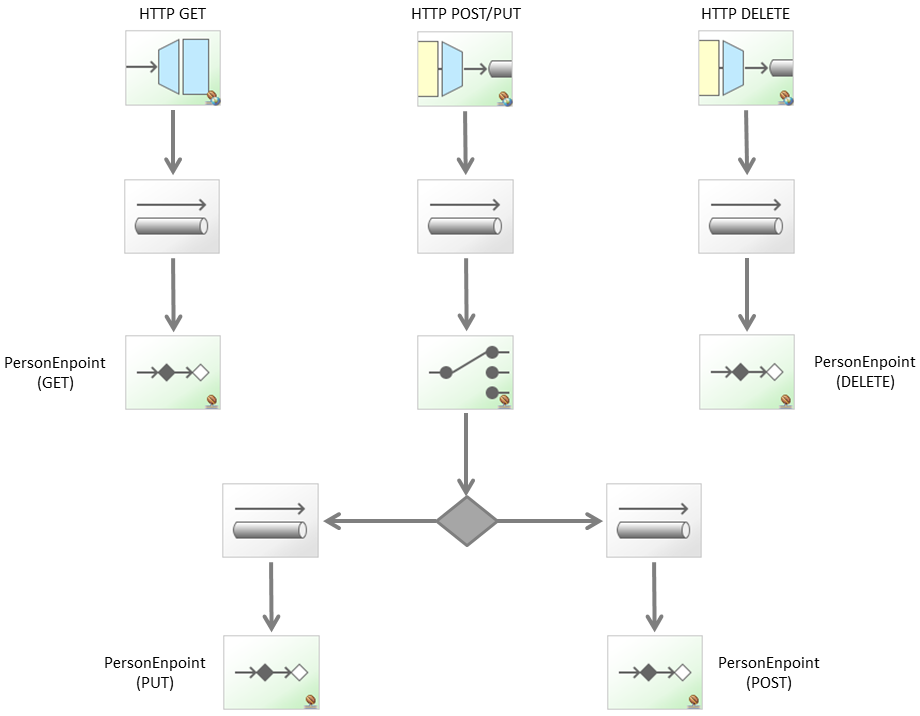
GET操作由HTTP入站网关处理,而其余部分(PUT,POST和DELETE)由HTTP入站通道适配器处理,因为没有响应主体返回给客户端。每个操作将在以下部分进行说明:
- 介绍
- 应用配置
- 获取操作
- 投放和发布操作
- 删除操作
- 结论
源代码在Github上提供。
2应用程序配置
在web.xml中文件包含分发程序Servlet的定义:
| 1 2 3 4 5 6 7 8 9 10 11 12 |
<servlet> <servlet-name>springServlet</servlet-name> <servlet-class>org.springframework.web.servlet.DispatcherServlet</servlet-class> <init-param> <param-name>contextConfigLocation</param-name> <param-value>classpath:xpadro/spring/integration/configuration/http-inbound-config.xml</param-value> </init-param> </servlet> <servlet-mapping> <servlet-name>springServlet</servlet-name> <url-pattern>/spring/*</url-pattern> </servlet-mapping> |
在http-inbound-config.xml文件将在下面的章节来解释。
该pom.xml文件详列如下。注意jackson库是很重要的。由于我们将使用JSON来表示我们的资源,因此这些库必须存在于类路径中。否则,框架将不会注册所需的转换器。
| 1 2 3 4 5 6 7 8 9 10 11 12 13 14 15 16 17 18 19 20 21 22 23 24 25 26 27 28 29 30 31 32 33 34 35 36 37 38 39 40 41 42 43 44 45 46 47 48 49 50 51 52 53 54 55 56 57 58 59 60 61 62 63 64 65 |
<properties> <spring-version>4.1.3.RELEASE</spring-version> <spring-integration-version>4.1.0.RELEASE</spring-integration-version> <slf4j-version>1.7.5</slf4j-version> <junit-version>4.9</junit-version> <jackson-version>2.3.0</jackson-version> </properties> <dependencies> <!-- Spring Framework - Core --> <dependency> <groupId>org.springframework</groupId> <artifactId>spring-context</artifactId> <version>${spring-version}</version> </dependency> <dependency> <groupId>org.springframework</groupId> <artifactId>spring-webmvc</artifactId> <version>${spring-version}</version> </dependency>
<!-- Spring Framework - Integration --> <dependency> <groupId>org.springframework.integration</groupId> <artifactId>spring-integration-core</artifactId> <version>${spring-integration-version}</version> </dependency> <dependency> <groupId>org.springframework.integration</groupId> <artifactId>spring-integration-http</artifactId> <version>${spring-integration-version}</version> </dependency>
<!-- JSON --> <dependency> <groupId>com.fasterxml.jackson.core</groupId> <artifactId>jackson-core</artifactId> <version>${jackson-version}</version> </dependency> <dependency> <groupId>com.fasterxml.jackson.core</groupId> <artifactId>jackson-databind</artifactId> <version>${jackson-version}</version> </dependency>
<!-- Testing --> <dependency> <groupId>junit</groupId> <artifactId>junit</artifactId> <version>${junit-version}</version> <scope>test</scope> </dependency>
<!-- Logging --> <dependency> <groupId>org.slf4j</groupId> <artifactId>slf4j-api</artifactId> <version>${slf4j-version}</version> </dependency> <dependency> <groupId>org.slf4j</groupId> <artifactId>slf4j-log4j12</artifactId> <version>${slf4j-version}</version> </dependency> </dependencies> |
3获取操作
流程的配置如下所示:
HTTP的入站-config.xml中
网关接收到此路径的请求:/ persons / {personId}。一旦请求到达,就会创建一条消息并发送到httpGetChannel通道。网关将等待服务激活器(personEndpoint)返回响应:
| 1 2 3 4 5 6 7 8 9 10 |
<int-http:inbound-gateway request-channel="httpGetChannel" reply-channel="responseChannel" supported-methods="GET" path="/persons/{personId}" payload-expression="#pathVariables.personId">
<int-http:request-mapping consumes="application/json" produces="application/json"/> </int-http:inbound-gateway> <int:service-activator ref="personEndpoint" method="get" input-channel="httpGetChannel" output-channel="responseChannel"/> |
现在需要解释一些问题:
- supported-methods:此属性指示网关支持哪些方法(仅GET请求)。
- payload-expression:我们在这里做的是从URI模板中获取personId变量的值并将其放入消息的有效载荷中。例如,请求路径'/ persons / 3'将成为值为'3'的消息作为其有效负载。
- request-mapping:我们可以包含这个元素来指定几个属性并过滤哪些请求将被映射到网关。在该示例中,只有包含Content-Type头(consumes属性)和Accept头(产生属性)的值为'application / json'的请求将由此网关处理。
一旦一个请求被映射到这个网关,就会建立一条消息并发送给服务激活器。在这个例子中,我们定义了一个简单的bean,它将从服务中获得所需的信息:
| 1 2 3 4 5 6 7 8 9 10 11 12 13 14 15 16 17 18 19 20 21 22 23 24 25 26 |
@Component public class PersonEndpoint { private static final String STATUSCODE_HEADER = "http_statusCode";
@Autowired private PersonService service;
public Message<?> get(Message<String> msg) { long id = Long.valueOf(msg.getPayload()); ServerPerson person = service.getPerson(id);
if (person == null) { return MessageBuilder.fromMessage(msg) .copyHeadersIfAbsent(msg.getHeaders()) .setHeader(STATUSCODE_HEADER, HttpStatus.NOT_FOUND) .build(); }
return MessageBuilder.withPayload(person) .copyHeadersIfAbsent(msg.getHeaders()) .setHeader(STATUSCODE_HEADER, HttpStatus.OK) .build(); }
//Other operations } |
根据从服务收到的回复,我们将退回请求的人员或状态代码,表明未找到任何人。
现在我们将测试一切按预期工作。首先,我们定义一个ClientPerson类,将响应转换为:
| 1 2 3 4 5 6 7 8 9 10 11 12 13 14 15 16 17 |
@JsonIgnoreProperties(ignoreUnknown = true) public class ClientPerson implements Serializable { private static final long serialVersionUID = 1L;
@JsonProperty("id") private int myId; private String name;
public ClientPerson() {}
public ClientPerson(int id, String name) { this.myId = id; this.name = name; }
//Getters and setters } |
然后我们执行测试。buildHeaders方法是我们指定Accept和Content-Type标头的地方。请记住,我们在这些标头中使用'application / json'值限制了请求。
| 1 2 3 4 5 6 7 8 9 10 11 12 13 14 15 16 17 18 19 20 21 22 23 24 25 26 27 28 29 30 31 32 33 34 35 36 37 38 39 40 41 42 43 44 45 46 47 48 49 50 51 52 53 |
@RunWith(BlockJUnit4ClassRunner.class) public class GetOperationsTest { private static final String URL = "http://localhost:8081/int-http-xml/spring/persons/{personId}"; private final RestTemplate restTemplate = new RestTemplate();
private HttpHeaders buildHeaders() { HttpHeaders headers = new HttpHeaders(); headers.setAccept(Arrays.asList(MediaType.APPLICATION_JSON)); headers.setContentType(MediaType.APPLICATION_JSON);
return headers; }
@Test public void getResource_responseIsConvertedToPerson() { HttpEntity<Integer> entity = new HttpEntity<>(buildHeaders()); ResponseEntity<ClientPerson> response = restTemplate.exchange(URL, HttpMethod.GET, entity, ClientPerson.class, 1); assertEquals("John" , response.getBody().getName()); assertEquals(HttpStatus.OK, response.getStatusCode()); }
@Test public void getResource_responseIsReceivedAsJson() { HttpEntity<Integer> entity = new HttpEntity<>(buildHeaders()); ResponseEntity<String> response = restTemplate.exchange(URL, HttpMethod.GET, entity, String.class, 1); assertEquals("{\"id\":1,\"name\":\"John\",\"age\":25}", response.getBody()); assertEquals(HttpStatus.OK, response.getStatusCode()); }
@Test(expected=HttpClientErrorException.class) public void getResource_sendXml_415errorReturned() { HttpHeaders headers = new HttpHeaders(); headers.setAccept(Arrays.asList(MediaType.APPLICATION_JSON)); headers.setContentType(MediaType.APPLICATION_XML); HttpEntity<Integer> entity = new HttpEntity<>(headers); restTemplate.exchange(URL, HttpMethod.GET, entity, ClientPerson.class, 1); }
@Test(expected=HttpClientErrorException.class) public void getResource_expectXml_receiveJson_406errorReturned() { HttpHeaders headers = new HttpHeaders(); headers.setAccept(Arrays.asList(MediaType.APPLICATION_XML)); headers.setContentType(MediaType.APPLICATION_JSON); HttpEntity<Integer> entity = new HttpEntity<>(headers); restTemplate.exchange(URL, HttpMethod.GET, entity, ClientPerson.class, 1); }
@Test(expected=HttpClientErrorException.class) public void getResource_resourceNotFound_404errorReturned() { HttpEntity<Integer> entity = new HttpEntity<>(buildHeaders()); restTemplate.exchange(URL, HttpMethod.GET, entity, ClientPerson.class, 8); } } |
在Content-Type标题中未指定正确的值将导致415 Unsupported Media Type错误,因为网关不支持此媒体类型。
另一方面,在Accept头中指定一个不正确的值将导致406 Not Acceptable错误,因为网关正在返回比预期内容更多的其他类型的内容。
4放置和后置操作
对于PUT和POST操作,我们使用相同的HTTP入站通道适配器,利用可能性来定义多个路径和方法。一旦请求到达,路由器将负责将消息传递到正确的端点。
http-inbound-config.xml中
| 1 2 3 4 5 6 7 8 9 10 11 12 13 14 15 16 |
<int-http:inbound-channel-adapter channel="routeRequest" status-code-expression="T(org.springframework.http.HttpStatus).NO_CONTENT" supported-methods="POST, PUT" path="/persons, /persons/{personId}" request-payload-type="xpadro.spring.integration.server.model.ServerPerson">
<int-http:request-mapping consumes="application/json"/> </int-http:inbound-channel-adapter> <int:router input-channel="routeRequest" expression="headers.http_requestMethod"> <int:mapping value="PUT" channel="httpPutChannel"/> <int:mapping value="POST" channel="httpPostChannel"/> </int:router> <int:service-activator ref="personEndpoint" method="put" input-channel="httpPutChannel"/> <int:service-activator ref="personEndpoint" method="post" input-channel="httpPostChannel"/> |
此通道适配器包含两个新属性:
- status-code-expression:默认情况下,通道适配器确认已收到请求并返回200状态码。如果我们想覆盖这个行为,我们可以在这个属性中指定一个不同的状态码。在这里,我们指定这些操作将返回一个204无内容状态码。
- request-payload-type:这个属性指定请求体将被转换成什么类。如果我们没有定义它,它将无法转换为服务激活器期望的类(ServerPerson)。
收到请求时,适配器将其发送到路由器期待的路由请求通道。该路由器将检查消息头,并根据“http_requestMethod”头的值将它传递给适当的端点。
PUT和POST操作都由同一个bean处理:
| 1 2 3 4 5 6 7 8 9 10 11 12 13 14 15 |
@Component public class PersonEndpoint { @Autowired private PersonService service;
//Get operation
public void put(Message<ServerPerson> msg) { service.updatePerson(msg.getPayload()); }
public void post(Message<ServerPerson> msg) { service.insertPerson(msg.getPayload()); } } |
返回类型为void,因为没有响应; 入站适配器将处理状态码的返回。
PutOperationsTest验证是否返回了正确的状态码并且资源已更新:
| 1 2 3 4 5 6 7 8 9 10 11 12 13 14 15 16 17 18 19 20 21 22 23 |
@RunWith(BlockJUnit4ClassRunner.class) public class PutOperationsTest { private static final String URL = "http://localhost:8081/int-http-xml/spring/persons/{personId}"; private final RestTemplate restTemplate = new RestTemplate();
//build headers method
@Test public void updateResource_noContentStatusCodeReturned() { HttpEntity<Integer> getEntity = new HttpEntity<>(buildHeaders()); ResponseEntity<ClientPerson> response = restTemplate.exchange(URL, HttpMethod.GET, getEntity, ClientPerson.class, 4); ClientPerson person = response.getBody(); person.setName("Sandra"); HttpEntity<ClientPerson> putEntity = new HttpEntity<ClientPerson>(person, buildHeaders());
response = restTemplate.exchange(URL, HttpMethod.PUT, putEntity, ClientPerson.class, 4); assertEquals(HttpStatus.NO_CONTENT, response.getStatusCode());
response = restTemplate.exchange(URL, HttpMethod.GET, getEntity, ClientPerson.class, 4); person = response.getBody(); assertEquals("Sandra", person.getName()); } } |
PostOperationsTest验证是否添加了新资源:
| 1 2 3 4 5 6 7 8 9 10 11 12 13 14 15 16 17 18 19 20 21 22 |
@RunWith(BlockJUnit4ClassRunner.class) public class PostOperationsTest { private static final String POST_URL = "http://localhost:8081/int-http-xml/spring/persons"; private static final String GET_URL = "http://localhost:8081/int-http-xml/spring/persons/{personId}"; private final RestTemplate restTemplate = new RestTemplate();
//build headers method
@Test public void addResource_noContentStatusCodeReturned() { ClientPerson person = new ClientPerson(9, "Jana"); HttpEntity<ClientPerson> entity = new HttpEntity<ClientPerson>(person, buildHeaders());
ResponseEntity<ClientPerson> response = restTemplate.exchange(POST_URL, HttpMethod.POST, entity, ClientPerson.class); assertEquals(HttpStatus.NO_CONTENT, response.getStatusCode());
HttpEntity<Integer> getEntity = new HttpEntity<>(buildHeaders()); response = restTemplate.exchange(GET_URL, HttpMethod.GET, getEntity, ClientPerson.class, 9); person = response.getBody(); assertEquals("Jana", person.getName()); } } |
5删除操作
我们宁静的API的最后一个操作是删除操作。这次我们使用单通道适配器来实现这个目的:
| 1 2 3 4 5 6 7 8 9 10 |
<int-http:inbound-channel-adapter channel="httpDeleteChannel" status-code-expression="T(org.springframework.http.HttpStatus).NO_CONTENT" supported-methods="DELETE" path="/persons/{personId}" payload-expression="#pathVariables.personId">
<int-http:request-mapping consumes="application/json"/> </int-http:inbound-channel-adapter> <int:service-activator ref="personEndpoint" method="delete" input-channel="httpDeleteChannel"/> |
通道适配器允许我们定义返回的状态码,并且我们使用payload-expression属性将请求的personId映射到消息正文。配置与之前的操作有所不同,但这里没有任何解释。
服务激活器(我们的人员端点)将请求人员服务删除此资源。
| 1 2 3 4 |
public void delete(Message<String> msg) { long id = Long.valueOf(msg.getPayload()); service.deletePerson(id); } |
最后,要求的测试:
| 1 2 3 4 5 6 7 8 9 10 11 12 13 14 15 16 17 18 19 20 21 |
@RunWith(BlockJUnit4ClassRunner.class) public class DeleteOperationsTest { private static final String URL = "http://localhost:8081/int-http-xml/spring/persons/{personId}"; private final RestTemplate restTemplate = new RestTemplate();
//build headers method
@Test public void deleteResource_noContentStatusCodeReturned() { HttpEntity<Integer> entity = new HttpEntity<>(buildHeaders()); ResponseEntity<ClientPerson> response = restTemplate.exchange(URL, HttpMethod.DELETE, entity, ClientPerson.class, 3); assertEquals(HttpStatus.NO_CONTENT, response.getStatusCode());
try { response = restTemplate.exchange(URL, HttpMethod.GET, entity, ClientPerson.class, 3); Assert.fail("404 error expected"); } catch (HttpClientErrorException e) { assertEquals(HttpStatus.NOT_FOUND, e.getStatusCode()); } } } |
六,结论
这篇文章介绍了我们的应用程序,以便从已知的角度了解它是如何构建的(xml配置)。在本教程的下一部分中,我们将使用Java DSL实现相同的应用程序。该应用程序将被配置为使用Java 8运行,但是当使用lambdas时,我还将展示如何使用Java 7来完成。