一、本机使用环境
商汤科技和香港中文大学联合开源的深度学习目标检测工具箱mmdetection源码地址
Ubuntu16.04
Cuda9.0 + cudnn7.5
Python3.6
GCC 7.2
Anaconda3
二、环境配置
官方配置教程(建议按此教程进行)
1.使用conda创建虚拟环境
conda create -n mmdetection python=3.6
source activate mmdetection
Anaconda镜像源已经可以使用
conda config --add channels https://mirrors.tuna.tsinghua.edu.cn/anaconda/pkgs/free/
conda config --add channels https://mirrors.tuna.tsinghua.edu.cn/anaconda/cloud/conda-forge
conda config --add channels https://mirrors.tuna.tsinghua.edu.cn/anaconda/cloud/msys2/

# 设置搜索时显示通道地址
conda config --set show_channel_urls yes
安装pytorch需要添加pytorch源
conda config --add channels https://mirrors.tuna.tsinghua.edu.cn/anaconda/cloud/pytorch/
2.安装pytorch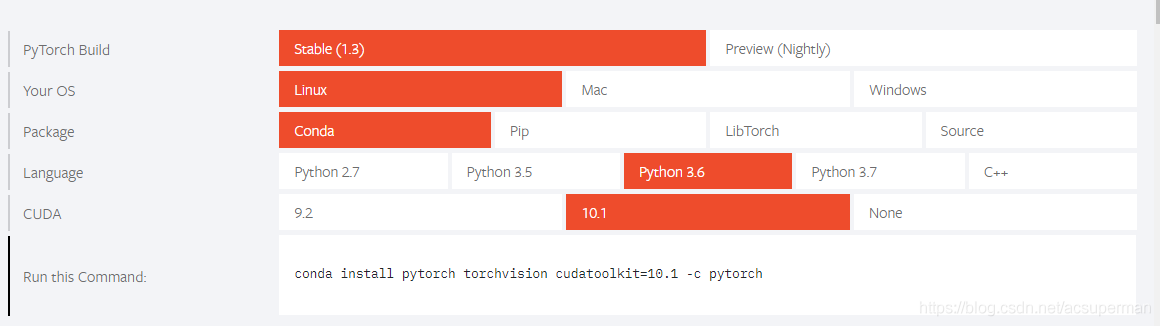
pytorch安装直接使用官网的命令即可,但是要把-c python去掉否则无法使用pytorch的清华源
比如我的cuda是9.0所以我使用的命令为
conda install pytorch==1.1.0 torchvision==0.3.0 cudatoolkit=9.0
#其中cudatoolkit只是一个cuda的工具包
3.clone仓库
git clone https://github.com/open-mmlab/mmdetection.git
cd mmdetection
4.运行命令
python setup.py develop建议在运行之前把以下的包装好(虽然此命令是自动下载下面的包,但是很慢)

mmdetection的步骤,至此完成。可以建立demo.py文件,测试一波。(模型是存储在亚马逊云服务器上,下载会比较慢)
from mmdet.apis import init_detector, inference_detector, show_result
import mmcv

config_file = 'configs/faster_rcnn_x101_32x4d_fpn_1x.py'
checkpoint_file = 'checkpoints/faster_rcnn_x101_32x4d_fpn_2x_20181218-0ed58946.pth'

# build the model from a config file and a checkpoint file
model = init_detector(config_file, checkpoint_file, device='cuda:0')

# test a single image and show the results
img = 'test.jpg'  # or img = mmcv.imread(img), which will only load it once
result = inference_detector(model, img)
# visualize the results in a new window
show_result(img, result, model.CLASSES)
# or save the visualization results to image files
#show_result(img, result, model.CLASSES, out_file='result.jpg')

# test a video and show the results
'''
video = mmcv.VideoReader('video.mp4')
for frame in video:
    result = inference_detector(model, frame)
    show_result(frame, result, model.CLASSES, wait_time=1)
三-VOC格式数据集训练与测试
1.数据集存放位置(如果服务器已有此数据集,建议使用软链接)
mmdetection
├── mmdet
├── tools
├── configs
├── data
│   ├── VOCdevkit
│   │   ├── VOC2007
│   │   │   ├── Annotations
│   │   │   ├── JPEGImages
│   │   │   ├── ImageSets
│   │   │   │   ├── Main
│   │   │   │   │   ├── test.txt
│   │   │   │   │   ├── train.txt
                    |—— trainval.txt
2代码修改
①mmdet/dataset/voc.py,把里面的类别改成你自己数据集的类别。
②mmdet/core/evaluation/class_name.py,把里面的voc_classes()改成你自己数据集的类别。
③修改config文件,以下我使用的RetinaNet样例
# model settings
model = dict(
    type='RetinaNet',
    pretrained='open-mmlab://resnext101_32x4d',
    backbone=dict(
        type='ResNeXt',
        depth=101,
        groups=32,
        base_width=4,
        num_stages=4,
        out_indices=(0, 1, 2, 3),
        frozen_stages=1,
        style='pytorch'),
    neck=dict(
        type='FPN',
        in_channels=[256, 512, 1024, 2048],
        out_channels=256,
        start_level=1,
        add_extra_convs=True,
        num_outs=5),
    bbox_head=dict(
        type='RetinaHead',
        num_classes=21, #修改为自己数据集的类别数+1
        in_channels=256,
        stacked_convs=4,
        feat_channels=256,
        octave_base_scale=4,
        scales_per_octave=3,
        anchor_ratios=[0.5, 1.0, 2.0],
        anchor_strides=[8, 16, 32, 64, 128],
        target_means=[.0, .0, .0, .0],
        target_stds=[1.0, 1.0, 1.0, 1.0],
        loss_cls=dict(
            type='FocalLoss',
            use_sigmoid=True,
            gamma=2.0,
            alpha=0.25,
            loss_weight=1.0),
        loss_bbox=dict(type='SmoothL1Loss', beta=0.11, loss_weight=1.0)))
# training and testing settings
train_cfg = dict(
    assigner=dict(
        type='MaxIoUAssigner',
        pos_iou_thr=0.5,
        neg_iou_thr=0.4,
        min_pos_iou=0,
        ignore_iof_thr=-1),
    allowed_border=-1,
    pos_weight=-1,
    debug=False)
test_cfg = dict(
    nms_pre=1000,
    min_bbox_size=0,
    score_thr=0.05,
    nms=dict(type='nms', iou_thr=0.5),
    max_per_img=100)
# dataset settings
dataset_type = 'VOCDataset'
data_root = 'data/VOCdevkit/'
img_norm_cfg = dict(
    mean=[123.675, 116.28, 103.53], std=[58.395, 57.12, 57.375], to_rgb=True)
train_pipeline = [
    dict(type='LoadImageFromFile'),
    dict(type='LoadAnnotations', with_bbox=True),
    dict(type='Resize', img_scale=(1333, 800), keep_ratio=True),
    dict(type='RandomFlip', flip_ratio=0.5),
    dict(type='Normalize', **img_norm_cfg),
    dict(type='Pad', size_divisor=32),
    dict(type='DefaultFormatBundle'),
    dict(type='Collect', keys=['img', 'gt_bboxes', 'gt_labels']),
]
test_pipeline = [
    dict(type='LoadImageFromFile'),
    dict(
        type='MultiScaleFlipAug',
        img_scale=(1333, 800),
        flip=False,
        transforms=[
            dict(type='Resize', keep_ratio=True),
            dict(type='RandomFlip'),
            dict(type='Normalize', **img_norm_cfg),
            dict(type='Pad', size_divisor=32),
            dict(type='ImageToTensor', keys=['img']),
            dict(type='Collect', keys=['img']),
        ])
]
data = dict(
    imgs_per_gpu=2,
    workers_per_gpu=2,
    train=dict(
        type=dataset_type,
        ann_file=data_root + 'VOC2007/ImageSets/Main/train.txt',
        img_prefix=data_root + 'VOC2007/',
        pipeline=train_pipeline),
    val=dict(
        type=dataset_type,
        ann_file=data_root + 'VOC2007/ImageSets/Main/trainval.txt',
        img_prefix=data_root + 'VOC2007/',
        pipeline=test_pipeline),
    test=dict(
        type=dataset_type,
        ann_file=data_root + 'VOC2007/ImageSets/Main/test.txt',
        img_prefix=data_root + 'VOC2007/',
        pipeline=test_pipeline))
# optimizer
optimizer = dict(type='SGD', lr=0.005, momentum=0.9, weight_decay=0.0001)
optimizer_config = dict(grad_clip=dict(max_norm=35, norm_type=2))
# learning policy
lr_config = dict(
    policy='step',
    warmup='linear',
    warmup_iters=500,
    warmup_ratio=1.0 / 3,
    step=[8, 11])
checkpoint_config = dict(interval=1)
# yapf:disable
log_config = dict(
    interval=50,
    hooks=[
        dict(type='TextLoggerHook'),
        # dict(type='TensorboardLoggerHook')
    ])
# yapf:enable
# runtime settings
total_epochs = 32
device_ids = range(8)
dist_params = dict(backend='nccl')
log_level = 'INFO'
work_dir = './work_dirs/retinanet_x101_32x4d_fpn_1x'
load_from = None
resume_from = None
workflow = [('train', 1)]
四 训练
python tools/train.py configs/RetinaNet.py --gpus 1 --gpus 为使用gpu的数量,默认是从第0块卡开始
五 测试
由于test.py文件中只对coco数据集进行eval,所以先用test.py生成pkl文件,再用eval_voc.py进行计算map
python tools/test.py configs/RetinaNet.py work_dirs/latest.pth --out=eval/result.pkl使用pkl文件计算机每个类的ap
python tools/voc_eval.py eval/result.pkl configs/RetinaNet.py还有许多使用命令,参考GitHub上的教程即可
推荐阅读
