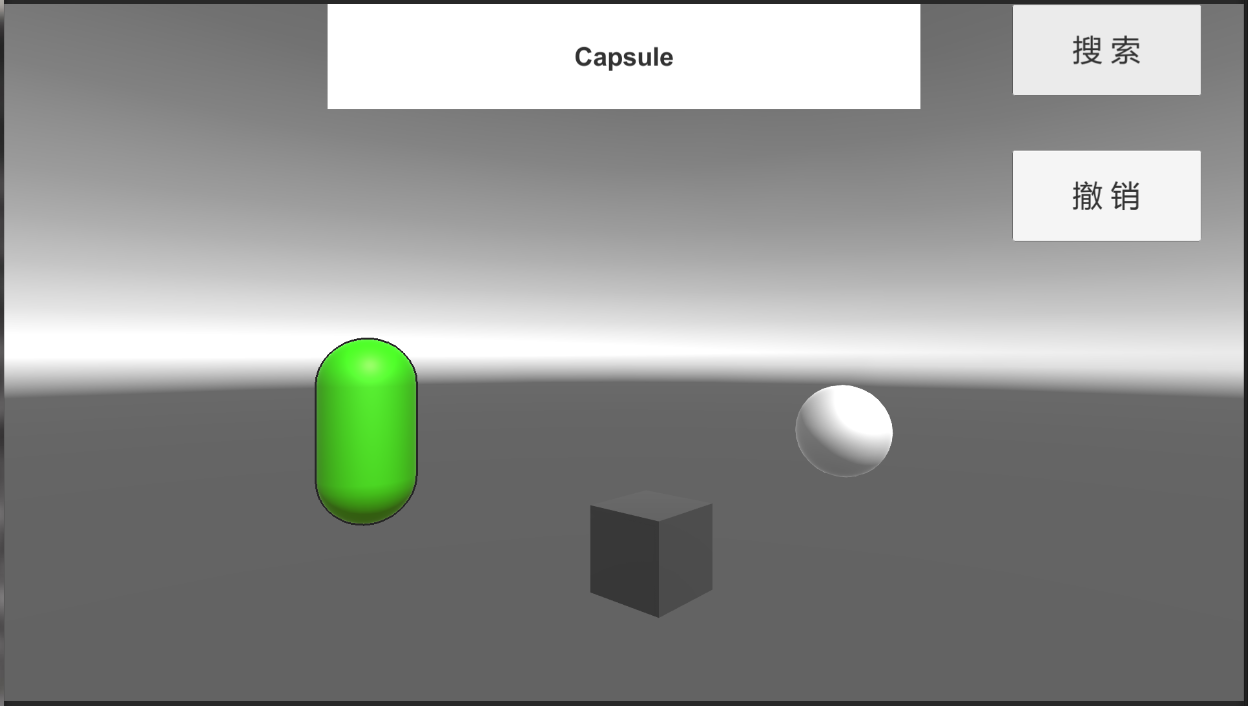
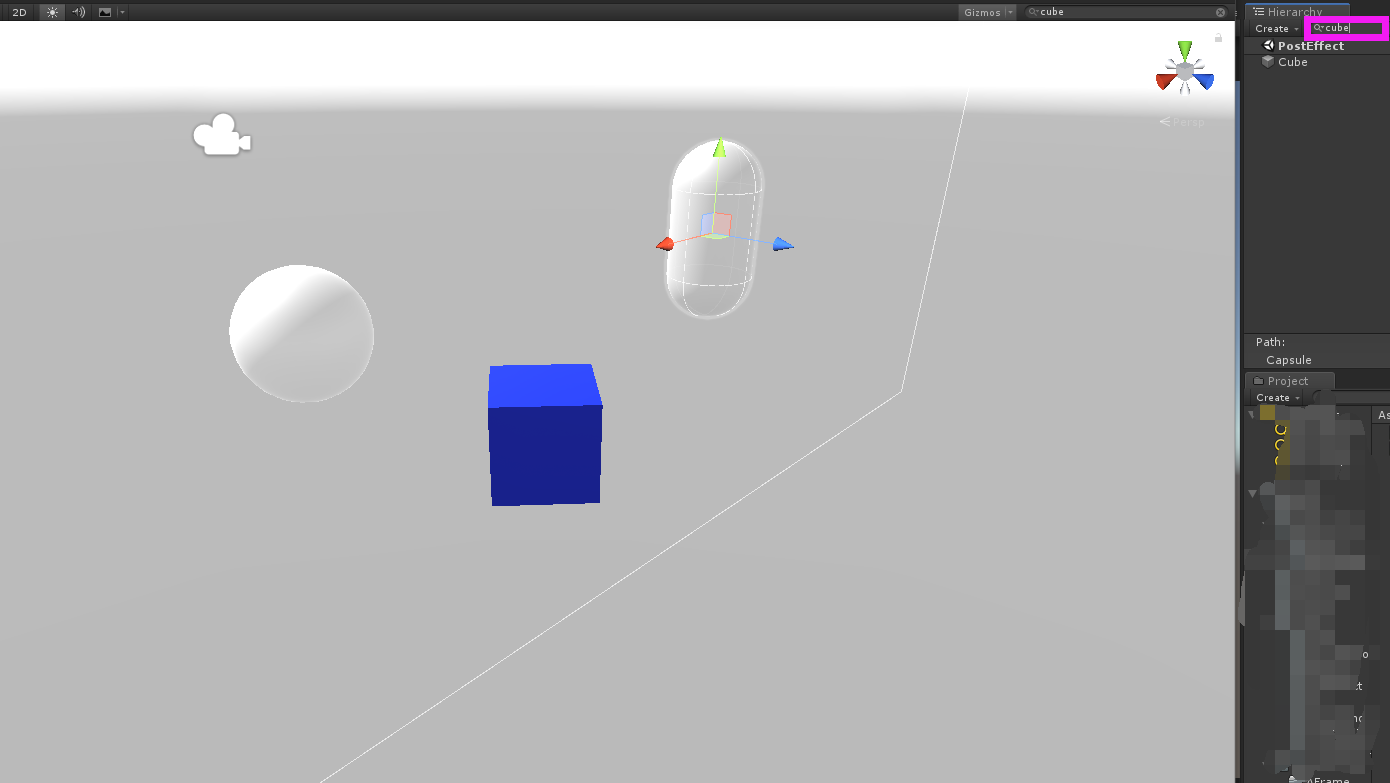
如U3D中Hierarchy面板下的搜索效果:
讲解分析:
1.这种PostEffect效果其实就是指Unity shader的后处理,即游戏中实现屏幕特效的常见方法。顾名思义屏幕后处理就是指在渲染完整个场景得到屏幕图像后,再对这个图像进行一系列操作,实现各种屏幕特效。
2.要实现这种屏幕后处理的基础在于得到渲染后的屏幕图像,即抓取屏幕,Unity中提供给我们一个方便接口——OnRenderImage函数。
3.OnRenderImage函数定义为MonoBehaviour.OnRenderImage (RenderTexture src, RenderTexture dest); Unity会把当前渲染得到的图像存储在第一个参数对应的源渲染纹理中,通过该函数一系列操作后,再把目标渲染纹理,即第二个参数对应的渲染纹理显示到屏幕上。在OnRenderImage函数中,通常利用Graphics.Blit函数来完成对渲染纹理的处理。(若dest为null,就会直接将结果显示到屏幕上)。

src纹理是源纹理,在屏幕后处理技术中,该参数就是当前屏幕的渲染纹理或者是上一步处理后得到的渲染纹理。参数mat是材质,此材质使用的Unity Shader将会进行各种屏幕后处理操作,而src纹理将会被传递给材质的shader中名为_MainTex的纹理属性。参数pass的默认值为-1,即依次执行shader中的所有Pass,否则 仅会调用给定索引的Pass。
4.整个过程如下:
首先在摄像机中添加一个用于屏幕后处理的脚本。在该脚本中,我们会实现OnRenderImage函数来获取当前屏幕的渲染纹理。其次,再调用Graphics.Blit函数使用特定的Unity Shader来对当前图像进行处理,再把返回的渲染纹理显示到屏幕上。对于一些复杂的屏幕特效,可能多次调用Graphics.Blit函数对上一步输出结果进行下一步处理。
详细代码:
PostEffect.cs
 1 using System.Collections;
 2 using System.Collections.Generic;
 3 using UnityEngine;
 4 using UnityEngine.Rendering;
 5
 6
 7 [ExecuteInEditMode]
 8 public class PostEffect : MonoBehaviour
 9 {
10
11     #region Variables
12     public float grayScaleAmout = 1.0f;
13
14     //主相机
15     public Camera sourceCamera;
16
17     //操作相机(为了结合另一个PostEffect,(OutlineEffect操作的相机))
18     public Camera outlineCamera;
19
20     //渲染纹理
21     RenderTexture renderTexture;
22
23     //开始灰色渲染效果标志
24     public bool isStart = false;
25
26     //材质
27     Material material = null;
28
29     #endregion
30
31     void Start()
32     {
33         if (material == null)
34         {
35             material = new Material(Resources.Load<Shader>("NewUnlitShader"));
36         }
37     }
38
39     void OnPreRender()
40     {
41         if (renderTexture == null || renderTexture.width != sourceCamera.pixelWidth || renderTexture.height != sourceCamera.pixelHeight)
42         {
43             renderTexture = new RenderTexture(sourceCamera.pixelWidth, sourceCamera.pixelHeight, 16, RenderTextureFormat.Default);
44             outlineCamera.targetTexture = renderTexture;
45         }
46         outlineCamera.Render();
47     }
48
49     void OnRenderImage(RenderTexture source, RenderTexture target)
50     {
51         if (isStart)
52         {
53             if (material != null)
54             {
55                 material.SetTexture("_OutLine", outlineCamera.targetTexture);
56                 material.SetFloat("_LuminosityAmount", grayScaleAmout);
57                 Graphics.Blit(source, target, material);
58             }
59         }
60         else
61         {
62             Graphics.Blit(source, target);
63         }
64     }
65
66     void OnDisable()
67     {
68         if (material)
69         {
70             DestroyImmediate(material);
71         }
72     }
73 }
shader部分:
Shader "Custom/GrayScale" {
    Properties {
        _MainTex ("Base (RGB)", 2D) = "white" {}
        _LuminosityAmount ("GrayScale Amount", Range(0.0, 1)) = 1.0
    }
    SubShader {
        Pass
        {
            CGPROGRAM
            #pragma vertex vert_img
            #pragma fragment frag
            #pragma fragmentoption ARB_precision_hint_fastest
            #include "UnityCG.cginc"

            uniform sampler2D _MainTex;
            fixed _LuminosityAmount;

            uniform sampler2D _OutLine;
            fixed _NumPixelH;
            fixed _NumPixelV;

            fixed4 frag(v2f_img i) : COLOR
            {
                fixed4 outlineTex = tex2D(_OutLine, i.uv);
                fixed4 renderTex = tex2D(_MainTex, i.uv);

                if((outlineTex.r+outlineTex.b+outlineTex.g+outlineTex.a)<0.1f)
                {
                    float luminosity = 0.299 * renderTex.r + 0.587 * renderTex.g + 0.114 * renderTex.b;
                    fixed4 finalColor = lerp(renderTex, luminosity, _LuminosityAmount);
                    return finalColor;
                }
                else
                {
                    return renderTex;
                }
            }

            ENDCG
            }
    }
    FallBack "Diffuse"
}
注释:
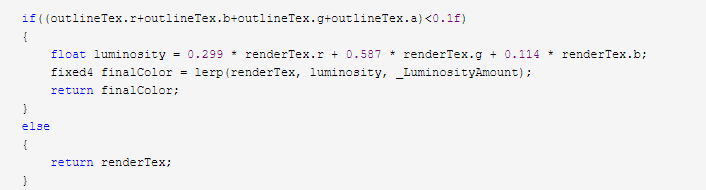
判断纹理顶点色值,我的源纹理初始色为黑色,所以搜索的物体附上色值,判断rgba的和是否为0,0为黑色,1为白色,黑色部分置灰(没选中的物体及场景其他部分),有色差的部分为选中部分返回当前color。
这效果结合上一篇的Outline效果,源纹理为上一篇处理的纹理,即_OutLine ,_MainTex为主纹理,即当前屏幕纹理。
测试代码:


 1 using cakeslice;
 2 using System.Collections;
 3 using System.Collections.Generic;
 4 using System.Text;
 5 using UnityEngine;
 6 using UnityEngine.UI;
 7
 8 public class test : MonoBehaviour
 9 {
10     public InputField Txt;
11
12     GameObject go = null;
13
14     public void OnClick()
15     {
16         var chr = Txt.text.ToCharArray();
17         StringBuilder stringBuilder = new StringBuilder();
18         for (int i = 0; i < chr.Length; i++)
19         {
20             if (i == 0)
21             {
22                 stringBuilder.Append(chr[0].ToString().ToUpper());
23             }
24             else
25             {
26                 stringBuilder.Append(chr[i].ToString().ToLower());
27             }
28         }
29         Debug.Log(stringBuilder.ToString());
30
31          go = GameObject.Find(stringBuilder.ToString());
32         if (go != null)
33         {
34             go.GetComponent<cakeslice.Outline>().Add();
35             Camera.main.GetComponent<PostEffect>().isStart = true;
36         }
37         else
38         {
39             Debug.Log("根据  "+ Txt.text + "  未找到搜索物体,请查看是否输入错误");
40         }
41     }
42
43     public void UnDo()
44     {
45         if (go!=null)
46         {
47             go.GetComponent<cakeslice.Outline>().Remove();
48             Camera.main.GetComponent<PostEffect>().isStart = false;
49             go = null;
50         }
51     }
52 }
实现效果如下: