HDFS写入过程注释解读 & 源码分析
此篇博客承接上一篇未讲完的内容,将会着重分析一下在Namenode获取到元数据后,具体是如何向datanode节点写入真实的数据的
1. 框架图展示
在开始前,还是老规矩,先上图
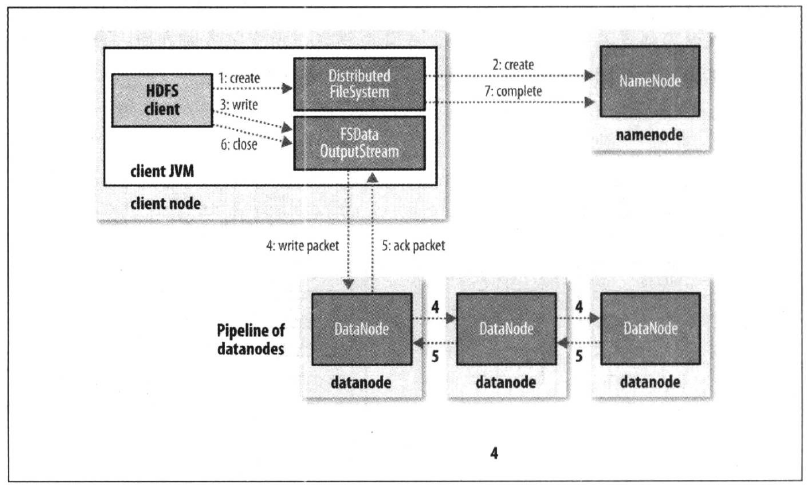
本篇内容将会重点介绍HDFS写入流程七大步骤中的4,5步骤,即数据包写入和数据包确认(write packet & ack packet)
2. 源码分析
2.1 文档注释翻译
在讲解这部分内容时会涉及到的类是DFSPacket
DFSPacket类
DFSPacket is used by DataStreamer and DFSOutputStream.
DFSOutputStream generates packets and then ask DataStreamer
to send them to datanodes.
DFSPacket被DataStreamer和DFSOutputStream所使用,DFSOutputStream产生数据包然后给DataStreamer发送请求让它将数据包发送至datanodes上去
buf is pointed into like follows:
 (C is checksum data, D is payload data)
[_________CCCCCCCCC________________DDDDDDDDDDDDDDDD___]
          ^        ^               ^               ^
          |        checksumPos     dataStart       dataPos
          checksumStart
Right before sending, we move the checksum data to immediately precede
the actual data, and then insert the header into the buffer immediately
preceding the checksum data, so we make sure to keep enough space in
front of the checksum data to support the largest conceivable header.
上图生动形象地展示了一个缓冲区包含了哪些部分,前面是校验和,而后面则是真实的数据,在发送数据之前,我们先立即将校验和数据移动至真实数据的正前方,然后再将头部立即插入到校验和数据的正前方,因此我们能够确保在校验和数据之前有足够大的空间来支持最大的可想象到的头部空间
2.2 数据包建立过程源码分析
由于HDFS文件系统中一个block的大小为128M,因此为了测试效果,我们准备了一个大于128M的文件,并将断点打到了下图的位置,然后进入调试模式观察源码!

经过两层不同类的write方法的调用后,我们见到了第一个比较重要的类,FSOutputSummer类,这个类中的write方法代码如下,在加粗的代码中,我们能够发现该write方法实际上是通过调用write1方法实现的,并且将其放到了一个for循环中,因此,可以这样猜想,在write1方法中必定有一个缓冲区,循环中每一次写入一个缓冲区长度数组的数据,在不断的循环中,最终完成全部的写任务
@Override
  public synchronized void write(byte b[], int off, int len)
      throws IOException {

    checkClosed();

    if (off < 0 || len < 0 || off > b.length - len) {
      throw new ArrayIndexOutOfBoundsException();
    }

    for (int n=0;n<len;n+=write1(b, off+n, len-n)) {
    }
  }
仔细查找,发现write1方法就在write方法的正下方,现在,我们就来好好解读一下这个write1方法:首先看第一个if判断,count是成员变量,表示的是缓冲区字节个数,初始状态必定为0,而buf是另一个成员变量,它的大小是每一个Chunk的大小乘以Buffer中Chunk的数量,即512 bytes x 9 = 4608 bytes,而我们在IOUtils.copyBytes方法中设置的每次拷贝的缓冲区长度是1024 bytes,因此很显然,第一个if判断并不能满足,走的是下面的代码,在不断的写入1024个字节的过程中,计数器count在不断增加,当buf.length达到4608个字节时(计算逻辑是4608整除1024,也就是在第5次循环时buf被填满)就会触发flushBuffer方法
private static final int BUFFER_NUM_CHUNKS = 9;

  protected FSOutputSummer(DataChecksum sum) {
    this.sum = sum;
    this.buf = new byte[sum.getBytesPerChecksum() * BUFFER_NUM_CHUNKS];
    this.checksum = new byte[getChecksumSize() * BUFFER_NUM_CHUNKS];
    this.count = 0;
  }
/**
   * Write a portion of an array, flushing to the underlying
   * stream at most once if necessary.
   */
  private int write1(byte b[], int off, int len) throws IOException {
    if(count==0 && len>=buf.length) {
      // local buffer is empty and user buffer size >= local buffer size, so
      // simply checksum the user buffer and send it directly to the underlying
      // stream
      final int length = buf.length;
      writeChecksumChunks(b, off, length);
      return length;
    }

    // copy user data to local buffer
    int bytesToCopy = buf.length-count;
    bytesToCopy = (len<bytesToCopy) ? len : bytesToCopy;
    System.arraycopy(b, off, buf, count, bytesToCopy);
    count += bytesToCopy;
    if (count == buf.length) {
      // local buffer is full
      flushBuffer();
    }
    return bytesToCopy;
  }
接下去,我们来仔细研究一下flushBuffer方法中到底干了什么,代码如下所示:首先我们看到了两个计算式,第一个变量partialLen计算的是在flush缓冲之后还余留了多少未缓冲的数据,相当于是一个小尾巴,而lenToFlush变量就是需要缓冲的字节数,当这个lenToFlush变量不等于0时,就会调用关键方法writeChecksumChunks,根据方法名顾名思义,我们可以知道,这个方法中会以校验和和真实数据的方式写出buf中的4608个字节
protected synchronized int flushBuffer(boolean keep,
      boolean flushPartial) throws IOException {
    int bufLen = count;
    int partialLen = bufLen % sum.getBytesPerChecksum();
    int lenToFlush = flushPartial ? bufLen : bufLen - partialLen;
    if (lenToFlush != 0) {
      writeChecksumChunks(buf, 0, lenToFlush);
      if (!flushPartial || keep) {
        count = partialLen;
        System.arraycopy(buf, bufLen - count, buf, 0, count);
      } else {
        count = 0;
      }
}
writeChecksumChunks方法的具体代码如下所示:首先,我们发现代码调用了sum的calculateChunkedSums方法,而sum变量是DataChecksum类的一个实例,这个类包含了校验和的类型,在此例中,这个类型为CRC32C,大小为4个字节,而checksum数组的大小也就很明显地可以被计算出来,9 x 4 = 36 bytes,最终将buf数组长度(4608字节),chunk长度,校验和数组,校验和偏移量等变量作为参数传入了关键的方法writeChunk中去
public static enum Type {
    NULL  (CHECKSUM_NULL, 0),
    CRC32 (CHECKSUM_CRC32, 4),
    CRC32C(CHECKSUM_CRC32C, 4),
    DEFAULT(CHECKSUM_DEFAULT, 0), // This cannot be used to create DataChecksum
    MIXED (CHECKSUM_MIXED, 0); // This cannot be used to create DataChecksum

    public final int id;
    public final int size;

    private Type(int id, int size) {
      this.id = id;
      this.size = size;
}
private void writeChecksumChunks(byte b[], int off, int len)
  throws IOException {
    sum.calculateChunkedSums(b, off, len, checksum, 0);
    for (int i = 0; i < len; i += sum.getBytesPerChecksum()) {
      int chunkLen = Math.min(sum.getBytesPerChecksum(), len - i);
      int ckOffset = i / sum.getBytesPerChecksum() * getChecksumSize();
      writeChunk(b, off + i, chunkLen, checksum, ckOffset, getChecksumSize());
    }
}
继续调试,我们发现writeChunk方法是通过调用writeChunkImpl方法实现的
// @see FSOutputSummer#writeChunk()
  @Override
  protected synchronized void writeChunk(byte[] b, int offset, int len,
      byte[] checksum, int ckoff, int cklen) throws IOException {
    TraceScope scope =
        dfsClient.getPathTraceScope("DFSOutputStream#writeChunk", src);
    try {
      writeChunkImpl(b, offset, len, checksum, ckoff, cklen);
    } finally {
      scope.close();
    }
}
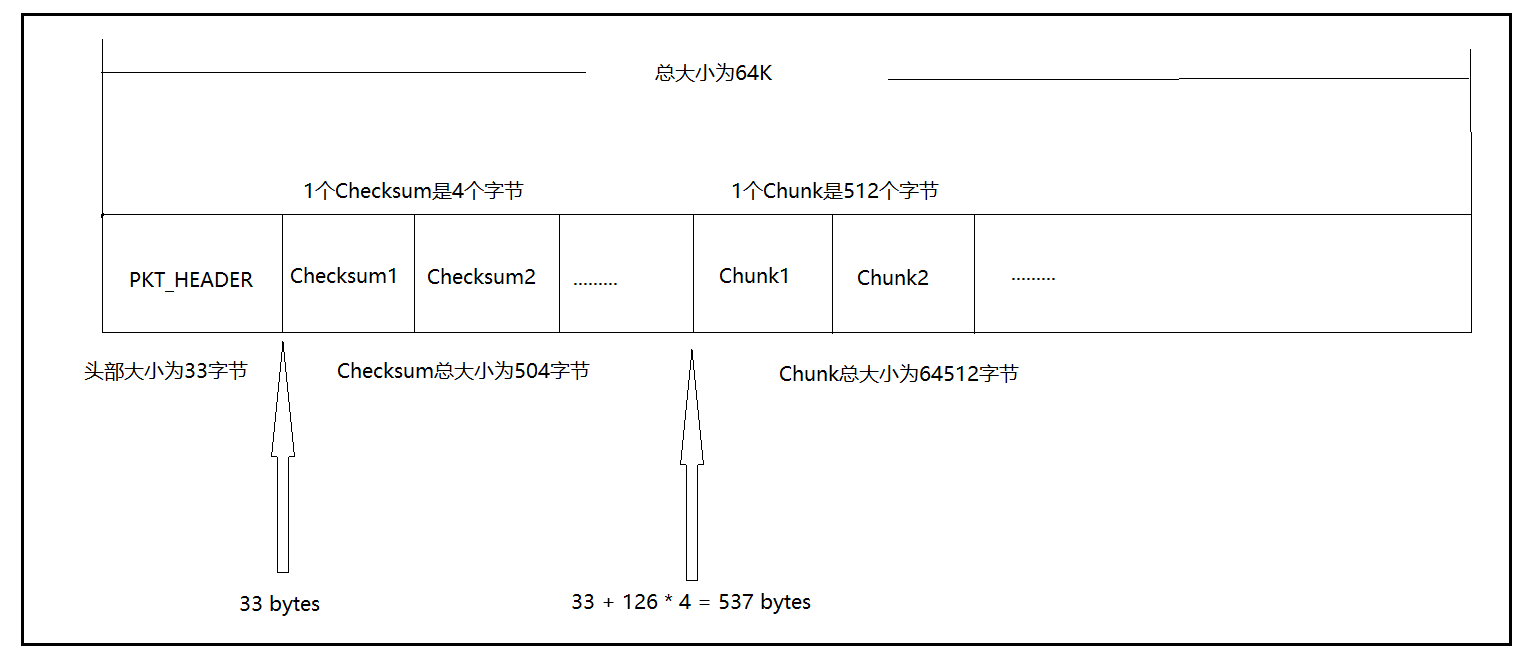
进入writeChunkImpl方法中,我们终于看到了建包的语句!currentPacket变量是通过调用createPacket方法创建出来的,查看createPacket方法,我们发现,buf的大小为头部的大小加上packetSize的大小,即33 bytes + 65016 bytes = 65049 bytes,而chunksPerPacket的值为126,也就是说,如果将一个chunk和一个checksum作为一个组合,这样的组合在一个packet中共有126对,计算一下,126 x ( 512 + 4 ) = 65016,正好是packetSize的大小!!!既然数据包以及创建出来了,那么接下去就可以开始数组拷贝了,需要拷贝的有两个,校验和以及真实数据,对应的方法就是writeChecksum以及writeData方法,将chunk中的以及checksum数组中的数据依次拷贝到packet数组中去,由于之前的buf数组是每9个chunks一缓冲,因此总共需要缓冲126 / 9 = 14次即可将packet拷满
private DFSPacket createPacket(int packetSize, int chunksPerPkt, long offsetInBlock,
      long seqno, boolean lastPacketInBlock) throws InterruptedIOException {
    final byte[] buf;
    final int bufferSize = PacketHeader.PKT_MAX_HEADER_LEN + packetSize;

    try {
      buf = byteArrayManager.newByteArray(bufferSize);
    } catch (InterruptedException ie) {
      final InterruptedIOException iioe = new InterruptedIOException(
          "seqno=" + seqno);
      iioe.initCause(ie);
      throw iioe;
    }

    return new DFSPacket(buf, chunksPerPkt, offsetInBlock, seqno,
                         getChecksumSize(), lastPacketInBlock);
}
synchronized void writeChecksum(byte[] inarray, int off, int len)
      throws ClosedChannelException {
    checkBuffer();
    if (len == 0) {
      return;
    }
    if (checksumPos + len > dataStart) {
      throw new BufferOverflowException();
    }
    System.arraycopy(inarray, off, buf, checksumPos, len);
    checksumPos += len;
}
synchronized void writeData(byte[] inarray, int off, int len)
      throws ClosedChannelException {
    checkBuffer();
    if (dataPos + len > buf.length) {
      throw new BufferOverflowException();
    }
    System.arraycopy(inarray, off, buf, dataPos, len);
    dataPos += len;
}
当chunk的数量达到最大chunk数量126即一个packet被填满了之后,这个packet会被放入dataQueue即数据队列中去,最终调用关键方法waitAndQueueCurrentPacket
// If packet is full, enqueue it for transmission
    //
    if (currentPacket.getNumChunks() == currentPacket.getMaxChunks() ||
        bytesCurBlock == blockSize) {
      if (DFSClient.LOG.isDebugEnabled()) {
        DFSClient.LOG.debug("DFSClient writeChunk packet full seqno=" +
            currentPacket.getSeqno() +
            ", src=" + src +
            ", bytesCurBlock=" + bytesCurBlock +
            ", blockSize=" + blockSize +
            ", appendChunk=" + appendChunk);
      }
      waitAndQueueCurrentPacket();
直接将断点打到waitAndQueueCurrentPacket方法处,我们查看以下这个方法的源码,发现数据队列以及确认队列都使用了LinkedList这一数据结构,并且使用了Java多线程技术的等待唤醒机制,packet已填满但还未放入数据队列时处于等待状态,而一旦将packet加入队列末尾这一动作完成后就使用了notifyAll方法通知到其他packet也能加入数据队列中去了

// both dataQueue and ackQueue are protected by dataQueue lock
  private final LinkedList<DFSPacket> dataQueue = new LinkedList<DFSPacket>();
  private final LinkedList<DFSPacket> ackQueue = new LinkedList<DFSPacket>();
private void waitAndQueueCurrentPacket() throws IOException {
    synchronized (dataQueue) {
      try {
      // If queue is full, then wait till we have enough space
        boolean firstWait = true;
        try {
          while (!isClosed() && dataQueue.size() + ackQueue.size() >
              dfsClient.getConf().writeMaxPackets) {
            if (firstWait) {
              Span span = Trace.currentSpan();
              if (span != null) {
                span.addTimelineAnnotation("dataQueue.wait");
              }
              firstWait = false;
            }
            try {
              dataQueue.wait();
            } catch (InterruptedException e) {
              // If we get interrupted while waiting to queue data, we still need to get rid
              // of the current packet. This is because we have an invariant that if
              // currentPacket gets full, it will get queued before the next writeChunk.
              //
              // Rather than wait around for space in the queue, we should instead try to
              // return to the caller as soon as possible, even though we slightly overrun
              // the MAX_PACKETS length.
              Thread.currentThread().interrupt();
              break;
            }
          }
        } finally {
          Span span = Trace.currentSpan();
          if ((span != null) && (!firstWait)) {
            span.addTimelineAnnotation("end.wait");
          }
        }
        checkClosed();
        queueCurrentPacket();
      } catch (ClosedChannelException e) {
      }
    }
}
private void queueCurrentPacket() {
    synchronized (dataQueue) {
      if (currentPacket == null) return;
      currentPacket.addTraceParent(Trace.currentSpan());
      dataQueue.addLast(currentPacket);
      lastQueuedSeqno = currentPacket.getSeqno();
      if (DFSClient.LOG.isDebugEnabled()) {
        DFSClient.LOG.debug("Queued packet " + currentPacket.getSeqno());
      }
      currentPacket = null;
      dataQueue.notifyAll();
    }
}
综上所述,我们可以整理出一个packet的构成应该如下图所示:
2.3 数据包发送过程源码分析
调用DataStreamer的run方法,我们可以看到setPipeline方法设置了管线并将数据包通过管线发送到三个datanodes上去,在该方法中,我们找到了记录datanodes信息的数组,截图如下所示,分别对应了s102-s104三个从节点
private void setPipeline(LocatedBlock lb) {
  setPipeline(lb.getLocations(), lb.getStorageTypes(), lb.getStorageIDs());
}
private void setPipeline(DatanodeInfo[] nodes, StorageType[] storageTypes,
    String[] storageIDs) {
  this.nodes = nodes;
  this.storageTypes = storageTypes;
  this.storageIDs = storageIDs;
}

将packet从数据队列移动至确认队列的过程如下:
synchronized (dataQueue) {
  // move packet from dataQueue to ackQueue
  if (!one.isHeartbeatPacket()) {
    span = scope.detach();
    one.setTraceSpan(span);
    dataQueue.removeFirst();
    ackQueue.addLast(one);
    dataQueue.notifyAll();
  }
}