其实作为一个新人呢,本来应该先学习一下Spring再学习SpringBoot的,但是由于个人不懂,就先学习了一下SpringBoot。所以就先记录一下吧,以后不懂得再补充。
1.了解Spring Boot
所谓的SpringBoot就是Spring,只是Spring的使用需要大量的配置才可以,而SpringBoot则是直接提供了这些大量的默认配置,大大减少了我们java码农的工作量;只用少量的配置就可以搭建一个Spring Boot应用。
我初学用的是Spring Boot2.0.4,该版本采用 Spring5.0.8 构建,要求 JDK 至少 1.8 版本,并且 Servlet 容器要求 3.1 版本以上,也就是 tomcat8.5+ ,Jetty 9.4+,Undertow 1.4+,或者其他 3.1 版本以上 Servlet 容器。
2.Spring Boot优点
- 使用 Spring Initializr 可以在几秒钟就配置好一个 Spring Boot 应用。
- 对大量的框架都可以无缝集成,基本不需要配置或者很少的配置就可以运行。
- 简化的安全性
- 丰富的 SQL 和 NoSQL 支持
- 嵌入式 Servlet 容器的支持,如:Tomcat,Jetty 和 Undertow
- 提高开发、生产效率,如热部署等功能
- 提供监控功能,如跟踪,指标和健康状况。
3.搭建第一个Spring Boot应用
环境要求:
JDK 1.8 或者更高版本、Spring Boot 2.0.4、Maven 3.2+、idea
(本人由于比较懒,jdk的下载以及环境变量的配置就不细说了,可参考:https://blog.csdn.net/whalefall/article/details/81543411
Maven的下载及环境变量配置方法可参考:https://www.cnblogs.com/platycoden/p/8313503.html;以后有时间再补充)
以前我用的开发工具呢其实是Myeclipse,但是一直有人说idea更加智能更好用,所以我也要试试,用的不太好,一起学习。
(安装激活教程可参考:https://blog.csdn.net/langyichen/article/details/90677380)
搭建:
1.直接生成Springboot模板
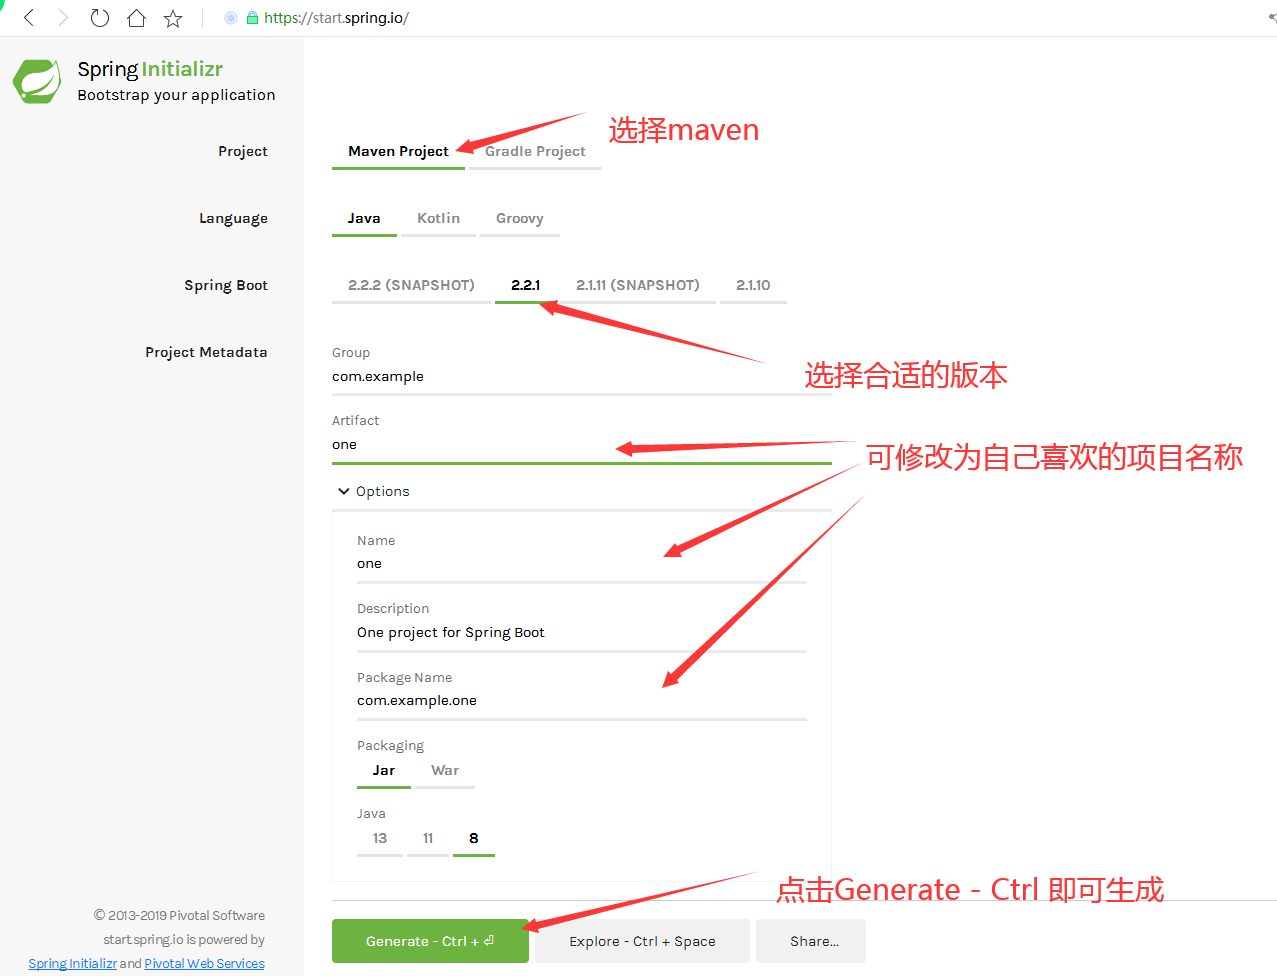
可以在官网https://start.spring.io/生成spring boot的模板。如图:
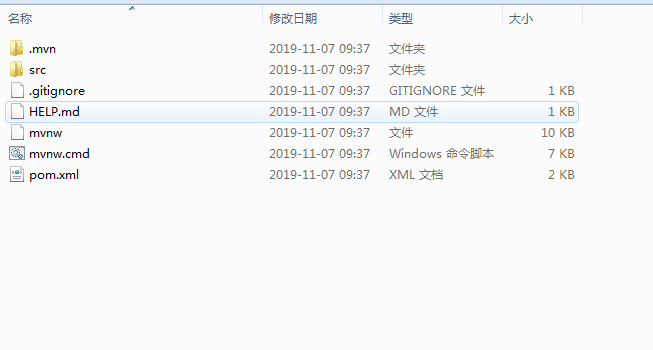
点击Generate下载后,解压文件夹内容为如图:
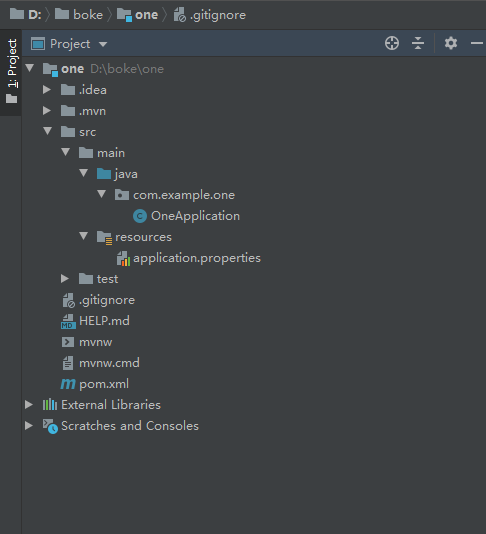
然后打开idea将生成的one文件导入:
打开idea——点击file——点击open——选择存储文件路径下的one——点击OK(稍等一会idea自动配置{idea确实很强大})即可。如图:

4. Spring Boot配置文件配置
4.1.1.Spring Boot中默认的application.properties配置文件
在上面的项目文件中,我们可以看到src/main/resource目录下面有一个application.properties配置文件(如果没有就自己按照上面项目截图新建一个),这个配置文件就是SpringBoot默认的配置文件,可以通过修改这个文件来修改SpringBoot的配置。
在修改之前,首先需要知道的就是properties文件的格式。properties文件的内容都是以键值对的形式出现键=值,例如要修改SpringBoot的端口,配写方式如下:
#端口
server.port=8080
注:
1.properties文件中的注释使用 # 开头。
2.properties文件中的每一个属性占有单独的一行。
properties中除了填写SpringBoot的配置信息外也可以自定义属性,比如在其添加:
#端口
server.port=8080
#属性
one.springboot=Hello_one
这个one.springboot就是自定义的属性,接下来就看看怎么在SpringBoot中使用:
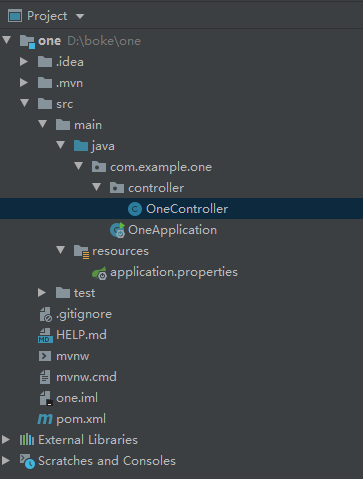
首先在com.example.one下新建包controller,在此包下建OneController.java 文件,并修改为下面代码。
项目结构如图:
OneController.java文件代码:
package com.example.one.controller;

import org.springframework.beans.factory.annotation.Value;
import org.springframework.web.bind.annotation.RequestMapping;
import org.springframework.web.bind.annotation.RestController;

@RestController
//@RestController相当于同时使用@Controller与@ResponseBody注解
public class OneController {
    /**
     *  调用src/main/resources 目录下有一个 application.properties 配置文件的自定义属性
     *  使用@Value注解注入属性值
     *  但只能访问application.propertie中的属性,其他的自定义配置文件的属性访问不到
     **/
    @Value("${one.springboot}")
    private String one;

    @RequestMapping("one")
    public String one(){
        return one;
    }
}
修改完成之后,启动项目在浏览器中输入:http://localhost:8080/one这个链接得到如下图画面,说明成功的访问了自定义的属性。

注意:这里只能访问application.properties中的属性,如果是其他自定义的配置文件中的属性是访问不到的,还需要其他处理。
4.1.2.Spring Boot自定义配置文件配置方式
其他配置文件属性的访问:
第一步:在src/main/resources目录下建立one.properties文件,内容为:
#自定义配置文件,自定义属性
one.test=One_test
第二步:修改OneController. java文件或者再在controller目录下新建一个测试OneControllerTest. java文件(我是新建的,对比方便):
package com.example.one.controller;

import org.springframework.beans.factory.annotation.Value;
import org.springframework.context.annotation.PropertySource;
import org.springframework.web.bind.annotation.RequestMapping;
import org.springframework.web.bind.annotation.RestController;

@RestController
//加载classpath目录下的one.properties文件
//@PropertySource加载指定的属性文件(自己定义的配置文件下的自定义属性)
@PropertySource(value = "classpath:one.properties")
public class OneControllerTest {
  @Value("${one.test}")
    private String onetest;

  @RequestMapping("onetest")
    public String oneTest(){
      return onetest;
  }
}
修改完成之后,再次启动项目在浏览器中输入:http://localhost:8080/onetest这个链接得到如下图画面,说明成功的访问了自定义的属性。

4.2.Spring Boot java 配置
SpringBoot除了可以使用application.properties配置之外,还可以使用java来定义配置;比如上述的修改访问端口为8088,也可以通过java代码来实现。
首先建立包com.example.one.config,在包目录下建立ServletConfig.java:
package com.example.one.config;

import org.springframework.boot.web.server.WebServerFactoryCustomizer;
import org.springframework.boot.web.servlet.server.ConfigurableServletWebServerFactory;
import org.springframework.context.annotation.Configuration;

//@Configuration表示该类为配置类,该注解可以被@ComponentScan扫描到
@Configuration
public class ServletConfig implements WebServerFactoryCustomizer<ConfigurableServletWebServerFactory> {
    @Override
    public void customize(ConfigurableServletWebServerFactory factory) {
        //设置端口为8088
        factory.setPort(8088);
    }
}
然后启动程序,浏览器输入http://localhost:8088/one 如果出现Hello_one或者输入http://localhost:8088/onetest 如果出现One_test;那么就说明成功的通过 java 代码修改了 SpringBoot 的配置。
注意:这是 SpringBoot2.x 通过 Java 代码修改内嵌容器端口的方式,如果是使用 SpringBoot1.x 这个方法就行不通了,SpringBoot1.x 是通过实现EmbeddedServletContainerCustomizer接口来修改。
4.3.Spring Boot xml 配置
SpringBoot已经不推荐使用xml 作为配置方式,如果一定需要使用,可以通过@ImportResource注解来完成。首先需要注释掉ServletConfig.java中的@Configuration
package com.example.one.config;

import org.springframework.boot.web.server.WebServerFactoryCustomizer;
import org.springframework.boot.web.servlet.server.ConfigurableServletWebServerFactory;
import org.springframework.context.annotation.Configuration;

//@Configuration表示该类为配置类,该注解可以被@ComponentScan扫描到
//当使用xml文件作为配置方式时,需要先将@Configuration注释掉
//@Configuration
public class ServletConfig implements WebServerFactoryCustomizer<ConfigurableServletWebServerFactory> {
    @Override
    public void customize(ConfigurableServletWebServerFactory factory) {
        //设置端口为8088
        factory.setPort(8088);
    }
}
然后在src/main/resources中建立xml 文件config.xml:
<?xml version="1.0" encoding="UTF-8"?>
<beans xmlns="http://www.springframework.org/schema/beans"
       xmlns:xsi="http://www.w3.org/2001/XMLSchema-instance"
       xsi:schemaLocation="http://www.springframework.org/schema/beans http://www.springframework.org/schema/beans/spring-beans.xsd">

    <bean id="servletConfig" class="com.example.one.config.ServletConfig"/>
</beans>
然后修改OneApplication.java为如下形式:
package com.example.one;

import org.springframework.boot.SpringApplication;
import org.springframework.boot.autoconfigure.SpringBootApplication;
import org.springframework.context.annotation.ImportResource;
/**
 * 当使用xml文件配置时需要通过@ImportResource加载xml配置文件
 * 添加下方代码
 */
@ImportResource (value = "classpath:config.xml")
@SpringBootApplication
public class OneApplication {

    public static void main(String[] args) {
        SpringApplication.run(OneApplication.class, args);
    }
}
然后接着重启项目,如果可以成功访问,那么说明成功导入了xml 配置。
以上就是Spring Boot的配置文件的简单应用介绍。