一、主配置文件
Spring Boot默认主配置文件名为application.yml或者application.properties
1.yml和properties
1.1 yml
语法:
-
key:空格value
-
同一个层级的缩进tab或者空格必须相同
server:
  port: 8081
person:
  name: Messi
  sex: male
  #children: [蒂亚戈,马特奥,${person.name} Ciro]
  children:
    - 蒂亚戈
    - 马特奥
    - ${person.name} Ciro
  #servants: {manager: Oliver,chef: Alice}
  servants:
    manager: Oliver
    chef: Alice
children: [蒂亚戈,马特奥,Ciro]映射到Bean就是List
servants: {manager: Oliver,chef: Alice}映射到Bean就是对象或者Map
上面的配置有两种写法:1.单行 2.多行。。。个人推荐单行编写
测试代码
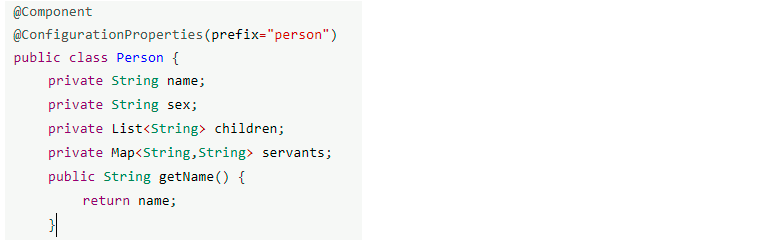
package com.jv.pojo; import java.util.List; import java.util.Map; import org.springframework.boot.context.properties.ConfigurationProperties; import org.springframework.stereotype.Component; @Component @ConfigurationProperties(prefix="person") public class Person { private String name; private String sex; private List<String> children; private Map<String,String> servants; public String getName() { return name; } public void setName(String name) { this.name = name; } public String getSex() { return sex; } public void setSex(String sex) { this.sex = sex; } public List<String> getChildren() { return children; } public void setChildren(List<String> children) { this.children = children; } public Map<String, String> getServants() { return servants; } public void setServants(Map<String, String> servants) { this.servants = servants; } @Override public String toString() { return "Person [name=" + name + ", sex=" + sex + ", children=" + children + ", servants=" + servants + "]"; } }
package com.jv; import org.junit.Test; import org.junit.runner.RunWith; import org.springframework.beans.factory.annotation.Autowired; import org.springframework.boot.test.context.SpringBootTest; import org.springframework.test.context.junit4.SpringRunner; import com.jv.pojo.Person; @RunWith(SpringRunner.class) @SpringBootTest public class SpringbootApplicationTests { @Autowired private Person person; @Test public void contextLoads() { System.out.println("Person:"+person); } }
执行上面的结果,会出现中文乱码
如果使用的Eclipse,通过如下方式修改
-
将*.properties文件编码格式设置为utf-8
-
Help-Eclipse MarketPlace-搜索properties Editor,找到并安装
-
window-preferences-File association,找到*.properties,将PropertiesEditor设置为默认值
如果是intellij idea,通过如下方式修改
-
将*.properties文件编码格式设置为utf-8
-
File -> Settings -> Editor -> File Encodings将
Properties Files (*.properties)下的Default encoding for properties files设置为UTF-8,将Transparent native-to-ascii conversion前的勾选上
1.2 properties
server.port=8081
person.name=Messi
person.sex=male
person.children=蒂亚戈,马特奥,${person.name} Ciro
person.servants.manager=Oliver
person.servants.chef=Alice
可以使用上面的代码共享测试,只需要将yml中的配置注释掉
另:在Eclipse中配置文件多行注释方式为“选中多行,ctrl+/”
1.3 比较yml和properties
| yml | properties | ||
|---|---|---|---|
| 单属性 | key: value | key=value | 编写雷同 |
| List | key: [value1,value2...] | key=value1,value2.... | 编写雷同 |
| 对象或者Map | parent-key: {key: value,key: value...} | parent-key.key=value | 后者编写更臃肿 |
yml的编写方式和咋们熟悉的Json串很像,字少,更有层次感
1.4 @ConfigurationProperties
使用该注解Spring Boot可以自动从主配置文件中的对应KEY-VALUE注入到对象的属性中,同时它还支持类似驼峰命名的功能,比如:
person:
    first_name: Lion
    last-name: Messi
public class Person{
    private String firstName;
    private String lastName;
}
虽然first_name和firstName不一样,但是使用了@ConfigurationProperties注解后,即使名字不一样也可以成功注入
还是可以使用@EnableConfigurationProperties(Person.class)在需要的时候将配置类加入到容器中
1.5 @Value
@Configuration注解自带@Component,所以在类上面不用加@Component
package com.jv.pojo; import java.util.List; import java.util.Map; import org.springframework.beans.factory.annotation.Value; import org.springframework.stereotype.Component; @Component public class PersonNew { @Value("${person.name}") private String name; @Value("${person.sex}") private String sex; @Value("${person.age:40}") private Integer age; //@Value("${person.children}") 不支持 private List<String> children; private Map<String,String> servants; public Integer getAge() { return age; } public void setAge(Integer age) { this.age = age; } public String getName() { return name; } public void setName(String name) { this.name = name; } public String getSex() { return sex; } public void setSex(String sex) { this.sex = sex; } public List<String> getChildren() { return children; } public void setChildren(List<String> children) { this.children = children; } public Map<String, String> getServants() { return servants; } public void setServants(Map<String, String> servants) { this.servants = servants; } @Override public String toString() { return "Person [name=" + name + ", sex=" + sex + ", age=" + age + ", children=" + children + ", servants=" + servants + "]"; } }
1.6 如何选择使用两个注解
| @ConfigurationProperties | @Value | |
|---|---|---|
| 自动注入 | 支持 | 不支持 |
| Spel表达式 | 不支持 | 支持 |
| target | 类 | 属性 |
| 集合 | 支持 | 不支持 |
| 对象 | 支持 | 不支持 |
通过上面的比较,在使用的时候,如果是纯配置类,那么推荐使用@ConfigurationProperties,如果是在其他业务类或者控制类中使用某一个属性,则使用@Value
2. 导入外部配置
2.1 @PropertiesResource
@PropertiesResource只能应用于properties文件
将主配置文件中的person相关提取到person.properties中,使用propertiesResource导入配置
person.name=Messi
person.sex=male
person.age=30
person.children=蒂亚戈,马特奥,${person.name} Ciro
person.servants.manager=Oliver
person.servants.chef=Alice
person.servants.driver=Tom
如果不想在启动类上添加,可以单独写一个配置类,在类上面添加@Configuration @PropertiesSource注解
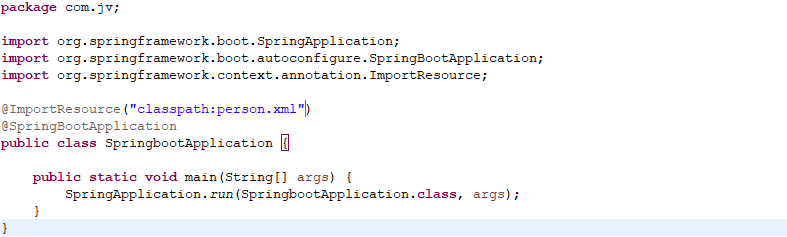
package com.jv; import org.springframework.boot.SpringApplication; import org.springframework.boot.autoconfigure.SpringBootApplication; @SpringBootApplication public class SpringbootApplication { public static void main(String[] args) { SpringApplication.run(SpringbootApplication.class, args); } }
2.2 @importResource
导入一个xml配置文件,可以在启动类上添加该注解,也可以写一个配置类,在类上面添加@Configuration @ImportResource注解
<?xml version="1.0" encoding="UTF-8"?> <beans xmlns="http://www.springframework.org/schema/beans" xmlns:xsi="http://www.w3.org/2001/XMLSchema-instance" xsi:schemaLocation="http://www.springframework.org/schema/beans http://www.springframework.org/schema/beans/spring-beans.xsd"> <bean id="personThird" class="com.jv.pojo.PersonThird"></bean> </beans>
或者

记住要注掉启动类上的@ImportResource
2.3 @Bean
Spring Boot推荐的方式,在一个配置类中新增一个方法用于构造需要的对象,然后在方法上添加@Bean注解
package com.jv.config; import org.springframework.context.annotation.Bean; import org.springframework.context.annotation.Configuration; import com.jv.pojo.PersonThird; @Configuration public class PersonThirdConfig { @Bean public PersonThird personThird() { return new PersonThird(); } }
这里的举例不是很好,具体的写法可以这样操作
比如你在工程中要使用Redis,那么先在配置文件中自定义redis相关的配置,定义一个配置类,注入相关属性,然后在利用Redis Api将属性设置到API对应的类中,返回Redis真正执行数据操作的组件
3. 多环境部署
3.1 properties
每一种环境编写一个properties文件,文件名命名格式:application-{profile}.properties,需要切换配置文件时,在主配置文件中通过如下参数进行配置
spring.profiles.active={profile}
开发环境:application-dev.properties
测试环境:application-test.properties
生产环境:application-prod.properties
比如要启用测试环境的配置,则在application.properties中新增 spring.profiles.active=test
3.2 yml
yml文件可以分为多个文件块,在每个文件块中编写每个环境的配置,每个文件块用"---"进行分隔
server:
  port: 8081
spring:
  profiles:
    active: prod
---
server:
  port: 8082
spring:
  profiles: dev
person:
  name: Messi
  sex: male
  #children: [蒂亚戈,马特奥,${person.name} Ciro]
  children:
    - 蒂亚戈
    - 马特奥
    - ${person.name} Ciro
  #servants: {manager: Oliver,chef: Alice}
  servants:
    manager: Oliver
    chef: Alicee
---
server:
  port: 8083
spring:
  profiles: prod
person:
  name: Messi
  sex: male
  #children: [蒂亚戈,马特奥,${person.name} Ciro]
  children:
    - 蒂亚戈
    - 马特奥
    - ${person.name} Ciro
  #servants: {manager: Oliver,chef: Alice}
  servants:
    manager: Oliver
    chef: Alice
    driver: Tom
在测试所有配置的时候,需要考虑到前面的配置是否会影响到现有想要生效的配置,比如重复配置,所以要去注掉一些配置类或者导入的配置文件等
3.3 所有激活profile的方式
-
在配置文件中指定,使用spring.profiles.active=profile_name
-
在启动命令中指定,使用--spring.profiles.active=profile_name
java -jar jar_name --spring.profiles.active=prod
-
在JVM参数中指定,使用-Dspring.profiles.active=profile_name
在shell文件的jvm参数中设置-Dspring.profiles.active=prod
在实际生产环境中,建议使用命令行或者JVM两种方式固化启动时选择的profile,而不选择每次打包发布时在主配置文件中去指定profile
4 配置文件加载顺序
四种加载路径
-
在命令行启动时用 --spring.config.location指定配置文件
java -jar jar_name --spring.config.location=d:/application.yml
-
当前项目下的config文件夹中的application.yml/properties
-
当前项目下的application.yml/properties
-
类路径(classpath)下的config文件夹中的application.yml/properties
-
类路径(classpath)下的application.yml/properties
优先级从高到低,相同配置高优先级覆盖低优先级,其他的互补
5 外部配置文件加载顺序
除了上面提到的加载配置文件的方式外,在Spring Boot官方文档列举了所有的方式
-
Devtools global settings propertieson your home directory (
~/.spring-boot-devtools.propertieswhen devtools is active). -
@TestPropertySourceannotations on your tests. -
@SpringBootTest#propertiesannotation attribute on your tests. -
Command line arguments.
-
Properties from
SPRING_APPLICATION_JSON(inline JSON embedded in an environmentvariable or system property). -
ServletConfiginit parameters. -
ServletContextinit parameters. -
JNDI attributes from
java:comp/env. -
Java System properties (
System.getProperties()). -
OS environment variables.
-
A
RandomValuePropertySourcethat has properties only inrandom.*. -
Profile-specificapplication properties outside of your packaged jar(
application-{profile}.propertiesand YAML variants). -
Profile-specificapplication properties packaged inside your jar (
application-{profile}.propertiesand YAML variants). -
Application properties outside of your packaged jar (
application.propertiesand YAMLvariants). -
Application properties packaged inside your jar (
application.propertiesand YAMLvariants). -
@PropertySourceannotations on your@Configurationclasses. -
Default properties (specified by setting
SpringApplication.setDefaultProperties)
所有的这些加载配置文件的方式都是高优先级覆盖低优先级,所有配置互补