文章目录
Spring Boot - 配置文件
1.Spring Boot 开发初体验
在上一篇文章中,我们已经学会如何去快速构建一个Spring Boot应用程序,并且知道如何去让它运行起来。
在了解Spring Boot配置文件之前我们先做一个简单的代码编写跑启我们的程序,我们先在com.springboot包下建一个controller目录用来存放controller文件,然后编写一个简单的接口
TestController.java
package com.springboot.controller;

import org.springframework.stereotype.Controller;
import org.springframework.web.bind.annotation.RequestMapping;
import org.springframework.web.bind.annotation.ResponseBody;

/**
 * @author hzk
 * @date 2018/12/18
 */
@Controller
@RequestMapping(value = "/api")
public class TestController {

    @RequestMapping(value = "/test")
    @ResponseBody
    public String test(){
        return "test";
    }
}
这是我们之前经常使用的接口编写方式,如果我们单纯是做接口服务提供,这里可以将@Controller注解换成@RestController,如此的话在该Controller下的方法将自动添加@ResponseBody,减少开发所需要手动添加的注解。
通过入口类启动该项目,通过访问localhost:8080/api/test可以发现达到了我们所需要的效果,一个Spring Boot程序的构建和开发很简单就完成了。
2.Spring Boot 核心配置文件
Spring Boot 应用构建之后会默认在resources下生成一个application.properties的配置文件,这个配置文件是用于整个Spring Boot 应用的全局核心配置文件,Spring Boot 不仅支持常规的 properties 配置文件,还支持 yaml 语言的配置文件。application.yml对于Spring Boot应用来说也是核心配置文件,但是需要注意的是yml文件和properties文件同时存在时,会优先加载properties文件。
大家有兴趣可以去了解学习一下yaml语言,或许有些同学更喜欢用这种方式配置项目所需属性。
这里我们先简单配置一下基本的属性体验一下Spring Boot 配置文件的魅力,我们先单纯配置一个端口和项目路径,这里两种文件方式都体验一下。
application.properties
server.port=8080
server.servlet.context-path=/springboot-basic
application.yml
#注意:yml properties文件同时存在时,会优先加载properties文件
server:
  port: 9090
  servlet:
    context-path: /springboot-basic
3.Spring Boot 多环境配置
接触过实际开发的同学都知道,每个项目一定都会包含多个环境的配置文件,去区分开发、测试以及生产环境的不同,Spring Boot 很好提供了这样的功能,当我们需要区别配置多个环境的配置文件时,我们只需要application-{}.properties文件,每个文件中相同的属性配置不同的内容值即可
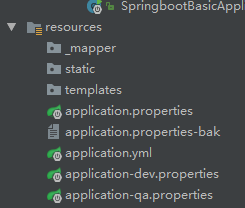
application-qa.properties
server.port=8081
server.servlet.context-path=/springboot-basic
application-dev.properties
server.port=8080
server.servlet.context-path=/springboot-basic
我们这里创建了两个配置文件application-qa.properties和application-dev.properties,那么如何去决定当前运行的应用读取的是哪个配置文件呢,我们需要在application.properties全局配置文件中设置spring.profiles.active属性
application.properties
#激活加载application-x.properties文件 此时取application-qa.properties 该命名格式约定俗成
#若application.properties主配置文件和激活配置文件中存在相同配置属性,则优先取激活配置文件中属性,例:主配置文件和激活配置文件中都配置了启动端口号,则使用激活配置文件中端口号
spring.profiles.active=qa
通过上面这个属性配置,则应用会去读取application-qa.properties下的配置属性,需要注意的是当我们在主配置文件和激活配置文件中若存在同样属性的配置,则会优先使用激活配置文件中配置的属性。
4.Spring Boot 自定义配置文件读取以及映射
在项目开发过程中,我们也经常会在代码编写中需要用到配置文件中配置的属性值,我们获取到配置文件属性值的方式这里介绍两种,通过注解和实体类映射。
application-qa.properties
server.port=8080
server.servlet.context-path=/springboot-basic

myconfig.name=JiangXiProvince
myconfig.location=NanChangCity
当我们配置文件中自定义配置了myconfig.name和myconfig.location这两个属性,我们要如何去获取呢
4.1 @Value注解获取
TestController.java
package com.springboot.controller;

import org.springframework.beans.factory.annotation.Autowired;
import org.springframework.beans.factory.annotation.Value;
import org.springframework.stereotype.Controller;
import org.springframework.web.bind.annotation.RequestMapping;
import org.springframework.web.bind.annotation.ResponseBody;

/**
 * @author hzk
 * @date 2018/12/18
 */
@Controller
@RequestMapping(value = "/api")
public class TestController {

    @Value("${myconfig.name}")
    private String name;
    @Value("${myconfig.location}")
    private String location;

    @RequestMapping(value = "/config")
    @ResponseBody
    public String config(){
        return name + ":" + location;
    }
}
4.2 实体类映射
我们在com.springboot包下建一个config包,创建一个MyConfig的实体类用于配置文件属性映射,加上@Component注解用于使用时调用,加上@ConfigurationProperties注解,并且设置prefix就可以将配置文件中该前缀的属性映射到该实体类上。如果我们不希望把所有配置都放在application.properties中,可以使用@PropertySource注解指定读取某个配置文件内容。
MyConfig.java
package com.springboot.config;

import org.springframework.boot.context.properties.ConfigurationProperties;
import org.springframework.stereotype.Component;

/**
 * @author hzk
 * @date 2018/12/18
 */
@Component
//@PropertySource(value = "classpath:constants.properties")
@ConfigurationProperties(prefix = "myconfig")
public class MyConfig {

    private String name;
    private String location;

    public String getName() {
        return name;
    }

    public void setName(String name) {
        this.name = name;
    }

    public String getLocation() {
        return location;
    }

    public void setLocation(String location) {
        this.location = location;
    }
}
TestController.java
package com.springboot.controller;

import com.springboot.config.MyConfig;
import org.springframework.beans.factory.annotation.Autowired;
import org.springframework.stereotype.Controller;
import org.springframework.web.bind.annotation.RequestMapping;
import org.springframework.web.bind.annotation.ResponseBody;

/**
 * @author hzk
 * @date 2018/12/18
 */
@Controller
@RequestMapping(value = "/api")
public class TestController {

    @Autowired
    private MyConfig myConfig;

    @RequestMapping(value = "/config")
    @ResponseBody
    public String config(){
        return myConfig.getName() + ":" + myConfig.getLocation();
    }
}
通过上面两种方式,我们都可以将我们所需要用到的配置文件中的属性加载到我们的代码中使用。