一:Spring缓存抽象
Spring定义了org.springframework.cache.Cache和org.springframework.cache.CacheManager接口来统一不同的缓存技术;并支持使用JCache(JSR-107)注解;
Cache接口为缓存的组件规范定义,包含缓存的各种操作集合;
Cache接口下Spring提供了各种xxxCache的实现;如RedisCache,EhCacheCache ,ConcurrentMapCache等;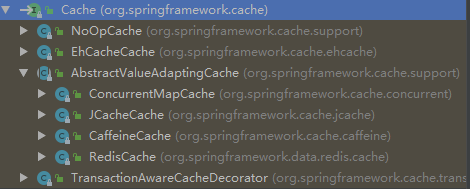
每次调用需要缓存功能的方法时,Spring会检查指定参数的指定的目标方法是否已经被调用过;如果有就直接从缓存中获取方法调用后的结果,如果没有就调用方法并缓存结果后返回给用户。下次调用直接从缓存中获取。
使用Spring缓存抽象时我们需要关注以下两点;
1、确定方法需要被缓存以及他们的缓存策略
2、从缓存中读取之前缓存存储的数据
二:几个重要概念&缓存注解
| 名称 | 解释 |
|---|---|
| Cache | 缓存顶级接口,定义缓存操作。实现有:RedisCache、EhCacheCache、ConcurrentMapCache等 |
| CacheManager | 缓存管理器,管理各种缓存(cache)组件 |
| serialize | 缓存数据时value序列化策略 |
| keyGenerator | 缓存数据时key生成策略 |
| @EnableCaching | 开启基于注解的缓存 |
| @CacheConfig | 统一配置本类的缓存注解的属性,如果方法上配置了相同的属性,那还是以方法上的为准 |
| @Cacheable | 主要针对方法配置,能够根据方法的请求参数对其进行缓存 |
| @CachePut | 保证方法被调用,又希望结果被缓存。与@Cacheable区别在于是否每次都调用方法,常用于更新 |
| @CacheEvict | 清空缓存 |
@Cacheable @CachePut @CacheEvict 主要的参数
| 名称 | 解释 |
|---|---|
| value | 缓存的命名空间,在 spring 配置文件中定义,必须指定至少一个,例如:@Cacheable(value=”mycache”) 或者@Cacheable(value={”cache1”,”cache2”} |
| cacheNames | 跟value是一样的作用,配一个即可 |
| key | 缓存的 key,可以为空,如果指定要按照 SpEL 表达式编写,如果不指定,则表示除非已配置自定义keyGenerator,否则缺省就按照方法的所有参数进行组合。例如:@Cacheable(value=”testcache”,key=”#id”) |
| keyGenerator | 生成key的策略,于key二选一就行 |
| condition | 缓存的条件,可以为空,使用 SpEL 编写,返回 true 或者 false,只有为 true 才进行缓存/清除缓存。例如:@Cacheable(value=”testcache”,condition=”#userName.length()>2”) |
| unless | 否定缓存。当条件结果为TRUE时,就不会缓存。@Cacheable(value=”testcache”,unless=”#userName.length()>2”) |
| allEntries(@CacheEvict ) | 是否清空所有缓存内容,缺省为 false,只会清除相关key的缓存,如果指定为 true,则方法调用后将立即清空该命令空间里的所有缓存,而不是整个项目的缓存。例如:@CachEvict(value=”testcache”,allEntries=true) |
| beforeInvocation(@CacheEvict) | 是否在方法执行前就清空,缺省为 false,如果指定为 true,则在方法还没有执行的时候就清空缓存,缺省情况下,如果方法执行抛出异常,则不会清空缓存。例如:@CachEvict(value=”testcache”,beforeInvocation=true) |
三:SpEL上下文数据
Spring Cache提供了一些供我们使用的SpEL上下文数据,下表直接摘自Spring官方文档:
| 名称 | 位置 | 描述 | 示例 |
|---|---|---|---|
| methodName | root对象 | 当前被调用的方法名 | #root.methodname |
| method | root对象 | 当前被调用的方法 | #root.method.name |
| target | root对象 | 当前被调用的目标对象实例 | #root.target |
| targetClass | root对象 | 当前被调用的目标对象的类 | #root.targetClass |
| args | root对象 | 当前被调用的方法的参数列表 | #root.args[0] |
| caches | root对象 | 当前方法调用使用的缓存列表 | #root.caches[0].name |
| ArgumentName | 执行上下文 | 当前被调用的方法的参数,如findArtisan(Artisan artisan),可以通过#artsian.id获得参数 | #artsian.id |
| result | 执行上下文 | 方法执行后的返回值(仅当方法执行后的判断有效,如 unless cacheEvict的beforeInvocation=false) | #result |
注意:
1.当我们要使用root对象的属性作为key时我们也可以将“#root”省略,因为Spring默认使用的就是root对象的属性。 如
@Cacheable(key = "targetClass + methodName +#p0")
2.使用方法参数时我们可以直接使用“#参数名”或者“#p参数index”。 如:
@Cacheable(value="users", key="#id")
@Cacheable(value="users", key="#p0")
SpEL提供了多种运算符
| 类型 | 运算符 |
|---|---|
| 关系 | <,>,<=,>=,==,!=,lt,gt,le,ge,eq,ne |
| 算术 | +,- ,* ,/,%,^ |
| 逻辑 | &&, |
| 条件 | ?: (ternary),?: (elvis) |
| 正则表达式 | matches |
| 其他类型 | ?.,?[…],![…],^[…],$[…] |
四:开始使用
1.开始使用前需要导入依赖#
    <dependency>
        <groupid>org.springframework.boot</groupid>
        <artifactid>spring-boot-starter-cache</artifactid>
    </dependency>
2.然后在启动类注解@EnableCaching开启缓存#
@SpringBootApplication
@EnableCaching  //开启缓存
public class DemoApplication{
    public static void main(String[] args) {
        SpringApplication.run(DemoApplication.class, args);
    }
}
3.缓存@Cacheable
@Cacheable注解会先查询是否已经有缓存,有会使用缓存,没有则会执行方法并缓存。
    @Override
    @Cacheable(value = "emp" ,key = "targetClass + methodName +#p0")
    public List<dept> queryAll(DeptQueryCriteria criteria) {
        return deptRepository.findAll(DeptQueryCriteria criteria);
    }
此处的value是必需的,它指定了你的缓存存放在哪块命名空间。
此处的key是使用的spEL表达式。这里有一个小坑,如果你把methodName换成method运行会报错,观察它们的返回类型,原因在于methodName是String而method是Method对象。
此处的Dept实体类一定要实现序列化public class Dept implements Serializable,否则会报java.io.NotSerializableException异常。
深入源码,查看它的其它属性
我们打开@Cacheable注解的源码,可以看到该注解提供的其他属性,如:
String[] cacheNames() default {}; //和value注解差不多,二选一
String keyGenerator() default ""; //key的生成器。key/keyGenerator二选一使用
String cacheManager() default ""; //指定缓存管理器
String cacheResolver() default ""; //或者指定获取解析器
String condition() default ""; //条件符合则缓存
String unless() default ""; //条件符合则不缓存
boolean sync() default false; //是否使用异步模式
4.配置@CacheConfig
当我们需要缓存的地方越来越多,可以在类上使用@CacheConfig(cacheNames = {"myCache"})注解来统一指定类里面方法的缓存注解的value值,这时方法就可省略value,如果方法依旧写上了value,那么依然以方法的value值为准。
使用方法如下:
@CacheConfig(cacheNames = {"myCache"})
public class BotRelationServiceImpl implements BotRelationService {
    @Override
    @Cacheable(key = "targetClass + methodName +#p0")//此处没写value
    public List<botrelation> findAllLimit(int num) {
        return botRelationRepository.findAllLimit(num);
    }
    .....
}
查看它的其它属性
String keyGenerator() default "";  //key的生成器。key/keyGenerator二选一使用
String cacheManager() default "";  //指定缓存管理器
String cacheResolver() default ""; //或者指定获取解析器
5.更新@CachePut
@CachePut注解的作用 主要针对方法配置,能够根据方法的请求参数对其结果进行缓存,和 @Cacheable 不同的是,它每次都会触发真实方法的调用 。简单来说就是用户更新缓存数据。但需要注意的是该注解的value 和 key 必须与要更新的缓存相同,也就是缓存保存的key完全相同(详见后面的集成redis时保存到redis的key,也就是缓存保存时的map结构的key,这个key是缓存注解的value和key的组合),也就是与@Cacheable 相同。示例:
@CachePut(value = "emp", key = "targetClass + #p0")
public NewJob updata(NewJob job) {
    NewJob newJob = newJobDao.findAllById(job.getId());
    newJob.updata(job);
    return job;
}

@Cacheable(value = "emp", key = "targetClass +#p0")//清空缓存
public NewJob save(NewJob job) {
    newJobDao.save(job);
    return job;
}
查看它的其它属性
String[] cacheNames() default {}; //与value二选一
String keyGenerator() default "";  //key的生成器。key/keyGenerator二选一使用
String cacheManager() default "";  //指定缓存管理器
String cacheResolver() default ""; //或者指定获取解析器
String condition() default ""; //条件符合则缓存
String unless() default ""; //条件符合则不缓存
6.清除@CacheEvict
@CachEvict 的作用 主要针对方法配置,能够根据一定的条件对缓存进行清空 。
allEntries	是否清空所有该命名空间的缓存内容,而不是指的整个项目,缺省为 false,就是指清除对应key的缓存。如果指定为 true,则方法调用后将立即清空该命名空间的所有缓存	@CachEvict(value=”testcache”,allEntries=true)
beforeInvocation	是否在方法执行前就清空,缺省为 false,就是方法正常结束后才清除。如果指定为 true,则在方法还没有执行的时候就清空缓存。缺省情况下,如果方法执行抛出异常,则不会清空缓存	@CachEvict(value=”testcache”,beforeInvocation=true)
示例:
    @Cacheable(value = "emp",key = "#p0.id")
    public NewJob save(NewJob job) {
        newJobDao.save(job);
        return job;
    }

    //清除emp命名空间里的一条缓存,key为要清空的数据
    @CacheEvict(value="emp",key="#id")
    public void delect(int id) {
        newJobDao.deleteAllById(id);
    }

    //方法调用后清空accountCache命名空间里的所有缓存
    @CacheEvict(value="accountCache",allEntries=true)
    public void delectAll() {
        newJobDao.deleteAll();
    }

    //方法调用前清空accountCache命名空间里的所有缓存
    @CacheEvict(value="accountCache",beforeInvocation=true)
    public void delectAll() {
        newJobDao.deleteAll();
    }
其他属性
String[] cacheNames() default {}; //与value二选一
String keyGenerator() default "";  //key的生成器。key/keyGenerator二选一使用
String cacheManager() default "";  //指定缓存管理器
String cacheResolver() default ""; //或者指定获取解析器
String condition() default ""; //条件符合则清空
7.组合@Caching
有时候我们可能组合多个Cache注解使用,此时就需要@Caching组合多个注解标签了。
    @Caching(cacheable = {
        @Cacheable(value = "emp",key = "#p0"),
        ...
    },
    put = {
        @CachePut(value = "emp",key = "#p0"),
        ...
    },evict = {
        @CacheEvict(value = "emp",key = "#p0"),
        ....
    })
    public User save(User user) {
        ....
    }
五:整合Redis
Redis 优势就不必说了,不会Redis的请移步,ehcache也差不多,有了前面的基础都简单了
1.安装Redis,请自行安装
2.导入依赖
就只需要这一个依赖!不需要spring-boot-starter-cache
  <dependency>
        <groupId>org.springframework.boot</groupId>
        <artifactId>spring-boot-starter-data-redis</artifactId>
  </dependency>
当你导入这一个依赖时,SpringBoot的CacheManager就会使用RedisCache。
如果你的Redis使用默认配置,这时候已经可以启动程序了。
3.配置Redis,根据需要自行配置
# Redis服务器地址
spring.redis.host=127.0.0.1
# Redis服务器连接端口
spring.redis.port=6379
# Redis服务器连接密码(默认为空)
spring.redis.password=
# 连接池最大连接数(使用负值表示没有限制)
spring.redis.pool.max-active=1000
# 连接池最大阻塞等待时间(使用负值表示没有限制)
spring.redis.pool.max-wait=-1
# 连接池中的最大空闲连接
spring.redis.pool.max-idle=10
# 连接池中的最小空闲连接
spring.redis.pool.min-idle=2
# 连接超时时间(毫秒)
spring.redis.timeout=0
4.配置RedisConfig
RedisConfig配置类
@Configuration
@EnableCaching
/**
 * 自动配置
 */
@ConditionalOnClass(RedisOperations.class)
@EnableConfigurationProperties(RedisProperties.class)
public class RedisConfig extends CachingConfigurerSupport {

    /**
     *  设置 redis 数据默认过期时间,默认1天
     *  设置@cacheable 序列化方式,这里使用了自定义的序列号工具类
     * @return
     */
    @Bean
    public RedisCacheConfiguration redisCacheConfiguration(){
        FastJsonRedisSerializer<Object> fastJsonRedisSerializer = new FastJsonRedisSerializer<>(Object.class);
        RedisCacheConfiguration configuration = RedisCacheConfiguration.defaultCacheConfig();
        configuration = configuration.serializeValuesWith(RedisSerializationContext.SerializationPair.fromSerializer(fastJsonRedisSerializer)).entryTtl(Duration.ofDays(1));
        return configuration;
    }

    @Bean(name = "redisTemplate")
    @ConditionalOnMissingBean(name = "redisTemplate")
    public RedisTemplate<Object, Object> redisTemplate(RedisConnectionFactory redisConnectionFactory) {
        RedisTemplate<Object, Object> template = new RedisTemplate<>();
        //序列化
        FastJsonRedisSerializer fastJsonRedisSerializer = new FastJsonRedisSerializer(Object.class);
        // value值的序列化采用fastJsonRedisSerializer
        template.setValueSerializer(fastJsonRedisSerializer);
        template.setHashValueSerializer(fastJsonRedisSerializer);

        // 全局开启AutoType,不建议使用
        // ParserConfig.getGlobalInstance().setAutoTypeSupport(true)
        // 建议使用这种方式,小范围指定白名单;参考:https://blog.csdn.net/liyantianmin/article/details/91890766
        // 因为使用FastJsonRedisSerializer把对象序列化时是带了class类型的,反序列化时就可以自动根据这个class转换成对应的类型,这里配置的就是那些包下的对象可以自动反序列化成对应的对象
        ParserConfig.getGlobalInstance().addAccept("cn.masterj.domain");
        // key的序列化采用StringRedisSerializer
        template.setKeySerializer(new StringRedisSerializer());
        template.setHashKeySerializer(new StringRedisSerializer());
        template.setConnectionFactory(redisConnectionFactory);
        return template;
    }

    /**
     * 自定义缓存key生成策略
     * 使用方法 @Cacheable(keyGenerator="keyGenerator")
     * @return
     */
    @Bean
    @Override
    public KeyGenerator keyGenerator() {
        return (target, method, params) -> {
            StringBuilder sb = new StringBuilder();
            sb.append(target.getClass().getName());
            sb.append(method.getName());
            for (Object obj : params) {
                sb.append(JSON.toJSONString(obj).hashCode());
            }
            return sb.toString();//结果就类似于:me.zhengjie.modules.system.service.impl.DeptServiceImplqueryAll467849810
        };
    }
}
使用FastJson来序列化和反序列化
/**
 * Value 序列化
 *
 * @author /
 * @param <T>
 */
public class FastJsonRedisSerializer<T> implements RedisSerializer<T> {

    public static final Charset DEFAULT_CHARSET = Charset.forName("UTF-8");

    private Class<T> clazz;

    public FastJsonRedisSerializer(Class<T> clazz) {
        super();
        this.clazz = clazz;
    }

    @Override
    public byte[] serialize(T t) throws SerializationException {
        if (t == null) {
            return new byte[0];
        }
        return JSON.toJSONString(t, SerializerFeature.WriteClassName).getBytes(DEFAULT_CHARSET);
    }

    @Override
    public T deserialize(byte[] bytes) throws SerializationException {
        if (bytes == null || bytes.length <= 0) {
            return null;
        }
        String str = new String(bytes, DEFAULT_CHARSET);
        return (T) JSON.parseObject(str, clazz);
    }

}
集成Redis的简单使用示例
@CacheConfig(cacheNames = "dept")
public interface DeptService {

    /**
     * queryAll
     * @param criteria
     * @return
     *  类上配置的value/cacheNames,指定的是这个类的所有带缓存注解的方法,缓存存放在哪块命名空间,如果方法上也指定了value/cacheNames,那这个方法就以方法上配置的作为这个方法缓存的命名空间
     *  最后保存到redis的缓存key就是:命名空间::keyGenerator生成的结果   组成缓存的key
     *  如:  dept::me.zhengjie.modules.system.service.impl.DeptServiceImplqueryAll467849810
     *  keyGenerator = "keyGenerator",就是指定这个方法的缓存key的生成策略是keyGenerator,keyGenerator就是KeyGenerator(函数式接口)的实现类,在RedisConfig里面实例化了KeyGenerator的实现类
     */
    @Cacheable(keyGenerator = "keyGenerator")
    List<DeptDTO> queryAll(DeptQueryCriteria criteria);

    /**
     * findById
     * @param id
     * @return
     */
    @Cacheable(key = "#p0")
    DeptDTO findById(Long id);

    @CacheEvict(allEntries = true)
    DeptDTO create(Dept resources);

    @CacheEvict(allEntries = true)
    void update(Dept resources);

    @CacheEvict(allEntries = true)
    void delete(Long id);

    @Cacheable(keyGenerator = "keyGenerator")
    List<Dept> findByPid(long pid);

}
ps:这个示例为了简介,把注解写在了接口里面了的,Spring是不建议这样做的,因为这样做只能在使用基于接口的代理时才能有预期的效果。应该要注解在实现类上。