springboot+mybatis整合redis实现缓存(写的略微粗糙,各位大佬凑活看吧)
开发环境/工具:
idea
jdk1.8
mysql
redis
RedisDesktopManager(用于查看,可用可不用)
开始:
idea创建好springboot项目并生成所需要的实体类以及mapper/mapping。(此处不做详细讲解我会把配置文件贴在下面,如不知如何操作可参考我之前的博客https://blog.csdn.net/zks_4826/article/details/81603865)
创建完毕后结构如下图


注意:此处只需要看我选择的几个文件即可
其中:pom.xml
<?xml version="1.0" encoding="UTF-8"?>
<project xmlns="http://maven.apache.org/POM/4.0.0" xmlns:xsi="http://www.w3.org/2001/XMLSchema-instance"
         xsi:schemaLocation="http://maven.apache.org/POM/4.0.0 http://maven.apache.org/xsd/maven-4.0.0.xsd">
    <modelVersion>4.0.0</modelVersion>
    <parent>
        <groupId>org.springframework.boot</groupId>
        <artifactId>spring-boot-starter-parent</artifactId>
        <version>2.1.5.RELEASE</version>
        <relativePath/> <!-- lookup parent from repository -->
    </parent>
    <groupId>com.zks</groupId>
    <artifactId>zhou</artifactId>
    <version>0.0.1-SNAPSHOT</version>
    <name>zhou</name>
    <description>Demo project for Spring Boot</description>

    <properties>
        <java.version>1.8</java.version>
    </properties>

    <dependencies>
        <dependency>
            <groupId>org.springframework.boot</groupId>
            <artifactId>spring-boot-starter-jdbc</artifactId>
        </dependency>
        <dependency>
            <groupId>org.springframework.boot</groupId>
            <artifactId>spring-boot-starter-web</artifactId>
        </dependency>
        <dependency>
            <groupId>org.mybatis.spring.boot</groupId>
            <artifactId>mybatis-spring-boot-starter</artifactId>
            <version>2.0.1</version>
        </dependency>

        <dependency>
            <groupId>mysql</groupId>
            <artifactId>mysql-connector-java</artifactId>
            <scope>runtime</scope>
        </dependency>
        <dependency>
            <groupId>org.springframework.boot</groupId>
            <artifactId>spring-boot-starter-test</artifactId>
            <scope>test</scope>
        </dependency>
        <dependency>
            <groupId>org.springframework.boot</groupId>
            <artifactId>spring-boot-starter-thymeleaf</artifactId>
        </dependency>

        <dependency>
            <groupId>org.mybatis.generator</groupId>
            <artifactId>mybatis-generator-core</artifactId>
            <version>1.3.5</version>
        </dependency>
        <dependency>
            <groupId>com.alibaba</groupId>
            <artifactId>druid</artifactId>
            <version>1.1.10</version>
        </dependency>
        <!-- 分页插件 -->
        <!--<dependency>
            <groupId>com.github.pagehelper</groupId>
            <artifactId>pagehelper-spring-boot-starter</artifactId>
            <version>1.2.5</version>
        </dependency>-->
        <!-- redis -->
        <dependency>
            <groupId>org.springframework.boot</groupId>
            <artifactId>spring-boot-starter-data-redis</artifactId>
        </dependency>
        <dependency>
            <groupId>org.apache.commons</groupId>
            <artifactId>commons-pool2</artifactId>
            <version>2.4.2</version>
        </dependency>
    </dependencies>

    <build>
        <plugins>
            <plugin>
                <groupId>org.springframework.boot</groupId>
                <artifactId>spring-boot-maven-plugin</artifactId>
            </plugin>
        </plugins>
    </build>

</project>
application.yml
spring:
  profiles:
    active: dev
application-dev.yml
server:
  port: 8080

spring:
  datasource:
    username: root
    password: 123456
    url: jdbc:mysql://localhost:3306/zkstest?useUnicode=true&characterEncoding=utf-8&useSSL=true&serverTimezone=UTC
    driver-class-name: com.mysql.cj.jdbc.Driver

mybatis:
  mapper-locations: classpath:mapping/*Mapping.xml
  type-aliases-package: com.zks.entity

#showSql
logging:
  level:
    com:
      example:
        mapper : debug

thymeleaf:
  cache: false
  prefix: classpath:/templates/
  suffix: .html
  encoding: utf-8
  mode: html5
  servlet:
    content-type: text/html


#整合redis
  spring.redis.database: 0
  spring.redis.host: 127.0.0.1
  spring.redis.port: 6379
  spring.redis.password:
  spring.redis.jedis.pool.max-active: 8
  spring.redis.jedis.pool.max-wait: -1ms
  spring.redis.jedis.pool.max-idle: 8
  spring.redis.lettuce.pool.min-idle: 0
  spring.redis.timeout: 10000ms

#druid数据源
  spring.datasource.name: mysql_test
  spring.datasource.type: com.alibaba.druid.pool.DruidDataSource
  spring.datasource.driver-class-name: com.mysql.cj.jdbc.Driver
  spring.datasource.url: jdbc:mysql://localhost:3306/zkstest?useUnicode=true&characterEncoding=utf-8&useSSL=true&serverTimezone=UTC
  spring.datasource.username: root
  spring.datasource.password: 123456
  #数据源配置,初始化大小、最小、最大
  spring.datasource.initialSize: 5
  spring.datasource.minIdle: 5
  spring.datasource.maxActive: 20
  #连接等待超时时间
  spring.datasource.maxWait: 60000
  #配置隔多久进行一次检测(检测可以关闭的空闲连接)
  spring.datasource.timeBetweenEvictionRunsMillis: 60000
  #配置连接在池中的最小生存时间
  spring.datasource.minEvictableIdleTimeMillis: 300000
  spring.datasource.validationQuery: SELECT 1 FROM DUAL
  spring.datasource.testWhileIdle: true
  spring.datasource.testOnBorrow: false
  spring.datasource.testOnReturn: false
  # 打开PSCache,并且指定每个连接上PSCache的大小
  spring.datasource.poolPreparedStatements: true
  spring.datasource.maxPoolPreparedStatementPerConnectionSize: 20
  # 配置监控统计拦截的filters,去掉后监控界面sql无法统计,'wall'用于防火墙
  spring.datasource.filters: stat,wall,log4j
  # 通过connectProperties属性来打开mergeSql功能;慢SQL记录
  spring.datasource.connectionProperties: druid.stat.mergeSql
  druid.stat.mergeSql: true
  druid.stat.slowSqlMillis: 5000
  #开启二级缓存
  spring.datasource.cachePrepStmts: true
mybatis-generator.xml
<?xml version="1.0" encoding="UTF-8"?>
<!DOCTYPE generatorConfiguration
        PUBLIC "-//mybatis.org//DTD MyBatis Generator Configuration 1.0//EN"
        "http://mybatis.org/dtd/mybatis-generator-config_1_0.dtd">

<generatorConfiguration>

    <!-- mysql-connector-java-5.1.46.jar的绝对路径 -->
    <!--<classPathEntry location="C:\Users\PC\.m2\repository\mysql\mysql-connector-java\8.0.16\mysql-connector-java-8.0.16.jar" />-->

    <context id="DB2Tables" targetRuntime="MyBatis3">
        <commentGenerator>
            <property name="suppressDate" value="true"/>
            <!-- 是否去除自动生成的注释 true:是 : false:否 -->
            <property name="suppressAllComments" value="true"/>
        </commentGenerator>

        <!-- 配置数据源 -->
        <jdbcConnection driverClass="com.mysql.cj.jdbc.Driver"
                        connectionURL="jdbc:mysql://localhost:3306/zkstest?serverTimezone=UTC"
                        userId="root"
                        password="123456">
        </jdbcConnection>

        <javaTypeResolver >
            <property name="forceBigDecimals" value="false" />
        </javaTypeResolver>

        <!-- 配置生成的javabean所存放的路径和包(使用绝对路径) -->
        <javaModelGenerator targetPackage="com.zks.entity" targetProject="src/main/java">
            <property name="enableSubPackages" value="true" />
            <property name="trimStrings" value="true" />
        </javaModelGenerator>

        <!-- 配置生成的**Mapper.xml文件所存放的路径和包(使用绝对路径) -->
        <sqlMapGenerator targetPackage="mapping"  targetProject="src/main/resources">
            <property name="enableSubPackages" value="true" />
        </sqlMapGenerator>

        <!-- 配置生成的**Mapper.java接口文件所存放的路径和包(使用绝对路径) -->
        <javaClientGenerator type="XMLMAPPER" targetPackage="com.zks.mapper"  targetProject="src/main/java">
            <property name="enableSubPackages" value="true" />
        </javaClientGenerator>

        <!-- 指定我们要操作的表明和生成的javabean类名 -->
        <table tableName="t_user" domainObjectName="TUser" enableCountByExample="false" enableUpdateByExample="false" enableDeleteByExample="false" enableSelectByExample="false" selectByExampleQueryId="false">
        </table>

    </context>
</generatorConfiguration>
注意:此处生成的*mapping.xml名称可能会是*mapper.xml注意自行更改
启动类ZhouApplication.java
package com.zks;

import org.apache.ibatis.annotations.Mapper;
import org.mybatis.spring.annotation.MapperScan;
import org.springframework.boot.SpringApplication;
import org.springframework.boot.autoconfigure.SpringBootApplication;
import org.springframework.cache.annotation.EnableCaching;

@MapperScan("com.zks.mapper")
@SpringBootApplication
@EnableCaching
public class ZhouApplication {

    public static void main(String[] args) {
        SpringApplication.run(ZhouApplication.class, args);
    }

}
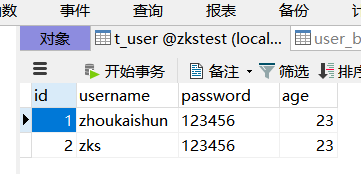
数据库表
RedisController.java
package com.zks.controller;

import com.zks.entity.TUser;
import com.zks.service.TUserService;
import org.springframework.beans.factory.annotation.Autowired;
import org.springframework.data.redis.core.RedisTemplate;
import org.springframework.data.redis.core.StringRedisTemplate;
import org.springframework.data.redis.core.ValueOperations;
import org.springframework.ui.Model;
import org.springframework.web.bind.annotation.GetMapping;
import org.springframework.web.bind.annotation.PathVariable;
import org.springframework.web.bind.annotation.RestController;

import java.util.Date;
import java.util.concurrent.TimeUnit;

/**
 * @author :zhoukaishun
 * @date :Created in 2019/5/31 15:08
 * @description:${description}
 * @modified By:
 * @version: $version$
 */
@RestController
public class RedisController {
    @Autowired
    StringRedisTemplate stringRedisTemplate;
    @Autowired
    TUserService tUserService;
    @Autowired
    RedisTemplate redisTemplate;
    @GetMapping("/redis")
    public String redis(){
        stringRedisTemplate.opsForValue().set("zks","zhoukaishun");
        return stringRedisTemplate.opsForValue().get("zks");
    }
    @GetMapping("/getPersonById/{id}")
    public String getPersonById(Model model, @PathVariable Integer id){
        String key = "user_" + id;
        ValueOperations<String, TUser> operations = redisTemplate.opsForValue();
        boolean hasKey = redisTemplate.hasKey(key);
        if(hasKey){
            System.out.println("==========从缓存中获得数据begin:"+System.currentTimeMillis()+"=========");
            long begin = System.currentTimeMillis();
            TUser tuser = operations.get(key);
            long end = System.currentTimeMillis();
            System.out.println("===========从缓存中获得数据end:"+System.currentTimeMillis()+"===========");
            System.out.println("缓存查询时长为:"+(end-begin));
            return tuser.toString();
        }else{
            System.out.println("======从数据库去取值begin:"+System.currentTimeMillis()+"=======");
            long begin = System.currentTimeMillis();
            TUser tuser = tUserService.getPersonById(id);
            long end = System.currentTimeMillis();
            System.out.println("======从数据库去取值end:"+System.currentTimeMillis()+"=======");
            System.out.println("数据库查询时长为:"+(end-begin));
            operations.set(key, tuser);
            return tuser.toString();
        }

    }
}
注:此处可先看redis()方法,用于简单测试redis是否可捕获我们设置的值
代码书写后启动无误后,启动本地redis
启动方法打开本地redis目录下shift+鼠标右键,进入命令行,输入 ./redis-server.exe redis.windows.conf 回车

下图表示启动成功,可在redis-desktop-manager登陆查看(可有可无,看一下比较放心)

名称随意,没有密码(因为没设置所以没有密码)端口默认6379 测试连接

因为之前写的0


刚开始并没有zks这个key
访问 http://localhost:8080/redis/ 后如下图


现在说明我们项目是可以往redis中塞值的,下面我们结合数据库再看方法getPersonById
前提是我们要将我们的实体序列化

关于service以及mapper/mapping中方法我就不往里面贴了,无坑,只需注意在serviceImpl中


详情看:https://docs.spring.io/spring/docs/current/spring-framework-reference/integration.html#cache
service以及mapper/mapping中方法书写完毕后运行项目访问:http://localhost:8080/getPersonById/1
如下图:

后台打印:

重新刷新网页重新获取id为1的数据

查询效率显而易见。至此,完毕。
参考文档:
https://blog.csdn.net/qq_27317475/article/details/81188642#commentBox
https://blog.csdn.net/zhangcongyi420/article/details/82686702
