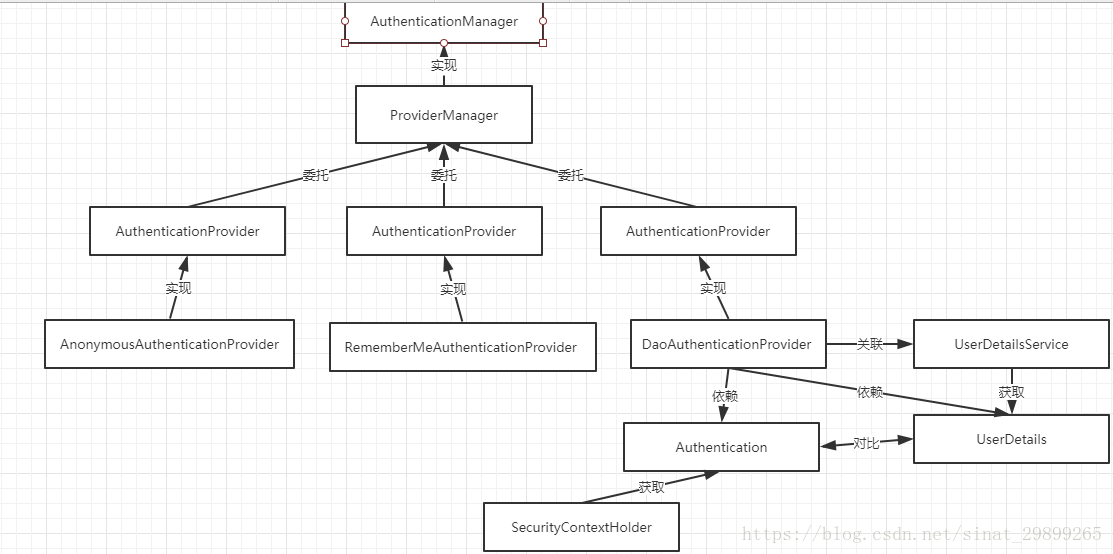
0、spring-security的用途和组件
-
用途
spring-security用户安全访问控制 -
组件:
原文地址:https://blog.csdn.net/sinat_29899265/article/details/80653167
1、需要的类
一个实现AuthenticationProvider接口的类,提供自己的认证逻辑
一个实现SavedRequestAwareAuthenticationSuccessHandler的类,提供默认认证成功后的处理
一个实现SimpleUrlAuthenticationFailureHandler的类,提供默认认证失败的处理
一个实现WebSecurityConfigurerAdapter的类,提供security配置
一个实现UserDetailsService接口的类,用于获取自定义的用户信息
一个实现UserDetails接口的类,用于保存自定义用户信息
2、上面各依赖在spring-security中的调用顺序
AuthenticationProvider–>
UserDetailsService–>认证信息匹配–>
SavedRequestAwareAuthenticationSuccessHandler(认证成功,有返回值)/
SimpleUrlAuthenticationFailureHandler(认证失败,根据抛出的异常进行提示)
3、相关依赖
<dependency>
   	<groupId>org.springframework.boot</groupId>
   	<artifactId>spring-boot-starter-security</artifactId>
   	<version>2.1.0.RELEASE</version>
</dependency>
<dependency>
	<groupId>org.mybatis.spring.boot</groupId>
	<artifactId>mybatis-spring-boot-starter</artifactId>
	<version>1.3.2</version>
</dependency>
<dependency>
	<groupId>mysql</groupId>
	<artifactId>mysql-connector-java</artifactId>
	<version>5.1.10</version>
	<scope>runtime</scope>
</dependency>

<!-- 阿里连接池 -->
<dependency>
    <groupId>com.alibaba</groupId>
    <artifactId>druid-spring-boot-starter</artifactId>
    <version>1.1.10</version>
</dependency>

<dependency>
	<groupId>org.springframework.boot</groupId>
	<artifactId>spring-boot-starter-jdbc</artifactId>
</dependency>

<!--pagehelper -->
<dependency>
	<groupId>com.github.pagehelper</groupId>
	<artifactId>pagehelper-spring-boot-starter</artifactId>
	<version>1.2.3</version>
	<exclusions>
		<exclusion>
			<groupId>org.mybatis.spring.boot</groupId>
			<artifactId>mybatis-spring-boot-starter</artifactId>
		</exclusion>
	</exclusions>
</dependency>
4、编写security配置类
@EnableWebSecurity	//激活WebSecurityConfiguration配置类
public class SecurityConfig extends WebSecurityConfigurerAdapter {

	/**
	 * 注入自定义的AuthenticationProvider
	 */
	@Autowired
    private AuthenticationProvider provider;
	 /**
     * 注入自定义的 AuthenticationSuccessHandler
     */
    @Autowired
    private AuthenticationSuccessHandler securityAuthenticationSuccessHandler;
    /**
     * 注入自定义的 AuthenticationFailureHandler
     */
    @Autowired
    private AuthenticationFailureHandler securityAuthenticationFailHandler;

	@Override
	protected void configure(AuthenticationManagerBuilder auth) throws Exception {
		auth.authenticationProvider(provider);	//使用自定义验证方式
	}

	@Override
	protected void configure(HttpSecurity http) throws Exception {
		http
			//默认开启csrf校验校验,如果不对/druid/*进行忽略,将会导致/druid/login.html登录后没有反应
			//.csrf().ignoringAntMatchers("/druid/*")
			//或直接关闭csrf效验
			.csrf().disable()
			.authorizeRequests()
				.antMatchers("/", "/index").permitAll()
				.antMatchers("/api/admin/**").access("hasRole('ROLE_ADMIN')")
				.antMatchers("/druid/**").access("hasRole('ROLE_DBA')")
				.antMatchers("/api/user/**").access("hasRole('ROLE_USER')")
				.anyRequest().fullyAuthenticated()
			.and()
			.formLogin()
				.loginPage("/access/login.html")
				.loginProcessingUrl("/login-process")
            	.successHandler(securityAuthenticationSuccessHandler)
            	.failureHandler(securityAuthenticationFailHandler)
            	.permitAll()  // 登录页面链接、登录表单链接、登录失败页面链接配置
			.and()
			.logout().logoutSuccessUrl("/index").permitAll()
			;
	}

	@Override
	public void configure(WebSecurity web) throws Exception {
		// TODO Auto-generated method stub
		super.configure(web);
		web.ignoring()
			.antMatchers("/resources/**")
			.antMatchers("/static/**")
			;
	}
}
使用到了@EnableWebSecurity注解,查看源码
@Retention(value = java.lang.annotation.RetentionPolicy.RUNTIME)
@Target(value = { java.lang.annotation.ElementType.TYPE })
@Documented
@Import({ WebSecurityConfiguration.class,//重点1
		SpringWebMvcImportSelector.class,
		OAuth2ImportSelector.class })
@EnableGlobalAuthentication//重点2
@Configuration
public @interface EnableWebSecurity {

	/**
	 * Controls debugging support for Spring Security. Default is false.
	 * @return if true, enables debug support with Spring Security
	 */
	boolean debug() default false;
}
是个组合注解,在重点1处激活了WebSecurityConfiguration配置类,该配置类注入了一个name为springSecurityFilterChain的bean,springSecurityFilterChain是spring security的核心过滤器,是认证的入口,其源码:
@Configuration
public class WebSecurityConfiguration implements ImportAware, BeanClassLoaderAware {
	....
	@Bean(name = AbstractSecurityWebApplicationInitializer.DEFAULT_FILTER_NAME)
	public Filter springSecurityFilterChain() throws Exception {
		boolean hasConfigurers = webSecurityConfigurers != null
				&& !webSecurityConfigurers.isEmpty();
		if (!hasConfigurers) {
			WebSecurityConfigurerAdapter adapter = objectObjectPostProcessor
					.postProcess(new WebSecurityConfigurerAdapter() {
					});
			webSecurity.apply(adapter);
		}
		return webSecurity.build();
	}
}
重点2处使用了@EnableGlobalAuthentication注解,看其源码
@Retention(value = java.lang.annotation.RetentionPolicy.RUNTIME)
@Target(value = { java.lang.annotation.ElementType.TYPE })
@Documented
@Import(AuthenticationConfiguration.class)	//重点3
@Configuration
public @interface EnableGlobalAuthentication {
}
其也是个组合注解,重点3处激活了AuthenticationConfiguration配置类,注入了一个name为authenticationManagerBuilder的bean,该bean是AuthenticationManagerBuilder类的实例,而AuthenticationManagerBuilder类是用来配置认证相关的核心类,其内部使用建造者模式,拥有创建AuthenticationManager
@Configuration
@Import(ObjectPostProcessorConfiguration.class)
public class AuthenticationConfiguration {
	...
	@Bean
	public AuthenticationManagerBuilder authenticationManagerBuilder(
			ObjectPostProcessor<Object> objectPostProcessor, ApplicationContext context) {
		LazyPasswordEncoder defaultPasswordEncoder = new LazyPasswordEncoder(context);
		AuthenticationEventPublisher authenticationEventPublisher = getBeanOrNull(context, AuthenticationEventPublisher.class);

		DefaultPasswordEncoderAuthenticationManagerBuilder result = new DefaultPasswordEncoderAuthenticationManagerBuilder(objectPostProcessor, defaultPasswordEncoder);
		if (authenticationEventPublisher != null) {
			result.authenticationEventPublisher(authenticationEventPublisher);
		}
		return result;
	}

}
再点开AuthenticationManagerBuilder
public class AuthenticationManagerBuilder
		extends
		AbstractConfiguredSecurityBuilder<AuthenticationManager, AuthenticationManagerBuilder>
		implements ProviderManagerBuilder<AuthenticationManagerBuilder> {
	private final Log logger = LogFactory.getLog(getClass());

	private AuthenticationManager parentAuthenticationManager;
	private List<AuthenticationProvider> authenticationProviders = new ArrayList<>();
	private UserDetailsService defaultUserDetailsService;
	private Boolean eraseCredentials;
	private AuthenticationEventPublisher eventPublisher;

	/**
	 * Creates a new instance
	 * @param objectPostProcessor the {@link ObjectPostProcessor} instance to use.
	 */
	public AuthenticationManagerBuilder(ObjectPostProcessor<Object> objectPostProcessor) {
		super(objectPostProcessor, true);
	}
	...
	public boolean isConfigured() {
		return !authenticationProviders.isEmpty() || parentAuthenticationManager != null;
	}
	...
	//重点4
	public AuthenticationManagerBuilder authenticationProvider(
			AuthenticationProvider authenticationProvider) {
		this.authenticationProviders.add(authenticationProvider);
		return this;
	}
	//重点5
	@Override
	protected ProviderManager performBuild() throws Exception {
		if (!isConfigured()) {
			logger.debug("No authenticationProviders and no parentAuthenticationManager defined. Returning null.");
			return null;
		}
		ProviderManager providerManager = new ProviderManager(authenticationProviders,
				parentAuthenticationManager);
		if (eraseCredentials != null) {
			providerManager.setEraseCredentialsAfterAuthentication(eraseCredentials);
		}
		if (eventPublisher != null) {
			providerManager.setAuthenticationEventPublisher(eventPublisher);
		}
		providerManager = postProcess(providerManager);
		return providerManager;
	}
}
重点4处该类中提供了设置自定义AuthenticationProvider ,在重点5处进行是否有自定义AuthenticationProvider,有则使用ProviderManager对其进行管理使用,否则抛出异常。
在该类中还提供了一些其他认证方式,如
静态认证方法inMemoryAuthentication()
所以自己定义的security配置类中的这段代码会在容器加载完成后生效自定义的AuthenticationProvider
@Override
	protected void configure(AuthenticationManagerBuilder auth) throws Exception {
		auth.authenticationProvider(provider);	//使用自定义验证方式
	}
5、编写认证处理成功和失败的handler
@Component("securityAuthenticationSuccessHandler")
public class SecurityAuthenticationSuccessHandler extends SavedRequestAwareAuthenticationSuccessHandler {
    /**
     * 成功处理
     *
     * @param request
     * @param response
     * @param authentication
     * @throws IOException
     * @throws ServletException
     */
    @Override
    public void onAuthenticationSuccess(HttpServletRequest request, HttpServletResponse response, Authentication authentication)
            throws IOException, ServletException {

    	Result result = new Result();
    	result.setCode("200");
    	result.setMsg("success");
        Map<String,Object> map=new HashMap<>();
     	Object principal = authentication.getPrincipal();
        String userInfo = JSON.toJSONString(principal);
     	map.put("userInfo", userInfo);
     	result.setDate(JSON.toJSONString(map));
     	response.setContentType("application/json;charset=UTF-8");
     	// 返回 JSON 数据
        response.getWriter().write(JSON.toJSONString(result));
    }
}
@Component("securityAuthenticationFailHandler")
public class SecurityAuthenticationFailHandler extends SimpleUrlAuthenticationFailureHandler {
	//失败
	@Override
	public void onAuthenticationFailure(HttpServletRequest request, HttpServletResponse response,
			AuthenticationException exception) throws IOException, ServletException {
		Result result = new Result();
    	result.setCode("401");
    	result.setMsg("认证失败,密码或帐号有误");
		response.setContentType("application/json;charset=UTF-8");
		// 返回 JSON 数据
		response.getWriter().write(JSON.toJSONString(result));
	}
}
在security配置类中,下面代码使其生效
@Override
	protected void configure(HttpSecurity http) throws Exception {
		http
			//默认开启csrf校验校验,如果不对/druid/*进行忽略,将会导致/druid/login.html登录后没有反应
			//.csrf().ignoringAntMatchers("/druid/*")
			//或直接关闭csrf效验
			.csrf().disable()
			.authorizeRequests()
				.antMatchers("/", "/index").permitAll()
				.antMatchers("/api/admin/**").access("hasRole('ROLE_ADMIN')")
				.antMatchers("/druid/**").access("hasRole('ROLE_DBA')")
				.antMatchers("/api/user/**").access("hasRole('ROLE_USER')")
				.anyRequest().fullyAuthenticated()
			.and()
			.formLogin()
				.loginPage("/access/login.html")
				.loginProcessingUrl("/login-process")
            	.successHandler(securityAuthenticationSuccessHandler)//重点1
            	.failureHandler(securityAuthenticationFailHandler)//重点2
            	.permitAll()
			.and()
			.logout().logoutSuccessUrl("/index").permitAll()
			;
	}
重点1和重点2使用了HttpSecurity 类中的方法,点开HttpSecurity
public final class HttpSecurity extends
		AbstractConfiguredSecurityBuilder<DefaultSecurityFilterChain, HttpSecurity>
		implements SecurityBuilder<DefaultSecurityFilterChain>,
		HttpSecurityBuilder<HttpSecurity> {
	private final RequestMatcherConfigurer requestMatcherConfigurer;
	private List<Filter> filters = new ArrayList<>();
	private RequestMatcher requestMatcher = AnyRequestMatcher.INSTANCE;
	private FilterComparator comparator = new FilterComparator();
	...
}
其中出现最多的字眼DefaultSecurityFilterChain,点开,其实现了SecurityFilterChain 接口,即上面说的@EnableWebSecurity激活了一个SecurityFilterChain,其实现就是这个。
public final class DefaultSecurityFilterChain implements SecurityFilterChain {
	private static final Log logger = LogFactory.getLog(DefaultSecurityFilterChain.class);
	private final RequestMatcher requestMatcher;	//重点1
	private final List<Filter> filters;	//重点2

	public DefaultSecurityFilterChain(RequestMatcher requestMatcher, Filter... filters) {
		this(requestMatcher, Arrays.asList(filters));
	}

	public DefaultSecurityFilterChain(RequestMatcher requestMatcher, List<Filter> filters) {
		logger.info("Creating filter chain: " + requestMatcher + ", " + filters);
		this.requestMatcher = requestMatcher;
		this.filters = new ArrayList<>(filters);
	}

	public RequestMatcher getRequestMatcher() {
		return requestMatcher;
	}

	public List<Filter> getFilters() {
		return filters;
	}

	public boolean matches(HttpServletRequest request) {
		return requestMatcher.matches(request);
	}

	@Override
	public String toString() {
		return "[ " + requestMatcher + ", " + filters + "]";
	}
}
该类中在重点1处是对设置的url进行匹配和重点2处保存filter。
回到security配置类
.successHandler(securityAuthenticationSuccessHandler)//重点1
.failureHandler(securityAuthenticationFailHandler)//重点2
点开successHandler
ublic abstract class AbstractAuthenticationFilterConfigurer<B extends HttpSecurityBuilder<B>, T extends AbstractAuthenticationFilterConfigurer<B, T, F>, F extends AbstractAuthenticationProcessingFilter>
		extends AbstractHttpConfigurer<T, B> {
	...
	private AuthenticationSuccessHandler successHandler = this.defaultSuccessHandler;//此处设置了默认的handler
	...
	public final T successHandler(AuthenticationSuccessHandler successHandler) {
		this.successHandler = successHandler;	//此处设置了自定义的handler
		return getSelf();
	}
	...
}
点开AuthenticationSuccessHandler ,根据其接口描述和方法描述,认证成功时将会默认调用次方法
/**
 * Strategy used to handle a successful user authentication.
 * ...
 */
public interface AuthenticationSuccessHandler {
	/**
	 * Called when a user has been successfully authenticated.
	 *	....
	 */
	void onAuthenticationSuccess(HttpServletRequest request,
			HttpServletResponse response, Authentication authentication)
			throws IOException, ServletException;

}
6、编写UserDetailsService
@Component
public class SecurityUserDetailsService implements UserDetailsService {

 	/**
 	*用户服务
 	*/
    @Autowired
    private UserService userService;


    /**
     * 通过查找数据库,查找是否有对应认证信息
     */
    @Override
    public UserDetails loadUserByUsername(String accounts) throws UsernameNotFoundException {
        /**  accounts(登录时输入的帐号)然后到数据库中找到对应的用户信息,并构建成我们自己的UserInfo来返回 */
        TbUser user = userService.selectUserByAccounts(accounts);
        if(null != user) {
            SecurityUserInfo userInfo = new SecurityUserInfo(user.getUserId(), user.getUsername(), user.getPassword(), user.getSalt(), user.getRoleId(),
                    user.getStatus(), true, true, true, true);
            return userInfo;
        }

        return null;
    }
}
7、编写UserDetails
public class SecurityUserInfo implements Serializable, UserDetails {

    private static final long serialVersionUID = 1L;

    /**
     * 用户id
     */
    private Long userId;
    /**
     * 用户名
     */
    private String username;
    /**
     * 密码
     */
    private String password;
    /**
     * 盐加密
     */
    private String salt;
    /**
     * 角色码
     */
    private int roleId;
    /**
     * 帐号状态(0正常 1停用)
     */
    private String status;

    private boolean accountNonExpired;
    private boolean accountNonLocked;
    private boolean credentialsNonExpired;
    private boolean enabled;

    /**
     * 保存权限
     */
    private Collection<? extends GrantedAuthority> authorities;

    public SecurityUserInfo(Long userId, String username, String password, String salt, int roleId, String status,
            boolean accountNonExpired, boolean accountNonLocked, boolean credentialsNonExpired, boolean enabled) {
        this.userId = userId;
    	this.username = username;
        this.password = password;
        this.salt = salt;
        this.roleId = roleId;
        this.status = status;
        this.accountNonExpired = accountNonExpired;
        this.accountNonLocked = accountNonLocked;
        this.credentialsNonExpired = credentialsNonExpired;
        this.enabled = enabled;
    }

    /**
     * 实现用户权限获取方法
     *
     * @return
     */
    @Override
    public Collection<? extends GrantedAuthority> getAuthorities() {
        return this.authorities;
    }

	public void setAuthorities(Collection<? extends GrantedAuthority> authorities) {
		this.authorities = authorities;
	}

    @Override
    public String getUsername() {
        return username;
    }

    public void setUsername(String username) {
        this.username = username;
    }

    @Override
    public String getPassword() {
        return password;
    }

    public void setPassword(String password) {
        this.password = password;
    }

    public String getSalt() {
        return salt;
    }

    public void setSalt(String salt) {
        this.salt = salt;
    }

    public int getRoleId() {
        return roleId;
    }

    public void setRoleId(int roleId) {
        this.roleId = roleId;
    }

    public String getStatus() {
        return status;
    }

    public void setStatus(String status) {
        this.status = status;
    }


    @Override
    public boolean isAccountNonExpired() {
        return accountNonExpired;
    }

    public void setAccountNonExpired(boolean accountNonExpired) {
        this.accountNonExpired = accountNonExpired;
    }

    @Override
    public boolean isAccountNonLocked() {
        return accountNonLocked;
    }

    public void setAccountNonLocked(boolean accountNonLocked) {
        this.accountNonLocked = accountNonLocked;
    }

    @Override
    public boolean isCredentialsNonExpired() {
        return credentialsNonExpired;
    }

    public void setCredentialsNonExpired(boolean credentialsNonExpired) {
        this.credentialsNonExpired = credentialsNonExpired;
    }

    @Override
    public boolean isEnabled() {
        return enabled;
    }

    public void setEnabled(boolean enabled) {
        this.enabled = enabled;
    }

	public Long getUserId() {
		return userId;
	}

	public void setUserId(Long userId) {
		this.userId = userId;
	}

}
8、总结
spring security用于安全访问控制,其核心组件有:AuthenticationManager,Authentication,ProviderManager,AuthenticationProvider,UserDetialsService,UserDetials,AuthenticationSuccessHandler,AuthenticationFailureHandler,SecurityFilterChain等,其安全访问控制有两步:1、认证 2、授权,其原理是使用过滤器和拦截器对用户发起的请求进行处理,在认证成功后,根据得到的用户信息中进行权限效验,根据拦截下来的url查找配置中资源的权限判断请求是否允许