文章目录
前言
上一篇博客总结了各种登录方式,是如何嫁接到token的认证方式上的。这篇博客会总结如何生成自定义的token,并总结一下如何通过JWT实现单点登录(SSO)
在spring security oauth中生成token的源码如下
//以下源码位于:org.springframework.security.oauth2.provider.token.DefaultTokenServices#createAccessToken(org.springframework.security.oauth2.provider.OAuth2Authentication, org.springframework.security.oauth2.common.OAuth2RefreshToken)
private OAuth2AccessToken createAccessToken(OAuth2Authentication authentication, OAuth2RefreshToken refreshToken) {


	DefaultOAuth2AccessToken token = new DefaultOAuth2AccessToken(UUID.randomUUID().toString());
	int validitySeconds = getAccessTokenValiditySeconds(authentication.getOAuth2Request());
	if (validitySeconds > 0) {


		token.setExpiration(new Date(System.currentTimeMillis() + (validitySeconds * 1000L)));
	}
	token.setRefreshToken(refreshToken);
	token.setScope(authentication.getOAuth2Request().getScope());

	return accessTokenEnhancer != null ? accessTokenEnhancer.enhance(token, authentication) : token;
}
可以看到,spring security oauth默认生成token,就是一串没有意义的UUID
自定义token基本参数配置
由于上篇博客中提到,token的生成是基于认证服务器,因此我们如果需要实现自定义token,则需要改造我们的认证服务器的代码,我们在 spring security oauth入门,这篇博客中,总结过OAuth认证服务器和资源服务器的概念,已经只需要通过两个注解,就可以完成认证服务器和资源服务器的标记。这些spring security oauth都为我们封装的很好了。我们自定义token,自然需要在认证服务器的代码中做相应的配置,相关的配置也并不复杂。
只需要继承AuthorizationServerConfigurerAdapter,其中有三个方法
@Configuration
@EnableAuthorizationServer
public class AppAuthorizationServerConfig extends AuthorizationServerConfigurerAdapter {


    /**
     配置安全性相关的内容,暂时用不到
    */
    @Override
    public void configure(AuthorizationServerSecurityConfigurer security) throws Exception {


        super.configure(security);
    }

    /**
     * 要给那些客户端发送appid和Appsecret,通过配置指定
     * @param clients
     * @throws Exception
     */
    @Override
    public void configure(ClientDetailsServiceConfigurer clients) throws Exception {


    }

    /**
    配置endpoints的内容,一个EndPoint可简单理解为Controller(TokenEndPoint是用于处理/oauth/token等响应的controller)
    */
    @Override
    public void configure(AuthorizationServerEndpointsConfigurer endpoints) throws Exception {


    }
}
针对endpoint的配置
endpoint是oauth认证的入口,针对endpoint我们可以配置token的存储,可自定义认证逻辑,这里和之前一样,可以注入AuthenticationManager和UserDetailsService的实现
@Autowired
private AuthenticationManager authenticationManager;

@Autowired
private UserDetailsService userDetailsService;

@Override
public void configure(AuthorizationServerEndpointsConfigurer endpoints) throws Exception {


    endpoints
            .userDetailsService(userDetailsService)
            .authenticationManager(authenticationManager);
}
针对客户端的配置
如果我们想通过配置,只是针对指定的客户端发放令牌,则我们需要在clients的配置方法中进行配置
@Data
public class OAuth2ClientProperties {


    private String clientId;

    private String clientSecret;

    private int accessTokenValidSeconds;

    private String grantTypes;
}

/**
 * 要给那些客户端发送appid和Appsecret,通过配置指定
 * @param clients
 * @throws Exception
 */
@Override
public void configure(ClientDetailsServiceConfigurer clients) throws Exception {


    InMemoryClientDetailsServiceBuilder builder = clients.inMemory();
    OAuth2ClientProperties[] clientArrays = securityProperties.getOauth2().getClients();

    if(ArrayUtils.isNotEmpty(clientArrays)){


        for(OAuth2ClientProperties oauth2ClientConfig:clientArrays){


            //读取配置中配置的可支持的授权模式,
            String[] grantTypes = oauth2ClientConfig.getGrantTypes().split(",");
            builder.withClient(oauth2ClientConfig.getClientId())//配置clientId
                    .secret(oauth2ClientConfig.getClientSecret())//配置clientSecret
                    .accessTokenValiditySeconds(oauth2ClientConfig.getAccessTokenValidSeconds())//配置令牌过期时间
                    .authorizedGrantTypes(grantTypes)
                    .scopes("all","read","write");//授权范围
        }
    }
}
由于为了简单,这里采用的是将client的相关配置信息存于内存中,如果要存于数据库中,则需要指定数据源即可。同时这里我们的配置支持多个client信息的配置
##自定义令牌配置
self.security.core.oauth2.clients[0].clientId=selfclientid
self.security.core.oauth2.clients[0].clientSecret=selfclientsecret
self.security.core.oauth2.clients[0].accessTokenValidSeconds=7200
self.security.core.oauth2.clients[0].grantTypes=refresh_token,password,authorization_code
##令牌有效期如果为0,表示不会过期
self.security.core.oauth2.clients[1].clientId=newclientid
self.security.core.oauth2.clients[1].clientSecret=newclientsecret
self.security.core.oauth2.clients[1].grantTypes=refresh_token,password
针对令牌持久化的配置
没有指定endpoint中令牌的相关配置,则令牌(token)默认存于数据库中,系统重启之后令牌就会失效。可以针对令牌做一个持久化的操作,一般由于令牌访问较为频繁,不推荐将令牌存于数据库中,推荐将令牌存于Redis一类的非关系型数据库中,便于访问。
自定义的TokenStoreConfig
/**
 * autor:liman
 * createtime:2021/8/15
 * comment:令牌存储的配置
 */
@Configuration
public class TokenStoreConfig {


    @Autowired
    private RedisConnectionFactory redisConnectionFactory;

    @Bean
    public TokenStore redisTokenStore(){


        return new RedisTokenStore(redisConnectionFactory);
    }
}
在endpoint的配置中,配置Redis的存储方式
/**
 * autor:liman
 * createtime:2021/7/22
 * comment: app的认证服务器配置类
 *
 * http://www.ictgu.cn/oauth/authorize?response_type=code&client_id=selfclientid&redirect_uri=http://example.com&scope=all
 * 这里包含服务端token生成规则的配置
 */
@Configuration
@EnableAuthorizationServer
public class AppAuthorizationServerConfig extends AuthorizationServerConfigurerAdapter {


    @Autowired
    private AuthenticationManager authenticationManager;

    @Autowired
    private UserDetailsService userDetailsService;

    @Autowired
    private TokenStore redisTokenStore;

    @Override
    public void configure(AuthorizationServerEndpointsConfigurer endpoints) throws Exception {


        endpoints
                .tokenStore(redisTokenStore)//将token存入到redis
                .userDetailsService(userDetailsService)
                .authenticationManager(authenticationManager);
    }
}
在梳理了一些基本配置项之后,我们就可以用我们自定义的token生成方式,替换掉spring security oauth中默认的token生成方式。
什么是JWT
这个不做具体介绍,网上百度很多,这里推荐一个博客——JWT 简介。JWT最重要的一个特性就是自包含,意味着本身生成的JWT,其实就可以存储相关用户信息(当然不是重要的用户信息)
只是需要知道的是JWT分为如下三个部分
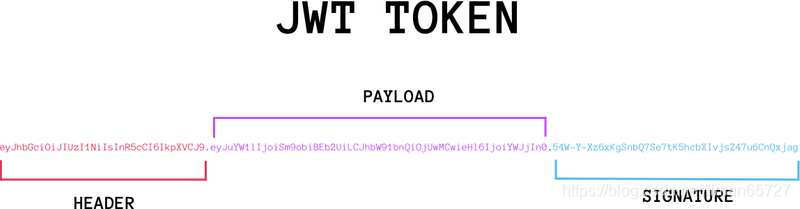
且都为明文传输,最重要的是签名部分,可以简单理解为:SIGNATURE =encode(HEADER+PAYLOAD);加密密钥只有具备签发token的服务端才有,且这个密钥不可泄漏。同时加密方式在HEADER中会指明。同时PAYLOAD部分其实可以指定我们自己需要存放的信息。JWT只能解决认证的问题,无法完全解决完全性的问题
自定义JWT生成token
其实spring security oauth也默认为我们集成了相关组件,我们只需要调用即可。为了与之前的Redis存储token的实例冲突,这里采用了@ConditionalOnProperty注解,用于根据相关的配置属性值,完成指定的bean生成与注入。
1、JWT生成的配置
/**
 * autor:liman
 * createtime:2021/8/9
 * comment: token存储的配置
 */
@Configuration
public class TokenStoreConfig {


    @Autowired
    private RedisConnectionFactory redisConnectionFactory;

    @Bean
    //如果是存在self.security.core.oauth2.storeType的配置项,且该配置的值为 redis,如下配置才会生效,matchIfMissing=false 表示如果没有这个配置项,这个不生效
    @ConditionalOnProperty(prefix = "self.security.core.oauth2",name="storeType",havingValue = "redis")
    public TokenStore redisTokenStore(){


        return new RedisTokenStore(redisConnectionFactory);
    }

    @Configuration
    //如果是存在self.security.core.oauth2.storeType的配置项,且该配置的值为jwt,如下配置才会生效,matchIfMissing=true表示如果没有这个配置项,这个也生效
    @ConditionalOnProperty(prefix = "self.security.core.oauth2",name="storeType",havingValue = "jwt",matchIfMissing = true)
    public static class JwtTokenStoreConfig{


        @Autowired
        private SecurityProperties securityProperties;

        //由于JWT本身可以存储用户信息,因此JWT有自己的tokenStore
        @Bean
        public TokenStore tokenStore(){


            //构造JwtTokenStore需要一个JwtAccessTokenConverter
            return new JwtTokenStore(jwtAccessTokenConverter());
        }

        //JwtAccessTokenConverter中指定签名密钥的配置
        @Bean
        public JwtAccessTokenConverter jwtAccessTokenConverter(){


            JwtAccessTokenConverter accessTokenConverter = new JwtAccessTokenConverter();
            String signKey = "self-security-jwt-key";
            accessTokenConverter.setSigningKey(signKey);//设置生成签名的密钥
            return accessTokenConverter;
        }
    }
}
完成之后,相关接口的返回结果,下图以密码授权登录为例,获得的token
[外链图片转存失败,源站可能有防盗链机制,建议将图片保存下来直接上传(img-I741rqCH-1629020239028)(E:\blogPic\spring-security-learn\image-20210815164441515.png)]
2、根据JWT获取用户信息
获取用户信息的接口如下:
//Oauth获取用户信息的方法
@GetMapping("/me")
public Object getCurrentUser(Authentication user){


    log.info("user me test");
    return user;
}
请求头为:

返回结果比较多,但是需要注意的是,这里是直接返回了spring security中为我们封装的Authentication信息,这个信息中的principal并不是完成的用户信息,spring security的默认实现是将JWT中本身包含的用户信息做了一个适配,在这里的时候,返回的Authentication中的principal信息就是一个简单的字符串:

JWT中加入自定义扩展信息
这一步需要之前提到的TokenEnhance
1、自定义实现TokenEnhancer接口
/**
 * autor:liman
 * createtime:2021/8/11
 * comment:自定义token的enhancer,用于JWT中生成扩展信息
 */
public class SelfJwtTokenEnhancer implements TokenEnhancer {


    @Override
    public OAuth2AccessToken enhance(OAuth2AccessToken accessToken, OAuth2Authentication authentication) {


        Map<String,Object> info = new HashMap<String,Object>();
        info.put("self_extention_info","这个是JWT的扩展信息");

        //扩展信息放入accessToken中
        ((DefaultOAuth2AccessToken)accessToken).setAdditionalInformation(info);
        return accessToken;
    }
}
2、配置中加入自定义的tokenEnhancer
@Configuration
//如果是存在self.security.core.oauth2.storeType的配置项,且该配置的值为jwt,如下配置才会生效,matchIfMissing=true表示如果没有这个配置项,这个也生效
@ConditionalOnProperty(prefix = "self.security.core.oauth2",name="storeType",havingValue = "jwt",matchIfMissing = true)
public static class JwtTokenStoreConfig{


    @Autowired
    private SecurityProperties securityProperties;

    @Bean
    public TokenStore tokenStore(){


        return new JwtTokenStore(jwtAccessTokenConverter());
    }

    @Bean
    public JwtAccessTokenConverter jwtAccessTokenConverter(){


        JwtAccessTokenConverter accessTokenConverter = new JwtAccessTokenConverter();
        String signKey = securityProperties.getOauth2().getJwtSigninKey();
        accessTokenConverter.setSigningKey(signKey);//设置生成签名的密钥
        return accessTokenConverter;
    }

    @Bean
    @ConditionalOnMissingBean(name = "jwtTokenEnhancer")//没有配置jwtTokenEnhancer,则会提供一个默认的实现
    public TokenEnhancer jwtTokenEnhancer(){


        return new SelfJwtTokenEnhancer();
    }
}
3、资源服务器中完成配置并注入
/**
 * autor:liman
 * createtime:2021/7/22
 * comment: app的认证服务器配置类
 * <p>
 * http://www.ictgu.cn/oauth/authorize?response_type=code&client_id=selfclientid&redirect_uri=http://example.com&scope=all
 * 这里包含服务端token生成规则的配置
 */
@Configuration
@EnableAuthorizationServer
public class AppAuthorizationServerConfig extends AuthorizationServerConfigurerAdapter {


    @Autowired
    private AuthenticationManager authenticationManager;

    @Autowired
    private UserDetailsService userDetailsService;

    @Autowired
    private TokenStore tokenStore;

    @Autowired
    private SecurityProperties securityProperties;

    @Autowired(required = false)
    private JwtAccessTokenConverter jwtAccessTokenConverter;

    @Autowired(required = false)
    private TokenEnhancer jwtTokenEnhancer;


    @Override
    public void configure(AuthorizationServerEndpointsConfigurer endpoints) throws Exception {


        endpoints
                .tokenStore(tokenStore)//将token存入到redis
                .userDetailsService(userDetailsService)
                .authenticationManager(authenticationManager);

        //判断是否指定jwtAccessTokenConverter和jwtTokenEnhancer
        if (null != jwtAccessTokenConverter && null != jwtTokenEnhancer) {


            //如果指定了,需要以TokenEnhancerChain的方式加入,否则二者都不会生效
            TokenEnhancerChain enhancerChain = new TokenEnhancerChain();
            List<TokenEnhancer> enchancerList = new ArrayList<>();
            enchancerList.add(jwtTokenEnhancer);
            enchancerList.add(jwtAccessTokenConverter);
            enhancerChain.setTokenEnhancers(enchancerList);

            endpoints
                    .tokenEnhancer(enhancerChain)
                    .accessTokenConverter(jwtAccessTokenConverter);
        }
    }
}
3、验证JWT的报文,并获取其中的自定义信息
这一步,spring security oauth并没有为我们集成,需要我们手动引入JWT解析的依赖
<dependency>
    <groupId>io.jsonwebtoken</groupId>
    <artifactId>jjwt</artifactId>
    <version>0.9.1</version>
</dependency>
在获取用户信息的接口中,进行JWT的验证与解析
@GetMapping("/me")
public Object getCurrentUser(Authentication user,HttpServletRequest request) throws Exception {


    log.info("user me test");

    log.info("开始解析JWT中的用户信息");
    //从header中截取token(JWT)
    String authorization = request.getHeader("Authorization");
    String token = StringUtils.substringAfter(authorization, "bearer ");
    //这里要指定密钥的编码方式
    Claims playload = Jwts.parser().setSigningKey("self-security-jwt-key".getBytes("UTF-8")).parseClaimsJws(token).getBody();

    String extentionInfo = (String) playload.get("self_extention_info");
    log.info("extention_info,{}",extentionInfo);

    return user;
}
需要注意的是,在jwtAccessTokenConverter中,我们设置签名密钥的时候,spring security oauth会根据UTF-8的编码为我们写入到JWT中,因此我们在解析的时候,也要指定密钥的编码为UTF-8,否则会抛出报文不受信任的异常。

成功获取自定义信息的结果:

总结
完成了JWT作为token的相关操作,在自定义JWT扩展字段部分,实例偏简单,如果用JWT认证并存在用户信息,只需要在自定义的tokenEnhancer中存入更为复杂的数据即可。