前言
外观模式在开发中使用频率非常高。我们常常使用的第三方和开源库 基本都会使用外观模式。通过一个外观类使得整个系统的接口只有一个统一高层接口,这样利于降低用户的使用成本,也对用户屏蔽了很多实现细节,项目更容易维护。
在使用第三方SDK和开源库时,可能最大的使用思想就是封装,封装第三方的API,同时可能还会用到其他设计模式如策略模式,方便随时替换第三方SDK。
本文会从理论和实践进一步深入总结外观模式在项目中的运用。
文章目录
外观模式的定义
外观模式(Facade Pattern)又叫门面模式。
要求一个子系统的外部与其内部的通信必须通过一个统一的对象进行。门面模式提供一个高层次的接口,使得子系统更易于使用。
外观模式的使用场景
- 在设计初期阶段,将不同的两个层分离;
- 在开发阶段,子系统往往因为不断的重构演化而变得越来越复杂,大多数的模式使用时也都会产生很多很小的类,这本是好事,但也给外部调用它们的用户程序带来了使用上的困难,增加外观Facade可以提供一个简单的接口,减少它们之间的依赖。
- 在维护一个遗留的大型系统时,可能这个系统已经非常难以维护和扩展了,但因为它包含非常重要的功能,新的需求开发必须依赖于它。
外观模式的 UML 类图
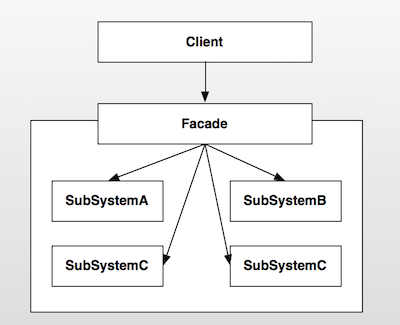
角色介绍
- Client : 客户端程序。
- Facade : 对外的统一入口,即外观对象。
- SubSystemA : 子系统A。
- SubSystemB : 子系统B。
- SubSystemC : 子系统C。
- SubSystemD : 子系统D。
不使用外观对象
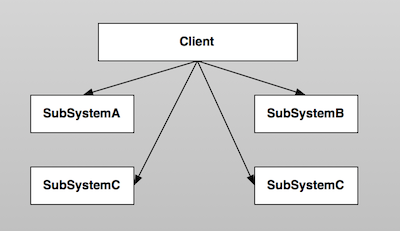
从图中可以看到 在没有外观类后这个统一接口后,客户端会和每一个子系统进行交互,增加了调用者的使用成本,项目维护成本也增加。
外观模式的简单示例实现
生活中的外观模式主要体现在 类似中央调度结构的组织,如地铁的调度中心、公司的项目负责人、软件公司的技术组长等等。也比如,电视遥控器,控制电视的开关机、播放、声音调节等,再如手机,集万千功能于一身等等。
下面以软件开发的流程中的技术组长(Leader)为例,用代码来实现。
1.开发人员,负责开发任务。
/**
 * 开发人员
 */
class Developer {
    fun develop(name: String) {
        println("开发任务:$name")
    }
}
2.测试人员,负责测试需求。
/**
 * 测试人员
 */
class Tester {

    fun test(name: String) {
        println("测试任务:$name")
    }
}
3.产品经理(PM)负责提需求,同时也负责跟进项目的开发、测试和项目的上线。把项目落地。
/**
 * 产品经理, 对接开发和测试
 */
class ProductManager {
    private val developer = Developer()
    private val tester = Tester()

    fun demand(name: String) {
        println("提需求:$name")
        developer.develop(name)
        tester.test(name)
    }
}
测试代码:
fun main() {
    val demander = ProductManager()
    demander.demand("开发一个跟淘宝一样的系统")
}
打印结果:
提需求:开发一个跟淘宝一样的系统
开发任务:开发一个跟淘宝一样的系统
测试任务:开发一个跟淘宝一样的系统
上面的较色只有三个(开发、测试和需求),上述代码没有引入外观模式。
公司小的时候,项目沟通基本上是老板扁平化管理,直接和开发、测试沟通,没有过多的组织层级。项目初期,这样做成本低,也能保证项目落地。但是到发展后期,项目变得复杂,需求变化频繁时,项目的规范就显得尤为重要。这时引入开发小组负责人(Leader)就变得很迫切,Leader可以直接和产品需求、测试和开发人员沟通,控制整个开发流程进度,可有效提升开发效率。
下面看看如何在之前的代码基础上引入外观模式。
首先添加一个角色(Leader),相当于负责整个开发流程中的沟通协调和进度把控。
/**
 * 技术组长 Leader (统一的外观类)
 * Leader负责统一协调开发资源,内部资源的协调不需要外部知道
 */
class Leader {
    private val developer = Developer()
    private val tester = Tester()

    fun processDemand(name: String) {
        developer.develop(name)
        tester.test(name)
    }
}
产品经理(PM)的工作方式 得到改进。之前要频繁沟通开发和测试两个角色,现在主要和Leader沟通就可以了。
/**
 * 产品经理直接对接技术组长Leader
 */
class ProductManager2 {
   private val leader = Leader()

    fun demand(name: String) {
      leader.processDemand(name)
    }
}
测试代码:
fun main() {
    val demander = ProductManager2()
    demander.demand("开发一个跟微信一样的系统")
}
//打印结果:
提需求:开发一个跟微信一样的系统
开发任务:开发一个跟微信一样的系统
测试任务:开发一个跟微信一样的系统
这个就是我们的外观模式,我们的技术组长(Leader)就是外观模式的象征,他专门对外提供接收需求服务,然后安排需求给开发同学和测试同学,保证完成。
Android源码中的外观模式实现
在开发过程中,Context是最重要的一个类型。它封装了很多重要的操作,比如startActivity()、sendBroadcast()等,几乎是开发者对应用操作的统一入口。Context是一个抽象类,它只是定义了抽象接口,真正的实现在ContextImpl类中。它就是今天我们要分析的外观类。
在应用启动时,首先会 fork一个子进程,并且调用ActivityThread.main方法启动该进程。ActivityThread又会构建Application对象,然后和Activity、ContextImpl关联起来,然后再调用Activity的onCreate、onStart、onResume函数使Activity运行起来。我们看看下面的相关代码:
private final void handleLaunchActivity(ActivityClientRecord r, Intent customIntent) {
		// 代码省略

        // 1、创建并且加载Activity,调用其onCreate函数
        Activity a = performLaunchActivity(r, customIntent);

        if (a != null) {
            r.createdConfig = new Configuration(mConfiguration);
            Bundle oldState = r.state;
            // 2、调用Activity的onResume方法,使Activity变得可见
            handleResumeActivity(r.token, false, r.isForward);

        }
    }

     private final Activity performLaunchActivity(ActivityClientRecord r, Intent customIntent) {
        // System.out.println("##### [" + System.currentTimeMillis() + "] ActivityThread.performLaunchActivity(" + r + ")");
		// 代码省略

        Activity activity = null;
        try {
            java.lang.ClassLoader cl = r.packageInfo.getClassLoader();
            // 1、创建Activity
            activity = mInstrumentation.newActivity(
                    cl, component.getClassName(), r.intent);
            r.intent.setExtrasClassLoader(cl);
            if (r.state != null) {
                r.state.setClassLoader(cl);
            }
        } catch (Exception e) {
            if (!mInstrumentation.onException(activity, e)) {
                throw new RuntimeException(
                    "Unable to instantiate activity " + component
                    + ": " + e.toString(), e);
            }
        }

        try {
            // 2、创建Application
            Application app = r.packageInfo.makeApplication(false, mInstrumentation);

            if (activity != null) {
                // ***** 构建ContextImpl  ******
                ContextImpl appContext = new ContextImpl();
                appContext.init(r.packageInfo, r.token, this);
                appContext.setOuterContext(activity);
                // 获取Activity的title
                CharSequence title = r.activityInfo.loadLabel(appContext.getPackageManager());
                Configuration config = new Configuration(mConfiguration);

                 // 3、Activity与context, Application关联起来
                activity.attach(appContext, this, getInstrumentation(), r.token,
                        r.ident, app, r.intent, r.activityInfo, title, r.parent,
                        r.embeddedID, r.lastNonConfigurationInstance,
                        r.lastNonConfigurationChildInstances, config);
				// 代码省略

                // 4、回调Activity的onCreate方法
                mInstrumentation.callActivityOnCreate(activity, r.state);

                // 代码省略
            }
            r.paused = true;

            mActivities.put(r.token, r);

        } catch (SuperNotCalledException e) {
            throw e;

        } catch (Exception e) {

        }

        return activity;
    }


    final void handleResumeActivity(IBinder token, boolean clearHide, boolean isForward) {

        unscheduleGcIdler();

        // 1、最终调用Activity的onResume方法
        ActivityClientRecord r = performResumeActivity(token, clearHide);
        // 代码省略
        // 2、这里是重点,在这里使DecorView变得可见
        if (r.window == null && !a.mFinished && willBeVisible) {
                // 获取Window,即PhoneWindow类型
                r.window = r.activity.getWindow();
                // 3、获取Window的顶级视图,并且使它可见
                View decor = r.window.getDecorView();
                decor.setVisibility(View.INVISIBLE);
                // 4、获取WindowManager
                ViewManager wm = a.getWindowManager();
                // 5、构建LayoutParams参数
                WindowManager.LayoutParams l = r.window.getAttributes();
                a.mDecor = decor;
                l.type = WindowManager.LayoutParams.TYPE_BASE_APPLICATION;
                l.softInputMode |= forwardBit;
                if (a.mVisibleFromClient) {
                    a.mWindowAdded = true;
                    // 6、将DecorView添加到WindowManager中,最终的操作是通过WindowManagerService的addView来操作
                    wm.addView(decor, l);
                }
            } else if (!willBeVisible) {
                if (localLOGV) Slog.v(
                    TAG, "Launch " + r + " mStartedActivity set");
                r.hideForNow = true;
            }
            // 代码省略
    }

 public final ActivityClientRecord performResumeActivity(IBinder token,
            boolean clearHide) {
        ActivityClientRecord r = mActivities.get(token);

        if (r != null && !r.activity.mFinished) {
                try {
                // 代码省略
                // 执行onResume
                r.activity.performResume();
				// 代码省略
            } catch (Exception e) {

            }
        }
        return r;
    }
Activity启动之后,Android给我们提供了操作系统服务的统一入口,也就是Activity本身。这些工作并不是Activity自己实现的,而是将操作委托给Activity父类ContextThemeWrapper的mBase对象,这个对象的实现类就是ContextImpl ( 也就是performLaunchActivity方法中构建的ContextImpl ())。
class ContextImpl extends Context {
    private final static String TAG = "ApplicationContext";
    private final static boolean DEBUG = false;
    private final static boolean DEBUG_ICONS = false;

    private static final Object sSync = new Object();
    private static AlarmManager sAlarmManager;
    private static PowerManager sPowerManager;
    private static ConnectivityManager sConnectivityManager;
    private AudioManager mAudioManager;
    LoadedApk mPackageInfo;
    private Resources mResources;
    private PackageManager mPackageManager;
    private NotificationManager mNotificationManager = null;
    private ActivityManager mActivityManager = null;

	// 代码省略

        @Override
    public void sendBroadcast(Intent intent) {
        String resolvedType = intent.resolveTypeIfNeeded(getContentResolver());
        try {
            ActivityManagerNative.getDefault().broadcastIntent(
                mMainThread.getApplicationThread(), intent, resolvedType, null,
                Activity.RESULT_OK, null, null, null, false, false);
        } catch (RemoteException e) {
        }
    }


        @Override
    public void startActivity(Intent intent) {
        if ((intent.getFlags()&Intent.FLAG_ACTIVITY_NEW_TASK) == 0) {
            throw new AndroidRuntimeException(
                    "Calling startActivity() from outside of an Activity "
                    + " context requires the FLAG_ACTIVITY_NEW_TASK flag."
                    + " Is this really what you want?");
        }
        mMainThread.getInstrumentation().execStartActivity(
            getOuterContext(), mMainThread.getApplicationThread(), null, null, intent, -1);
    }


        @Override
    public ComponentName startService(Intent service) {
        try {
            ComponentName cn = ActivityManagerNative.getDefault().startService(
                mMainThread.getApplicationThread(), service,
                service.resolveTypeIfNeeded(getContentResolver()));
            if (cn != null && cn.getPackageName().equals("!")) {
                throw new SecurityException(
                        "Not allowed to start service " + service
                        + " without permission " + cn.getClassName());
            }
            return cn;
        } catch (RemoteException e) {
            return null;
        }
    }

        @Override
    public String getPackageName() {
        if (mPackageInfo != null) {
            return mPackageInfo.getPackageName();
        }
        throw new RuntimeException("Not supported in system context");
    }
}
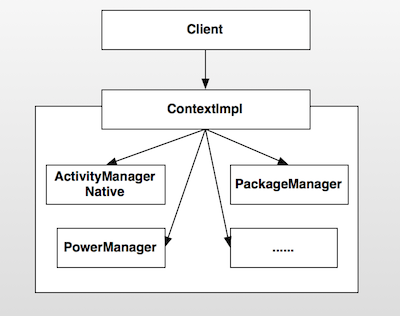
可以看到,ContextImpl内部有很多xxxManager类的对象,也就是我们上文所说的各种子系统的角色。ContextImpl内部封装了一些系统级别的操作,有的子系统功能虽然没有实现,但是也提供了访问该子系统的接口,比如获取ActivityManager的getActivityManager方法。
比如我们要启动一个Activity的时候,我们调用的是startActivity方法,这个功能的内部实现实际上是Instrumentation完成的。ContextImpl封装了这个功能,使得用户根本不需要知晓Instrumentation相关的信息,直接使用startActivity即可完成相应的工作。其他的子系统功能也是类似的实现,比如启动Service和发送广播内部使用的是ActivityManagerNative等。ContextImpl的结构图如下 :
外观模式非常的简单,只是封装了子系统的操作,并且暴露接口让用户使用,避免了用户需要与多个子系统进行交互,降低了系统的耦合度、复杂度。如果没有外观模式的封装,那么用户就必须知道各个子系统的相关细节,子系统之间的交互必然造成纠缠不清的关系,影响系统的稳定性、复杂度。
外观模式在项目中的运用实践
- 图片加载加载库
ImageLoder,封装了内部的网络请求、缓存、加载成功或失败的几种模式细节等等。 - 友盟统计
SDK中的MobclickAgent,封装了内部的统计功能细节等等。
外观模式的优点与缺点
优点
- 使用方便,使用外观模式客户端完全不需要知道子系统的实现过程;
- 降低客户端与子系统的耦合,方便拥抱变化 ;
- 更好的划分访问层次;
缺点
- 外观类接口膨胀。由于子系统的接口都有外观类统一对外暴露,使得外观类的
API接口较多,在一定程度上增加了用户使用的使用成本; - 在不引入抽象外观类的情况下,增加新的子系统可能需要修改外观类或客户端的源代码,违背了“开闭原则”;
总结
外观模式的核心思想在于封装,目的在于统一编程接口。通过一个高层次结构为用户提供统一的接口API入口,使得用户通过一个类型就能够操作整个系统,这样减少了用户的使用成本,提升了系统的灵活性。
参考资料:
1.何红辉,关爱民. Android 源码设计模式解析与实战[M]. 北京:人民邮电出版社