Linux4.14的设备树下已经对itop4412做了支持,本来应该很容易进行移植,可是在使用讯为给的资料中,对exynos4412-itop-scp-core.dtsi中原本的代码全部进行了注释,并自己添加了部分节点。导致我移植完成后cpu只有一个核心在工作。
于是重新到linux官网下载源码得到exynos4412-itop-scp-core.dtsi文件,编译烧写后发现卡在
Starting kernel ...
Uncompressing Linux... done, booting the kernel.
经过网上搜索发现是无法解析firmware节点导致,于是把这段代码注释掉
firmware@0203F000 {
compatible = "samsung,secure-firmware";
reg = <0x0203F000 0x1000>;
};
重点来了,注释掉上段代码后,可以正常启动linux,可就是挂载不上根文件系统,往上翻log显示:
[ 2.504695] mmcblk1: error -5 sending status command, retrying
...
[ 3.024971] dwmmc_exynos 12550000.mmc: Busy; trying anyway
[ 3.528986] mmc_host mmc1: Timeout sending command (cmd 0x202000 arg 0x0 status 0x80202000)
[ 3.562416] mmc_host mmc1: Bus speed (slot 0) = 50000000Hz (slot req 400000Hz, actual 396825HZ div = 63)
(我把根文件系统放在emmc中,在uboot中emmc为mmc0,可是被linux识别成emmc1,所以root=/dev/mmcblk1p2,暂时没搞清楚怎么更改)
从log可以看出是与emmc通讯受阻,因为在用讯为给的exynos4412-itop-scp-core.dtsi文件是可以正常使用emmc的,所以查看设备树的emmc节点
首先是exynos4412.dtsi:
329 mshc_0: mmc@12550000 {
330 compatible = "samsung,exynos4412-dw-mshc";
331 reg = <0x12550000 0x1000>;
332 interrupts = <GIC_SPI 77 IRQ_TYPE_LEVEL_HIGH>;
333 #address-cells = <1>;
334 #size-cells = <0>;
335 fifo-depth = <0x80>;
336 clocks = <&clock CLK_SDMMC4>, <&clock CLK_SCLK_MMC4>;
337 clock-names = "biu", "ciu";
338 status = "disable";
339 };
exynos4412-itop-scp-core.dtsi:
&mshc_0 {
pinctrl-0 = <&sd4_clk &sd4_cmd &sd4_bus4 &sd4_bus8>;
pinctrl-names = "default";
status = "okay";
vmmc-supply = <&buck9_reg>;
broken-cd;
card-detect-delay = <200>;
samsung,dw-mshc-ciu-div = <3>;
samsung,dw-mshc-sdr-timing = <2 3>;
samsung,dw-mshc-ddr-timing = <1 2>;
bus-width = <8>;
cap-mmc-highspeed;
};
上面都是在官方linux下的设备树中的片段,而讯为做出以下改动
exynos4412-itop-scp-core.dtsi:
mshc_0: mmc@12550000 {
compatible = "samsung,exynos4412-dw-mshc";
reg = <0x12550000 0x1000>;
interrupts = <0 77 0>;
#address-cells = <1>;
#size-cells = <0>;
fifo-depth = <0x80>;
clocks = <&clock CLK_SDMMC4>, <&clock CLK_SCLK_MMC4>;
clock-names = "biu", "ciu";
status = "disabled";
};
讯为无论是在dts还是dtsi中都没有描述vmmc-supply = <&buck9_reg>;这个节点,而查看S5M8767A的原理图
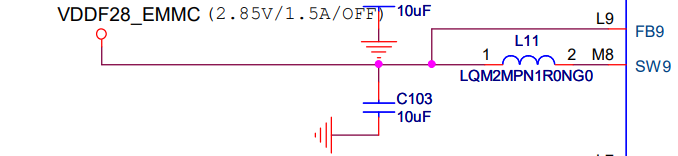
可以看到刚启动的时候,BUCK9是OFF状态也就是没有电压,接下来看emmc的原理图

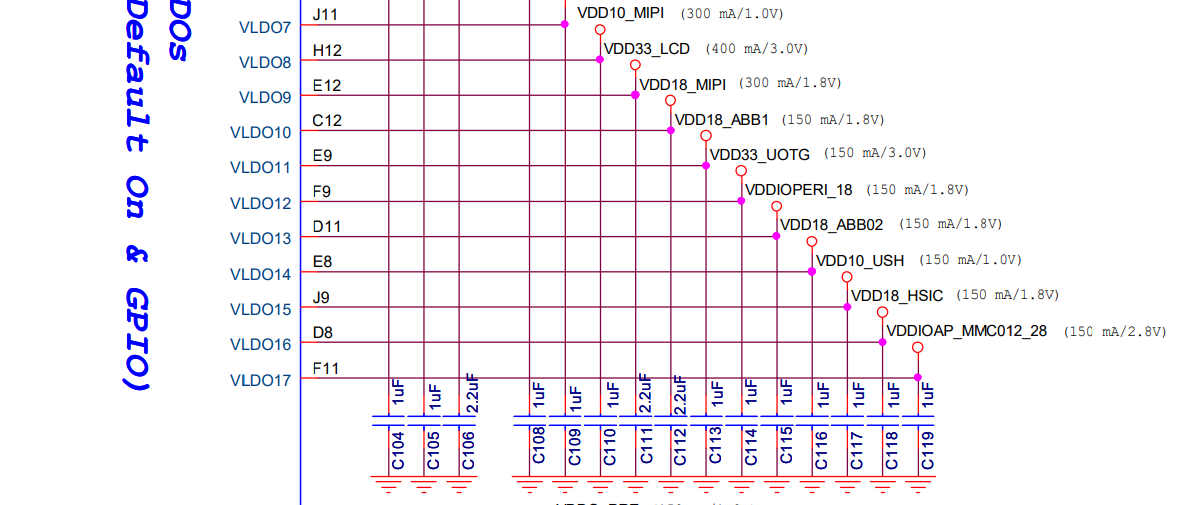
原理图明确标出emmc的供电就是VDDF28_EMMC,这就是问题所在,在uboot中我也用到了emmc,而这时pmu根本没有初始化,也就是说如果原理图正确的话emmc在uboot是不能工作的。所以结论就是讯为给的原理图居然是错误的,导致官方的设备树文件emmc的供电部分给出了vmmc-supply = <&buck9_reg>,经过我的查找确定了emmc的供电为VDDIOAP_MMC012_28,就是最下面这个,这个供电默认状态是开启的。
于是修改vmmc-supply = <&buck9_reg>为vmmc-supply = <&ldo17_reg>,编译后正常启动并可以挂载根文件系统,也有四颗核心在工作了。
[ 0.002640] CPU: Testing write buffer coherency: ok
[ 0.003759] CPU0: thread -1, cpu 0, socket 10, mpidr 80000a00
[ 0.040055] Setting up static identity map for 0x40100000 - 0x40100060
[ 0.060012] Hierarchical SRCU implementation.
[ 0.119998] smp: Bringing up secondary CPUs ...
[ 0.200218] CPU1: thread -1, cpu 1, socket 10, mpidr 80000a01
[ 0.280091] CPU2: thread -1, cpu 2, socket 10, mpidr 80000a02
[ 0.360092] CPU3: thread -1, cpu 3, socket 10, mpidr 80000a03
[ 0.360292] smp: Brought up 1 node, 4 CPUs
[ 0.360319] SMP: Total of 4 processors activated (192.00 BogoMIPS).
...
[ 2.528840] VFS: Mounted root (ext4 filesystem) on device 179:2.
...
十一放假,解决这个问题排查了好长时间,在这不得不吐槽讯为,原理图都是错的,照着官方的设备树居然改不好自己的设备树,这个方案估计是照着哪里抄的的吧,抄就抄了,你把原理图搞对好吧。录的视频和没有一样,毫无技术含量可言。