- 模块简介
- time & datetime模块
- random
- os
- sys
- shutil
- json & pickle
- shelve
- xml处理
- configparser
- hashlib
- subprocess
- logging模块
- re正则表达式
模块简介:
模块,是用一堆代码实现了某个功能的代码集合,n个.py文件组成的代码集合就称为模块。
模块分为三种:
- 自定义模块(自己手动编写的python代码文件)
- 内置标准模块(又称标准库)
- 开源模块
导入模块有以下几种方法:
import module #执行module.py文件的所有代码
import packages #执行packages目录下__init__.py下的代码
from module import test #从module.py文件只导入test方法
from module import test as t #从module.py文件只导入test方法并改名为t
from module import * #从module.py文件导入所有方法,如果有跟它同名的函数会被其覆盖,慎用
导入模块其实就是告诉Python解释器去解释那个py文件
- 导入一个py文件,解释器解释该py文件
- 导入一个包,解释器解释该包下的 __init__.py 文件
安装模块有以下两种方式:
1,使用系统命令:pip install
2,编译安装源代码包
编译源码    python setup.py build
安装源码    python setup.py install
time & datetime模块
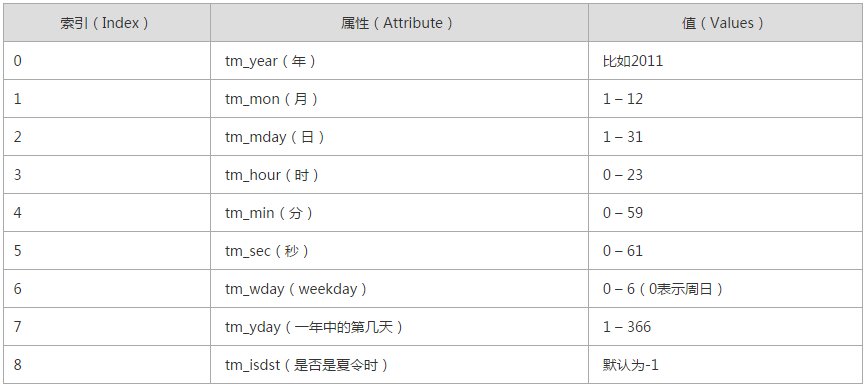
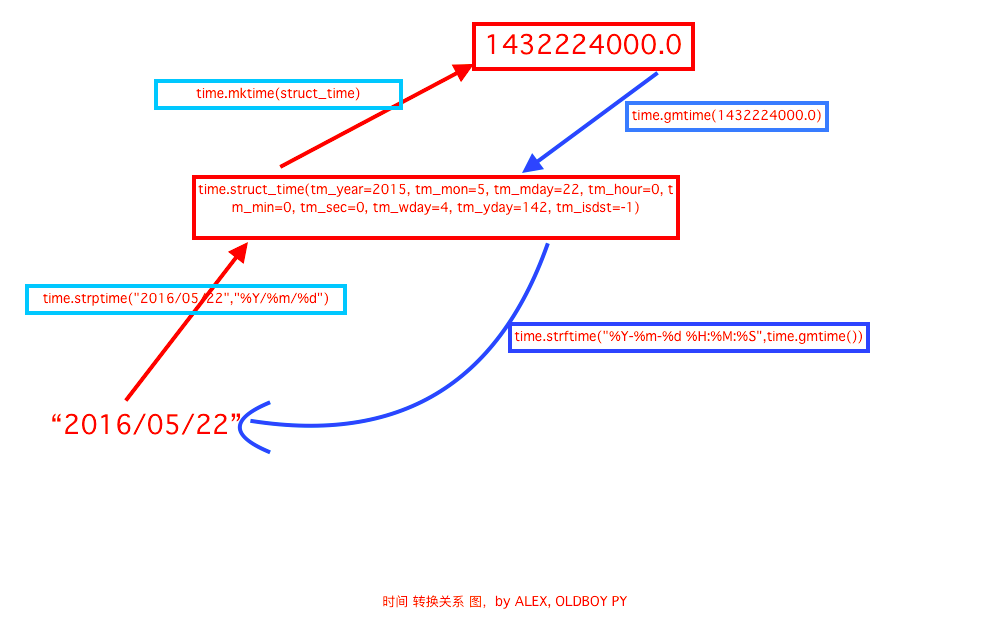
时间相关的操作,时间有三种表示方式:
- 时间戳 1970年1月1日之后的秒,即:time.time()
- 格式化的字符串 2014-11-11 11:11, 即:time.strftime('%Y-%m-%d')
- 结构化时间 元组包含了:年、日、星期等... time.struct_time 即:time.localtime()


 1 import time
 2 import datetime
 3 print(time.gmtime())#返回utc时间的struc时间对象格式
 4 print(time.strftime("%Y-%m-%d %H:%M:%S",time.gmtime()))#将utc struct_time格式转成指定的字符串格式
 5 #time.sleep(1)
 6 print(time.localtime())
 7 print(time.process_time())#测量处理器运算时间
 8 print(time.asctime())#返回时间格式如“Sun Apr  1 17:18:24 2018”
 9 print(time.ctime())#返回时间格式如“Sun Apr  1 17:18:24 2018”
10 string_2_struct = time.strptime("2018/04/11","%Y/%m/%d")#将日期字符串转成struct时间对象格式
11 print(string_2_struct)
12
13 print(datetime.datetime.now())#返回时间格式 2018-04-01 17:28:23.644249
14 print(datetime.date.fromtimestamp(time.time()))#时间戳直接转成日期格式 2018-04-01
15 print(datetime.datetime.now() + datetime.timedelta(1))#当前时间+1天
16 print(datetime.datetime.now() + datetime.timedelta(-1))#当前时间-1天
17 print(datetime.datetime.now() + datetime.timedelta(hours=1))#当前时间+1小时
18 print(datetime.datetime.now() + datetime.timedelta(minutes=10),'\n')#当前时间+10分
19 c_time = datetime.datetime.now()
20 print(c_time.replace(minute=1,hour=3))#时间替换,把小时改为3,分钟改为1。
random模块
随机验证码实例:
 1 #!/usr/bin/env python
 2 # -*- coding:utf-8 -*-
 3 __author__ = 'lvlibing'
 4
 5 import random
 6 checkcode = ''
 7
 8 for i in range(6):
 9     current = random.randrange(1,6)
10     if current == i:
11         tmp = chr(random.randint(65,90))
12     else:
13         tmp = random.randint(0,9)
14     checkcode+=str(tmp)
15
16 print(checkcode)
OS模块
提供对操作系统进行调用的接口
sys模块
用于提供对解释器相关的操作
 1 #!/usr/bin/env python
 2 # -*- coding:utf-8 -*-
 3 __author__ = 'lvlibing'
 4
 5 import os
 6 import sys
 7
 8 print(os.getcwd())#获取当前工作目录,即当前python脚本工作的目录路径
 9 print(os.curdir)#返回当前目录: '.'
10 print(os.pardir)#获取当前目录的父目录字符串名:'..'
11 # os.chdir("dirname")#改变当前脚本工作目录
12 os.makedirs('J:\\test\\a\\b\\c\\d')#可递归生成多层目录
13 os.removedirs('J:\\test\\a\\b\\c\\d')#若目录为空,则删除,并递归到上一级目录,如若也为空,则删除,依此类推
14 os.mkdir(r'J:\test\1')#生成单级目录
15 os.rmdir(r'j:\test\1')#删除单级空目录,若目录不为空则无法删除
16 print(os.listdir(r'j:\test'))#列出指定目录下的所有文件和子目录,包括隐藏文件
17 #os.remove(r'j:\test\test.txt')#删除一个文件
18 #os.rename('oldname','newname')#重命名文件/目录
19 print(os.stat(r'j:\test'))#获取文件/目录信息
20 print(os.name)#输出字符串指示当前使用平台
21 os.system('ipconfig')
22 print(os.environ)#获取系统环境变量
23 os.path.abspath(r'j:\test\test.txt')#返回文件的绝对路径
24 os.path.split(r'j:\test\test.txt')#将path分割成目录和文件名二元组返回
25 os.path.dirname(r'j:\test\test.txt')#返回目录名
26 os.path.basename(r'j:\test\test.txt')#返回文件名
27 os.path.exists(r'j:\test\test.txt')#如果存在,返回True;如果不存在,返回False
28 os.path.isfile(r'j:\test\test.txt')
29 print(os.path.isdir(r'j:\test'))
30 print(os.path.getatime(r'j:\test'))
31 print(os.path.getctime(r'j:\test'))
32 print(os.path.getmtime(r'j:\test'))
33 print(os.system('dir'))#运行dos命令,直接显示结果
34
35 print(sys.argv)#命令行参数List,第一个元素是程序本身路径
36 print(sys.exit(n))#退出程序,默认正常退出时exit(0)
shutil 模块
提供对文件、文件夹、压缩包处理
shutil.copyfileobj(fsrc, fdst[, length])
将文件内容拷贝到另一个文件中,可以部分内容
shutil.copyfile(src, dst)
拷贝文件
shutil.copymode(src, dst)
仅拷贝权限。内容、组、用户均不变
shutil.copystat(src, dst)
拷贝状态的信息,包括:mode bits, atime, mtime, flags
shutil.copy(src, dst)
拷贝文件和权限
shutil.copy2(src, dst)
拷贝文件和状态信息
shutil.copytree(src, dst, symlinks=False, ignore=None)
递归的去拷贝文件
shutil.rmtree(path[, ignore_errors[, onerror]])
递归的去删除文件
shutil.move(src, dst)
递归的去移动文件
shutil.ignore_patterns(*patterns)
匹配模式到的文件忽略拷贝
json & pickle 模块
用于序列化的两个模块
- json,用于字符串 和 python数据类型间进行转换
- pickle,用于python特有的类型 和 python的数据类型间进行转换
Json模块提供了四个功能:dumps、dump、loads、load
pickle模块提供了四个功能:dumps、dump、loads、load
 1 #!/usr/bin/env python
 2 # -*- coding:utf-8 -*-
 3 # __Author__ = 'lvlibing'
 4
 5 import pickle
 6 import json
 7
 8 data = {'k1':'123','k2':'hello','k3':'你好'}
 9 p_str1 = pickle.dumps(data)#将数据通过特殊的形式转换为只有python语言认识的字符串
10 p_str2 = json.dumps(data)#将数据通过特殊的形式转换为所有语言认识的字符串,只支持字符串、列表、字典类型转换
11 print(p_str1)
12 print(p_str2)
13
14 with open('data.pickle', 'wb') as f:
15     pickle.dump(data,f)#将数据通过特殊的形式转换为只有python语言认识的字符串,并写入文件
16
17 #pickle.load(f)#恢复
18
19 if __name__ == '__main__':#只在程序本身被使用的时候运行
20     with open('data.json', 'w') as fp:
21        json.dump(data,fp)#将数据通过特殊的形式转换为所有语言认识的字符串,只支持字符串、列表、字典类型转换,并写入文件
22
23 #json.load(fp)#恢复
shelve 模块
shelve模块是一个简单的k,v将内存数据通过文件持久化的模块,可以持久化任何pickle可支持的python数据格式
 1 # -*- coding:utf-8 -*-
 2 __author__ = 'BillyLV'
 3
 4 import shelve
 5 import datetime
 6
 7 d = shelve.open('shelve_test')  # 打开一个文件
 8
 9 l1 = ["alex", "jack", "test"]
10 d1 = {'name':'lv','job':'it'}
11 d["list"] = l1  # 持久化列表
12 d["dict"] = d1 # 持久化字典
13 d['dtime'] = datetime.datetime.now()#持久化当前时间
14
15 print(d.get('list'))#获取l1列表信息
16 print(d.get('dict'))#获取d1字典信息
17 print(d.get('dtime'))
18
19 d.close()
xml处理模块
xml是实现不同语言或程序之间进行数据交换的协议,xml协议在各个语言里的都是支持的。
 1 <data>
 2     <country name="Liechtenstein">
 3         <rank updated="yes">2</rank>
 4         <year>2008</year>
 5         <gdppc>141100</gdppc>
 6         <neighbor direction="E" name="Austria" />
 7         <neighbor direction="W" name="Switzerland" />
 8     </country>
 9     <country name="Singapore">
10         <rank updated="yes">5</rank>
11         <year>2011</year>
12         <gdppc>59900</gdppc>
13         <neighbor direction="N" name="Malaysia" />
14     </country>
15     <country name="Panama">
16         <rank updated="yes">69</rank>
17         <year updated="yes">2013</year>
18         <gdppc>13600</gdppc>
19         <neighbor direction="W" name="Costa Rica" />
20         <neighbor direction="E" name="Colombia" />
21     </country>
22 </data>
 1 # -*- coding:utf-8 -*-
 2 __author__ = 'BillyLV'
 3
 4 import xml.etree.ElementTree as ET
 5
 6 tree = ET.parse('xmltest.xml')
 7 root = tree.getroot()
 8 print(root.tag,'\n')
 9
10 #遍历xml文档
11 for child in root:
12     print(child.tag,child.attrib)
13     for i in child:
14         print(i.tag,i.text,'\n')
15
16 #只遍历year 节点
17 for node in root.iter('year'):
18     print(node.tag, node.text)
19
20 #修改
21 for sec_node in root.iter('year'):
22     new_year = int(sec_node.text) + 1
23     node.text = str(new_year)
24     node.set('updated','yes')
25
26 tree.write('xmltest.xml')
27
28 #删除
29 for country in root.findall('country'):
30     rank = int(country.find('rank').text)
31     if rank > 50:
32         root.remove(country)
33
34 tree.write('output.xml')
35
36 #创建xml文档
37 new_xml = ET.Element('namelist')
38 name = ET.SubElement(new_xml,'name',attrib={'encrolled':'no'})
39 sex = ET.SubElement(name,'age',attrib={'checked':'no'})
40 sex.text = '29'
41 name2 = ET.SubElement(new_xml,'name',attrib={'encrolled':'yes'})
42 age = ET.SubElement(name2,'age')
43 age.text = '18'
44 et = ET.ElementTree(new_xml)
45 et.write('test.xml',encoding='utf-8',xml_declaration=True)
46 ET.dump(new_xml)
ConfigParser模块
用于生成和修改常见配置文档
 1 import configparser
 2
 3 config = configparser.ConfigParser()
 4 config["DEFAULT"] = {'ServerAliveInterval': '45',
 5                      'Compression': 'yes',
 6                      'CompressionLevel': '9'}
 7
 8 config['bitbucket.org'] = {}
 9 config['bitbucket.org']['User'] = 'hg'
10 config['topsecret.server.com'] = {}
11 topsecret = config['topsecret.server.com']
12 topsecret['Host Port'] = '50022'  # mutates the parser
13 topsecret['ForwardX11'] = 'no'  # same here
14 config['DEFAULT']['ForwardX11'] = 'yes'
15 with open('example.ini', 'w') as configfile:
16     config.write(configfile)
17 config.sections()
18 config.read('example.ini')
19 config.sections()
hashlib模块
用于加密相关的操作,3.x里代替了md5模块和sha模块,主要提供 SHA1, SHA224, SHA256, SHA384, SHA512 ,MD5 算法
hmac 模块
它内部对我们创建 key 和 内容 再进行处理然后再加密
 1 import hashlib,hmac
 2
 3 hash = hashlib.sha512()
 4 hash.update(b'admin')
 5 print(hash.hexdigest())
 6
 7 m = hashlib.md5(b'sdfa23ds14')
 8 m.update(b"Hello")
 9 m.update(b"It's me")
10 print(m.hexdigest())#16进制格式
11 m.update(b"It's been a long time since last time we ...")
12 print(m.digest())#2进制格式
13
14 mac = hmac.new(b'dqqq33f')
15 mac.update(b"Enhanced")
16 print(mac.hexdigest())
Subprocess模块
用于执行系统命令
可用参数:
- args:shell命令,可以是字符串或者序列类型(如:list,元组)
- bufsize:指定缓冲。0 无缓冲,1 行缓冲,其他 缓冲区大小,负值 系统缓冲
- stdin, stdout, stderr:分别表示程序的标准输入、输出、错误句柄
- preexec_fn:只在Unix平台下有效,用于指定一个可执行对象(callable object),它将在子进程运行之前被调用
- close_sfs:在windows平台下,如果close_fds被设置为True,则新创建的子进程将不会继承父进程的输入、输出、错误管道。
所以不能将close_fds设置为True同时重定向子进程的标准输入、输出与错误(stdin, stdout, stderr)。 - shell:同上
- cwd:用于设置子进程的当前目录
- env:用于指定子进程的环境变量。如果env = None,子进程的环境变量将从父进程中继承。
- universal_newlines:不同系统的换行符不同,True -> 同意使用 \n
- startupinfo与createionflags只在windows下有效
将被传递给底层的CreateProcess()函数,用于设置子进程的一些属性,如:主窗口的外观,进程的优先级等等
terminate() 杀掉所启动进程
communicate() 等待任务结束
logging模块
用于便捷记录日志且线程安全的模块
logging的日志可以分为 debug < info < warn(warning) < error < critical(fatal)5个级别,只有大于或等于当前日志级别的操作才会被记录。
 1 # -*- coding:utf-8 -*-
 2 __author__ = 'BillyLV'
 3
 4 import logging
 5
 6 logging.warning("user [lv] attempted wrong password more than 3 times")
 7 logging.critical("server is down")
 8
 9 # 高于或等于INFO级别的才会输出
10 logging.basicConfig(filename='example.log',level=logging.INFO)
11 logging.debug('This message should go to the log file')
12 logging.info('So should this')
13 logging.warning('And this, too')
14
15 # 带时间格式
16 logging.basicConfig(format='%(asctime)s %(message)s', datefmt='%m/%d/%Y %I:%M:%S %p')
17 logging.warning('is when this event was logged.')
18
19 from logging import handlers
20
21 logger = logging.getLogger(__name__)
22
23 log_file = "timelog.log"
24 #fh = handlers.RotatingFileHandler(filename=log_file,maxBytes=10,backupCount=3)
25 fh = handlers.TimedRotatingFileHandler(filename=log_file,when="S",interval=5,backupCount=3)
26
27 formatter = logging.Formatter('%(asctime)s %(module)s:%(lineno)d %(message)s')
28
29 fh.setFormatter(formatter)
30
31 logger.addHandler(fh)
32
33 logger.warning("test1")
34 logger.warning("test12")
35 logger.warning("test13")
36 logger.warning("test14")
re模块
用于对python的正则表达式的操作。
字符:
. 匹配除换行符以外的任意字符
\w 匹配字母或数字或下划线或汉字
\s 匹配任意的空白符
\d 匹配数字
\b 匹配单词的开始或结束
^ 匹配字符串的开始
$ 匹配字符串的结束
次数:
* 重复零次或更多次
+ 重复一次或更多次
? 重复零次或一次
{n} 重复n次
{n,} 重复至少n次
{n,m} 重复n到m次
re.match 从起始位置开始根据模型去字符串中匹配指定内容,匹配单个
re.search 根据模型去字符串中匹配指定内容,匹配单个
re.findall 匹配字符串中所有符合条件的元素
re.splitall 以匹配到的字符当做列表分隔符
re.sub 匹配字符并替换
反斜杠:
匹配一个数字的"\\d"可以写成r"\d"
re.I(re.IGNORECASE): 忽略大小写(括号内是完整写法,下同)
M(MULTILINE): 多行模式,改变
'^'
和
'$'
的行为
S(DOTALL): 点任意匹配模式,改变
'.'
的行为
# -*- coding:utf-8 -*-
__author__ = 'BillyLV'

import re

print(re.findall("ab*","cabb3abcbbac"))
print(re.findall("ab+","ab+cd+abb+bba"))
a = re.search("abc|ABC","ABCBabcCD").group()
print(a)
b = re.search("(abc){2}a(123|456)c", "abcabca123c").group()
print(b)
print(re.search("^al","alexabc"))
#分组匹配
c=re.search("(?P<province>[0-9]{3})(?P<city>[0-9]{3})(?P<birthday>[0-9]{4})","371481199306143242").groupdict("city")
print(c)
参考:
http://www.cnblogs.com/alex3714
http://www.cnblogs.com/wupeiqi
internet&python books
PS:如侵权,联我删。