基础模块
time&datetime
示例
import time


print(time.time())					  # # 时间戳
print(time.localtime(1604969222))     # 转换为time.struct_time, 默认是当前时间
print(time.strftime("%Y-%m-%d %X"))   # # 格式化字符串 2020-11-10 08:16:04

# 时间 转换
print(time.localtime(time.time()))  # time.struct_time(tm_year=2020, tm_mon=11, tm_mday=10, tm_hour=8, tm_min=16, tm_sec=4, tm_wday=1, tm_yday=315, tm_isdst=0)
print(time.gmtime(time.time()))    # 与本地时间会差一个格林豪治时间  UTF+8时区

# 将当前时间转换为时间戳
print(time.mktime(time.localtime()))  # 1604967364.354219

# 格式化时间
print(time.strftime("%Y-%m-%d %X", time.localtime()))  # 2020-11-10 08:17:54
print(time.strftime("%Y-%m-%d %X", time.gmtime()))     # 2020-11-10 00:17:54

# 将时间戳转换成年份
stamp = time.time()  # 当前时间的时间戳
data = time.localtime(stamp)   # 将时间戳转换成时间格式
formata_data = time.strftime("%Y-%m-%d %X", data)
print("当前时间为:{}".format(formata_data))
时间戳转换
# 将时间转换为时间戳
tms = time.strptime('2020-11-08', "%Y-%m-%d")
print(tms) # time.struct_time(tm_year=2020, tm_mon=11, tm_mday=8, tm_hour=0, tm_min=0, tm_sec=0, tm_wday=6, tm_yday=313, tm_isdst=-1)
print(time.mktime(tms))  # 1604764800.0

# 将时间戳转换为时间
print(time.time())  			   # 1604967906.584846
print(time.localtime(time.time())) # time.struct_time(tm_year=2020, tm_mon=11, tm_mday=10, tm_hour=8, tm_min=25, tm_sec=6, tm_wday=1, tm_yday=315, tm_isdst=0)
print(time.localtime(1604967000))  # time.struct_time(tm_year=2020, tm_mon=11, tm_mday=10, tm_hour=8, tm_min=10, tm_sec=0, tm_wday=1, tm_yday=315, tm_isdst=0)

print(time.strftime("%Y-%m-%d %X", time.localtime(time.time())))  # 2020-11-10 08:28:55
datetime
import datetime
# 获取当前时间
print(datetime.datetime.now())
# 获取某个时间戳的具体时间
print(datetime.datetime.fromtimestamp(time.time()))

# 三天后的时间
print(datetime.datetime.now() + datetime.timedelta(days=3))
# 三天前的时间
print(datetime.datetime.now() + datetime.timedelta(days=-3))

# 修改时间 当前时间的年份从2019改为2021
tm = datetime.datetime.now()
tm=tm.replace(year=2021)
random
import random

# 生成一个随机小数
print(random.random())

# 生成一个1-3之间的随机小数2.84226916987601
print(random.uniform(1,3))

# 随机生成一个1-10之间的整数
print(random.randint(1,10))

# 随机生成一个整数的范围
print(random.randrange(1,100))

#  语法 chioce([xx,xx,xx])  列表中在嵌套
print(random.choice([1,2,3,["a","n","c"]]))

# 语法 sample([],2)  在列表中随机挑选两个
print(random.sample([1,2,3,4],2))

# 打乱temp的列表
temp=["a","n","c"]
random.shuffle(temp)
验证码
import random
def checkcode():
    get_num = [random.choice([chr(random.randint(65, 90)), chr(random.randint(97, 122)),
                              random.randint(0, 9)]) for num in range(6)]
    return "".join(str(i) for i in get_num)
print(checkcode())		# mAbLw1
os
os模块是与操作系统交互的一个接口
# 查
os.getcwd() 获取当前工作目录,即当前python脚本工作的目录路径
os.chdir("dirname")  改变当前脚本工作目录;相当于shell下cd
os.curdir  返回当前目录: ('.')
os.pardir  获取当前目录的父目录字符串名:('..')
os.listdir('dirname')    列出指定目录下的所有文件和子目录,包括隐藏文件,并以列表方式打印
os.sep    输出操作系统特定的路径分隔符,win下为"\\",Linux下为"/"
os.linesep    输出当前平台使用的行终止符,win下为"\t\n",Linux下为"\n"
os.pathsep    输出用于分割文件路径的字符串 win下为;,Linux下为:

# 增删
os.makedirs('dirname1/dirname2')    可生成多层递归目录
os.removedirs('dirname1')    若目录为空,则删除,并递归到上一级目录,如若也为空,则删除,依此类推
os.mkdir('dirname')    生成单级目录;相当于shell中mkdir dirname
os.rmdir('dirname')    删除单级空目录,若目录不为空则无法删除,报错;相当于shell中rmdir dirname
os.remove()  删除一个文件

# 改
os.rename("oldname","newname")  重命名文件/目录

# 获取相关状态
os.system("bash command")   运行shell命令,直接显示
os.environ  			    获取系统环境变量
os.stat('path/filename')    获取文件/目录信息
os.name    					输出字符串指示当前使用平台。win->'nt'; Linux->'posix'
os.scandir # with os.scandir(self.getFile) as dirEntryList 循环文件夹 设置别名 for curSubEntry in dirEntryList: if curSubEntry.is_file():

# 路径相关
os.path.abspath(path)  返回path规范化的绝对路径
os.path.split(path)  将path分割成目录和文件名二元组返回

os.path.dirname(path)  返回path的目录。其实就是os.path.split(path)的第一个元素
os.path.basename(path)  返回path最后的文件名。如何path以/或\结尾,那么就会返回空值。即
os.path.split(path)的第二个元素

os.path.exists(path)  如果path存在,返回True;如果path不存在,返回False
os.path.isabs(path)  如果path是绝对路径,返回True
os.path.isfile(path)  如果path是一个存在的文件,返回True。否则返回False
os.path.isdir(path)  如果path是一个存在的目录,则返回True。否则返回False
os.path.join(path1[, path2[, ...]])  将多个路径组合后返回,第一个绝对路径之前的参数将被忽略

os.path.getatime(path)  返回path所指向的文件或者目录的最后存取时间
os.path.getmtime(path)  返回path所指向的文件或者目录的最后修改时间
os.path.getsize(path) 返回path的大小
# 相当于是 os.stat(r"C:/Users/xiong/Desktop/py练习/刷博客/模块/01-time.py").st_atime
路径规范
# 在Linux和Mac平台上,该函数会原样返回path,在windows平台上会将路径中所有字符转换为小写,并将所有斜杠转换为斜杠。
print(os.path.normpath('c://windows\\System32\\../Temp/'))  # c:\windows\Temp

# 规范化路径,如..和/
a='/Users/jieli/test1/\\\\a1/\\\\aa.py/../..'
print(os.path.normpath(a))     # \Users\jieli\test1\a1

a='/Users/jieli/test1/\\\\a1/\\\\aa.py/..'
print(os.path.normpath(a))     # \Users\jieli\test1
sys
sys.exit(n)        退出程序,正常退出时exit(0)
sys.version        获取Python解释程序的版本信息
sys.maxint         最大的Int值,python int支持的最大整型
sys.path           返回模块的搜索路径,初始化时使用PYTHONPATH环境变量的值
sys.platform       返回操作系统平台名称

import sys
# sys.argv  用来接收python解释器执行Py文件后跟的参数
# 如  python xx.py arg1 arg2

# 默认是python的文件绝对路径
print(sys.argv)     ['C:/Users/xiong/Desktop/xxx.py']
示例
import sys
import os

def the_cp(sourcefile, destfile):
    """  文件复制功能

    :param sourcefile:  源文件
    :param destfile:    目标文件
    """
    dest_path, dest_file = os.path.split(destfile)
    if os.path.isfile(dest_file):
        print("目标文件已存在!")
        sys.exit(100)
    with open(sourcefile, "rb") as read_f, \
            open(dest_file, "wb") as write_f:
        for read in read_f:
            read_f.seek(0, 0)
            write_f.write(read_f.read())
        print("复制成功")

the_cp(r"C:/Users/xiong/xxxx/模块/z04-sys实现cp功能.py", r"z04-sys实现cp功能1.py")
进度条
# 不换行跳回行首
time.sleep(1)
print("\r[{:<{}}]".format("#", 40),end="")
time.sleep(1)
print("\r[{:<40}]".format("##"),end="")
    [##                                      ]

def process(precent, width=50):
    precent = 1 if precent >= 1 else precent		# 如果大于1那就强制值等于1
    show_str = "[{:<{}}]".format(int(precent * width) * "#", width)
        # [{}]:  # 这里是第一个值  :<{} 这里是第二个传值
    print("\r{} {}%".format(show_str, int(precent * 100)), end="")


count_filesize = 20480
filesize = 0
while filesize < count_filesize:	# 当filesize小于总文件大小时
    filesize += 1024       			# 初始大小 每次加1024
    precent = round(filesize / count_filesize, 2)   # 只保留 2位小数点
    time.sleep(0.1)
    process(precent)
shutil (*****)
高级的 文件、文件夹、压缩包 处理模块
copyfileobj 将文件内容拷贝到另一个文件中
import shutil

语法 shutil.copyfileobj(fsrc, fdst)

with open("./src/a.txt", "r") as read_f, open("./desc/b.txt", "w") as write_f:
    shutil.copyfileobj(read_f, write_f)
shutil.copyfile(src, dst) 拷贝文件

shutil.copyfile("./src/a.txt", "./desc/c.txt")
**shutil.copymode(src, dst) ** 仅拷贝权限。内容、组、用户均不变
shutil.copymode("./src/a.txt", "./desc/b.txt") #目标文件需要存在
shutil.copystat(src, dst) 仅拷贝状态的信息,包括:mode bits, atime, mtime, flags
shutil.copystat("./src/a.txt", "./desc/b.txt") #目标文件需要存在
shutil.copy(src, dst) 拷贝文件和权限 copy2 拷贝文件和状态信息
shutil.copy("./src/a.txt", "./desc/d.txt")   # 目标文件可以不存在 继承权限

shutil.copy2("./src/a.txt", "./desc/e.txt")
shutil.ignore_patterns(*patterns)
shutil.copytree(src, dst, symlinks=False, ignore=None) 递归的去拷贝文件夹
需要注意的如果将源文件,复制到目标文件下面,会造成一直往里头重复的复制下去
# 复制整个src的文件到 /desc/目录下的src文件, 目标文件目录需要不存在
# ignore=shutil.ignore_patterns 忽略带有这几个文件的文件夹
shutil.copytree("./src/", "./desc/src", ignore=shutil.ignore_patterns('*.pyc', "*tmp"))

import os

up_dir = os.path.dirname(os.path.dirname(__file__))
module = os.path.join(up_dir, "模块")
new_dir = os.path.join(up_dir, "new")
# 目标目录不能存在,注意对folder2目录父级目录要有可写权限,ignore的意思是排除
shutil.copytree(module, new_dir, ignore=shutil.ignore_patterns("*.txt", "*.wrapper.*"))
shutil.rmtree(path[, ignore_errors[, onerror]]) 递归的去删除文件
shutil.rmtree("./desc/src")
shutil.move(src, dst) 递归的去移动文件,它类似mv命令,其实就是重命名。
shutil.move("./desc/src/", "./desc/rename/") # 相当于是给这个文件夹重命名
shutil.make_archive(base_name, format,…)
创建压缩包并返回文件路径,例如:zip、tar
-
base_name: 压缩包的文件名,也可以是压缩包的路径。只是文件名时,则保存至当前目录,否则保存至指定路径,
-
如 data_bak =>保存至当前路径
如:/tmp/data_bak =>保存至/tmp/ -
format: 压缩包种类,“zip”, “tar”, “bztar”,“gztar”
-
root_dir: 要压缩的文件夹路径(默认当前目录)
-
owner: 用户,默认当前用户
-
group: 组,默认当前组
-
logger: 用于记录日志,通常是logging.Logger对象
# 要保存在何处,名称为 desc.tar.gz, root_dir表示要压缩哪个文件夹 我这是上级目录整个目录
shutil.make_archive("./desc", "gztar", root_dir="../")
归档文件备份
#!/usr/bin/env python3
# -*- coding: utf-8 -*-
#
import os
import shutil

fsrc = "/opt/drs/ccu"
fdst = "/tmp/ccu"

shutil.copytree(fsrc, fdst, ignore=shutil.ignore_patterns("wrapper.*", "*.log"))
shutil.make_archive(base_name="{}".format(os.path.join("/tmp", "ccu_archive")), format="tar", root_dir=fdst)
# 备份文件名称就是 ccu_archive.tar
shutil.rmtree(fdst)
tarfile 解压缩
# 解压缩
import tarfile
t=tarfile.open("./desc.tar.gz", "r")  # 先以读的方式打开 desc.tar.gz
t.extractall("./desc/tar")    # 解压至何处
t.close()   # 解压完成之后关闭这个文件
zipfile
z= zipfile.ZipFile("desc.zip", "r")
z.extractall("./desc/zip)
z.close
序列化
# 一、什么是序列化/反序列化
	序列化就是将内存中的数据结构转换成一种 中间格式 存储到磁盘或者基于网络传输,在Python中叫pickling
    反序列化就是硬盘中或者网络中传来的一种数据格式转换成内存中的数据结构,在Python中叫unpickling

# 二、为什么要用序列化
	1、持久保存状态
    2、跨平台数据交互,不管是哪个平台,将序列化的内容写入磁盘或者通过网络传输只要双方约定好用一种序列化格式,那么便打破了平台/语言差异化带来的限制,实现了跨平台数据交互

# 如何用
	json  优点: 跨平台性强,  缺点: 只能支持/对应python的部分数据类型,如下的类型表
    pickle 优点:支持/对应python所有格式  缺点: 只能被python识别,不能跨平台
json&pickle
如果我们要在不同的编程语言之间传递对象,就必须把对象序列化为标准格式,比如XML,但更好的方法是序列化为JSON,因为JSON表示出来就是一个字符串,可以被所有语言读取,也可以方便地存储到磁盘或者通过网络传输。JSON不仅是标准格式,并且比XML更快,而且可以直接在Web页面中读取,非常方便。
JSON表示的对象就是标准的JavaScript语言的对象,JSON和Python内置的数据类型对应如下:
| JSON类型 | Python类型 |
|---|---|
| {} | dict |
| [] | list |
| “string” | str |
| 123.56 | int或float |
| true/false | True/False |
| null | None |
转换 : 内存中结构化的数据 <–> 格式json <–> 字符串 <–> 保存到文件或基于网络传输
json格式不能识别单引号,只能识别双引号
json.dumps(字典)     		   # 将字典 序列化成 str格式 持久化于存储或网络中
json.loads(类似字典的字符串)   # 将网络或存储中的数据 转换为保存时的状态以便后续继续操作


dumps写法  与 loads对应
dic = {

    "name":"xiong", 'age': 100, "sex":"male"}

json_str = json.dumps(dic)
print(json_str, type(json_str))
# {"name": "xiong", "age": 100, "sex": "male"} <class 'str'>

# save to files
with open("file.json", "wt", encoding="utf-8") as f:
    f.write(json_str)

# 找到文件,直接将类型字典格式的字符串转换为json格式,  文本中的json需要是双引号,如果是单引号会报错
with open("file.json", "r") as f:
    data=json.loads(f.read())
print(data["name"])


dump与load的对应关系
with open("file.json", "wt", encoding="utf-8") as f:
    json.dump(dic, f)

with open("file.json", "r") as f:
    data2 = json.load(f)
print(data2)
dumps\loads
#########################   dumps  ############################################
dic = {

    "name": "xiong", "age": 100, "salary": 11111111}

json_str = json.dumps(dic)

print(json_str, type(json_str))
# {'name': 'xiong', 'age': 100, 'salary': 11111111} <class 'str'>

with open("test.json", "wt", encoding="utf-8")as f :
    f.write(json_str)

#########################   loads  ############################################

with open("test.json", "rt", encoding="utf-8") as f:
    json_str = f.read()

print(json_str, type(json_str))   # 出来的就是一个字符串

json_str = json.loads(json_str)
print(json_str, type(json_str))  # 反序列化成一个字典
dump\load
with open("test.json", "wt", encoding="utf-8") as f:
    json.dump(dic, f)   # dic是字典,可迭代的对象,f 是要写入的文件对象  序列化对象,文件

with open("test.json", "rt", encoding="utf-8") as f:
    json_str = json.load(f)   # 直接读取文件,一次性
shelve (*)
import shelve

# 增
db=shelve.open("db.txt")    # 打开一个实例文件, 用于保存序列化的字符,
# 保存之后会有三个文件 xx.bak  xx.dat xx.dir
# db["xiong"] = {"pwd": "123", "age": 100, "sex": "male"}     类似的一个字典格式
# xx.bak 可以查看到key 'xiong', (0, 50)

# 查
# 类似的一个字典格式
print(db)  # <shelve.DbfilenameShelf object at 0x0000020F4CE5D898>  直接就是一个shelve对象
print(db["xiong"])

# 改
db2= shelve.open("db.txt", writeback=True)
db2["xiong"]["pwd"] = 654321
print(db2["xiong"])     # {'username': 'xiong', 'pwd': 654321}
db2.close()
struct
- 按照指定格式将Python数据转换为字符串,该字符串为字节流,如网络传输时,不能传输int,此时先将int转化为字节流,然后再发送;
- 按照指定格式将字节流转换为Python指定的数据类型;
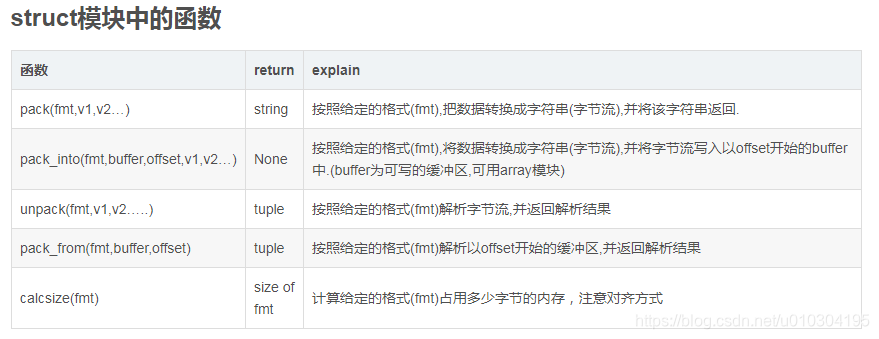
格式符
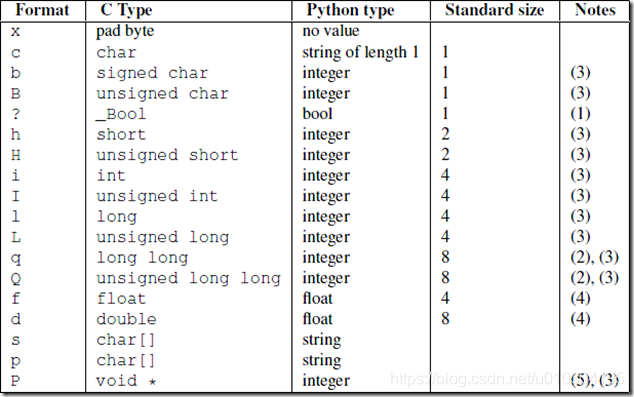
格式化字符串
# 当打包或者解包的时,需要按照特定的方式来打包或者解包.该方式就是格式化字符串,它指定了数据类型,除此之外,还有用于控制字节顺序、大小和对齐方式的特殊字符.

当要格式化的是整形时  i
obj = struct.pack("i", 123)
print(obj, len(obj))       # b'\x0c\x00\x00\x00' 4

# 解包
jbo = struct.unpack("i", obj)
print(jbo)   # (123,)
print(jbo[1])  # 主能直接取出元组中的 123了
configparser
# 文件 jdbc.cfg
[conf1]
user = "xiong"
pwd = 123


import configparser

# 生成一个configparser对象
conf = configparser.ConfigParser()
conf.read("jdbc.cfg")  # 读取这个文件

# 查看
	sections() 		 # 查看配置文件中的标题
	items("标题")  	# 查看该标题内的所有键值对
    get("标题","key") # 查看该标题 key的value

print(conf.sections())  # 查看所有标题 ['conf1', 'conf2']
print(conf.options("conf1"))  # 所有key ['user', 'pwd', 'version']

conf2 = conf.items("conf1")  # 列表加元组
print(conf2)  # [('user', '"xiong"'), ('pwd', '123'), ('version', '1')]

res = conf.get("conf1", "pwd")  # 标题,key,
print(res, type(res))  # 返回结果:123 <class 'str'>

res= conf.getint("conf1", "pwd")    # 直接转换为整形就不需要调用 int了 其它格式也一样
print(res, type(res))  # 返回结果:123 <class 'int'>
删改
import configparser

config = configparser.ConfigParser()
config.read("jdbc.cfg")

# 删除
config.remove_section("conf2")
config.remove_option("conf1", "version")  # remove_option(self, section, option)

# 判断是否存在
print(config.has_section("conf2"))  # False  判断是否存在
print(config.has_option("conf1", "pwd"))  # True  判断标题下的这个key是否存在

# 添加   # set(self, section, option, value=None)
config.add_section("con3")
config.set("con3", "user", "conf3")
config.set("con3", "pwd", "321")

print(config.sections())
print(config.items("con3"))     # [('user', 'conf3'), ('pwd', '321')]

# 最最重要的一步,  最后改删除完成之后需要写入
config.write(open("jdbc.cfg","w"))
示例-添加一个xx.ini
#!/usr/bin/env python3
# -*- coding: utf-8 -*-
#

import configparser

conf = configparser.ConfigParser()

conf["default"] = {

    			# 也可以直接赋值
    "user": "xiong",
    "pwd": 123
}
conf["test.org"] = {

    }
conf["test.org"]["xiong"] = "haha"

conf["xiong"] = {

    }			# 先创建一个空字典
test = conf['xiong']		# 将这个字典对象重新赋值给test
test["address"] = "127.0.0.1"	# 添加key
test["hostname"] = "xiong"

conf.write(open("xx.ini", "w"))

# xx.ini
[default]
user = xiong
pwd = 123

[test.org]
xiong = haha

[xiong]
address = 127.0.0.1
hostname = xiong
hashlib
# 1、什么叫hash:
	hash是一种算法(3.x里代替了md5模块和sha模块,主要提供 SHA1, SHA224, SHA256, SHA384, SHA512 ,MD5 算法),该算法接受传入的内容,经过运算得到一串hash值

# 2、hash值的特点是:
    只要传入的内容一样,得到的hash值必然一样=====>要用明文传输密码文件完整性校验
    不能由hash值返解成内容=======》把密码做成hash值,不应该在网络传输明文密码
    只要使用的hash算法不变,无论校验的内容有多大,得到的hash值长度是固定的
示例
import hashlib

li1 = hashlib.md5()  # <md5 HASH object @ 0x000001A18ADE7648>
li2 = hashlib.sha256()  # <sha256 HASH object @ 0x000001A18ADE7558>
li3 = hashlib.sha512()
print(li1, li2, li3)

li1.update("hello".encode("utf-8"))  # 更新加密
print(li1.hexdigest(), len(li1.hexdigest()))  # 32位加密

li2.update("hello".encode("utf-8"))  # 64位加密
print(li2.hexdigest(), len(li2.hexdigest()))

li3.update("hello".encode("utf-8"))  # 128位加密 sha512
print(li3.hexdigest(), len(li3.hexdigest()))
hmac
import hmac

hn = hmac.new("hello".encode("utf-8"))  # 加盐
hn.update("xiong".encode("utf-8"))      # 密码
print(hn.hexdigest())    # cece89cd54c07753bbc5ad0eceae01b9


hn = hmac.new("hello".encode("utf-8"))  # 加盐
hn.update("x".encode("utf-8"))
hn.update("iong".encode("utf-8"))   # 无论Update多少次,只要拼接的结果一样 那么得出的检验值也一样
print(hn.hexdigest())       # cece89cd54c07753bbc5ad0eceae01b9