Spark的应用程序是通过spark-submit提交到Spark集群上运行的,那么spark-submit到底提交了什么,集群是怎样调度运行的,下面一一详解。
0. spark-submit提交任务
0.1 启动脚本解析
分析spark-submit脚本源码可知最终该命令执行./bin/spark-class的Java类脚本,./bin/spark-class脚本启动的类是org.apache.spark.launcher.Main,在spark-submit模式下该类会启动SparkSubmitCommandBuilder.java类,最终调用package org.apache.spark.deploy.SparkSubmit.scala。
/**
 * Main gateway of launching a Spark application.  启动Spark应用程序的主要入口
 *
 * This program handles setting up the classpath with relevant Spark dependencies and provides   处理与Spark依赖相关的类路径设置
 * a layer over the different cluster managers and deploy modes that Spark supports.   在Spark支持的不同部署模式下提供一个抽象层,封装了不同集群模式的差异
 */
object SparkSubmit {
0.2 任务解析--运行提交任务时设置的主类
根据不同的集群模式,任务会在不同的节点上进行解析。
a. CLIENT模式(本地模式),此时任务设置的主类直接在提交节点运行。
b. CLUSTER模式,此时会由集群调度,在集群分配的节点上运行任务设置的主类。(具体分配的细节略过)
1. 千呼万唤始出来--SparkContext
/**
 * Main entry point for Spark functionality. A SparkContext represents the connection to a Spark   SparkContext是Spark集群的主入口,负责与集群建立连接,
 * cluster, and can be used to create RDDs, accumulators and broadcast variables on that cluster.  同时可以创建RDD,累加器和广播变量。
 *
 * Only one SparkContext may be active per JVM.  You must `stop()` the active SparkContext before   Spark中每一个运行的JVM只有一个SparkContext实例。
 * creating a new one.  This limitation may eventually be removed; see SPARK-2243 for more details.
 *
 * @param config a Spark Config object describing the application configuration. Any settings in
 *   this config overrides the default configs as well as system properties.
 */
class SparkContext(config: SparkConf) extends Logging {
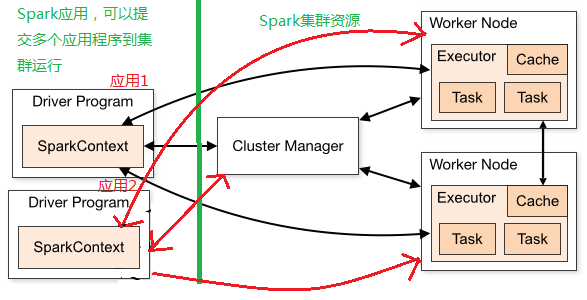
在Spark中,SparkContext负责与集群进行通信、资源的申请、任务的分配和监控等。可以理解为一个SparkContext实例对应一个Spark Driver Program(Spark应用程序),存在于任务的整个生命周期中。
开发Spark应用程序首先需要获取SparkContext对象,SparkSession和StreamingContext在实例时前都会先创建SparkContext对象。
    def getOrCreate(): SparkSession = synchronized {
        ...
        val sparkContext = userSuppliedContext.getOrElse {
              // set app name if not given
              val randomAppName = java.util.UUID.randomUUID().toString
              val sparkConf = new SparkConf()
              options.foreach { case (k, v) => sparkConf.set(k, v) }
              if (!sparkConf.contains("spark.app.name")) {
                sparkConf.setAppName(randomAppName)
              }
              val sc = SparkContext.getOrCreate(sparkConf)
  private[streaming] val sc: SparkContext = {
    if (_sc != null) {
      _sc
    } else if (isCheckpointPresent) {
      SparkContext.getOrCreate(_cp.createSparkConf())
    } else {
      throw new SparkException("Cannot create StreamingContext without a SparkContext")
    }
  }
SparkContext包含四大核心对象:DAGScheduler,TaskScheduler,SchedulerBackend,MapOutputTaskMaster,四大核心对象后面详述。
SchedulerBackend是一个traint,根据不同运行方法,实例化不同的对象。以StandaloneSchedulerBackend为例,主要有三大功能:
1. 负责与Master通信,注册当前程序RegisterWithMaster;
2.接收集群中为当前应用程序分配的计算资源Excutor的注册并管理Executors;
3.负责发送Task到具体的Executor执行。
1.1 SparkContext在实例化过程
1. SparkContext实例化时,所有不在方法中的成员都会被实例化。createTaskScheduler位于SparkContext的代码块中,在实例化时会被执行;
2. createTaskScheduler会根据不同的集群类型返回对应的二元组(SchedulerBackend,TaskScheduler),以Standalone为例,返回(StandaloneSchedulerBackend,TaskSchedulerImpl);
// Create and start the scheduler
    val (sched, ts) = SparkContext.createTaskScheduler(this, master, deployMode)
    _schedulerBackend = sched
    _taskScheduler = ts
    _dagScheduler = new DAGScheduler(this)
    _heartbeatReceiver.ask[Boolean](TaskSchedulerIsSet)

    // start TaskScheduler after taskScheduler sets DAGScheduler reference in DAGScheduler's
    // constructor
    _taskScheduler.start()
3. 执行_taskScheduler.start()方法,该方法中调用SchedulerBackend(此处为StandaloneSchedulerBackend)的start方法;
4. 在StandaloneSchedulerBackend的start方法中将任务信息封装,调用StandaloneAppClient的start方法(此处仅注册任务信息,并不会提交任务);
 // Start executors with a few necessary configs for registering with the scheduler
    val sparkJavaOpts = Utils.sparkJavaOpts(conf, SparkConf.isExecutorStartupConf)
    val javaOpts = sparkJavaOpts ++ extraJavaOpts
    val command = Command("org.apache.spark.executor.CoarseGrainedExecutorBackend",
      args, sc.executorEnvs, classPathEntries ++ testingClassPath, libraryPathEntries, javaOpts)
    val appUIAddress = sc.ui.map(_.appUIAddress).getOrElse("")
    val coresPerExecutor = conf.getOption("spark.executor.cores").map(_.toInt)
  ...
  client = new StandaloneAppClient(sc.env.rpcEnv, masters, appDesc, this, conf)
  client.start()
5. StandaloneAppClient(向Master注册任务的客户端,并不是Driver)的方法会创建ClientEndPoint对象,调用自己的onStart方法,onStart中会调用registerWithMaster方法向Master注册;
2. Master注册任务信息
Master中的receive方法接收到StandaloneAppClient的注册信息,主要完成以下工作:
1. 注册应用信息app
2. 将注册成功的信息driver.send(RegisteredApplication(app.id, self))回传给请求注册的客户端StandaloneAppClient(此时已经完成了任务的注册)
3.调用schedule方法,为任务分配资源
case RegisterApplication(description, driver) =>
      // TODO Prevent repeated registrations from some driver
      if (state == RecoveryState.STANDBY) {
        // ignore, don't send response
      } else {
        logInfo("Registering app " + description.name)
        val app = createApplication(description, driver)
        registerApplication(app)
        logInfo("Registered app " + description.name + " with ID " + app.id)
        persistenceEngine.addApplication(app)
        driver.send(RegisteredApplication(app.id, self))
        schedule()
      }
schedule方法主要进行driver和worker的资源分配,具体的Dirver和Executor运行在Worker中;将Worker资源分配给任务并启动对应的Dirver和Executors执行任务。
/**
   * Schedule the currently available resources among waiting apps. This method will be called
   * every time a new app joins or resource availability changes.
   */
  private def schedule(): Unit = {
    if (state != RecoveryState.ALIVE) {
      return
    }
    // Drivers take strict precedence over executors
    val shuffledAliveWorkers = Random.shuffle(workers.toSeq.filter(_.state == WorkerState.ALIVE))
    val numWorkersAlive = shuffledAliveWorkers.size
    var curPos = 0
    for (driver <- waitingDrivers.toList) { // iterate over a copy of waitingDrivers
      // We assign workers to each waiting driver in a round-robin fashion. For each driver, we
      // start from the last worker that was assigned a driver, and continue onwards until we have
      // explored all alive workers.
      var launched = false
      var numWorkersVisited = 0
      while (numWorkersVisited < numWorkersAlive && !launched) {
        val worker = shuffledAliveWorkers(curPos)
        numWorkersVisited += 1
        if (worker.memoryFree >= driver.desc.mem && worker.coresFree >= driver.desc.cores) {
          launchDriver(worker, driver)          //加载Driver
          waitingDrivers -= driver
          launched = true
        }
        curPos = (curPos + 1) % numWorkersAlive
      }
    }
    startExecutorsOnWorkers()                //启动Workers
  }
3. Worker中启动Driver
3.1 Driver启动过程
Master发送LaunchDriver消息给Worker,Worker收到消息后创建一个DriverRunner对象,创建完成后调用该对象的start方法启动。
case LaunchDriver(driverId, driverDesc) =>
      logInfo(s"Asked to launch driver $driverId")
      val driver = new DriverRunner
start方法最后会调用prepareAndRunDriver通过runDriver启动一个Driver进程。
downloadUserJar方法将用户的jar包下载到本地。
 private[worker] def prepareAndRunDriver(): Int = {
    val driverDir = createWorkingDirectory()
    val localJarFilename = downloadUserJar(driverDir)

    def substituteVariables(argument: String): String = argument match {
      case "{{WORKER_URL}}" => workerUrl
      case "{{USER_JAR}}" => localJarFilename
      case other => other
    }

    // TODO: If we add ability to submit multiple jars they should also be added here
    val builder = CommandUtils.buildProcessBuilder(driverDesc.command, securityManager,
      driverDesc.mem, sparkHome.getAbsolutePath, substituteVariables)

    runDriver(builder, driverDir, driverDesc.supervise)
  }
3.2 关于Driver的几个问题
a. Driver指的是提交的应用程序,如下在DriverDescription中的定义。
override def toString: String = s"DriverDescription (${command.mainClass})"
b. Driver是在Worker中加载运行的,具体在哪个Worker上运行,由Master分配,worker.endpoint.send(LaunchDriver(driver.id, driver.desc))。
private def launchDriver(worker: WorkerInfo, driver: DriverInfo) {
    logInfo("Launching driver " + driver.id + " on worker " + worker.id)
    worker.addDriver(driver)
    driver.worker = Some(worker)
    worker.endpoint.send(LaunchDriver(driver.id, driver.desc))
    driver.state = DriverState.RUNNING
  }
c. Driver不是提交的应用程序,Driver是在Worker中实例化的DriverRunner对象,是Worker中一个独立运行的进程,负责管理该Driver的execution以及失败重启。
/**
 * Manages the execution of one driver, including automatically restarting the driver on failure.
 * This is currently only used in standalone cluster deploy mode.
 */
private[deploy] class DriverRunner(
d. 从Master的注册应用的过程及schedule方法中可知,一个应用程序对应一个Driver,可以有多个Worker(Executors)。
4. Worker中启动Executor
Master中schedule方法调用startExecutorsOnWorkers最终会发送消息LaunchExecutor给Worker,通过val manager = new ExecutorRunner实例化一个ExecutorRunner对象来运行任务。
ExecutorRunner方法中会调用fetchAndRunExecutor创建一个新的进程来执行任务。
 /**
   * Download and run the executor described in our ApplicationDescription
   */
  private def fetchAndRunExecutor() {
    try {
      // Launch the process
      val builder = CommandUtils.buildProcessBuilder(appDesc.command, new SecurityManager(conf),
** appDesc.command为StandaloneSchedulerBackend传入的command,即Worker节点中启动ExecutorRunner时,ExecutorRunner中会启动CoarseGrainedExecutorBackend进程
val command = Command("org.apache.spark.executor.CoarseGrainedExecutorBackend",
在CoarseGrainedExecutorBackend的onStart方法中,会向Driver发送RedisterExecutor的注册请求。
override def onStart() {
    logInfo("Connecting to driver: " + driverUrl)
    rpcEnv.asyncSetupEndpointRefByURI(driverUrl).flatMap { ref =>
      // This is a very fast action so we can use "ThreadUtils.sameThread"
      driver = Some(ref)
      ref.ask[Boolean](RegisterExecutor(executorId, self, hostname, cores, extractLogUrls))
Driver处理完注册请求后会返回注册结果给CoarseGrainedExecutorBackend,注册成功后CoarseGrainedExecutorBackend会新建一个Executor执行器,至此Executor创建完成。
  override def receive: PartialFunction[Any, Unit] = {
    case RegisteredExecutor =>
      logInfo("Successfully registered with driver")
      try {
        executor = new Executor(executorId, hostname, env, userClassPath, isLocal = false)
      } catch {
        case NonFatal(e) =>
          exitExecutor(1, "Unable to create executor due to " + e.getMessage, e)
      }
* 每个Worker上可以启动多个Executors,每个Executor是一个独立的进程。
* 下图为用户提交Spark任务的流程图
