Mycat环境搭建
Mycat下载地址
Mycat文档
接着前篇已经搭建好的Mysql主从复制开始
# 解压
tar -zxvf Mycat-server-1.6.7.1-release-20190627191042-linux.tar.gz
#启动
./bin/mycat start
#关闭
./bin/mycat stop
#启动日志
tail -f logs/wrapper.log
#运行日志
tail -f logs/mycat.log
查看,wrapper.log。出现下图就是启动成功了

然后进入conf目录下
配置schema.xml
<mycat:schema xmlns:mycat="http://io.mycat/">
    <!-- test是mycat的逻辑库名称,链接需要用的 -->
    <schema name="test" checkSQLschema="false" sqlMaxLimit="100" dataNode="noed-1"></schema>
        <!-- database 是MySQL数据库的库名 -->
    <dataNode name="noed-1" dataHost="dbHost1" database="test" />

    <dataHost name="dbHost1" maxCon="1000" minCon="10" balance="3" writeType="0" dbType="mysql" dbDriver="native" switchType="1"  slaveThreshold="100">
        <heartbeat>select user()</heartbeat>
        <!-- 可以配置多个主从 -->
        <writeHost host="hostM1" url="192.168.100.131:3306" user="root" password="root">
            <!-- 可以配置多个从库 -->
            <readHost host="hostS2" url="192.168.100.132:3306" user="root" password="root" />
        </writeHost>
    </dataHost>
</mycat:schema>
配置server.xml
<mycat:server xmlns:mycat="http://io.mycat/">
   <!-- 读写都可用的用户 -->
    <user name="root" defaultAccount="true">
        <property name="password">root</property>
        <property name="schemas">test</property>
    </user>

    <!-- 只读用户 -->
    <user name="user">
        <property name="password">user</property>
        <property name="schemas">test</property>
        <property name="readOnly">true</property>
    </user>
</mycat:server>| 属性 | 值 |
|---|---|
| 客户端连接端口号 | 8066 |
| server. xmI | Mycat的配置文件,设置账号、参数等 |
| schema. xmI | Mycat对应的物理数据库和数据库表的配置 |
| rule. xmI | Mycat分片(分库分表)规则 |


在配置完这些的时候出现了一个问题,就是当逻辑库名与实际Mysql的库名不同时。连接Mycat中间件的时候就会找不到表,也无法创建表。后来查看Mycat.log看到了,到真实库中查询的时候也是携带了逻辑库的名称。也不清除是哪里配置不对。后来就把逻辑库和真实的Mysql库名改成一致了


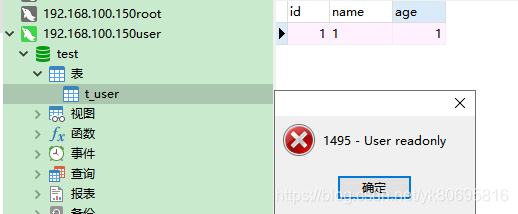
可以看到配置的读用户是无法写数据的。
Springboot实现读写分离
- 数据源连接配置
application.yml

spring:
  datasource:
    ####写数据源
    update:
      jdbc-url: jdbc:mysql://192.168.100.150:8066/test
      driver-class-name: com.mysql.jdbc.Driver
      username: root
      password: root
    ###读数据源
    select:
      jdbc-url: jdbc:mysql://192.168.100.150:8066/test
      driver-class-name: com.mysql.jdbc.Driver
      username: user
      password: user
type: com.alibaba.druid.pool.DruidDataSource- 配置读写数据源
DataSourceConfig.java

/**
 * 配置读写数据源
 */
@Configuration
public class DataSourceConfig {

    @Bean(name = "selectDataSource")
    @ConfigurationProperties(prefix = "spring.datasource.select")
    public DataSource dataSource1() {
        return DataSourceBuilder.create().build();
    }

    @Bean(name = "updateDataSource")
    @ConfigurationProperties(prefix = "spring.datasource.update")
    public DataSource dataSource2() {
        return DataSourceBuilder.create().build();
    }

}
- 保存本地数据源
DataSourceContextHolder.java

/**
 * 保存本地多数据源
 */
@Component
@Lazy(false)
public class DataSourceContextHolder {
    private static final ThreadLocal<String> contextHolder = new ThreadLocal<>();

    // 设置数据源类型
    public static void setDbType(String dbType) {
        contextHolder.set(dbType);
    }

    public static String getDbType() {
        return contextHolder.get();
    }

    public static void clearDbType() {
        contextHolder.remove();
    }

}
- 配置动态切换数据源类
DynamicDataSource.java

/**
 * 该类继承自 AbstractRoutingDataSource 类,在访问数据库时会调用该类的 determineCurrentLookupKey() 方法获取数据库实例的 key
 */
@Component
@Primary
public class DynamicDataSource extends AbstractRoutingDataSource {
    private static final Logger logger = LoggerFactory.getLogger(DynamicDataSource.class);
    @Autowired
    @Qualifier("selectDataSource")
    private DataSource selectDataSource;
    @Autowired
    @Qualifier("updateDataSource")
    private DataSource updateDataSource;

    /**
     * 返回生效的数据源名称
     */
    @Override
    protected Object determineCurrentLookupKey() {
        logger.info("DataSourceContextHolder:{}", DataSourceContextHolder.getDbType());
        return DataSourceContextHolder.getDbType();
    }
    /**
     * 配置使用的数据源信息,如果不存在就使用默认的数据源
     */
    @Override
    public void afterPropertiesSet() {
        Map<Object, Object> map = new HashMap<>();
        map.put("selectDataSource", selectDataSource);
        map.put("updateDataSource", updateDataSource);
        //注册数据源
        setTargetDataSources(map);
        setDefaultTargetDataSource(updateDataSource);
        super.afterPropertiesSet();
    }
}
- APO配置
DataSourceAOP.java

@Aspect
@Component
@Lazy(false)
// Order设定AOP执行顺序 使之在数据库事务上先执行
@Order(0)
public class DataSourceAOP {
    private static final Logger logger = LoggerFactory.getLogger(DataSourceAOP.class);
    //横切点
    @Before("execution(* com.yk.service.*.*(..))")
    public void process(JoinPoint joinPoint) {
        String methodName = joinPoint.getSignature().getName();
        if (methodName.startsWith("get") || methodName.startsWith("count") || methodName.startsWith("find")
                || methodName.startsWith("list") || methodName.startsWith("select") || methodName.startsWith("check")) {
            DataSourceContextHolder.setDbType("selectDataSource");
            logger.info("使用的是读数据源:selectDataSource");
        } else {
            DataSourceContextHolder.setDbType("updateDataSource");
            logger.info("使用的是写数据源:updateDataSource");
        }
    }
}
主要的配置完成,其他的都是dao,service,controller了。

