一、摘要
okhttp3在android应用开发中是现今最牛(哔)的网络交易框架,不接受反驳。
二、okhttp3源码地址
okhttp3框架源码地址: https://github.com/square/okhttp
三、okhttp3简单使用
OkHttpClient client = new OkHttpClient.Builder().build();
Request request = new Request.Builder().
        url("https://github.com/cozing").
        build();
Call call = client.newCall(request);
try {
    //1.同步请求方式
    Response response = call.execute();
    //2.异步请求方式
    call.enqueue(new Callback() {
        @Override
        public void onFailure(Call call, IOException e) {
            Log.w("cozing", "交易失败");
        }

        @Override
        public void onResponse(Call call, Response response) throws IOException {
            Log.w("cozing", "交易成功");
        }
     });
} catch (IOException e) {
    e.printStackTrace();
}
这是使用okhttp3发送一个简单交易的流程,其中包括同步请求和异步请求:
1.同步请求调用的方法是call.execute(),内部采用的是线程阻塞方式直接将结果返回到Response,后面咱们会详细讲解;
2.异步请求调用的方法是call.enqueue(Callback callback),该方法需要传入一个Callback等待结果回调的接口,交易结果在onFailure()(失败)和onResponse()(成功)中返回。
那么,接下来咱们来看看okhttp3的源码的整体流程。
四、整体架构流程图
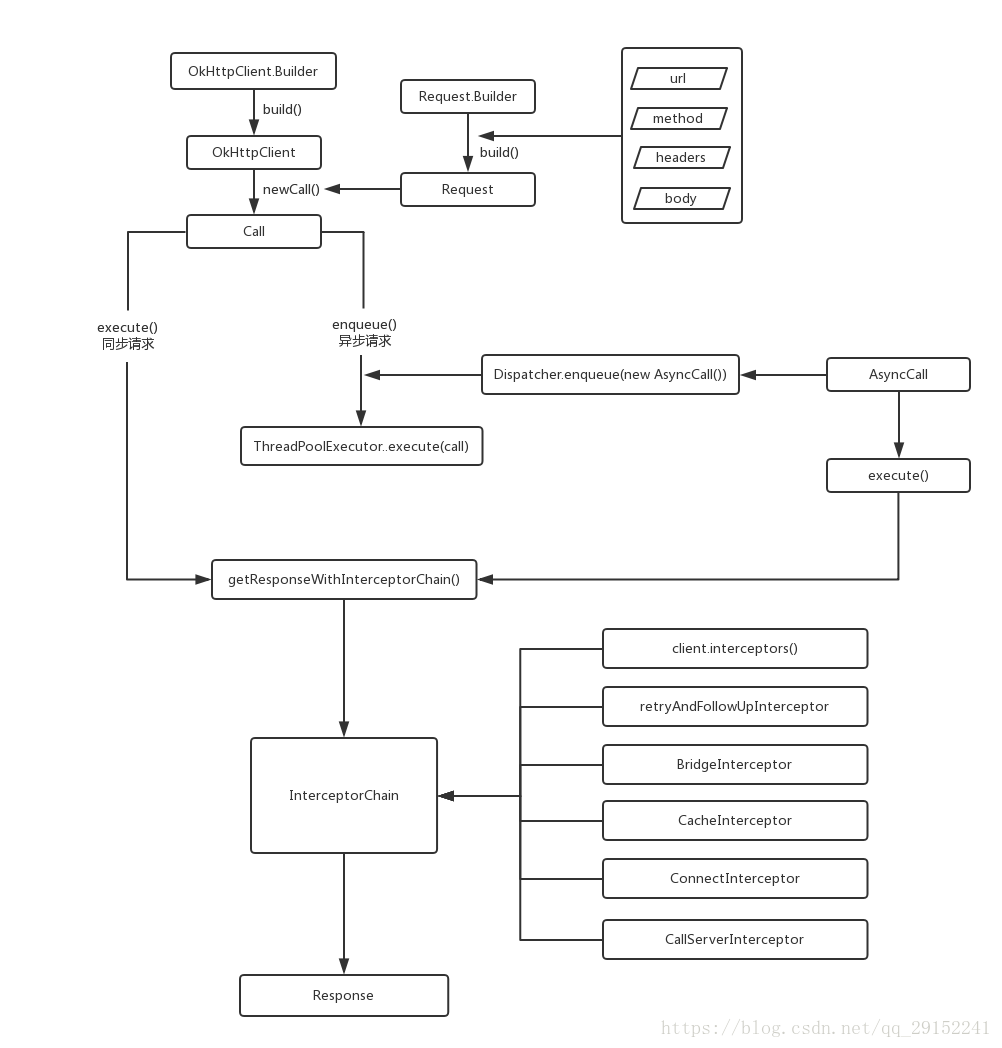
接下来咱们将根据这个整体架构图来来看看okhttp3的内部实现。
五、流程详解
1.创建OkHttpClient
首先创建OkHttpClient对象,OkHttpClient是okhttp3框架的客户端,用于发送http请求(Requests)和读取读取交易返回数据(Responses)。官方建议使用单例创建OkHttpClient,即一个进程中只创建一次即可,以后的每次交易都使用该实例发送交易。这是因为OkHttpClient拥有自己的连接池和线程池,这些连接池和线程池可以重复使用,这样做利于减少延迟和节省内存,如果咱们每次发交易都创建一个OkHttpClient的话,将会浪费很多内存资源。
除了上面例子的创建方式:
        OkHttpClient client = new OkHttpClient.Builder().build();
        Request request = new Request.Builder().
                url("https://github.com/cozing").
                build();
        Call call = client.newCall(request);
        ...
还有一种方式创建OkHttpCleint对象的方式:
        OkHttpClient client = new OkHttpClient();
        Request request = new Request.Builder().
                url("https://github.com/cozing").
                build();
        Call call = client.newCall(request);
        ...
这两种创建方式内部实现,第一种采用构建者模式创建OkHttpClient对象,这种方式可以自定义Builder内部的每一个参数属性,第二种采用普通的创建实例方式创建一个OkHttpClient对象,内部创建了一个默认的Builder,因此这种方式使用默认Builder的内部属性。
2.创建Call对象
一个Call对象表示一次请求,每一次交易请求都会生产一个新的Call,Call其实是一个接口对象,它的具体实现类是RealCall,Call的创建过程:
        ...
        Request request = new Request.Builder().
                url("https://github.com/cozing").
                build();
        Call call = client.newCall(request);
        ...
可以看到在创建Call对象时候传进去了一个Request对象,Request对象表示用户的交易请求参数,咱们看看它的内部实现:
public final class Request {
  final HttpUrl url;
  final String method;
  final Headers headers;
  final @Nullable RequestBody body;
  final Object tag;
...
  Request(Builder builder) {
    this.url = builder.url;
    this.method = builder.method;
    this.headers = builder.headers.build();
    this.body = builder.body;
    this.tag = builder.tag != null ? builder.tag : this;
  }
...
}
可以看到,里面包括:
url:交易请求地址;
method:请求方式,比如:get/post/http...等请求方式;
headers:请求头;
body:请求体;
咱们这时看看Call的创建方法client.newCall(request)的内部实现:
@Override
public Call newCall(Request request) {
    return RealCall.newRealCall(this, request, false /* for web socket */);
}
继续看RealCall.newRealCall():
  static RealCall newRealCall(OkHttpClient client, Request originalRequest, boolean forWebSocket) {
    // Safely publish the Call instance to the EventListener.
    RealCall call = new RealCall(client, originalRequest, forWebSocket);
    call.eventListener = client.eventListenerFactory().create(call);
    return call;
  }
可以看到确实如上面咱们所说,最后创建的是RealCall对象。
3.请求交易
okhttp3中提供了两种交易方式:一种是同步请求,第二种是异步请求。同步请求调用call.execute()方法,异步请求调用call.enqueue(Callback callback)方法,
在看两个请求方式的实现之前,咱们先来看okhttp3中一个重要成员Dispatcher(调度器):
(1)Dispatcher(调度器):
Dispatcher是okhttp3的任务调度核心类,负责管理同步和异步的请求,管理每一个请求任务的请求状态,并且其内部维护了一个线程池用于执行相应的请求,Dispatcher的实现框架图:
Dispatcher内部维护了两个队列:
public final class Dispatcher {
...
//用于保存等待执行的异步队列
private final Deque<AsyncCall> readyAsyncCalls = new ArrayDeque<>();
//用于保存正在执行的异步队列
private final Deque<AsyncCall> runningAsyncCalls = new ArrayDeque<>();
...
}
两个队列的作用可以看上面注释,那么为何要使用这两个队列呢?咱们可以这么理解:把Dispatcher当成生产者,把线程池当成消费者,当生产者生产的线程大于消费者所能承受的最大范围,就把未能及时执行的任务保存在readyAsyncCalls队列中,当时机成熟,也就是线程池有空余线程可以执行时,会调用promoteCall()这个方法把等待队列中的任务取出放到线程池中执行,并且把这个任务转移到runningAsyncCalls队列中去。
接下来咱们分别看看同步请求和异步请求的实现过程,并详细说一下他们是如何实现的。
(2).同步交易请求
call.execute()实现方式:
final class RealCall implements Call {

...

  @Override public Response execute() throws IOException {
    synchronized (this) {
      if (executed) throw new IllegalStateException("Already Executed");
      executed = true;
    }
    captureCallStackTrace();
    eventListener.callStart(this);
    try {
      //①调用调度器dispatcher的executed方法
      client.dispatcher().executed(this);
      Response result = getResponseWithInterceptorChain();
      if (result == null) throw new IOException("Canceled");
      return result;
    } catch (IOException e) {
      eventListener.callFailed(this, e);
      throw e;
    } finally {
      //②调用分配器Dispatcher的finish()方法
      client.dispatcher().finished(this);
    }
  }

...

}
咱们看看注释①部分的实现,调用了 client.dispatcher()的executed()方法,来看client.dispatcher()的内部实现:
public class OkHttpClient{
...
final Dispatcher dispatcher;
...
public Dispatcher dispatcher() {
return dispatcher;
}
...
}
可以看到实际调用的是Dispatcher调度器的executed()方法,继续看Dispatcher的实现:
public final class Dispatcher {
...
  private final Deque<RealCall> runningSyncCalls = new ArrayDeque<>();
...
  synchronized void executed(RealCall call) {
    runningSyncCalls.add(call);
  }
...
}
到此咱们可以知道这部分是将这次交易的请求RealCall存进了Deque队列,Deque是一个双向队列接口,Deque接口具有丰富的抽象数据形式,它支持从队列两端点检索和插入元素,在此咱们不对其做过多讲解。
接下来看到注释②中,不管结果交易结果如何,都会调用finally中的client.dispatcher().finished(this)将本次请求从队列中移除。
接下来调用该方法:
...
Response result = getResponseWithInterceptorChain();
...
这个方法是okhttp3的实现精髓点之一,这部分咱先放一边,将会在异步请求中一起讲解。
(3).异步交易请求
call.enqueue(Callback callback)实现方式:
final class RealCall implements Call {
...
  @Override public void enqueue(Callback responseCallback) {
    synchronized (this) {
      if (executed) throw new IllegalStateException("Already Executed");
      executed = true;
    }
    captureCallStackTrace();
    eventListener.callStart(this);
    //①调用调度器dispatcher的enqueue()
    client.dispatcher().enqueue(new AsyncCall(responseCallback));
  }
...
}
当调用此次异步请求交易方法的时候,内部是调用了调度器dispatcher的equeue(new AsyncCall(responseCallback))方法,该方法需要传入一个AsyncCall的对象。
接下来看dispatcher的equeue(new AsyncCall(responseCallback))方法的实现:
public final class Dispatcher {
...
  private int maxRequests = 64;
  private int maxRequestsPerHost = 5;
...
  private final Deque<AsyncCall> readyAsyncCalls = new ArrayDeque<>();
...
  synchronized void enqueue(AsyncCall call) {
    if (runningAsyncCalls.size() < maxRequests && runningCallsForHost(call) < maxRequestsPerHost) {
      runningAsyncCalls.add(call);
      executorService().execute(call);
    } else {
      readyAsyncCalls.add(call);
    }
  }
...
}
先判断当前运行中的请求数是否小于设定的最大请求数量,默认最大请求数是同时执行64个请求,并且判断当前运行中的共同主机的请求数量是否小于设定的最大请求数量,默认同一主机的请求数量最大值为5,当两者条件都成立的时候会调用executorService()的execute(call)方法;两者中只要有一个条件不成立,就会调用redyAsncCalls.add(call)将表示此次请求的call对象存在readyAsyncCalls队列中,readyAsyncCalls表示已准备好并等待执行请求的队列,当有空闲网络请求线程时,会从该队列中取出并执行网络请求。
接下来看executorService().execute(call):
public final class Dispatcher {
...
  public synchronized ExecutorService executorService() {
    if (executorService == null) {
      executorService = new ThreadPoolExecutor(0, Integer.MAX_VALUE, 60, TimeUnit.SECONDS,
          new SynchronousQueue<Runnable>(), Util.threadFactory("OkHttp Dispatcher", false));
    }
    return executorService;
  }
...
}
可以看到调度器Dispatcher内部维护了一个ThreadPoolExecutor线程池,并直接将call对象传入线程池执行。
咱们在刚才知道这个call的实现对象是AsyncCall,来看看内部实现:
final class RealCall implements Call {
...
  final class AsyncCall extends NamedRunnable {
    private final Callback responseCallback;

    AsyncCall(Callback responseCallback) {
      super("OkHttp %s", redactedUrl());
      this.responseCallback = responseCallback;
    }

    String host() {
      return originalRequest.url().host();
    }

    Request request() {
      return originalRequest;
    }

    RealCall get() {
      return RealCall.this;
    }

    @Override protected void execute() {
      boolean signalledCallback = false;
      try {
        Response response = getResponseWithInterceptorChain();
        if (retryAndFollowUpInterceptor.isCanceled()) {
          signalledCallback = true;
          responseCallback.onFailure(RealCall.this, new IOException("Canceled"));
        } else {
          signalledCallback = true;
          responseCallback.onResponse(RealCall.this, response);
        }
      } catch (IOException e) {
        if (signalledCallback) {
          // Do not signal the callback twice!
          Platform.get().log(INFO, "Callback failure for " + toLoggableString(), e);
        } else {
          eventListener.callFailed(RealCall.this, e);
          responseCallback.onFailure(RealCall.this, e);
        }
      } finally {
        client.dispatcher().finished(this);
      }
    }
  }
...
}
可以看到AsyncCall是RealCall的一个内部类,继承自NamedRunnable,再看NamedRunnable:
public abstract class NamedRunnable implements Runnable {
  protected final String name;

  public NamedRunnable(String format, Object... args) {
    this.name = Util.format(format, args);
  }

  @Override public final void run() {
    String oldName = Thread.currentThread().getName();
    Thread.currentThread().setName(name);
    try {
      execute();
    } finally {
      Thread.currentThread().setName(oldName);
    }
  }

  protected abstract void execute();
}
所以,AsyncCall就是一个Runnable的实现,用来开启一个线程,当网络请求线程池执行该线程的run()方法时,会调用AsyncCall的execute()的方法,最后在execute()方法内部调用了和上面咱们分析的同步请求方法一样的getResponseWithInterceptorChain()。
(4)getResponseWithInterceptorChain()/拦截器链
通过上面的分析咱们知道不管是同步请求还是异步请求,最后都会走getResponseWithInterceptorChain()方法,getResponseWithInterceptorChain()是okhttp3中的精髓设计之一,那么现在咱们来看看这个方法的内部实现:
final class RealCall implements Call {
...
  Response getResponseWithInterceptorChain() throws IOException {
    // Build a full stack of interceptors.
    List<Interceptor> interceptors = new ArrayList<>();
    interceptors.addAll(client.interceptors());
    interceptors.add(retryAndFollowUpInterceptor);
    interceptors.add(new BridgeInterceptor(client.cookieJar()));
    interceptors.add(new CacheInterceptor(client.internalCache()));
    interceptors.add(new ConnectInterceptor(client));
    if (!forWebSocket) {
      interceptors.addAll(client.networkInterceptors());
    }
    interceptors.add(new CallServerInterceptor(forWebSocket));

    Interceptor.Chain chain = new RealInterceptorChain(interceptors, null, null, null, 0,
        originalRequest, this, eventListener, client.connectTimeoutMillis(),
        client.readTimeoutMillis(), client.writeTimeoutMillis());

    return chain.proceed(originalRequest);
  }
}
这个方法是通过拦截器链对请求数据和返回数据进行处理,内部采用责任链模式,将每一个拦截器对应负责的处理任务进行严格分配,最后将交易结果返回并回调到暴露给调用者的接口上。
这些拦截器包括:
①.用户自定义的拦截器
②.retryAndFollowUpInterceptor:重试和重定向拦截器,主要负责网络失败重连。
③.BridgeInterceptor:主要负责添加交易请求头。
④.CacheInterceptor:缓存拦截器,主要负责拦截缓存。
⑤.ConnectInterceptor:网络连接拦截器,主要负责正式开启http请求。
⑥.CallServerInterceptor:负责发送网络请求和读取网络响应。
有关每个拦截器的具体实现和内部流程,咱们将会在下一篇文章中详细讲解,这篇文章咱们主要还是分析okhttp3的整体架构。
根据上面的源码可以看到,最后交给了了RealInterceptorChain(拦截器链类)这个真正的处理类,并调用RealInterceptorChain的proceed()方法来实现,具体实现:
public final class RealInterceptorChain implements Interceptor.Chain {
...
  @Override public Response proceed(Request request) throws IOException {
    return proceed(request, streamAllocation, httpCodec, connection);
  }

  public Response proceed(Request request, StreamAllocation streamAllocation, HttpCodec httpCodec,
      RealConnection connection) throws IOException {
    if (index >= interceptors.size()) throw new AssertionError();

    calls++;

    if (this.httpCodec != null && !this.connection.supportsUrl(request.url())) {
      throw new IllegalStateException("network interceptor " + interceptors.get(index - 1)
          + " must retain the same host and port");
    }

    // 保证此次调用的唯一性
    if (this.httpCodec != null && calls > 1) {
      throw new IllegalStateException("network interceptor " + interceptors.get(index - 1)
          + " must call proceed() exactly once");
    }

    // 调用拦截器链的下一个拦截器
    RealInterceptorChain next = new RealInterceptorChain(interceptors, streamAllocation, httpCodec,
        connection, index + 1, request, call, eventListener, connectTimeout, readTimeout,
        writeTimeout);
    Interceptor interceptor = interceptors.get(index);
    // 注释①
    Response response = interceptor.intercept(next);

    if (httpCodec != null && index + 1 < interceptors.size() && next.calls != 1) {
      throw new IllegalStateException("network interceptor " + interceptor
          + " must call proceed() exactly once");
    }

    if (response == null) {
      throw new NullPointerException("interceptor " + interceptor + " returned null");
    }

    if (response.body() == null) {
      throw new IllegalStateException(
          "interceptor " + interceptor + " returned a response with no body");
    }

    return response;
  }
}
看注释①处,会调用拦截器的intercept(next)方法,只有当前拦截器的response返回结果时,才会执行下一个拦截器,因此得出结论:下一个拦截器依赖于当前拦截器的返回,可以保证拦截器的依次执行。
在拦截器链中执行的结果,在同步请求中会直接在response返回,异步请求:
final class RealCall implements Call {
...
  final class AsyncCall extends NamedRunnable {
    ...
    @Override
    public Response execute() throws IOException {
    ...
        responseCallback.onResponse(RealCall.this, response);
    ...
    }
...
}
异步请求时会把拦截器链的处理结果通过Callback的onReponse回调给用户。
五、总结
至此,okhttp3的整体架构分析完毕,建议咱们课后可以跟着源码一步步去理解,去了解okhttp3的作者大神们的思想,然后应用到咱们的项目开发中。当然,okhttp3是一个很庞大的一个框架,咱们这篇文章主要是从它的整体架构方面对其做了简单的分析,内部的实现逻辑和思想都很值得咱们认真思考和细细品味。