OkHttp是一个非常优秀的网络请求框架,已被谷歌加入到Android的源码中。目前比较流行的Retrofit也是默认使用OkHttp的。所以OkHttp的源码是一个不容错过的学习资源,学习源码之前,务必熟练使用这个框架,否则就是跟自己过不去。
use -> running source code -> reading & learning the source code.
1、初识
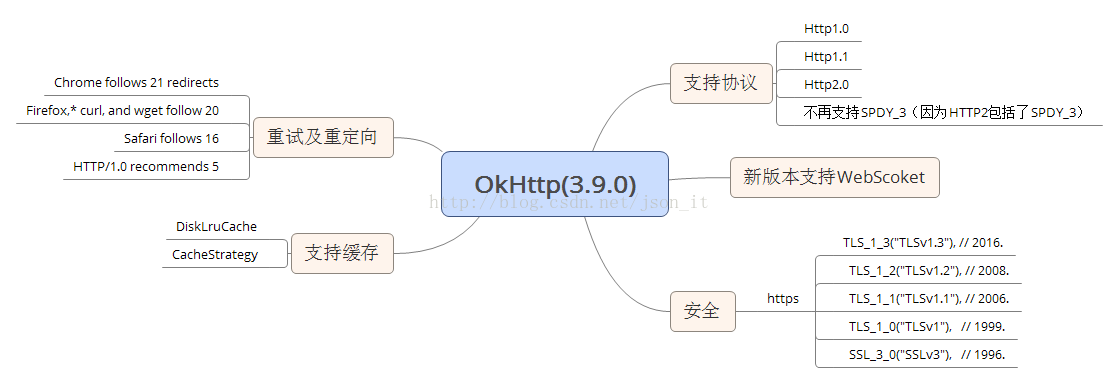
在早期的版本中,OkHttp支持Http1.0,1.1,SPDY协议,但是Http2协议的问世,导致OkHttp也做出了改变,OkHttp鼓励开发者使用HTTP2,不再对SPDY协议给予支持。另外,新版本的OkHttp还有一个新的亮点就是支持WebScoket,这样我们就可以非常方便的建立长连接了。
关于Http各个版本的异同,可以查看这篇博客:http://blog.csdn.net/json_it/article/details/78312311
作为一个优秀的网络框架,OkHttp同样支持网络缓存,OkHttp的缓存基于DiskLruCache,对这个类不熟悉的可以
这里学习。DiskLruCache虽然没有被收入到Android的源码中,但也是谷歌推荐的一个优秀的缓存框架。有时间可以自己学习源码,这里不再叙述。
在安全方便,OkHttp目前支持了如上图所示的TLS版本,以确保一个安全的Socket连接。
重试及重定向就不再说了,都知道什么意思,左上角给出了各浏览器或Http版本支持的重试或重定向次数。
2、流程(以同步请求为例)
2.1、基本使用
2.2、同步请求流程

在开始流程讲解之前,先了解一下三个概念的含义(以下来自源码注释):
Connections:连接远程服务器的物理连接;
Streams:基于Connection的逻辑Http请求/响应对。一个连接可以承载多少个Stream都是有限制的,Http1.x连接只能承载一个Stream,而一个Http2.0连接可以承载多个Stream(支持并发请求,并发请求共用一个Connection);
Calls:逻辑Stream序列,典型的例子是一个初始请求及其后续的请求。We prefer to keep all streams of a single call on the same connection for better behavior and locality.
对于同步和异步请求,唯一的区别就是异步请求会放在线程池(ThreadPoolExecutor)中去执行,而同步请求则会在当前线程中执行,注意:同步请求会阻塞当前线程。
对于Http1.1,call - 1:1 - Stream - 1:1 - connection;
对于http2.0,call - 1:1 - Stream - N:1 - connection;
由上述流程图,我们可以直观的了解到一次基本的请求包括如下两个部分:call+interceptors。
call:最终的请求对象;
interceptors:这是OkHttp最核心的部分,一个请求会经过OkHttp的若干个拦截器进行处理,每一个拦截器都会完成一个功能模块,比如CacheInterceptor完成网络请求的缓存。一个Request经过拦截器链的处理之后,会得到最终的Response。
interceptors里面包括的东西很多东西,后续的源码分析就是以拦截器为主线来进行分析。
3、源码分析
还是以上面的这段最基本的用法作为源码分析的入口。
3.1、OkHttpClient
首先,我们生成了一个OKHttpClient对象,注意OKHttpClient对象的生成有两种方式:一种是我们使用的方式,另一种是使用建造者(Builder)模式 -- new OkHttpClient.Builder()....Build()。那么这两种方式有什么区别呢?
第一种:
可以看到我们简单的一句new OkHttpClient(),OkHttp就已经为我们做了很多工作,很多我们需要的参数在这里都获得默认值。各字段含义如下:
dispatcher:直译就是调度器的意思。主要作用是通过双端队列保存Calls(同步&异步Call),同时在线程池中执行异步请求。后面会详细解析该类。
protocols:默认支持的Http协议版本 -- Protocol.HTTP_2, Protocol.HTTP_1_1;
connectionSpecs:OKHttp连接(Connection)配置 -- ConnectionSpec.MODERN_TLS, ConnectionSpec.CLEARTEXT,我们分别看一下:
可以看出一个是针对TLS连接的配置,一个是针对普通的Http连接的配置;
eventListenerFactory :一个Call的状态监听器,注意这个是okhttp新添加的功能,目前还不是最终版,在后面的版本中会发生改变的。
proxySelector :使用默认的代理选择器;
cookieJar:默认是没有Cookie的;
socketFactory:使用默认的Socket工厂产生Socket;
hostnameVerifier、 certificatePinner、 proxyAuthenticator、 authenticator:安全相关的设置;
connectionPool :连接池;后面会详细介绍;
dns:这个一看就知道,域名解析系统 domain name -> ip address;
pingInterval :这个就和WebSocket有关了。为了保持长连接,我们必须间隔一段时间发送一个ping指令进行保活;
第二种:默认的设置和第一种方式相同,但是我们可以利用建造者模式单独的设置每一个属性;
注意事项:OkHttpClient强烈建议全局单例使用,因为每一个OkHttpClient都有自己单独的连接池和线程池,复用连接池和线程池能够减少延迟、节省内存。
3.2、RealCall(生成一个Call)
在我们定义了请求对象request之后,我们需要生成一个Call对象,该对象代表了一个准备被执行的请求。Call是可以被取消的。Call对象代表了一个request/response 对(Stream).还有就是一个Call只能被执行一次。执行同步请求,代码如下(RealCall的execute方法):
解析:首先如果executed等于true,说明已经被执行,如果再次调用执行就抛出异常。这说明了一个Call只能被执行。注意此处同步请求与异步请求生成的Call对象的区别,执行
异步请求代码如下(RealCall的enqueue方法):
可以看到同步请求生成的是RealCall对象,而异步请求生成的是AsyncCall对象。AsyncCall说到底其实就是Runnable的子类。
接着上面继续分析,如果可以执行,则对当前请求添加监听器等操作,然后将请求Call对象放入调度器Dispatcher中。最后由拦截器链中的各个拦截器来对该请求进行处理,返回最终的Response。
3.3、Dispatcher(调度器)
Dispatcher是保存同步和异步Call的地方,并负责执行异步AsyncCall。
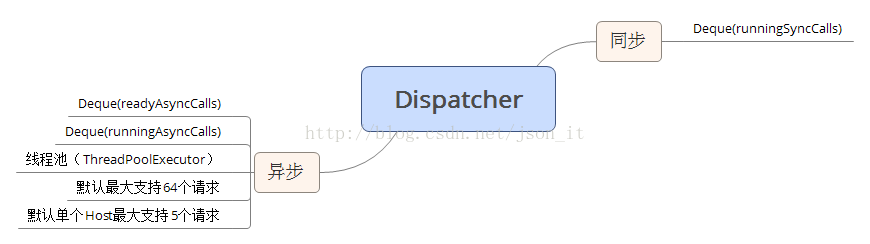
如上图,针对同步请求,Dispatcher使用了一个Deque保存了同步任务;针对异步请求,Dispatcher使用了两个Deque,一个保存准备执行的请求,一个保存正在执行的请求,为什么要用两个呢?因为Dispatcher默认支持最大的并发请求是64个,单个Host最多执行5个并发请求,如果超过,则Call会先被放入到readyAsyncCall中,当出现空闲的线程时,再将readyAsyncCall中的线程移入到runningAsynCalls中,执行请求。先看Dispatcher的流程,跟着流程读源码:
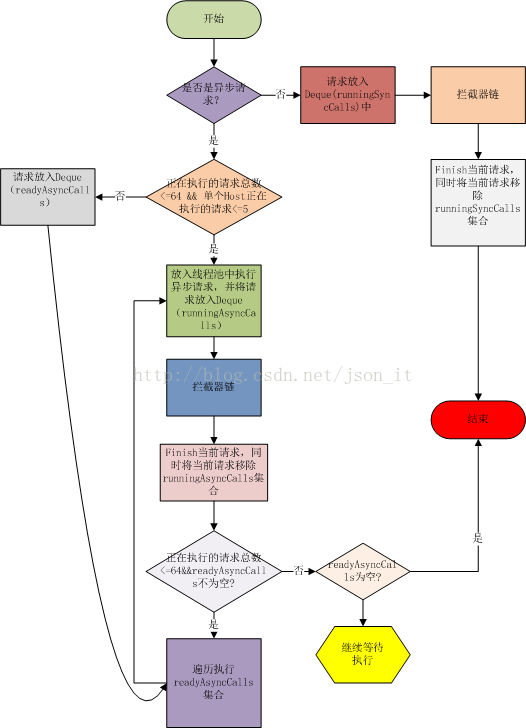
在3.2小节中,当一个请求是同步请求的请求的,可以看到执行了这句代码:client.dispatcher().executed(this);根据Dispatcher源码,看一下到底发生了什么?
可以看到,只是简单的将同步任务当到了runningSyncCalls集合中。
在经过拦截器的处理之后,得到了响应的Response,最终会执行finally语句块:
-
void finished(RealCall call) {
-
finished(runningSyncCalls, call, false);
-
}
-
private
<T> void finished(Deque
<T> calls, T call, boolean promoteCalls) {
-
int runningCallsCount;
-
Runnable idleCallback;
-
synchronized (this) {
-
if (!calls.remove(call)) throw new AssertionError("Call wasn't in-flight!");//将请求移除集合
-
if (promoteCalls) promoteCalls();
-
...
-
}
-
...
-
}
Dispatcher中,同步请求的逻辑还是比较简单的。异步请求的逻辑相对麻烦一些,但也不是很复杂。
在3.2小节,第二处代码是执行异步请求的逻辑,最关键的是最后依据代码:client.dispatcher().enqueue(new AsyncCall(responseCallback));紧跟着看一下enqueue方法中到底发生了什么:
-
synchronized void enqueue(AsyncCall call) {
-
if (runningAsyncCalls.size()
< maxRequests && runningCallsForHost(call) < maxRequestsPerHost) {
-
runningAsyncCalls.add(call);
-
executorService().execute(call);
-
} else {
-
readyAsyncCalls.add(call);
-
}
-
}
此处的执行逻辑和同步的执行逻辑基本相同,区别在最后一句代码:client.dispatcher().finished(this);因为这是一个异步任务,所以会调用另外一个finish方法:
-
private
<T> void finished(Deque
<T> calls, T call, boolean promoteCalls) {
-
int runningCallsCount;
-
Runnable idleCallback;
-
synchronized (this) {
-
if (!calls.remove(call)) throw new AssertionError("Call wasn't in-flight!");//将请求移除集合
-
if (promoteCalls) promoteCalls();
-
...
-
}
-
-
...
-
}
可以看到最后一个参数是true,这意味着需要执行promoteCalls方法:
-
private void promoteCalls() {
-
if (runningAsyncCalls.size() >= maxRequests) return; // Already running max capacity.
-
if (readyAsyncCalls.isEmpty()) return; // No ready calls to promote.
-
-
for (Iterator
<AsyncCall> i = readyAsyncCalls.iterator(); i.hasNext(); ) {
-
AsyncCall call = i.next();
-
-
if (runningCallsForHost(call)
< maxRequestsPerHost) {
-
i.remove();
-
runningAsyncCalls.add(call);
-
executorService().execute(call);
-
}
-
-
if (runningAsyncCalls.size() >= maxRequests) return; // Reached max capacity.
-
}
-
}
3.4、拦截器链
在依次介绍各个拦截器之前,先介绍一个比较重要的类:RealInterceptorChain,直译就是拦截器链类;这个类在什么地方会用到呢?还是3.2节,RealCall的execute方法有这么一段代码:
Response result = getResponseWithInterceptorChain();
-
Response getResponseWithInterceptorChain() throws IOException {
-
// Build a full stack of interceptors.
-
List
<Interceptor> interceptors = new ArrayList
<>();
-
interceptors.addAll(client.interceptors());
-
interceptors.add(retryAndFollowUpInterceptor);
-
interceptors.add(new BridgeInterceptor(client.cookieJar()));
-
interceptors.add(new CacheInterceptor(client.internalCache()));
-
interceptors.add(new ConnectInterceptor(client));
-
if (!forWebSocket) {
-
interceptors.addAll(client.networkInterceptors());
-
}
-
interceptors.add(new CallServerInterceptor(forWebSocket));
-
-
Interceptor.Chain chain = new RealInterceptorChain(interceptors, null, null, null, 0,
-
originalRequest, this, eventListener, client.connectTimeoutMillis(),
-
client.readTimeoutMillis(), client.writeTimeoutMillis());
-
-
return chain.proceed(originalRequest);
-
}
该方法最核心的代码就是中间的这几句,执行当前拦截器的Intercept方法,并调用下一个(index+1)拦截器。下一个(index+1)拦截器的调用依赖于当前拦截器的Intercept方法中,对RealInterceptorChain的proceed方法的调用:
response = realChain.proceed(request, streamAllocation, null, null);
3.4.1、重试及 followup拦截器
3.4.2、BridgeInterceptor
咸蛋少扯,上图:
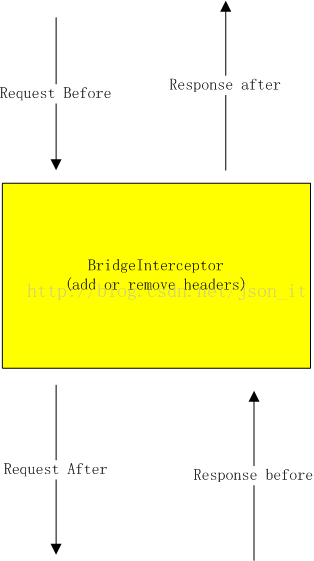
BridgeInterceptor的主要作用就是为请求(request before)添加请求头,为响应(Response Before)添加响应头。看源码:
-
@Override public Response intercept(Chain chain) throws IOException {
-
Request userRequest = chain.request();
-
Request.Builder requestBuilder = userRequest.newBuilder();
-
//----------------------request----------------------------------------------
-
RequestBody body = userRequest.body();
-
if (body != null) {
-
MediaType contentType = body.contentType();
-
if (contentType != null) {//添加Content-Type请求头
-
requestBuilder.header("Content-Type", contentType.toString());
-
}
-
-
long contentLength = body.contentLength();
-
if (contentLength != -1) {
-
requestBuilder.header("Content-Length", Long.toString(contentLength));
-
requestBuilder.removeHeader("Transfer-Encoding");
-
} else {
-
requestBuilder.header("Transfer-Encoding", "chunked");//分块传输
-
requestBuilder.removeHeader("Content-Length");
-
}
-
}
-
-
if (userRequest.header("Host") == null) {
-
requestBuilder.header("Host", hostHeader(userRequest.url(), false));
-
}
-
-
if (userRequest.header("Connection") == null) {
-
requestBuilder.header("Connection", "Keep-Alive");
-
}
-
-
// If we add an "Accept-Encoding: gzip" header field we're responsible for also decompressing
-
// the transfer stream.
-
boolean transparentGzip = false;
-
if (userRequest.header("Accept-Encoding") == null && userRequest.header("Range") == null) {
-
transparentGzip = true;
-
requestBuilder.header("Accept-Encoding", "gzip");
-
}
-
-
List
<Cookie> cookies = cookieJar.loadForRequest(userRequest.url());
-
if (!cookies.isEmpty()) {
-
requestBuilder.header("Cookie", cookieHeader(cookies));
-
}
-
-
if (userRequest.header("User-Agent") == null) {
-
requestBuilder.header("User-Agent", Version.userAgent());
-
}
-
-
Response networkResponse = chain.proceed(requestBuilder.build());
-
//----------------------------------response----------------------------------------------
-
HttpHeaders.receiveHeaders(cookieJar, userRequest.url(), networkResponse.headers());//保存cookie
-
-
Response.Builder responseBuilder = networkResponse.newBuilder()
-
.request(userRequest);
-
-
if (transparentGzip
-
&& "gzip".equalsIgnoreCase(networkResponse.header("Content-Encoding"))
-
&& HttpHeaders.hasBody(networkResponse)) {
-
GzipSource responseBody = new GzipSource(networkResponse.body().source());
-
Headers strippedHeaders = networkResponse.headers().newBuilder()
-
.removeAll("Content-Encoding")//Content-Encoding、Content-Length不能用于Gzip解压缩
-
.removeAll("Content-Length")
-
.build();
-
responseBuilder.headers(strippedHeaders);
-
String contentType = networkResponse.header("Content-Type");
-
responseBuilder.body(new RealResponseBody(contentType, -1L, Okio.buffer(responseBody)));
-
}
-
-
return responseBuilder.build();
-
}
3.4.3、CacheInterceptor
在解析CacheInterceptor之前,先看一张关于Http缓存机制的图片(来源于网络):
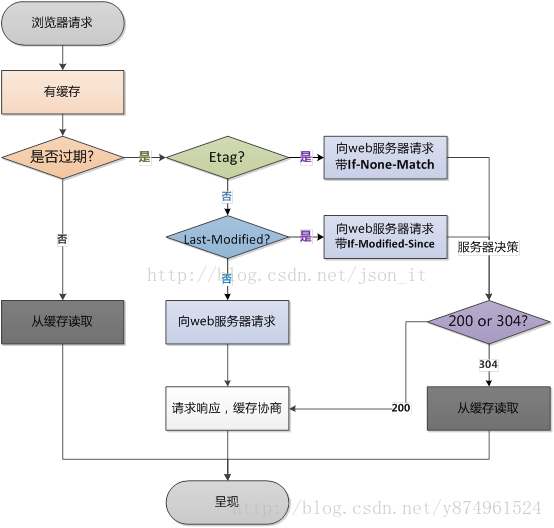
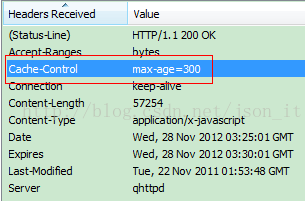
先看一下缓存的响应头:
(本模块前两个图均来自于http://blog.csdn.net/y874961524/article/details/61419716,感谢)
几个相关的字段先解释一下(估计都知道):
Cache-control:标明缓存的最大存活时常;
Date:服务器告诉客户端,该资源的发送时间;
Expires:表示过期时间(该字段是1.0的东西,当cache-control和该字段同时存在的条件下,cache-control的优先级更高);
Last-Modified:服务器告诉客户端,资源的最后修改时间;
还有一个字段,这个图没给出,就是E-Tag:当前资源在服务器的唯一标识,可用于判断资源的内容是否被修改了。
除以上响应头字段以外,还需了解两个相关的Request请求头:If-Modified-since、If-none-Match。这两个字段是和Last-Modified、E-Tag配合使用的。大致流程如下:
服务器收到请求时,会在200 OK中回送该资源的Last-Modified和ETag头(服务器支持缓存的情况下才会有这两个头哦),客户端将该资源保存在cache中,并记录这两个属性。当客户端需要发送相同的请求时,根据Date + Cache-control来判断是否缓存过期,如果过期了,会在请求中携带If-Modified-Since和If-None-Match两个头。两个头的值分别是响应中Last-Modified和ETag头的值。服务器通过这两个头判断本地资源未发生变化,客户端不需要重新下载,返回304响应。
看源码之前,先看几个与CacheInterceptor相关的比较重要的几个类:
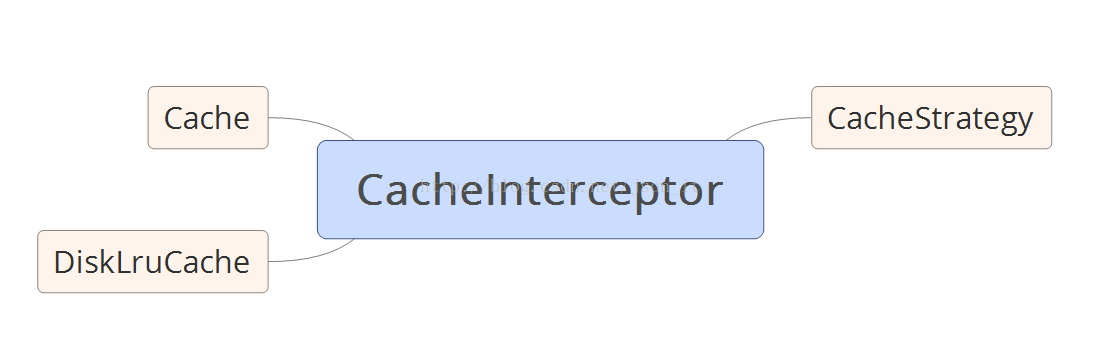
CacheStrategy是一个缓存策略类,该类告诉CacheInterceptor是使用缓存还是使用网络请求;
Cache是封装了实际的缓存操作;
DiskLruCache:Cache基于DiskLruCache;
下面看一下CacheInterceptor的源码:
上面源码中的注释已经解释的很清楚了,下面再简单的说一下流程:
根据缓存策略类返回的结果:
1、如果网络不可用并且无可用的有效缓存,则返回504错误;
2、继续,如果不需要网络请求,则直接使用缓存;
3、继续,如果需要网络可用,则进行网络请求;
4、继续,如果有缓存,并且网络请求返回HTTP_NOT_MODIFIED,说明缓存还是有效的,则合并网络响应和缓存结果。同时更新缓存;
5、继续,如果没有缓存,则写入新的缓存;
我们可以看到,CacheStrategy在CacheInterceptor中起到了很关键的作用。该类决定了是网络请求还是使用缓存。该类最关键的代码是getCandidate()方法:
-
private CacheStrategy getCandidate() {
-
// No cached response.
-
if (cacheResponse == null) {//没有缓存,直接网络请求
-
return new CacheStrategy(request, null);
-
}
-
-
// Drop the cached response if it's missing a required handshake.
-
if (request.isHttps() && cacheResponse.handshake() == null) {//https,但没有握手,直接网络请求
-
return new CacheStrategy(request, null);
-
}
-
-
// If this response shouldn't have been stored, it should never be used
-
// as a response source. This check should be redundant as long as the
-
// persistence store is well-behaved and the rules are constant.
-
if (!isCacheable(cacheResponse, request)) {//不可缓存,直接网络请求
-
return new CacheStrategy(request, null);
-
}
-
-
CacheControl requestCaching = request.cacheControl();
-
if (requestCaching.noCache() || hasConditions(request)) {
-
//请求头nocache或者请求头包含If-Modified-Since或者If-None-Match
-
//请求头包含If-Modified-Since或者If-None-Match意味着本地缓存过期,需要服务器验证
-
//本地缓存是不是还能继续使用
-
return new CacheStrategy(request, null);
-
}
-
-
CacheControl responseCaching = cacheResponse.cacheControl();
-
if (responseCaching.immutable()) {//强制使用缓存
-
return new CacheStrategy(null, cacheResponse);
-
}
-
-
long ageMillis = cacheResponseAge();
-
long freshMillis = computeFreshnessLifetime();
-
-
if (requestCaching.maxAgeSeconds() != -1) {
-
freshMillis = Math.min(freshMillis, SECONDS.toMillis(requestCaching.maxAgeSeconds()));
-
}
-
-
long minFreshMillis = 0;
-
if (requestCaching.minFreshSeconds() != -1) {
-
minFreshMillis = SECONDS.toMillis(requestCaching.minFreshSeconds());
-
}
-
-
long maxStaleMillis = 0;
-
if (!responseCaching.mustRevalidate() && requestCaching.maxStaleSeconds() != -1) {
-
maxStaleMillis = SECONDS.toMillis(requestCaching.maxStaleSeconds());
-
}
-
//可缓存,并且ageMillis + minFreshMillis
< freshMillis + maxStaleMillis
-
// (意味着虽过期,但可用,只是会在响应头添加
warning)
-
if (!
responseCaching.noCache() &&
ageMillis +
minFreshMillis <
freshMillis +
maxStaleMillis) {
-
Response.Builder
builder =
cacheResponse.newBuilder();
-
if (
ageMillis +
minFreshMillis >= freshMillis) {
-
builder.addHeader("Warning", "110 HttpURLConnection \"Response is stale\"");
-
}
-
long oneDayMillis = 24 * 60 * 60 * 1000L;
-
if (ageMillis > oneDayMillis && isFreshnessLifetimeHeuristic()) {
-
builder.addHeader("Warning", "113 HttpURLConnection \"Heuristic expiration\"");
-
}
-
return new CacheStrategy(null, builder.build());//使用缓存
-
}
-
-
// Find a condition to add to the request. If the condition is satisfied, the response body
-
// will not be transmitted.
-
String conditionName;
-
String conditionValue;
-
//流程走到这,说明缓存已经过期了
-
//添加请求头:If-Modified-Since或者If-None-Match
-
//etag与If-None-Match配合使用
-
//lastModified与If-Modified-Since配合使用
-
//前者和后者的值是相同的
-
//区别在于前者是响应头,后者是请求头。
-
//后者用于服务器进行资源比对,看看是资源是否改变了。
-
// 如果没有,则本地的资源虽过期还是可以用的
-
if (etag != null) {
-
conditionName = "If-None-Match";
-
conditionValue = etag;
-
} else if (lastModified != null) {
-
conditionName = "If-Modified-Since";
-
conditionValue = lastModifiedString;
-
} else if (servedDate != null) {
-
conditionName = "If-Modified-Since";
-
conditionValue = servedDateString;
-
} else {
-
return new CacheStrategy(request, null); // No condition! Make a regular request.
-
}
-
-
Headers.Builder conditionalRequestHeaders = request.headers().newBuilder();
-
Internal.instance.addLenient(conditionalRequestHeaders, conditionName, conditionValue);
-
-
Request conditionalRequest = request.newBuilder()
-
.headers(conditionalRequestHeaders.build())
-
.build();
-
return new CacheStrategy(conditionalRequest, cacheResponse);
-
}
1、没有缓存,直接网络请求;
2、如果是https,但没有握手,直接网络请求;
3、不可缓存,直接网络请求;
4、请求头nocache或者请求头包含If-Modified-Since或者If-None-Match,则需要服务器验证本地缓存是不是还能继续使用,直接网络请求;
5、可缓存,并且ageMillis + minFreshMillis < freshMillis + maxStaleMillis(意味着虽过期,但可用,只是会在响应头添加warning),则使用缓存;
5、可缓存,并且ageMillis + minFreshMillis < freshMillis + maxStaleMillis(意味着虽过期,但可用,只是会在响应头添加warning),则使用缓存;
6、缓存已经过期,添加请求头:If-Modified-Since或者If-None-Match,进行网络请求;
3.4.4、ConnectInterceptor(核心,连接池)
ConnectInterceptor器如其名,是一个连接相关的拦截器。这个拦截器是这几个拦截器里面代码最少的。但是少并不意味着很简单。先看一下ConnectIntercepor中比较重要的几个类及其含义: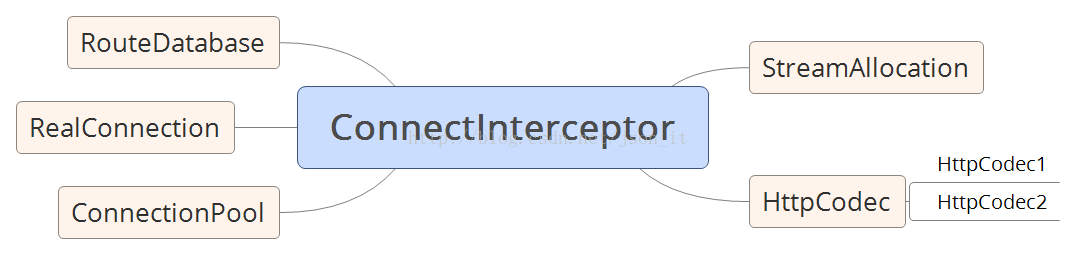
RouteDataBase:这是一个关于路由信息的白名单和黑名单类,处于黑名单的路由信息会被避免不必要的尝试;
RealConnecton:Connect子类,主要实现连接的建立等工作;
ConnectionPool:连接池,实现连接的复用;
这里再说一下Connection和Stream的关系:Http1.x是1:1的关系,而Http2是1对多的关系。就是说一个http1.x连接只能被一个请求使用,而一个Http2连接是对应多个Stream的,多个Stream的意思是Http2连接支持并发请求,即一个连接可以被多个请求同时使用的。
还有,Http1.1的keep-alive机制的作用是保证连接使用完不关闭,当下一次请求与连接的Host相同的时候,连接可以直接使用,不用再次创建(节省资源,提高了性能)。
StreamAllocation:直译就是流分配。流是什么呢?我们知道Connection是一个连接远程服务器的物理Socket连接,而Stream则是基于Connection的逻辑Http 请求/响应对。StreamAllocation会通过ConnectPool获取或者新生成一个RealConnection来得到一个连接到Server的Connection连接,同时会生成一个HttpCodec用于下一个CallServerInterceptor,以完成最终的请求;
HttpCodec: Encodes HTTP requests and decodes HTTP responses。(源码注释哦)。针对不同的版本,OkHttp为我们提供了HttpCodec1(Http1.x)和HttpCodec2(Http2).
一句话概括就是:分配一个Connection和HttpCodec,为最终的请求做准备。
代码量是不是很少?是的。表面上看起来很少,实际上大部分的功能都被封装到其他的类里面去了,此处只是调用。所以为了代码的可读性和可维护性,该封装的还是乖乖的封装吧。
核心代码就两行:
可以看出,主要的工作是由StreamAllocation完成。我们来看看这个StreamAllocation的newStream和connection()到底做了什么。
可以看到,最关键的一步就是findHealthyConnection,这个方法的主要的作用就是找到一个可用的连接(如果连接不可用,这个过程会一直持续哦)。
上述代码还是很容易理解的,唯一让我有点费解的就是这个noNewsStream方法。刚开始看名字有点蒙圈。啥叫noNewStream嘞,看源码(其实应该先看findConnection的源码的,但是先搞懂这个地方,对后面的理解有益无害的):
上述关键代码是deallocate:
需要说的都写在了上面源码的注释里面了,不再多说了。
接着看findConnection方法,好吧,继续,源码有点长,不过我都给注释了,看起来应该也不会很难。
-
private RealConnection findConnection(int connectTimeout, int readTimeout, int writeTimeout,
-
boolean connectionRetryEnabled) throws IOException {
-
boolean foundPooledConnection = false;
-
RealConnection result = null;
-
Route selectedRoute = null;
-
Connection releasedConnection;
-
Socket toClose;
-
synchronized (connectionPool) {
-
//----------排除异常情况----------------
-
if (released) throw new IllegalStateException("released");
-
if (codec != null) throw new IllegalStateException("codec != null");
-
if (canceled) throw new IOException("Canceled");
-
-
// Attempt to use an already-allocated connection. We need to be careful here because our
-
// already-allocated connection may have been restricted from creating new streams.
-
releasedConnection = this.connection;
-
//这个方法的作用,与deallocate作用一样
-
//如果连接不能创建Stream,则释放资源,返回待关闭的close Socket
-
toClose = releaseIfNoNewStreams();
-
//经过releaseIfNoNewStreams,如果connection不为null,则连接是可用的
-
if (this.connection != null) {
-
// We had an already-allocated connection and it's good.
-
//存在可使用的已分配连接
-
result = this.connection;
-
releasedConnection = null;//为null值,则说明这个连接是有效的
-
}
-
if (!reportedAcquired) {
-
// If the connection was never reported acquired, don't report it as released!
-
releasedConnection = null;
-
}
-
-
if (result == null) {//没有可使用的连接,去连接池中找
-
// Attempt to get a connection from the pool.//首先通过ConnectionPool,Address,StreamAllocation从连接池获取连接,
-
// 连接池后面会单独讲解*************
-
Internal.instance.get(connectionPool, address, this, null);//ConnectionPool,Address,StreamAllocation,Route
-
if (connection != null) {
-
foundPooledConnection = true;
-
result = connection;
-
} else {
-
selectedRoute = route;
-
}
-
}
-
}
-
closeQuietly(toClose);
-
-
if (releasedConnection != null) {
-
eventListener.connectionReleased(call, releasedConnection);
-
}
-
if (foundPooledConnection) {
-
eventListener.connectionAcquired(call, result);
-
}
-
if (result != null) {
-
// If we found an already-allocated or pooled connection, we're done.
-
return result;//找到了一个已分配或者连接池中的连接,此过程结束,返回
-
}
-
//否则,我们需要一个路由信息,这是一个阻塞的操作
-
// If we need a route selection, make one. This is a blocking operation.
-
boolean newRouteSelection = false;
-
if (selectedRoute == null && (routeSelection == null || !routeSelection.hasNext())) {
-
newRouteSelection = true;
-
routeSelection = routeSelector.next();
-
}
-
-
synchronized (connectionPool) {
-
if (canceled) throw new IOException("Canceled");
-
-
if (newRouteSelection) {
-
// Now that we have a set of IP addresses, make another attempt at getting a connection from
-
// the pool. This could match due to connection coalescing.
-
//提供更加全面的路由信息,再次从连接池中获取连接
-
List
<Route> routes = routeSelection.getAll();
-
for (int i = 0, size = routes.size(); i
< size; i++) {
-
Route route = routes.get(i);
-
Internal.instance.get(connectionPool, address, this, route);
-
if (connection != null) {
-
foundPooledConnection = true;
-
result = connection;
-
this.route = route;
-
break;
-
}
-
}
-
}
-
//*实在是没找到,只能生成新的连接******了
-
if (!foundPooledConnection) {
-
if (selectedRoute == null) {
-
selectedRoute = routeSelection.next();
-
}
-
-
// Create a connection and assign it to this allocation immediately. This makes it possible
-
// for an asynchronous cancel() to interrupt the handshake we're about to do.
-
route = selectedRoute;
-
refusedStreamCount = 0;
-
result = new RealConnection(connectionPool, selectedRoute);
-
acquire(result, false);//添加connection的StreamAllocation添加到connection.allocations集合中*****
-
}
-
}
-
-
// If we found a pooled connection on the 2nd time around, we're done.
-
//如果连接是从连接池中找到的,说明是可复用的。不是新生成的,因为新生成的连接,
-
// 需要去连接服务器之后才能可用呀
-
if (foundPooledConnection) {
-
eventListener.connectionAcquired(call, result);
-
return result;
-
}
-
-
// Do TCP + TLS handshakes. This is a blocking operation.//连接Server
-
result.connect(
-
connectTimeout, readTimeout, writeTimeout, connectionRetryEnabled, call, eventListener);
-
routeDatabase().connected(result.route());//将路由信息添加到routeDatabase中。
-
-
Socket socket = null;
-
synchronized (connectionPool) {
-
reportedAcquired = true;
-
-
// Pool the connection.
-
Internal.instance.put(connectionPool, result);//将新生成的连接放入连接池中
-
-
// If another multiplexed connection to the same address was created concurrently, then
-
// release this connection and acquire that one.
-
//如果是一个http2连接,由于http2连接应具有多路复用特性,
-
// 因此,我们需要确保http2连接的多路复用特性
-
if (result.isMultiplexed()) {
-
//deduplicate:确保http2连接的多路复用特性,重复的连接将被剔除
-
socket = Internal.instance.deduplicate(connectionPool, address, this);
-
result = connection;
-
}
-
}
-
closeQuietly(socket);
-
-
eventListener.connectionAcquired(call, result);
-
return result;
-
}
上述代码加了很多注释,可以看一下。为了更加快速的了解其过程,画了一个流程图,跟着流程图来一步一步的解析(没有什么是一张图解决不了的,如果不能,那么就两张O(∩_∩)O)。
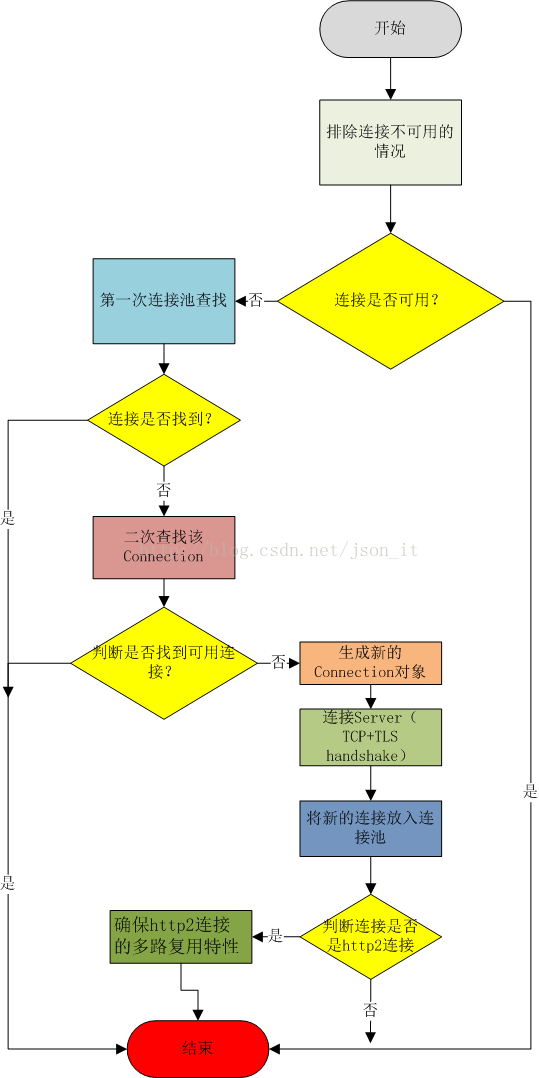
这个方法是说如果连接处于nonewStream状态,则释放该连接。否则,该连接是可用的。关于noNewStream和deallocate方法前面已经解释的很清楚了。
b)判断连接是否可用
经过releaseIfNoNewStreams方法,如果connection不为null,则一定是可用的。
c)第一次连接池查找(没有提供路由信息)
如果查找到了,则将查找到的连接赋值给result。
d)遍历路由表,进行二次查找
-
List
<Route> routes = routeSelection.getAll();
-
for (int i = 0, size = routes.size(); i
< size; i++) {
-
Route route = routes.get(i);
-
Internal.instance.get(connectionPool, address, this, route);
-
if (connection != null) {
-
foundPooledConnection = true;
-
result = connection;
-
this.route = route;
-
break;
-
}
-
}
g)新的连接,连接服务器
h)新的连接放入线程池
i)如果连接是一个HTTP2连接,则需要确保多路复用的特性
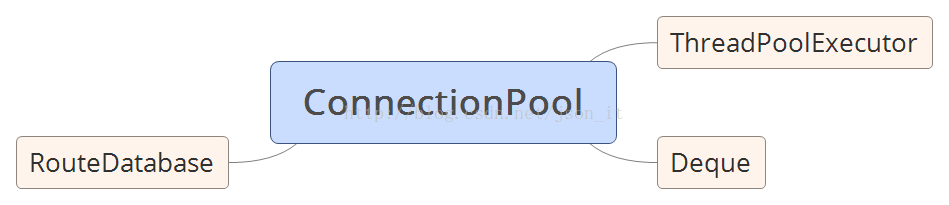
在Connectinterceptor中,起到关键作用的就是ConnectionPool,既然这么关键我们就来看看这个连接池吧。
-------------------------------------------------------------------------------------------------------------------------------------------------------------
在目前的版本下,连接池默认是可以保持5个空闲的连接。这些空闲的连接如果超过5分钟不被使用,则将被连接池移除。
当然,这些默认的数值在未来的okhttp版本中,会被改变的。另外,这两个数值支持开发人员修改。
-------------------------------------------------------------------------------------------------------------------------------------------------------------
ConnectionPool中比较关键的几个点,线程池(ThreadPoolExecutor)、队列(Deque)、路由记录表;
线程池:用于支持连接池的cleanup任务,清除idle线程;
队列:存放待复用的连接;
路由记录表:前面已讲,不再叙述;
对于连接池,开发人员最感兴趣的肯定的:存、取、清除;
a)存
可以看到,在放入连接到connections(Deque)之前,可能是需要执行连接池的“清洁”任务的。连接存入连接池的操作很简单,主要看一下这个cleanUp到底做了些什么?
-
long cleanup(long now) {
-
int inUseConnectionCount = 0;
-
int idleConnectionCount = 0;
-
RealConnection longestIdleConnection = null;
-
long longestIdleDurationNs = Long.MIN_VALUE;
-
-
// Find either a connection to evict, or the time that the next eviction is due.
-
synchronized (this) {
-
for (Iterator
<RealConnection> i = connections.iterator(); i.hasNext(); ) {
-
RealConnection connection = i.next();
-
-
// If the connection is in use, keep searching.
-
if (pruneAndGetAllocationCount(connection, now) > 0) {
-
inUseConnectionCount++;//线程池中处于使用状态的连接数
-
continue;
-
}
-
-
idleConnectionCount++;//处于空闲状态的连接数
-
-
// If the connection is ready to be evicted, we're done.
-
long idleDurationNs = now - connection.idleAtNanos;
-
//寻找空闲最久的那个连接
-
if (idleDurationNs > longestIdleDurationNs) {
-
longestIdleDurationNs = idleDurationNs;
-
longestIdleConnection = connection;
-
}
-
}
-
//空闲最久的那个连接
-
//如果空闲时间大于keepAliveDurationNs(默认5分钟)
-
//或者空闲的连接总数大于maxIdleConnections(默认5个)
-
//--->执行移除操作
-
if (longestIdleDurationNs >= this.keepAliveDurationNs
-
|| idleConnectionCount > this.maxIdleConnections) {
-
// We've found a connection to evict. Remove it from the list, then close it below (outside
-
// of the synchronized block).
-
connections.remove(longestIdleConnection);
-
} else if (idleConnectionCount > 0) {
-
// A connection will be ready to evict soon.
-
return keepAliveDurationNs - longestIdleDurationNs;//空闲最久的那个连接的空闲时长与keepAliveDurationNs的差值
-
} else if (inUseConnectionCount > 0) {
-
// All connections are in use. It'll be at least the keep alive duration 'til we run again.
-
return keepAliveDurationNs;
-
} else {
-
// No connections, idle or in use.
-
cleanupRunning = false;
-
return -1;
-
}
-
}
-
-
closeQuietly(longestIdleConnection.socket());//关闭Socket
-
-
// Cleanup again immediately.
-
return 0;
-
}
b)取
首先,判断address对应的Connection是否还能承载一个新的StreamAllocation,如果可以得话,我们就将这个streamAllocation添加到connection.allocations中。最后返回这个Connection。
c)移除
-
public void evictAll() {
-
List
<RealConnection> evictedConnections = new ArrayList
<>();
-
synchronized (this) {
-
for (Iterator
<RealConnection> i = connections.iterator(); i.hasNext(); ) {
-
RealConnection connection = i.next();
-
if (connection.allocations.isEmpty()) {
-
connection.noNewStreams = true;
-
evictedConnections.add(connection);
-
i.remove();
-
}
-
}
-
}
-
-
for (RealConnection connection : evictedConnections) {
-
closeQuietly(connection.socket());
-
}
-
}
3.4.5、CallServerInterceptor
该拦截器就是利用HttpCodec完成最终请求的发送。
4、总结
okhttp是一个Http+Htttp2客户端,适用于Android + Java 应用。其整体的架构如下:
(此图来源于https://yq.aliyun.com/articles/78105?spm=5176.100239.blogcont78104.10.FlPFWr,感谢)
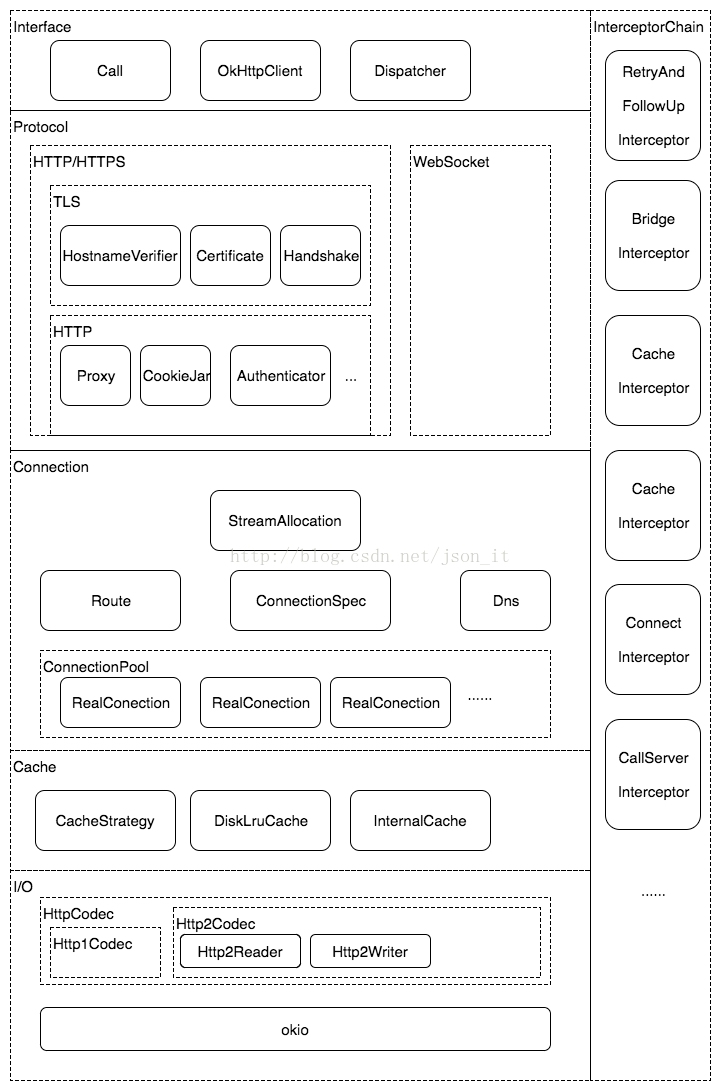
整体分析完之后,再看这个整体架构,感觉上图画的十分清晰。
云栖社区的这篇
《OkHtp 3.7源码分析》写的相当不错。有时间的可以阅读以下。
