title: Android OkHttp3源码分析
date: 2019-06-03 21:16:50
tags: Android第三方框架
category: Android
文章目录
Android OkHttp3源码分析
介绍
OKHttp优点
- 支持HTTP2/SPDY(SPDY是Google开发的基于TCP的传输层协议,用以最小化网络延迟,提升网络速度,优化用户的网络使用体验。)
- socket自动选择最好路线,并支持自动重连,拥有自动维护的socket连接池,减少握手次数,减少了请求延迟,共享Socket,减少对服务器的请求次数。
- 基于Headers的缓存策略减少重复的网络请求。
- 拥有Interceptors轻松处理请求与响应(自动处理GZip压缩)。
OKHttp的功能
- PUT,DELETE,POST,GET等请求
- 文件的上传下载
- 加载图片(内部会图片大小自动压缩)
- 支持请求回调,直接返回对象、对象集合
- 支持session的保持
一些类介绍:
-
OkHttpClient:
OkHttp框架的客户端,是一个用户面板;通过它对OkHttp进行各种设置,网络请求都是通过OkHttpClient完成的,每个OkHttpClient内部都维护了自己的任务队列、连接池、Cache、拦截器等
-
Call:
描述一个实际的访问请求,用户的每一个网络请求都是一个Call实例;实际实现是RealCall和AsyncCall
-
Dispatcher:
任务调度器,维护了一个线程池,维护了三个双端队列,一个用于同步请求,两个用于异步请求
-
ExchangeCodec:
协议层,分别支持HTTP1.1和HTTP2.0,对HTTP请求编码和响应解码
-
Exchange:
传输单个HTTP请求和响应对,处理ExchangeCodec这个实际I/O
-
ExchangeFinder:
Exchange辅助查找类
-
RealConnection:
描述一个物理socket连接,连接池中维护多个RealConnection实例
-
RealConnectionPool:
连接池,存储RealConnection连接
-
ConnectionPool:
连接池,内部持有RealConnectionPool,通过它来及进行连接池的复用
-
StreamAllocation:
由于Http/2支持多路复用,一个RealConnection可以支持多个网络访问请求,所以OkHttp又引入了StreamAllocation来描述一个实际的网络请求开销(从逻辑上一个Stream对应一个Call,但在实际网络请求过程中一个Call常常涉及到多次请求。如重定向,Authenticate等场景。所以准确地说,一个Stream对应一次请求,而一个Call对应一组有逻辑关联的Stream),一个RealConnection对应一个或多个StreamAllocation,所以StreamAllocation可以看做是RealConenction的计数器,当RealConnection的引用计数变为0,且长时间没有被其他请求重新占用就将被释放。
-
Request:
请求对象,构造网络请求,包含头部这些
-
Response:
响应对象,构造网络响应,包含头部这些
-
Transmitter:
发射器,更准确的说是用来通知和调度网络请求的,作用在整个网络请求生命周期;OkHttp的应用程序和网络层之间的桥梁。此类公开高级应用程序层:连接,请求,响应和流;也是用来计算RealConnection的连接引用,判定是否为空闲连接
-
RealCall:
默认实现的Call对象,同步也是通过它来进行
-
AsyncCall:
异步请求对象,执行异步请求
-
RealInterceptorChain:
拦截器链对象,操作整个链式,每一次调用一个拦截器
源码分析
简单使用
		OkHttpClient okHttpClient = new OkHttpClient.Builder()
                .addInterceptor(new Interceptor() {})
                .addNetworkInterceptor(new Interceptor() {})
                .build();

        Request request = new Request.Builder()
                .url("http://")
                .build();
        okHttpClient.newCall(request).enqueue(new Callback() {
            @Override
            public void onFailure(Call call, IOException e) {

            }

            @Override
            public void onResponse(Call call, Response response) throws IOException {

            }
        });
一次简单的网络请求大致就这样了,接下来看看具体怎么来进行请求的吧
OkHttpClient的创建
首先我们通过Builder模式创建了OkHttpClient,最后发起网络请求的也是它
public static final class Builder {
    //任务调度器,主要用于控制并发的请求,异步的时候就需要通过它来调度所有的网络请求
    Dispatcher dispatcher;
    //代理类,用于一些代理设置,如Http、socks等
    @Nullable Proxy proxy;
    //协议集合
    List<Protocol> protocols;
    //连接的配置 如指定Http通过socket连接
    List<ConnectionSpec> connectionSpecs;
    //拦截器集合,拦截器链
    final List<Interceptor> interceptors = new ArrayList<>();
    //网络拦截器,针对网络请求的拦截器,比如经常用到了日志拦截器
    final List<Interceptor> networkInterceptors = new ArrayList<>();
    //事件监听器
    EventListener.Factory eventListenerFactory;
    //代理选择器
    ProxySelector proxySelector;
    //http cookis 持久化策略
    CookieJar cookieJar;
    //缓存cache
    @Nullable Cache cache;
    //OkHttp内部缓存
    @Nullable InternalCache internalCache;
    //socket工厂
    SocketFactory socketFactory;
    //SSL socket工厂
    @Nullable SSLSocketFactory sslSocketFactory;
    //证书链的清理类 CA证书
    @Nullable CertificateChainCleaner certificateChainCleaner;
    //对host基本接口的验证
    HostnameVerifier hostnameVerifier;
    //约束的信任证书
    CertificatePinner certificatePinner;
    //代理认证
    Authenticator proxyAuthenticator;
    Authenticator authenticator;
    //连接池 复用连接
    ConnectionPool connectionPool;
    //DNS解析
    Dns dns;
    //SSL重定向
    boolean followSslRedirects;
    //重定向
    boolean followRedirects;
    //是否失败自动重连
    boolean retryOnConnectionFailure;
    //完整调用请求超时时间
    int callTimeout;
    //连接超时时间
    int connectTimeout;
    //读取数据超时时间
    int readTimeout;
    //发送数据超时时间
    int writeTimeout;
    //时间间隔
    int pingInterval;

    public Builder() {
      	dispatcher = new Dispatcher();
      	protocols = DEFAULT_PROTOCOLS;
      	connectionSpecs = DEFAULT_CONNECTION_SPECS;
      	eventListenerFactory = EventListener.factory(EventListener.NONE);
      	proxySelector = ProxySelector.getDefault();
      	if (proxySelector == null) {
        	proxySelector = new NullProxySelector();
      	}
      	cookieJar = CookieJar.NO_COOKIES;
      	socketFactory = SocketFactory.getDefault();
      	hostnameVerifier = OkHostnameVerifier.INSTANCE;
      	certificatePinner = CertificatePinner.DEFAULT;
      	proxyAuthenticator = Authenticator.NONE;
      	authenticator = Authenticator.NONE;
      	connectionPool = new ConnectionPool();
      	dns = Dns.SYSTEM;
      	followSslRedirects = true;
      	followRedirects = true;
      	retryOnConnectionFailure = true;
      	callTimeout = 0;
      	connectTimeout = 10_000;
      	readTimeout = 10_000;
      	writeTimeout = 10_000;
      	pingInterval = 0;
    }

    Builder(OkHttpClient okHttpClient) {
      	this.dispatcher = okHttpClient.dispatcher;
        ...
    }
    ...
}
Builder的成员属性注释在代码中了,OkHttpClient基本上跟Builder是对应的;接着在Builder创建的时候,会将这些参数设置一个默认值;还可以通过OkHttpClient来再创建一个
- dispatcher:创建一个Dispatcher,后面看同步、异步的时候会看到
- protocols:默认使用HTTP_1_1(http/1.1)和HTTP_2(http/2)两种HTTP协议
- connectionSpecs:默认连接规格——MODERN_TLS(现代TLS)和CLEARTEXT(明文)
- eventListenerFactory :默认是一个空实现
- proxySelector:默认是系统代理,如果是null则设置为没有代理(NullProxySelector)
- cookieJar:默认没有cookis(空实现)
- socketFactory:DCL返回的默认socketFactory(DefaultSocketFactory),原始的Java Socket
- hostnameVerifier:默认OkHostnameVerifier
- certificatePinner:默认CertificatePinner
- proxyAuthenticator:默认没有代理认证
- authenticator:默认没有
- connectionPool:创建连接复用池
- dns:默认使用系统的DNS
- followSslRedirects:true表示遵循SSL重定向
- followRedirects:true表示开启普通重定向
- retryOnConnectionFailure:true表示默认开启连接失败后自动重连
- callTimeout :默认请求超时0
- connectTimeout:默认连接超时时间10_000
- readTimeout:默认读取超时时间10_000
- writeTimeout:默认发送超时时间10_000
- pingInterval:默认时间间隔0
然后就是通过Builder模式的API我们可以自定义这些设置,下面我们随便看几个
public Builder callTimeout(long timeout, TimeUnit unit) {
	callTimeout = checkDuration("timeout", timeout, unit);
	return this;
}
...
public Builder addInterceptor(Interceptor interceptor) {
    if (interceptor == null) throw new IllegalArgumentException("interceptor == null");
      	interceptors.add(interceptor);
    return this;
}
...
public Builder addNetworkInterceptor(Interceptor interceptor) {
    if (interceptor == null) throw new IllegalArgumentException("interceptor == null");
		networkInterceptors.add(interceptor);
	return this;
}
...
超时时间检验后就直接赋值,拦截器也是直接添加到对应的拦截器集合中,没啥特殊的
接着看Builder的build方法,创建OkHttpClient
public OkHttpClient build() {
    return new OkHttpClient(this);
}
直接就是new了OkHttpClient,将Builder作为参数
public OkHttpClient() {
    this(new Builder());
}

OkHttpClient(Builder builder) {
    this.dispatcher = builder.dispatcher;
    this.proxy = builder.proxy;
    this.protocols = builder.protocols;
    this.connectionSpecs = builder.connectionSpecs;
    this.interceptors = Util.immutableList(builder.interceptors);
    this.networkInterceptors = Util.immutableList(builder.networkInterceptors);
    this.eventListenerFactory = builder.eventListenerFactory;
    this.proxySelector = builder.proxySelector;
    this.cookieJar = builder.cookieJar;
    this.cache = builder.cache;
    this.internalCache = builder.internalCache;
    this.socketFactory = builder.socketFactory;

    boolean isTLS = false;
    for (ConnectionSpec spec : connectionSpecs) {
      	isTLS = isTLS || spec.isTls();
    }

    if (builder.sslSocketFactory != null || !isTLS) {
      	this.sslSocketFactory = builder.sslSocketFactory;
      	this.certificateChainCleaner = builder.certificateChainCleaner;
    } else {
      	X509TrustManager trustManager = Util.platformTrustManager();
      	this.sslSocketFactory = newSslSocketFactory(trustManager);
      	this.certificateChainCleaner = CertificateChainCleaner.get(trustManager);
    }

    if (sslSocketFactory != null) {
      	Platform.get().configureSslSocketFactory(sslSocketFactory);
    }

    this.hostnameVerifier = builder.hostnameVerifier;
    this.certificatePinner = builder.certificatePinner.withCertificateChainCleaner(
        certificateChainCleaner);
    this.proxyAuthenticator = builder.proxyAuthenticator;
    this.authenticator = builder.authenticator;
    this.connectionPool = builder.connectionPool;
    this.dns = builder.dns;
    this.followSslRedirects = builder.followSslRedirects;
    this.followRedirects = builder.followRedirects;
    this.retryOnConnectionFailure = builder.retryOnConnectionFailure;
    this.callTimeout = builder.callTimeout;
    this.connectTimeout = builder.connectTimeout;
    this.readTimeout = builder.readTimeout;
    this.writeTimeout = builder.writeTimeout;
    this.pingInterval = builder.pingInterval;

    if (interceptors.contains(null)) {
      	throw new IllegalStateException("Null interceptor: " + interceptors);
    }
    if (networkInterceptors.contains(null)) {
      	throw new IllegalStateException("Null network interceptor: " + networkInterceptors);
    }
}
在OkHttpClient的构造函数中,就是一个简单的赋值和检验
需要注意的是,如果在Builder中没有配置sslSocketFactory和certificateChainCleaner,那么它们就是null,在OkHttpClient的构造函数中,会进行null判断,为null的时候会通过X509TrustManager去创建对应的默认值
interceptors和networkInterceptors中是不能包含null的,否则会抛出异常
至此,配置好各种参数,一个OkHttpClient就创建完成了
Request的创建
接着网络请求第二步,创建我们的请求Request,同样是通过Builder模式来创建的
public static class Builder {
    //请求地址
    @Nullable HttpUrl url;
    //请求方法
    String method;
    //请求头 Builder
    Headers.Builder headers;
    //请求body
    @Nullable RequestBody body;

    Map<Class<?>, Object> tags = Collections.emptyMap();

    public Builder() {
      	this.method = "GET";
      	this.headers = new Headers.Builder();
    }

    Builder(Request request) {
      	this.url = request.url;
      	this.method = request.method;
      	this.body = request.body;
      	this.tags = request.tags.isEmpty()
          	? Collections.emptyMap()
          	: new LinkedHashMap<>(request.tags);
      	this.headers = request.headers.newBuilder();
    }
}
Request的Builder就很简单,不像OkHttpClient那么多参数了;默认请求方法method是GEt方法,请求头headers也是直接new的;接着看一下Builder中的API吧
public Builder url(HttpUrl url) {
    if (url == null) throw new NullPointerException("url == null");
    this.url = url;
    return this;
}

public Builder url(String url) {
    if (url == null) throw new NullPointerException("url == null");
    // Silently replace web socket URLs with HTTP URLs.
    if (url.regionMatches(true, 0, "ws:", 0, 3)) {
        url = "http:" + url.substring(3);
    } else if (url.regionMatches(true, 0, "wss:", 0, 4)) {
        url = "https:" + url.substring(4);
    }
    return url(HttpUrl.get(url));
}
...
public Builder addHeader(String name, String value) {
    headers.add(name, value);
    return this;
}
...
先看一下请求头的设置吧,其实很简单,就是通过Headers的Builder去设置
重点看一下URL的设置吧,通常我们的URL是一个String,那么在Request中确实HttpUrl,那就说明需要进行转换
首先针对web socket的URL和HTTP的URL做了一个替换,接着通过HttpUrl.get()方法转为HttpUrl
public static HttpUrl get(String url) {
    return new Builder().parse(null, url).build();
}
通过HttpUrl的Builder进行构造HttpUrl
Builder parse(@Nullable HttpUrl base, String input) {
	int pos = skipLeadingAsciiWhitespace(input, 0, input.length());
    int limit = skipTrailingAsciiWhitespace(input, pos, input.length());
    // Scheme.
    int schemeDelimiterOffset = schemeDelimiterOffset(input, pos, limit);
    if (schemeDelimiterOffset != -1) {
        if (input.regionMatches(true, pos, "https:", 0, 6)) {
          	this.scheme = "https";
          	pos += "https:".length();
    	} else if (input.regionMatches(true, pos, "http:", 0, 5)) {
          	this.scheme = "http";
          	pos += "http:".length();
        } else {
          	throw new IllegalArgumentException("Expected URL scheme 'http' or 'https' but was '"
              + input.substring(0, schemeDelimiterOffset) + "'");
        }
    } else if (base != null) {
        this.scheme = base.scheme;
    } else {
        throw new IllegalArgumentException(
            "Expected URL scheme 'http' or 'https' but no colon was found");
    }
	// Authority.
    boolean hasUsername = false;
    boolean hasPassword = false;
    int slashCount = slashCount(input, pos, limit);
    if (slashCount >= 2 || base == null || !base.scheme.equals(this.scheme)) {
        pos += slashCount;
        authority:
        while (true) {
            int componentDelimiterOffset = delimiterOffset(input, pos, limit, "@/\\?#");
          	int c = componentDelimiterOffset != limit
              ? input.charAt(componentDelimiterOffset)
              : -1;
          	switch (c) {
            	case '@':
              		// User info precedes.
              		if (!hasPassword) {
                		int passwordColonOffset = delimiterOffset(
                    		input, pos, componentDelimiterOffset, ':');
                		String canonicalUsername = canonicalize(input, pos, passwordColonOffset, USERNAME_ENCODE_SET, true, false, false, true, null);
                		this.encodedUsername = hasUsername
                    		? this.encodedUsername + "%40" + canonicalUsername : canonicalUsername;
                		if (passwordColonOffset != componentDelimiterOffset) {
                  			hasPassword = true;
                  			this.encodedPassword = canonicalize(input, passwordColonOffset + 1, componentDelimiterOffset, PASSWORD_ENCODE_SET, true, false, false, true, null);
                		}
                		hasUsername = true;
              		} else {
                		this.encodedPassword = this.encodedPassword + "%40" + canonicalize(input, pos,
                    	componentDelimiterOffset, PASSWORD_ENCODE_SET, true, false, false, true, null);
              		}
                    pos = componentDelimiterOffset + 1;
                    break;
            	case -1:
            	case '/':
                case '\\':
                case '?':
                case '#':
              		// Host info precedes.
              		int portColonOffset = portColonOffset(input, pos, componentDelimiterOffset);
              		if (portColonOffset + 1 < componentDelimiterOffset) {
                        host = canonicalizeHost(input, pos, portColonOffset);
                        port = parsePort(input, portColonOffset + 1, componentDelimiterOffset);
                        if (port == -1) {
                          	throw new IllegalArgumentException("Invalid URL port: \""
                              + input.substring(portColonOffset + 1, componentDelimiterOffset) + '"');
                        }
                  	} else {
                        host = canonicalizeHost(input, pos, portColonOffset);
                        port = defaultPort(scheme);
                  	}
              		if (host == null) {
                        throw new IllegalArgumentException(
                            INVALID_HOST + ": \"" + input.substring(pos, portColonOffset) + '"');
              		}
                  	pos = componentDelimiterOffset;
                  	break authority;
          	}
		}
    } else {
        // This is a relative link. Copy over all authority components. Also maybe the path & query.
        this.encodedUsername = base.encodedUsername();
        this.encodedPassword = base.encodedPassword();
        this.host = base.host;
        this.port = base.port;
        this.encodedPathSegments.clear();
        this.encodedPathSegments.addAll(base.encodedPathSegments());
        if (pos == limit || input.charAt(pos) == '#') {
          	encodedQuery(base.encodedQuery());
        }
    }
    // Resolve the relative path.
    int pathDelimiterOffset = delimiterOffset(input, pos, limit, "?#");
    resolvePath(input, pos, pathDelimiterOffset);
    pos = pathDelimiterOffset;
    // Query.
    if (pos < limit && input.charAt(pos) == '?') {
        int queryDelimiterOffset = delimiterOffset(input, pos, limit, '#');
        this.encodedQueryNamesAndValues = queryStringToNamesAndValues(canonicalize(
            input, pos + 1, queryDelimiterOffset, QUERY_ENCODE_SET, true, false, true, true, null));
        pos = queryDelimiterOffset;
    }
    // Fragment.
    if (pos < limit && input.charAt(pos) == '#') {
        this.encodedFragment = canonicalize(
            input, pos + 1, limit, FRAGMENT_ENCODE_SET, true, false, false, false, null);
    }
    return this;
}
这个就是对String进行解析了,通过字符匹配,最后得到对应的HttpUrl需要的参数,最后通过HttpUrl的Builder的build方法,创建了HttpUrl
这样,Request中的url就得到了
先看一下HTTP请求报文结构
再看一下网上找的HTTP请求报文图吧
得到Call对象newCall
接着第三步,通过OkHttpClient的newCall方法得到一个Call对象,然后通过enqueue方法进行网络请求
@Override public Call newCall(Request request) {
    return RealCall.newRealCall(this, request, false /* for web socket */);
}
调用newCall方法,默认返回了RealCall对象,进行网络请求
static RealCall newRealCall(OkHttpClient client, Request originalRequest, boolean forWebSocket) {
    // Safely publish the Call instance to the EventListener.
    RealCall call = new RealCall(client, originalRequest, forWebSocket);
    call.transmitter = new Transmitter(client, call);
    return call;
}
在创建RealCall的时候,需要有OkHttpClient、Request,还有一个布尔值forWebSocket,标识是否为Web Sokcet,从前面知道,默认是false
然后直接创建了RealCall对象,同时也创建了Transmitter(发射机,OkHttp的应用程序和网络层之间的桥梁)
在后面的分析前先看看这个Transmitter,这个贯穿了整个网络请求,每一个RealCall都对应着一个Transmitter
public final class Transmitter {
    //OkHttpClient
  	private final OkHttpClient client;
    //连接池 RealConnectionPool
  	private final RealConnectionPool connectionPool;
  	//Call对象
    private final Call call;
  	//事件监听
    private final EventListener eventListener;
  	//异步超时计时器
    private final AsyncTimeout timeout = new AsyncTimeout() {
    	@Override protected void timedOut() {
      		cancel();
    	}
  	};
	//call的堆栈
  	private @Nullable Object callStackTrace;
	//请求Request
  	private Request request;
  	//Exchange的辅助查找类
    private ExchangeFinder exchangeFinder;
  	//连接
  	public RealConnection connection;
    //Exchange,传输单个HTTP请求和响应对。在处理实际的I/O的 ExchangeCodec上的这层连接管理和事件
  	private @Nullable Exchange exchange;
    //请求结束
  	private boolean exchangeRequestDone;
  	//响应结束
    private boolean exchangeResponseDone;
    //是否取消
  	private boolean canceled;
  	//超时退出
    private boolean timeoutEarlyExit;
  	//没有更多的Exchange
    private boolean noMoreExchanges;

  	public Transmitter(OkHttpClient client, Call call) {
    	this.client = client;
    	this.connectionPool = Internal.instance.realConnectionPool(client.connectionPool());
    	this.call = call;
    	this.eventListener = client.eventListenerFactory().create(call);
    	this.timeout.timeout(client.callTimeoutMillis(), MILLISECONDS);
  	}
    ...
}
在Transmitter的构造方法中,得到了OkHttpClient、ConnectionPool、Call等参数,从后面网络请求可以知道,Transmitter维持着整个网络请求的进行和消息通知
同步请求execute
如果是同步请求,就是调用execute方法
@Override public Response execute() throws IOException {
    synchronized (this) {
      	if (executed) throw new IllegalStateException("Already Executed");
      		executed = true;
    }
    transmitter.timeoutEnter();
    transmitter.callStart();
    try {
        //添加到同步队列
      	client.dispatcher().executed(this);
        //返回结果
      	return getResponseWithInterceptorChain();
    } finally {
        client.dispatcher().finished(this);
    }
}
executed表示对应的call是否已经执行, 这里同步锁可以避免了竞态条件的出现, 可以看出一个call实例只能被执行一次, 是一个"消耗品";通过Transmitter来通知和通信,然后这个方法主要做了两件事:一是通过OkHttpClient的dispatcher来进行分发(其实是添加到同步队列,交由Dispatcher分发),二是通过拦截器链进行请求并得到结果
-
添加到Dispatcher的同步队列
synchronized void executed(RealCall call) {
    runningSyncCalls.add(call);
}
在Dispatcher中的executed方法,直接调用runningSyncCalls,将RealCall添加进去,runningSyncCalls是一个双端队列,里面保存了每一个同步请求的RealCall对象
也就是说,RealCall默认的是一个同步请求的Call
execute就是将RealCall添加到Dispatcher的双端队列中,等待执行(其实Dispatcher维护了一个线程池,会在这里调度所有的网络请求,后面讲咯)
-
在看通过拦截器链之前,先看看请求结束后做了什么,不然后面篇幅过长容易忘
调用dispatcher的finished方法
void finished(RealCall call) {
    finished(runningSyncCalls, call);
}
Dispatcher中有重载的finished方法,不过我们这里自然就是RealCall这个了
private <T> void finished(Deque<T> calls, T call) {
    Runnable idleCallback;
    synchronized (this) {
      	if (!calls.remove(call)) throw new AssertionError("Call wasn't in-flight!");
      	idleCallback = this.idleCallback;
    }

    boolean isRunning = promoteAndExecute();

    if (!isRunning && idleCallback != null) {
      	idleCallback.run();
    }
}
上锁的形式,从runningSyncCalls中移除了RealCall
至于后面的isRunning是对异步的一些操作和一些准备工作,后面异步请求再说
-
通过拦截器链:
getResponseWithInterceptorChain()Response getResponseWithInterceptorChain() throws IOException { // Build a full stack of interceptors. List<Interceptor> interceptors = new ArrayList<>(); //自定义拦截器 interceptors.addAll(client.interceptors()); //失败重连或重定向拦截器 interceptors.add(new RetryAndFollowUpInterceptor(client)); //请求和响应的转换拦截器 interceptors.add(new BridgeInterceptor(client.cookieJar())); //缓存拦截器 从缓存中请求并将响应写入缓存 interceptors.add(new CacheInterceptor(client.internalCache())); //建立连接拦截器 interceptors.add(new ConnectInterceptor(client)); if (!forWebSocket) { //自定义的network拦截器 interceptors.addAll(client.networkInterceptors()); } //最后一个拦截器,处理网络调用服务器 interceptors.add(new CallServerInterceptor(forWebSocket)); //责任链的包装,去调用拦截器 Interceptor.Chain chain = new RealInterceptorChain(interceptors, transmitter, null, 0, originalRequest, this, client.connectTimeoutMillis(), client.readTimeoutMillis(), client.writeTimeoutMillis()); boolean calledNoMoreExchanges = false; try { Response response = chain.proceed(originalRequest); if (transmitter.isCanceled()) { closeQuietly(response); throw new IOException("Canceled"); } return response; } catch (IOException e) { calledNoMoreExchanges = true; throw transmitter.noMoreExchanges(e); } finally { if (!calledNoMoreExchanges) { transmitter.noMoreExchanges(null); } } }首先就是添加拦截器,把所有的拦截器都添加到一个集合,自定义的拦截器在前,再加上RetryAndFollowUpInterceptor、BridgeInterceptor、CacheInterceptor、ConnectInterceptor、CallServerInterceptor等几个,然后通过RealInterceptorChain开始第一个拦截器的调用
response是通过
chain.proceed(originalRequest)得到,chain就是RealInterceptorChain,跟进去看一下@Override public Response proceed(Request request) throws IOException { return proceed(request, transmitter, exchange); } public Response proceed(Request request, Transmitter transmitter, @Nullable Exchange exchange) throws IOException { //是否越界 if (index >= interceptors.size()) throw new AssertionError(); //一些检查 ... //请求下一个责任链 RealInterceptorChain next = new RealInterceptorChain(interceptors, transmitter, exchange, index + 1, request, call, connectTimeout, readTimeout, writeTimeout); //获取当前的拦截器 Interceptor interceptor = interceptors.get(index); //执行, 返回响应 Response response = interceptor.intercept(next); //后面是一些检查 ... return response; }首先就是重载了一次proceed方法,然后还是通过包装RealInterceptorChain,来尽心下一个拦截器的使用,可以注意到这里的index+1,也就是说最后是遍历完整个interceptors集合的,然后就是取出拦截器,通过intercept方法对response进行拦截过滤(这里就留着后面看拦截器的时候再看)
整个拦截器链的调用大致如下

异步请求enqueue
后面就是执行Call的enqueue方法,那么默认就是RealCall的enqueue方法
@Override public void enqueue(Callback responseCallback) {
    synchronized (this) {
      if (executed) throw new IllegalStateException("Already Executed");
      executed = true;
    }
    transmitter.callStart();
    client.dispatcher().enqueue(new AsyncCall(responseCallback));
}
同样交给Dispatcher一个Call,异步就是AsyncCall
void enqueue(AsyncCall call) {
    synchronized (this) {
        readyAsyncCalls.add(call);

        // Mutate the AsyncCall so that it shares the AtomicInteger of an existing running call to
        // the same host.
        if (!call.get().forWebSocket) {
        	AsyncCall existingCall = findExistingCallWithHost(call.host());
        	if (existingCall != null) call.reuseCallsPerHostFrom(existingCall);
        }
    }
    promoteAndExecute();
}
将AsyncCall添加到readyAsyncCalls中,readyAsyncCalls也是一个双端队列,这是一个准备执行状态的请求队列,同时还有一个runningAsyncCalls,就是正在执行状态的请求队列
然后调用promoteAndExecute()进行调度,将符合条件的从准备状态队列添加到正在执行队列
private boolean promoteAndExecute() {
    assert (!Thread.holdsLock(this));

    List<AsyncCall> executableCalls = new ArrayList<>();
    boolean isRunning;
    synchronized (this) {
      	for (Iterator<AsyncCall> i = readyAsyncCalls.iterator(); i.hasNext(); ) {
        	AsyncCall asyncCall = i.next();
			//判断当前异步请求数是否小于最大请求数 以及 同主机的请求数是否小于每个主机的最大请求数
        	if (runningAsyncCalls.size() >= maxRequests) break; // Max capacity.
        	if (asyncCall.callsPerHost().get() >= maxRequestsPerHost) continue; // Host max capacity.

        	i.remove();
            asyncCall.callsPerHost().incrementAndGet();
            executableCalls.add(asyncCall);
            runningAsyncCalls.add(asyncCall);
      	}
      	isRunning = runningCallsCount() > 0;
    }

    for (int i = 0, size = executableCalls.size(); i < size; i++) {
      	AsyncCall asyncCall = executableCalls.get(i);
      	asyncCall.executeOn(executorService());
    }

    return isRunning;
}
遍历readyAsyncCalls,如果runningAsyncCalls到达最大连接数(maxRequests默认最大64)跳出循环,如果请求主机数达到最大(maxRequestsPerHost默认为5),则将readyAsyncCalls中的请求取出添加到runningAsyncCalls和executableCalls中
然后遍历executableCalls可执行的Call,调用asyncCall.executeOn(executorService()),其中executorService()方法就是准备线程池
public synchronized ExecutorService executorService() {
    if (executorService == null) {
      	executorService = new ThreadPoolExecutor(0, Integer.MAX_VALUE, 60, TimeUnit.SECONDS,
          	new SynchronousQueue<>(), Util.threadFactory("OkHttp Dispatcher", false));
    }
    return executorService;
}
executorService就是一个线程池,保活是60s,采用SynchronousQueue
接着回到之前看看AsyncCall的executeOn方法
void executeOn(ExecutorService executorService) {
    assert (!Thread.holdsLock(client.dispatcher()));
    boolean success = false;
    try {
        executorService.execute(this);
        success = true;
    } catch (RejectedExecutionException e) {
        InterruptedIOException ioException = new InterruptedIOException("executor rejected");
        ioException.initCause(e);
        transmitter.noMoreExchanges(ioException);
        responseCallback.onFailure(RealCall.this, ioException);
    } finally {
        if (!success) {
          client.dispatcher().finished(this); // This call is no longer running!
        }
    }
}
这个方法里主要就是通过executorService线程池来执行当前的AsyncCall请求
AsyncCall继承自NamedRunnable
public abstract class NamedRunnable implements Runnable {
    protected final String name;

  	public NamedRunnable(String format, Object... args) {
    	this.name = Util.format(format, args);
  	}

  	@Override public final void run() {
        String oldName = Thread.currentThread().getName();
        Thread.currentThread().setName(name);
        try {
          	execute();
        } finally {
          	Thread.currentThread().setName(oldName);
        }
  	}

  	protected abstract void execute();
}
NamedRunnable实现了Runnable,重写了run方法,在run方法中,调用了抽象方法execute(),具体实现就是我们的AsyncCall,所以线程池执行的代码就是AsyncCall的execute方法
@Override protected void execute() {
    boolean signalledCallback = false;
    transmitter.timeoutEnter();
    try {
        Response response = getResponseWithInterceptorChain();
        signalledCallback = true;
        responseCallback.onResponse(RealCall.this, response);
    } catch (IOException e) {
        if (signalledCallback) {
          	// Do not signal the callback twice!
          	Platform.get().log(INFO, "Callback failure for " + toLoggableString(), e);
        } else {
          	responseCallback.onFailure(RealCall.this, e);
        }
    } finally {
        client.dispatcher().finished(this);
    }
}
这里主要的就是通过getResponseWithInterceptorChain()获取Response,这个就跟前面同步请求一样了,通过责任链的方式去调用所有的拦截器,得到response,然后回调
结束后,调用dispatcher的finished方法
void finished(AsyncCall call) {
    call.callsPerHost().decrementAndGet();
    finished(runningAsyncCalls, call);
}

private <T> void finished(Deque<T> calls, T call) {
    Runnable idleCallback;
    synchronized (this) {
      	if (!calls.remove(call)) throw new AssertionError("Call wasn't in-flight!");
      	idleCallback = this.idleCallback;
    }

    boolean isRunning = promoteAndExecute();

    if (!isRunning && idleCallback != null) {
      	idleCallback.run();
    }
}
从runningAsyncCalls移除这个AsyncCall,再次通过promoteAndExecute()来判断调度当前异步请求数是否超过最大请求, 如果没有, 则会从异步请求等待队列中获取出来再进行请求执行
拦截器链
整个拦截器调用大致如下,下面我就只分析默认的情况下的拦截器链
RetryAndFollowUpInterceptor
通过死循环实现重连,在连接失败后进行重新连接,必要时进行重定向,如果调用被取消,可能会抛出IOException
@Override public Response intercept(Chain chain) throws IOException {
    //获取Request
    Request request = chain.request();
    //拦截器链
    RealInterceptorChain realChain = (RealInterceptorChain) chain;
    //发射器 用于通信
    Transmitter transmitter = realChain.transmitter();

    int followUpCount = 0;
    Response priorResponse = null;
    while (true) {
        //通知准备连接 初始化ExchangeFinder等
      	transmitter.prepareToConnect(request);
		//是否取消 因为transmitter的存在,是可以随时取消,中断网络请求的
      	if (transmitter.isCanceled()) {
        	throw new IOException("Canceled");
      	}

      	Response response;
      	boolean success = false;
      	try {
            //通过拦截器链,调用下一个拦截器
        	response = realChain.proceed(request, transmitter, null);
        	success = true;
      	} catch (RouteException e) {
        	...
      	} catch (IOException e) {
        	...
      	} finally {
        	//异常情况,通知释放资源
        	if (!success) {
          		transmitter.exchangeDoneDueToException();
        	}
      	}

      	// 如果前一个有Response,检测前一个Response
      	if (priorResponse != null) {
            response = response.newBuilder()
                .priorResponse(priorResponse.newBuilder()
                        .body(null)
                        .build())
                .build();
      	}
		//创建Exchange,传输单个HTTP请求和响应对。这层连接管理和事件
      	Exchange exchange = Internal.instance.exchange(response);
        //连接用于到达抽象源服务器的具体路由。创建连接时,客户端有很多选项
      	Route route = exchange != null ? exchange.connection().route() : null;
      	Request followUp = followUpRequest(response, route);
		//followUp为null,表示不要重定向,释放资源并且返回response
      	if (followUp == null) {
        	if (exchange != null && exchange.isDuplex()) {
          		transmitter.timeoutEarlyExit();
        	}
        	return response;
      	}
		//如果是不可重复的请求体,抛出异常
      	RequestBody followUpBody = followUp.body();
      	if (followUpBody != null && followUpBody.isOneShot()) {
        	return response;
      	}

      	closeQuietly(response.body());
      	if (transmitter.hasExchange()) {
        	exchange.detachWithViolence();
      	}
		//最大重定向次数20
      	if (++followUpCount > MAX_FOLLOW_UPS) {
        	throw new ProtocolException("Too many follow-up requests: " + followUpCount);
      	}
		//赋值
      	request = followUp;
      	priorResponse = response;
    }
}
首先获取到Request、RealInterceptorChain和Transmitter,都是从拦截器链中获取的
通过死循环
- 针对请求Request,通过拦截器链RealInterceptorChain,调用下一个拦截器,出现异常,则通过Transmitter通知并停止该次请求,释放资源
- 针对响应Response,检查上次的Response,创建Exchange来传输单个HTTP请求和响应对,结合Route路由;接着就是检查是否需要重定向,是否达到最大重定向次数
BridgeInterceptor
构建访问网络的桥梁,首先,将用户请求转换成网络请求,然后访问网络,最后将网络响应转换成用户响应。
@Override public Response intercept(Chain chain) throws IOException {
    Request userRequest = chain.request();
    //通过Builder复制一个Request
    Request.Builder requestBuilder = userRequest.newBuilder();
	//将用户的Request构造成服务器的Request
    RequestBody body = userRequest.body();
    //请求体存在,进行转换
    if (body != null) {
      	MediaType contentType = body.contentType();
        //类型这些都很简单明了了
      	if (contentType != null) {
        	requestBuilder.header("Content-Type", contentType.toString());
      	}
      	long contentLength = body.contentLength();
      	if (contentLength != -1) {
        	requestBuilder.header("Content-Length", Long.toString(contentLength));
        	requestBuilder.removeHeader("Transfer-Encoding");
      	} else {
        	requestBuilder.header("Transfer-Encoding", "chunked");
        	requestBuilder.removeHeader("Content-Length");
      	}
    }
	//Host主机
    if (userRequest.header("Host") == null) {
      	requestBuilder.header("Host", hostHeader(userRequest.url(), false));
    }
	//保持连接
    if (userRequest.header("Connection") == null) {
      	requestBuilder.header("Connection", "Keep-Alive");
    }
    //Gzip压缩
    boolean transparentGzip = false;
    if (userRequest.header("Accept-Encoding") == null && userRequest.header("Range") == null) {
      	transparentGzip = true;
      	requestBuilder.header("Accept-Encoding", "gzip");
    }
	//设置Cookies
    List<Cookie> cookies = cookieJar.loadForRequest(userRequest.url());
    if (!cookies.isEmpty()) {
      	requestBuilder.header("Cookie", cookieHeader(cookies));
    }

    if (userRequest.header("User-Agent") == null) {
      	requestBuilder.header("User-Agent", Version.userAgent());
    }
	//传入已构造好的服务器Request,调用下一个拦截器,获取服务器的networkResponse
    Response networkResponse = chain.proceed(requestBuilder.build());
	//后面是对Response的处理
    HttpHeaders.receiveHeaders(cookieJar, userRequest.url(), networkResponse.headers());
    Response.Builder responseBuilder = networkResponse.newBuilder()
        .request(userRequest);

    if (transparentGzip
        && "gzip".equalsIgnoreCase(networkResponse.header("Content-Encoding"))
        && HttpHeaders.hasBody(networkResponse)) {
      	GzipSource responseBody = new GzipSource(networkResponse.body().source());
        //移除一些信息
      	Headers strippedHeaders = networkResponse.headers().newBuilder()
              .removeAll("Content-Encoding")
              .removeAll("Content-Length")
              .build();
      	responseBuilder.headers(strippedHeaders);
      	String contentType = networkResponse.header("Content-Type");
        //响应体构造为RealResponseBody
      	responseBuilder.body(new RealResponseBody(contentType, -1L, Okio.buffer(responseBody)));
    }
	//返回
    return responseBuilder.build();
}
- 首先将用户的Request(也就是我们自己构造的Request)复制一份,然后转换请求体,变成服务器需要的请求——主要是请求头的处理;然后通过拦截器链调用下一个拦截器
- 针对服务器返回的Response,进行处理和转换,转为用户Response
CacheInterceptor
缓存拦截器,从缓存中获取服务器请求,或者把服务器响应写入缓存中
@Override public Response intercept(Chain chain) throws IOException {
    Response cacheCandidate = cache != null
        ? cache.get(chain.request())
        : null;
    long now = System.currentTimeMillis();
	//获取缓存策略
    CacheStrategy strategy = new CacheStrategy.Factory(now, chain.request(), cacheCandidate).get();
    Request networkRequest = strategy.networkRequest;
    Response cacheResponse = strategy.cacheResponse;
	//从缓存中追踪Response
    if (cache != null) {
      	cache.trackResponse(strategy);
    }
	//如果缓存不适用,则关闭
    if (cacheCandidate != null && cacheResponse == null) {
      	closeQuietly(cacheCandidate.body()); // The cache candidate wasn't applicable. Close it.
    }
    //如果网络被禁止,且缓存为空,则返回失败
    if (networkRequest == null && cacheResponse == null) {
      	return new Response.Builder()
              .request(chain.request())
              .protocol(Protocol.HTTP_1_1)
              .code(504)
              .message("Unsatisfiable Request (only-if-cached)")
              .body(Util.EMPTY_RESPONSE)
              .sentRequestAtMillis(-1L)
              .receivedResponseAtMillis(System.currentTimeMillis())
              .build();
    }
    //不需要网络时,从缓存中获取
    if (networkRequest == null) {
      	return cacheResponse.newBuilder()
              .cacheResponse(stripBody(cacheResponse))
              .build();
    }

    Response networkResponse = null;
    try {
        //调用下一个拦截者,从网络获取Response
      	networkResponse = chain.proceed(networkRequest);
    } finally {
      	// 关闭body,防止内存泄露
      	if (networkResponse == null && cacheCandidate != null) {
        	closeQuietly(cacheCandidate.body());
      	}
    }

    //如果缓存中存在Response,同时检测networkResponse是否被修改
    if (cacheResponse != null) {
      	if (networkResponse.code() == HTTP_NOT_MODIFIED) {
            Response response = cacheResponse.newBuilder()
                .headers(combine(cacheResponse.headers(), networkResponse.headers()))
                .sentRequestAtMillis(networkResponse.sentRequestAtMillis())
                .receivedResponseAtMillis(networkResponse.receivedResponseAtMillis())
                .cacheResponse(stripBody(cacheResponse))
                .networkResponse(stripBody(networkResponse))
                .build();
            networkResponse.body().close();
            //更新缓存中的数据至最新
            cache.trackConditionalCacheHit();
            cache.update(cacheResponse, response);
            return response;
      	} else {
        	closeQuietly(cacheResponse.body());
      	}
    }
	//构建response
    Response response = networkResponse.newBuilder()
        .cacheResponse(stripBody(cacheResponse))
        .networkResponse(stripBody(networkResponse))
        .build();
	//把之前未缓存的添加至缓存中
    if (cache != null) {
      	if (HttpHeaders.hasBody(response) && CacheStrategy.isCacheable(response, networkRequest)) {
            // Offer this request to the cache.
            CacheRequest cacheRequest = cache.put(response);
            return cacheWritingResponse(cacheRequest, response);
      	}
      	if (HttpMethod.invalidatesCache(networkRequest.method())) {
            try {
              	cache.remove(networkRequest);
            } catch (IOException ignored) {
              	// The cache cannot be written.
            }
      	}
    }
    return response;
}
ConnectInterceptor
打开一个连接,去连接目标服务器。
@Override public Response intercept(Chain chain) throws IOException {
    RealInterceptorChain realChain = (RealInterceptorChain) chain;
    Request request = realChain.request();
    Transmitter transmitter = realChain.transmitter();
    //默认GET请求
    boolean doExtensiveHealthChecks = !request.method().equals("GET");
    //如果不是,则需要做转换
    Exchange exchange = transmitter.newExchange(chain, doExtensiveHealthChecks);
	//调用下一个拦截器
    return realChain.proceed(request, transmitter, exchange);
}
通过Transmitter的newExchange去捕获新的Request和Response
Exchange newExchange(Interceptor.Chain chain, boolean doExtensiveHealthChecks) {
	//连接池
    synchronized (connectionPool) {
      if (noMoreExchanges) {
        throw new IllegalStateException("released");
      }
      if (exchange != null) {
        throw new IllegalStateException("cannot make a new request because the previous response "
            + "is still open: please call response.close()");
      }
    }
	//获取ExchangeCodec对象,对HTTP请求编码和响应解码
    ExchangeCodec codec = exchangeFinder.find(client, chain, doExtensiveHealthChecks);
    //构建转换后的结果,创建了Exchange对象
    Exchange result = new Exchange(this, call, eventListener, exchangeFinder, codec);

    synchronized (connectionPool) {
      this.exchange = result;
      this.exchangeRequestDone = false;
      this.exchangeResponseDone = false;
      return result;
    }
}
ExchangeFinder是一个辅助查找Exchange类,看看exchangeFinder.find(client, chain, doExtensiveHealthChecks)方法
public ExchangeCodec find(
      OkHttpClient client, Interceptor.Chain chain, boolean doExtensiveHealthChecks) {
    int connectTimeout = chain.connectTimeoutMillis();
    int readTimeout = chain.readTimeoutMillis();
    int writeTimeout = chain.writeTimeoutMillis();
    int pingIntervalMillis = client.pingIntervalMillis();
    boolean connectionRetryEnabled = client.retryOnConnectionFailure();

    try {
        //找到一个可用的健康的连接,如果没有健康安全的连接,则会一直查找直到有为止
      	RealConnection resultConnection = findHealthyConnection(connectTimeout, readTimeout,
          writeTimeout, pingIntervalMillis, connectionRetryEnabled, doExtensiveHealthChecks);
        //根据具体的resultConnection 创建ExchangeCodec
      	return resultConnection.newCodec(client, chain);
    } catch (RouteException e) {
      	trackFailure();
      	throw e;
    } catch (IOException e) {
      	trackFailure();
      	throw new RouteException(e);
    }
}
找到Connection,RealConnection是整个协议部分,socket、握手等动作;
先看看如何通过findHealthyConnection()找到连接的
private RealConnection findHealthyConnection(int connectTimeout, int readTimeout,
      int writeTimeout, int pingIntervalMillis, boolean connectionRetryEnabled,
      boolean doExtensiveHealthChecks) throws IOException {
    while (true) {
      	RealConnection candidate = findConnection(connectTimeout, readTimeout, writeTimeout,
          pingIntervalMillis, connectionRetryEnabled);

      	//如果是一个新连接,也需要检查
      	synchronized (connectionPool) {
        	if (candidate.successCount == 0) {
          		return candidate;
        	}
      	}

      	//检查,如果不是一个好连接,则从连接池中移除,继续查找
      	if (!candidate.isHealthy(doExtensiveHealthChecks)) {
        	candidate.noNewExchanges();
        	continue;
      	}

      	return candidate;
    }
}
通过死循环,通过findConnection()查找
private RealConnection findConnection(int connectTimeout, int readTimeout, int writeTimeout,
      int pingIntervalMillis, boolean connectionRetryEnabled) throws IOException {
    boolean foundPooledConnection = false;
    RealConnection result = null;
    Route selectedRoute = null;
    RealConnection releasedConnection;
    Socket toClose;
    synchronized (connectionPool) {
      	if (transmitter.isCanceled()) throw new IOException("Canceled");
      	hasStreamFailure = false; // This is a fresh attempt.

      	//尝试用已经有了的连接,直接从Transmitter的引用拿去
      	releasedConnection = transmitter.connection;
        //releaseConnectionNoEvents方法来判断这个连接是不是已经释放了
      	toClose = transmitter.connection != null && transmitter.connection.noNewExchanges
              ? transmitter.releaseConnectionNoEvents()
              : null;

      	if (transmitter.connection != null) {
            //如果不为null,赋给result
            result = transmitter.connection;
            releasedConnection = null;
      	}

      	if (result == null) {
            //为null,尝试从连接池中获取,并将RealConnection和Transmitter关联上,这个方法里如果找到了连接,会将该连接的transmitters(连接引用,Trnsmitter)进行+1
            if (connectionPool.transmitterAcquirePooledConnection(address, transmitter, null, false)) {
              	foundPooledConnection = true;
              	result = transmitter.connection;
            } else if (nextRouteToTry != null) {
                //路由
              	selectedRoute = nextRouteToTry;
             	nextRouteToTry = null;
            } else if (retryCurrentRoute()) {
              	selectedRoute = transmitter.connection.route();
            }
      	}
    }
    //关闭socket
    closeQuietly(toClose);

    if (releasedConnection != null) {
      	eventListener.connectionReleased(call, releasedConnection);
    }
    if (foundPooledConnection) {
      	eventListener.connectionAcquired(call, result);
    }
    if (result != null) {
      	//如果result不为null,说明直接从Transmitter中或者从连接池中找到了这个连接,返回
      	return result;
    }

    //是否需要一个新的路由
    boolean newRouteSelection = false;
    if (selectedRoute == null && (routeSelection == null || !routeSelection.hasNext())) {
      	newRouteSelection = true;
      	routeSelection = routeSelector.next();
    }

    List<Route> routes = null;
    synchronized (connectionPool) {
      	if (transmitter.isCanceled()) throw new IOException("Canceled");

      	if (newRouteSelection) {
            //重新设置路由后,再一次尝试从连接池获取这个连接
            routes = routeSelection.getAll();
            //具体分析请看后面的连接池部分
            if (connectionPool.transmitterAcquirePooledConnection(
                address, transmitter, routes, false)) {
              	foundPooledConnection = true;
              	result = transmitter.connection;
            }
      	}
		//如果还是没有找到连接
      	if (!foundPooledConnection) {
            if (selectedRoute == null) {
              	selectedRoute = routeSelection.next();
            }
            //创建一个新的连接
            result = new RealConnection(connectionPool, selectedRoute);
            connectingConnection = result;
      	}
    }

    //如果第二次从连接池中找到,就直接返回
    if (foundPooledConnection) {
      	eventListener.connectionAcquired(call, result);
      	return result;
    }

    //此时是一个新连接,需要进行connect,进行TCP和TLS握手
    result.connect(connectTimeout, readTimeout, writeTimeout, pingIntervalMillis,
        connectionRetryEnabled, call, eventListener);
    //更新连接池中的路由信息
    connectionPool.routeDatabase.connected(result.route());

    Socket socket = null;
    synchronized (connectionPool) {
      	connectingConnection = null;
      	//再次尝试从连接池中获取,避免多线程下重复添加
      	if (connectionPool.transmitterAcquirePooledConnection(address, transmitter, routes, true)) {
            // We lost the race! Close the connection we created and return the pooled connection.
            result.noNewExchanges = true;
            socket = result.socket();
            result = transmitter.connection;
     	} else {
            //新连接,存入连接池
            connectionPool.put(result);
            transmitter.acquireConnectionNoEvents(result);
      	}
    }
    closeQuietly(socket);
    eventListener.connectionAcquired(call, result);
    return result;
}
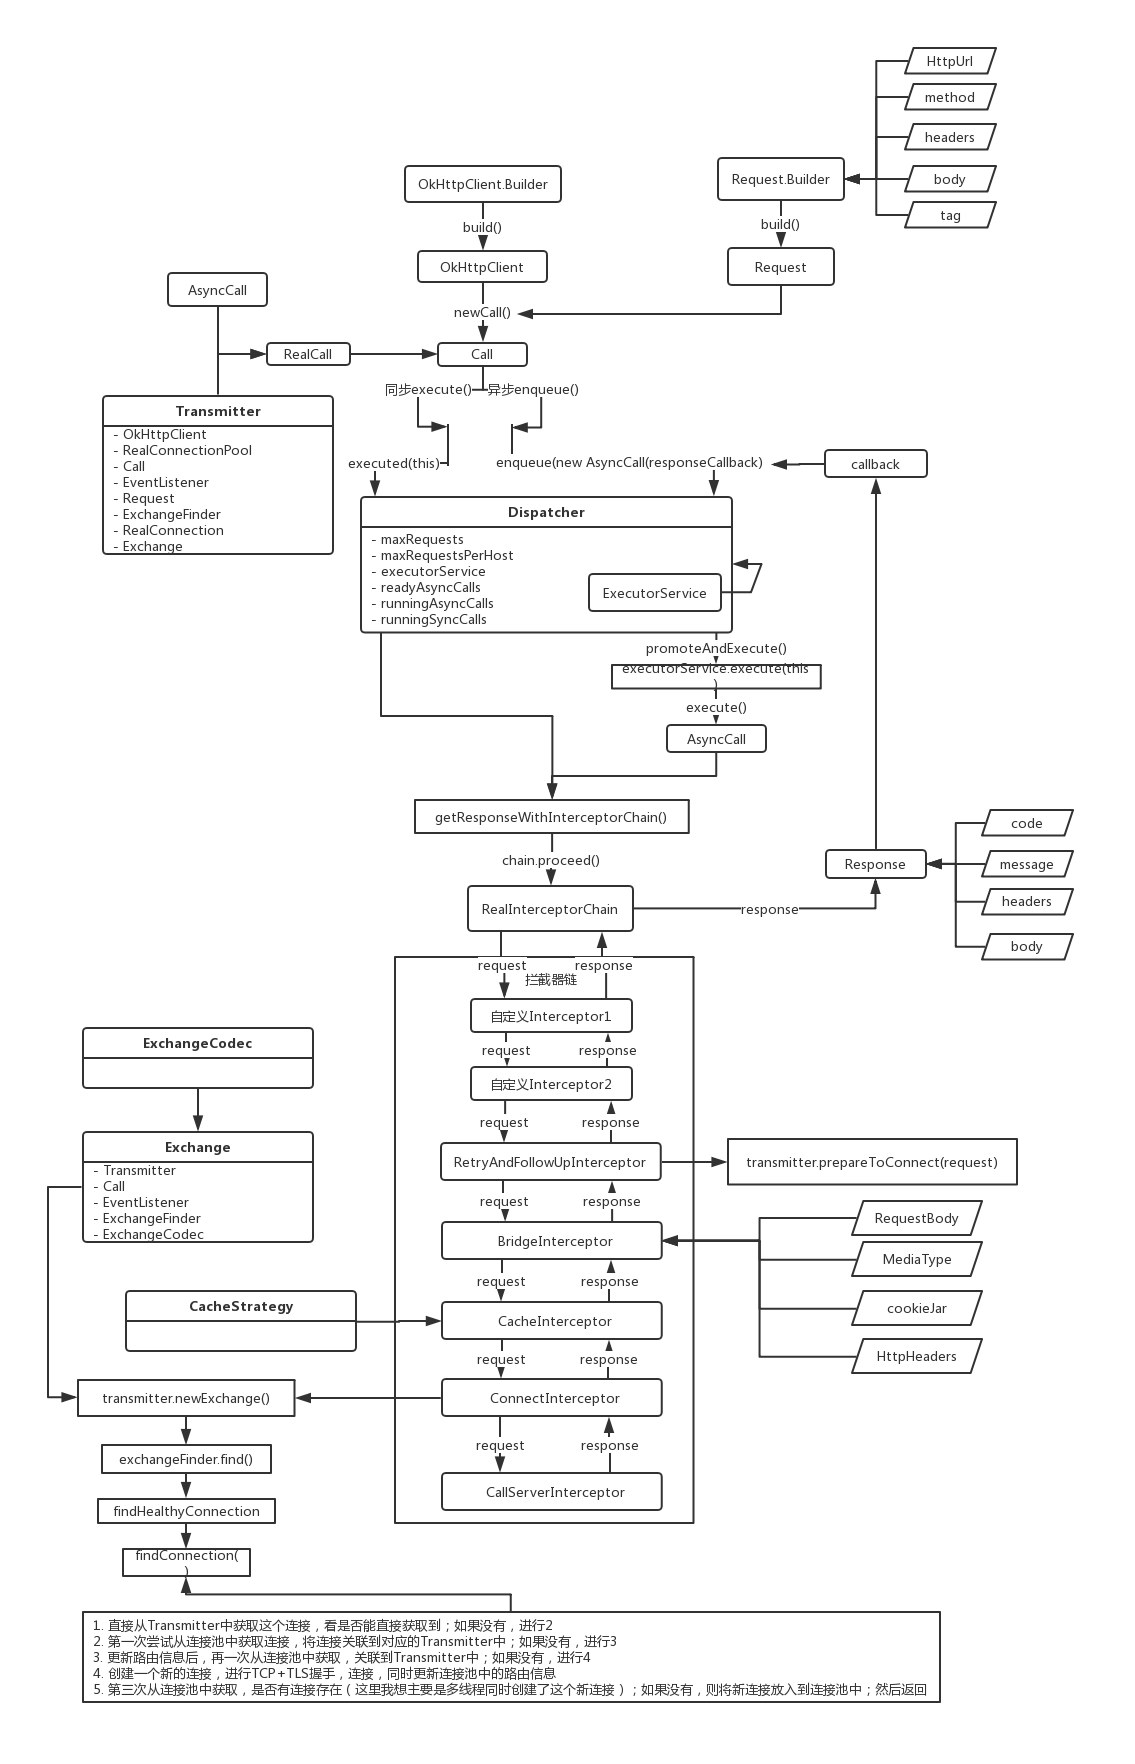
查找连接主要做了以下几件事:
- 直接从Transmitter中获取这个连接,看是否能直接获取到;如果没有,进行2
- 第一次尝试从连接池中获取连接,将连接关联到对应的Transmitter中;如果没有,进行3
- 更新路由信息后,再一次从连接池中获取,关联到Transmitter中;如果没有,进行4
- 创建一个新的连接,进行TCP+TLS握手,连接,同时更新连接池中的路由信息
- 第三次从连接池中获取,是否有连接存在(这里我想主要是多线程同时创建了这个新连接);如果没有,则将新连接放入到连接池中;然后返回
然后我们还需要注意到其中的一个调用,109行transmitter.acquireConnectionNoEvents(result);这是将该Transmitter设置到连接中去,因为每一个连接中有一个引用计数,记的就是Transmitter引用(因为每一个Call是一个Transmitter,就是一次请求,但是可以复用同一个RealConnection);这行代码主要是针对新连接的调用,那么针对从连接池或者直接从Transmitter获取的连接,也会调用transmitter.acquireConnectionNoEvents(result);这个方法,进行连接引用计数+1,只不过后面的两种是通过连接池去调用的这个方法,具体可以在连接池的connectionPool.transmitterAcquirePooledConnection(address, transmitter, routes, true)中看到,后面连接池有讲到
void acquireConnectionNoEvents(RealConnection connection) {
    assert (Thread.holdsLock(connectionPool));

    if (this.connection != null) throw new IllegalStateException();
    this.connection = connection;
    connection.transmitters.add(new TransmitterReference(this, callStackTrace));
}
这个方法主要就是将这个连接的引用计数里面再加一次(因为又连接了一次),主要就是通过TransmitterReference的List
接着resultConnection.newCodec(client, chain)
ExchangeCodec newCodec(OkHttpClient client, Interceptor.Chain chain) throws SocketException {
    if (http2Connection != null) {
      	return new Http2ExchangeCodec(client, this, chain, http2Connection);
    } else {
      	socket.setSoTimeout(chain.readTimeoutMillis());
      	source.timeout().timeout(chain.readTimeoutMillis(), MILLISECONDS);
      	sink.timeout().timeout(chain.writeTimeoutMillis(), MILLISECONDS);
      	return new Http1ExchangeCodec(client, this, source, sink);
    }
  }
根据connection,返回对应的ExchangeCodec(真正进行I/O流的地方),有HTTP2和HTTP1对应的两种
回到ConnectInterceptor的intercept方法,获取到新的Request和Response后,调用下一个拦截器
CallServerInterceptor
拦截器链中的最后一个链点,通过网络请求服务器
@Override public Response intercept(Chain chain) throws IOException {
    RealInterceptorChain realChain = (RealInterceptorChain) chain;
    Exchange exchange = realChain.exchange();
    Request request = realChain.request();

    long sentRequestMillis = System.currentTimeMillis();
	//写入请求头
    exchange.writeRequestHeaders(request);

    boolean responseHeadersStarted = false;
    Response.Builder responseBuilder = null;
    //检测是否有body的请求方法
    if (HttpMethod.permitsRequestBody(request.method()) && request.body() != null) {
        //如果请求头是"100-continue",等待服务器的响应
        if ("100-continue".equalsIgnoreCase(request.header("Expect"))) {
            exchange.flushRequest();
            responseHeadersStarted = true;
            exchange.responseHeadersStart();
            responseBuilder = exchange.readResponseHeaders(true);
        }

        if (responseBuilder == null) {
            //将请求体转换成sink,并封装在CountingSink 内部
            if (request.body().isDuplex()) {
                // Prepare a duplex body so that the application can send a request body later.
                exchange.flushRequest();
              	BufferedSink bufferedRequestBody = Okio.buffer(
                  	exchange.createRequestBody(request, true));
              	request.body().writeTo(bufferedRequestBody);
            } else {
              	// Write the request body if the "Expect: 100-continue" expectation was met.
              	BufferedSink bufferedRequestBody = Okio.buffer(
                  	exchange.createRequestBody(request, false));
              	request.body().writeTo(bufferedRequestBody);
              	bufferedRequestBody.close();
            }
        } else {
            exchange.noRequestBody();
            if (!exchange.connection().isMultiplexed()) {
              	exchange.noNewExchangesOnConnection();
            }
      	}
    } else {
      	exchange.noRequestBody();
    }

    if (request.body() == null || !request.body().isDuplex()) {
      	exchange.finishRequest();
    }

    if (!responseHeadersStarted) {
      	exchange.responseHeadersStart();
    }
	//从httpCodec中获取响应头
    if (responseBuilder == null) {
      	responseBuilder = exchange.readResponseHeaders(false);
    }
	//构建response
    Response response = responseBuilder
        .request(request)
        .handshake(exchange.connection().handshake())
        .sentRequestAtMillis(sentRequestMillis)
        .receivedResponseAtMillis(System.currentTimeMillis())
        .build();

    int code = response.code();
    //如果服务器返回的状态码是100,再次尝试读取具体的response
    if (code == 100) {
      	response = exchange.readResponseHeaders(false)
              .request(request)
              .handshake(exchange.connection().handshake())
              .sentRequestAtMillis(sentRequestMillis)
              .receivedResponseAtMillis(System.currentTimeMillis())
              .build();

      	code = response.code();
    }

    exchange.responseHeadersEnd(response);
	//如果是WebSocket,并且返回状态码为101,表示响应body为空
    if (forWebSocket && code == 101) {
      	response = response.newBuilder()
          	.body(Util.EMPTY_RESPONSE)
          	.build();
    } else {
        //读取body
      	response = response.newBuilder()
          	.body(exchange.openResponseBody(response))
          	.build();
    }
	//如果响应头部是"close",关闭流
    if ("close".equalsIgnoreCase(response.request().header("Connection"))
        || "close".equalsIgnoreCase(response.header("Connection"))) {
      	exchange.noNewExchangesOnConnection();
    }
	//协议异常
    if ((code == 204 || code == 205) && response.body().contentLength() > 0) {
      	throw new ProtocolException(
          "HTTP " + code + " had non-zero Content-Length: " + response.body().contentLength());
    }

    return response;
}
连接池复用
当然大量的连接每次连接关闭都要三次握手四次分手的很显然会造成性能低下,因此http有一种叫做keepalive connections的机制,它可以在传输数据后仍然保持连接,当客户端需要再次获取数据时,直接使用刚刚空闲下来的连接而不需要再次握手

Okhttp支持5个并发KeepAlive,默认链路生命为5分钟(链路空闲后,保持存活的时间)。
创建连接池实在OkHttpClient初始化的时候,ConnectinoPool通过直接new出的
public final class ConnectionPool {
	final RealConnectionPool delegate;

  	public ConnectionPool() {
    	this(5, 5, TimeUnit.MINUTES);
  	}

  	public ConnectionPool(int maxIdleConnections, long keepAliveDuration, TimeUnit timeUnit) {
    	this.delegate = new RealConnectionPool(maxIdleConnections, keepAliveDuration, timeUnit);
  	}

  	/** Returns the number of idle connections in the pool. */
  	public int idleConnectionCount() {
    	return delegate.idleConnectionCount();
  	}

  	/** Returns total number of connections in the pool. */
  	public int connectionCount() {
    	return delegate.connectionCount();
  	}

  	/** Close and remove all idle connections in the pool. */
  	public void evictAll() {
    	delegate.evictAll();
  	}
}
从这里就可以看到,默认的是5个并发KeepAlive,默认链路生命是5分钟,直接创建了RealConnectionPool对象
RealConnectionPool
public final class RealConnectionPool {
  	private static final Executor executor = new ThreadPoolExecutor(0 /* corePoolSize */,
      Integer.MAX_VALUE /* maximumPoolSize */, 60L /* keepAliveTime */, TimeUnit.SECONDS,
      new SynchronousQueue<>(), Util.threadFactory("OkHttp ConnectionPool", true));
  	//空闲的socket最大连接数
  	private final int maxIdleConnections;
    //socket的keepAlive时间
  	private final long keepAliveDurationNs;
    //用来进行自动清理无用的连接
  	private final Runnable cleanupRunnable = () -> {
    	while (true) {
          	long waitNanos = cleanup(System.nanoTime());
          	if (waitNanos == -1) return;
          	if (waitNanos > 0) {
                long waitMillis = waitNanos / 1000000L;
                waitNanos -= (waitMillis * 1000000L);
                synchronized (RealConnectionPool.this) {
                  	try {
                    	RealConnectionPool.this.wait(waitMillis, (int) waitNanos);
                  	} catch (InterruptedException ignored) {
                  	}
                }
          	}
    	}
  	};
	//双端队列维护RealConnection
  	private final Deque<RealConnection> connections = new ArrayDeque<>();
  	//路由数据库,它用来记录连接失败的Route的黑名单,当连接失败的时候就会把失败的线路加进去
    final RouteDatabase routeDatabase = new RouteDatabase();
  	//是否自动回收空闲连接
    boolean cleanupRunning;
  	...
}
在RealConnectionPool中维护了一个线程池,来进行回收和复用;connections是一个记录连接的双端队列;routeDatabase是记录路由失败的线路,cleanupRunnable是用来进行自动回收连接的。
然后我们重点看一下cleanupRunnable:首先是一个死循环,一直执行,通过cleanup方法进行回收连接,并返回了下次清理的间隔时间(以纳米为单位,下次调用这个方法的时间),-1表示不需要再进行回收,则跳出循环,否则一直进行回收,同时让连接池RealConnectionPool等待
long cleanup(long now) {
    int inUseConnectionCount = 0;
    int idleConnectionCount = 0;
    RealConnection longestIdleConnection = null;
    long longestIdleDurationNs = Long.MIN_VALUE;
	synchronized (this) {
      	//遍历所有的连接
        for (Iterator<RealConnection> i = connections.iterator(); i.hasNext(); ) {
            RealConnection connection = i.next();
            //判断是否正在使用
            //查询此连接的StreamAllocation的引用数量,如果大于0则inUseConnectionCount数量加1,否则idleConnectionCount加1
            if (pruneAndGetAllocationCount(connection, now) > 0) {
              	inUseConnectionCount++;
              	continue;
            }

            idleConnectionCount++;
            //确定这个连接需要进行回收 标记连接
            long idleDurationNs = now - connection.idleAtNanos;
            if (idleDurationNs > longestIdleDurationNs) {
              	longestIdleDurationNs = idleDurationNs;
              	longestIdleConnection = connection;
            }
      	}
		//如果空闲连接keepAlive时间超过5分钟,或者空闲连接数超过5个,则从Deque中移除此连接
      	if (longestIdleDurationNs >= this.keepAliveDurationNs
          || idleConnectionCount > this.maxIdleConnections) {
            //从connections中移除
            connections.remove(longestIdleConnection);
      	} else if (idleConnectionCount > 0) {
        	//如果空闲连接大于0,则返回此连接即将到期的时间
        	return keepAliveDurationNs - longestIdleDurationNs;
      	} else if (inUseConnectionCount > 0) {
        	//如果没有空闲连接,并且活跃连接大于0则返回5分钟
        	return keepAliveDurationNs;
      	} else {
        	//没有连接
        	cleanupRunning = false;
        	return -1;
      	}
    }
	//关闭连接
    closeQuietly(longestIdleConnection.socket());
    return 0;
}
根据连接中的引用计数来计算空闲连接数和活跃连接数,然后标记出空闲的连接,如果空闲连接keepAlive时间超过5分钟,或者空闲连接数超过5个,则从Deque中移除此连接。接下来根据空闲连接或者活跃连接来返回下次需要清理的时间数:如果空闲连接大于0则返回此连接即将到期的时间,如果都是活跃连接并且大于0则返回默认的keepAlive时间5分钟,如果没有任何连接则跳出循环并返回-1
看看怎么来判断活跃连接的1pruneAndGetAllocationCount()
private int pruneAndGetAllocationCount(RealConnection connection, long now) {
    List<Reference<Transmitter>> references = connection.transmitters;
    //遍历引用
    for (int i = 0; i < references.size(); ) {
      	Reference<Transmitter> reference = references.get(i);
		//如果还在使用
      	if (reference.get() != null) {
        	i++;
        	continue;
      	}
      	// We've discovered a leaked transmitter. This is an application bug.
      	TransmitterReference transmitterRef = (TransmitterReference) reference;
      	String message = "A connection to " + connection.route().address().url()
          + " was leaked. Did you forget to close a response body?";
      	Platform.get().logCloseableLeak(message, transmitterRef.callStackTrace);
		//如果没有使用,则移除
      	references.remove(i);
      	connection.noNewExchanges = true;

      	//如果列表为空则说明此连接没有被引用了,则返回0,表示此连接是空闲连接
      	if (references.isEmpty()) {
        	connection.idleAtNanos = now - keepAliveDurationNs;
        	return 0;
      	}
    }
    //否则还有引用
    return references.size();
}
遍历RealConnection的transmitters列表,通过前面,我们知道每一次Call都会有一个Transmitter,这就对应着这个连接是否是空闲的,Transmitter越多,代表Call越多,连接次数越多,transmitters不为空,就不是空闲连接是活跃连接
回到cleanup方法,我们看看最后的closeQuietly(longestIdleConnection.socket())关闭连接
在Utils中
public static void closeQuietly(Socket socket) {
    if (socket != null) {
      	try {
        	socket.close();
      	} catch (AssertionError e) {
        	if (!isAndroidGetsocknameError(e)) throw e;
      	} catch (RuntimeException rethrown) {
        	throw rethrown;
      	} catch (Exception ignored) {
      	}
    }
}
这个就很简单了,关闭套接字Socket就可以了
这样,一个空闲连接就被回收关闭了
缓存操作
-
put
void put(RealConnection connection) {
    assert (Thread.holdsLock(this));
    if (!cleanupRunning) {
      	cleanupRunning = true;
      	executor.execute(cleanupRunnable);
    }
    connections.add(connection);
}
put操作就很简单,根据cleanupRunning判断是否在进行自动回收,没有则先通过线程池执行cleanupRunnable进行回收,然后将连接connection添加到双端队列connections中
-
get
boolean transmitterAcquirePooledConnection(Address address, Transmitter transmitter,
      @Nullable List<Route> routes, boolean requireMultiplexed) {
    assert (Thread.holdsLock(this));
    for (RealConnection connection : connections) {
      	if (requireMultiplexed && !connection.isMultiplexed()) continue;
      	if (!connection.isEligible(address, routes)) continue;
      	transmitter.acquireConnectionNoEvents(connection);
      	return true;
    }
    return false;
}
这个方法就是尝试从连接池中获取连接;遍历connections,根据address和route来判断是不是所需要的连接,如果找到了对应的连接,就放到对应的Transmitter中,返回true,否则返回false
找到连接后,会调用
transmitter.acquireConnectionNoEvents(connection);将这个连接的引用次数+1void acquireConnectionNoEvents(RealConnection connection) { assert (Thread.holdsLock(connectionPool)); if (this.connection != null) throw new IllegalStateException(); this.connection = connection; connection.transmitters.add(new TransmitterReference(this, callStackTrace)); }创建了一个TransmitterReference引用,添加到连接的transmitters中
final List<Reference<Transmitter>> transmitters = new ArrayList<>();这个transmitters就是一个连接引用的list,记录所有引用这个连接的Transmitter
-
关闭所有空闲连接
public void evictAll() {
    List<RealConnection> evictedConnections = new ArrayList<>();
    synchronized (this) {
      	for (Iterator<RealConnection> i = connections.iterator(); i.hasNext(); ) {
        	RealConnection connection = i.next();
        	if (connection.transmitters.isEmpty()) {
              	connection.noNewExchanges = true;
              	evictedConnections.add(connection);
              	i.remove();
        	}
      	}
    }

    for (RealConnection connection : evictedConnections) {
      	closeQuietly(connection.socket());
    }
}
取出所有空闲连接,然后通过closeQuietly关闭
总结
这次不想写总结了,直接放图吧,太多了