原文地址:https://www.pyimagesearch.com/2018/06/25/raspberry-pi-face-recognition/
In last week’s blog post you learned how to perform Face recognition with Python, OpenCV, and deep learning.
But as I hinted at in the post, in order to perform face recognition on the Raspberry Pi you first need to consider a few optimizations — otherwise, the face recognition pipeline would fall flat on its face.
Namely, when performing face recognition on the Raspberry Pi you should consider:
- On which machine you are computing your face recognition embeddings for your training set (i.e., onboard the Raspberry Pi, on a laptop/desktop, on a machine with a GPU)
- The method you are using for face detection (Haar cascades, HOG + Linear SVM, or CNNs)
- How you are polling for frames from your camera sensor (threaded vs. non-threaded)
All of these considerations and associated assumptions are critical when performing accurate face recognition on the Raspberry Pi — and I’ll be right here to guide you through the trenches.
To learn more about using the Raspberry Pi for face recognition, just follow along.
Looking for the source code to this post?
Jump right to the downloads section.
Raspberry Pi Face Recognition
This post assumes you have read through last week’s post on face recognition with OpenCV — if you have not read it, go back to the post and read it before proceeding.
In the first part of today’s blog post, we are going to discuss considerations you should think through when computing facial embeddings on your training set of images.
From there we’ll review source code that can be used to perform face recognition on the Raspberry Pi, including a number of different optimizations.
Finally, I’ll provide a demo of using my Raspberry Pi to recognize faces (including my own) in a video stream.

Configuring your Raspberry Pi for face recognition
Let’s configure our Raspberry Pi for today’s blog post.
First, go ahead and install OpenCV if you haven’t done so already. You can follow my instructions linked on this OpenCV Install Tutorials page for the most up to date instructions.
Next, let’s install Davis King’s dlib toolkit software into the same Python virtual environment (provided you are using one) that you installed OpenCV into:
Raspberry Pi Face Recognition
Shell
| 1 2 |
$ workon <your env name> # optional $ pip install dlib |
If you’re wondering who Davis King is, check out my 2017 interview with Davis!
From there, simply use pip to install Adam Geitgey’s face_recognition module:
Raspberry Pi Face Recognition
Shell
| 1 2 |
$ workon <your env name> # optional $ pip install face_recognition |
And don’t forget to install my imutils package of convenience functions:
Raspberry Pi Face Recognition
Shell
| 1 2 |
$ workon <your env name> # optional $ pip install imutils |
PyImageConf 2018, a PyImageSearch conference

Would you like to receive live, in-person training from myself, Davis King, Adam Geitgey, and others at PyImageSearch’s very own conference in San Francisco, CA?
Both Davis King (creator of dlib) and Adam Geitgey (author of the Machine Learning is Fun! series) will be teaching at PyImageConf 2018 and you don’t want to miss it! You’ll also be able to learn from other prominent computer vision and deep learning industry speakers, including me!
You’ll meet others in the industry that you can learn from and collaborate with. You’ll even be able to socialize with attendees during evening events.
There are only a handful of tickets remaining, and once I’ve sold a total of 200 I won’t have space for you. Don’t delay!
I want to attend PyImageConf 2018!
Project structure
If you want to perform facial recognition on your Raspberry Pi today, head to the “Downloads” section of this blog post and grab the code. From there, copy the zip to your Raspberry Pi (I use SCP) and let’s begin.
On your Pi, you should unzip the archive, change working directory, and take a look at the project structure just as I have done below:
Raspberry Pi Face Recognition
Python
| 1 2 3 4 5 6 7 8 9 10 11 12 13 14 15 16 17 18 19 20 21 22 23 24 25 26 27 |
$ unzip pi-face-recognition.zip ... $ cd pi-face-recognition $ tree . ├── dataset │ ├── adrian │ │ ├── 00000.png │ │ ├── 00001.png │ │ ├── 00002.png │ │ ├── 00003.png │ │ ├── 00004.png │ │ └── 00005.png │ └── ian_malcolm │ ├── 00000000.jpg │ ├── 00000001.jpg │ ├── 00000003.jpg │ ├── 00000005.jpg │ ├── 00000007.jpg │ ├── 00000008.jpg │ └── 00000009.jpg ├── encode_faces.py ├── encodings.pickle ├── haarcascade_frontalface_default.xml └── pi_face_recognition.py 3 directories, 17 files |
Our project has one directory with two sub-directories:
- dataset/ : This directory should contain sub-directories for each person you would like your facial recognition system to recognize.
- adrian/ : This sub-directory contains pictures of me. You’ll want to replace it with pictures of yourself ?.
- ian_malcolm/ : Pictures of Jurassic Park’s character, Ian Malcolm, are in this folder, but again you’ll likely replace this directory with additional directories of people you’d like to recognize.
From there, we have four files inside of pi-face-recognition/ :
- encode_faces.py : This file will find faces in our dataset and encode them into 128-d vectors.
- encodings.pickle : Our face encodings (128-d vectors, one for each face) are stored in this pickle file.
- haarcascade_frontalface_default.xml : In order to detect and localize faces in frames we rely on OpenCV’s pre-trained Haar cascade file.
- pi_face_recognition.py : This is our main execution script. We’re going to review it later in this post so you understand the code and what’s going on under the hood. From there feel free to hack it up for your own project purposes.
Now that we’re familiar with the project files and directories, let’s discuss the first step to building a face recognition system for your Raspberry Pi.
Step #1: Gather your faces dataset
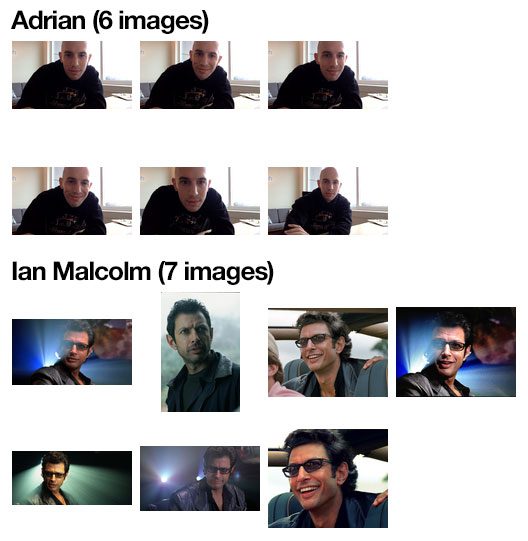
Figure 1: A face recognition dataset is necessary for building a face encodings file to use with our Python + OpenCV + Raspberry Pi face recognition method.
Before we can apply face recognition we first need to gather our dataset of example images we want to recognize.
There are a number of ways we can gather such images, including:
- Performing face enrollment by using a camera + face detection to gather example faces
- Using various APIs (ex., Google, Facebook, Twitter, etc.) to automatically download example faces
- Manually collecting the images
This post assumes you already have a dataset of faces gathered, but if you haven’t yet, or are in the process of gathering a faces dataset, make sure you read my blog post on How to create a custom face recognition dataset to help get you started.
For the sake of this blog post, I have gathered images of two people:
- Myself (5 total)
- Dr. Ian Malcolm from the movie Jurassic Park (6 total)
Using only this small number of images I’ll be demonstrating how to create an accurate face recognition application capable of being deployed to the Raspberry Pi.
Step #2: Compute your face recognition embeddings
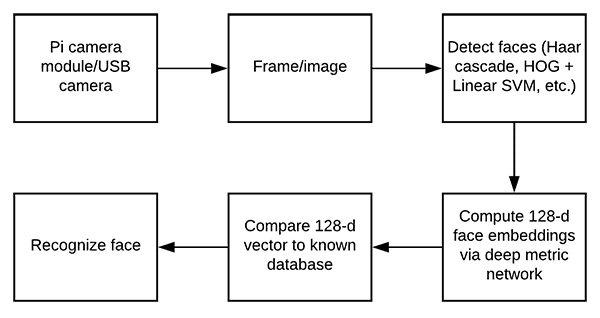
Figure 2: Beginning with capturing input frames from our Raspberry Pi, our workflow consists of detecting faces, computing embeddings, and comparing the vector to the database via a voting method. OpenCV, dlib, and face_recognition are required for this face recognition method.
We will be using a deep neural network to compute a 128-d vector (i.e., a list of 128 floating point values) that will quantify each face in the dataset. We’ve already reviewed both (1) how our deep neural network performs face recognition and (2) the associated source code in last week’s blog post, but as a matter of completeness, we’ll review the code here as well.
Let’s open up encode_faces.py from the “Downloads” associated with this blog post and review:
Face recognition with OpenCV, Python, and deep learning
Python
| 1 2 3 4 5 6 7 8 9 10 11 12 13 14 15 16 17 |
# import the necessary packages from imutils import paths import face_recognition import argparse import pickle import cv2 import os # construct the argument parser and parse the arguments ap = argparse.ArgumentParser() ap.add_argument("-i", "--dataset", required=True, help="path to input directory of faces + images") ap.add_argument("-e", "--encodings", required=True, help="path to serialized db of facial encodings") ap.add_argument("-d", "--detection-method", type=str, default="cnn", help="face detection model to use: either `hog` or `cnn`") args = vars(ap.parse_args()) |
First, we need to import required packages. Notably, this script requires imutils ,face_recognition , and OpenCV installed. Scroll up to the “Configuring your Raspberry Pi for face recognition” section to install the necessary software.
From there, we handle our command line arguments with argparse :
- --dataset : The path to our dataset (we created a dataset using method #2 of last week’s blog post).
- --encodings : Our face encodings are written to the file that this argument points to.
- --detection-method : Before we can encode faces in images we first need to detectthem. Our two face detection methods include either hog or cnn . Those two flags are the only ones that will work for --detection-method .
Note: The Raspberry Pi is not capable of running the CNN detection method. If you want to run the CNN detection method, you should use a capable compute, ideally one with a GPU if you’re working with a large dataset. Otherwise, use the hog face detection method.
Now that we’ve defined our arguments, let’s grab the paths to the images files in our dataset (as well as perform two initializations):
Face recognition with OpenCV, Python, and deep learning
Python
| 19 20 21 22 23 24 25 |
# grab the paths to the input images in our dataset print("[INFO] quantifying faces...") imagePaths = list(paths.list_images(args["dataset"])) # initialize the list of known encodings and known names knownEncodings = [] knownNames = [] |
From there we’ll proceed to loop over each face in the dataset:
Face recognition with OpenCV, Python, and deep learning
Python
| 27 28 29 30 31 32 33 34 35 36 37 38 39 40 41 42 43 44 45 46 47 48 49 50 51 52 |
# loop over the image paths for (i, imagePath) in enumerate(imagePaths): # extract the person name from the image path print("[INFO] processing image {}/{}".format(i + 1, len(imagePaths))) name = imagePath.split(os.path.sep)[-2] # load the input image and convert it from BGR (OpenCV ordering) # to dlib ordering (RGB) image = cv2.imread(imagePath) rgb = cv2.cvtColor(image, cv2.COLOR_BGR2RGB) # detect the (x, y)-coordinates of the bounding boxes # corresponding to each face in the input image boxes = face_recognition.face_locations(rgb, model=args["detection_method"]) # compute the facial embedding for the face encodings = face_recognition.face_encodings(rgb, boxes) # loop over the encodings for encoding in encodings: # add each encoding + name to our set of known names and # encodings knownEncodings.append(encoding) knownNames.append(name) |
Inside of the loop, we:
- Extract the person’s name from the path (Line 32).
- Load and convert the image to rgb (Lines 36 and 37).
- Localize faces in the image (Lines 41 and 42).
- Compute face embeddings and add them to knownEncodings along with their name added to a corresponding list element in knownNames (Lines 45-52).
Let’s export the facial encodings to disk so they can be used in our facial recognition script:
Face recognition with OpenCV, Python, and deep learning
Python
| 54 55 56 57 58 59 |
# dump the facial encodings + names to disk print("[INFO] serializing encodings...") data = {"encodings": knownEncodings, "names": knownNames} f = open(args["encodings"], "wb") f.write(pickle.dumps(data)) f.close() |
Line 56 constructs a dictionary with two keys — "encodings" and "names" . The values associated with the keys contain the encodings and names themselves.
The data dictionary is then written to disk on Lines 57-59.
To create our facial embeddings open up a terminal and execute the following command:
Face recognition with OpenCV, Python, and deep learning
Shell
| 1 2 3 4 5 6 7 8 9 10 11 |
$ python encode_faces.py --dataset dataset --encodings encodings.pickle \ --detection-method hog [INFO] quantifying faces... [INFO] processing image 1/11 [INFO] processing image 2/11 [INFO] processing image 3/11 ... [INFO] processing image 9/11 [INFO] processing image 10/11 [INFO] processing image 11/11 [INFO] serializing encodings... |
After running the script, you’ll have a pickle file at your disposal. Mine is named encodings.pickle — this file contains the 128-d face embeddings for each face in our dataset.
Wait! Are you running this script on a Raspberry Pi?
No problem, just use the --detection-method hog command line argument. The --detection-method cnn will not work on a Raspberry Pi, but certainly can be used if you’re encoding your faces with a capable machine. If you aren’t familiar with command line arguments, just be sure to give this post a quick read and you’ll be a pro in no time!
Step #3: Recognize faces in video streams on your Raspberry Pi
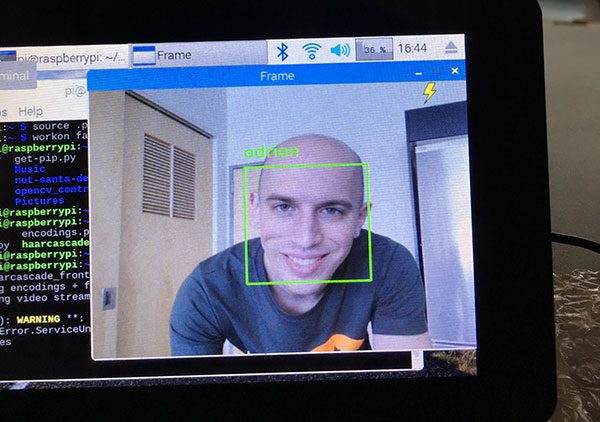
Figure 3: Face recognition on the Raspberry Pi using OpenCV and Python.
Our pi_face_recognition.py script is very similar to last week’s recognize_faces_video.py script with one notable change. In this script we will use OpenCV’s Haar cascade to detect and localize the face. From there, we’ll continue on with the same method to actually recognize the face.
Without further ado, let’s get to coding pi_face_recognition.py :
Raspberry Pi Face Recognition
Python
| 1 2 3 4 5 6 7 8 9 10 11 12 13 14 15 16 17 |
# import the necessary packages from imutils.video import VideoStream from imutils.video import FPS import face_recognition import argparse import imutils import pickle import time import cv2 # construct the argument parser and parse the arguments ap = argparse.ArgumentParser() ap.add_argument("-c", "--cascade", required=True, help = "path to where the face cascade resides") ap.add_argument("-e", "--encodings", required=True, help="path to serialized db of facial encodings") args = vars(ap.parse_args()) |
First, let’s import packages and parse command line arguments. We’re importing two modules ( VideoStream and FPS ) from imutils as well as imutils itself. We also import face_recognition and cv2 (OpenCV). The rest of the modules listed are part of your Python installation. Refer to “Configuring your Raspberry Pi for face recognition” to install the software.
We then parse two command line arguments:
- --cascade : The path to OpenCV’s Haar cascade (included in the source code download for this post).
- --encodings : The path to our serialized database of facial encodings. We just built encodings in the previous section.
From there, let’s instantiate several objects before we begin looping over frames from our camera:
Raspberry Pi Face Recognition
Python
| 19 20 21 22 23 24 25 26 27 28 29 30 31 32 |
# load the known faces and embeddings along with OpenCV's Haar # cascade for face detection print("[INFO] loading encodings + face detector...") data = pickle.loads(open(args["encodings"], "rb").read()) detector = cv2.CascadeClassifier(args["cascade"]) # initialize the video stream and allow the camera sensor to warm up print("[INFO] starting video stream...") vs = VideoStream(src=0).start() # vs = VideoStream(usePiCamera=True).start() time.sleep(2.0) # start the FPS counter fps = FPS().start() |
In this block we:
- Load the facial encodings data (Line 22).
- Instantiate our face detector using the Haar cascade method (Line 23).
- Initialize our VideoStream — we’re going to use a USB camera, but if you want to use a PiCamera with your Pi, just comment Line 27 and uncomment Line 28.
- Wait for the camera to warm up (Line 29).
- Start our frames per second, fps , counter (Line 32).
From there, let’s begin capturing frames from the camera and recognizing faces:
Raspberry Pi Face Recognition
Python
| 34 35 36 37 38 39 40 41 42 43 44 45 46 47 48 49 50 51 52 53 54 55 56 57 |
# loop over frames from the video file stream while True: # grab the frame from the threaded video stream and resize it # to 500px (to speedup processing) frame = vs.read() frame = imutils.resize(frame, width=500) # convert the input frame from (1) BGR to grayscale (for face # detection) and (2) from BGR to RGB (for face recognition) gray = cv2.cvtColor(frame, cv2.COLOR_BGR2GRAY) rgb = cv2.cvtColor(frame, cv2.COLOR_BGR2RGB) # detect faces in the grayscale frame rects = detector.detectMultiScale(gray, scaleFactor=1.1, minNeighbors=5, minSize=(30, 30)) # OpenCV returns bounding box coordinates in (x, y, w, h) order # but we need them in (top, right, bottom, left) order, so we # need to do a bit of reordering boxes = [(y, x + w, y + h, x) for (x, y, w, h) in rects] # compute the facial embeddings for each face bounding box encodings = face_recognition.face_encodings(rgb, boxes) names = [] |
We proceed to grab a frame and preprocess it. The preprocessing steps include resizing followed by converting to grayscale and rgb (Lines 38-44).
In the words of Ian Malcolm:
Your scientists were so preoccupied with whether they could, they didn’t stop to think if they should.
Well, he was referring to growing dinosaurs. As far as face recognition, we can and we should detect and recognize faces with our Raspberry Pi. We’ve just got to be careful not to overload the Pi’s limited memory with a complex deep learning method. Therefore, we’re going to use a slightly dated but very prominent approach to face detection — Haar cascades!
Haar cascades are also known as the Viola-Jones algorithm from their paper published in 2001.
The highly cited paper proposed their method to detect objects in images at multiple scales in realtime. For 2001 it was a huge discovery and share of knowledge — Haar cascades are still well known today.
We’re going to make use of OpenCV’s trained face Haar cascade which may require a little bit of parameter tuning (as compared to a deep learning method for face detection).
Parameters to the detectMultiScale method include:
- gray : A grayscale image.
- scaleFactor : Parameter specifying how much the image size is reduced at each image scale.
- minNeighbors : Parameter specifying how many neighbors each candidate rectangle should have to retain it.
- minSize : Minimum possible object (face) size. Objects smaller than that are ignored.
For more information on these parameters and how to tune them, be sure to refer to my book, Practical Python and OpenCV as well as the PyImageSearch Gurus course.
The result of our face detection is rects , a list of face bounding box rectangles which correspond to the face locations in the frame (Lines 47 and 48). We convert and reorder the coordinates of this list on Line 53.
We then compute the 128-d encodings for each face on Line 56, thus quantifying the face.
Now let’s loop over the face encodings and check for matches:
Raspberry Pi Face Recognition
Python
| 59 60 61 62 63 64 65 66 67 68 69 70 71 72 73 74 75 76 77 78 79 80 81 82 83 84 85 86 87 |
# loop over the facial embeddings for encoding in encodings: # attempt to match each face in the input image to our known # encodings matches = face_recognition.compare_faces(data["encodings"], encoding) name = "Unknown" # check to see if we have found a match if True in matches: # find the indexes of all matched faces then initialize a # dictionary to count the total number of times each face # was matched matchedIdxs = [i for (i, b) in enumerate(matches) if b] counts = {} # loop over the matched indexes and maintain a count for # each recognized face face for i in matchedIdxs: name = data["names"][i] counts[name] = counts.get(name, 0) + 1 # determine the recognized face with the largest number # of votes (note: in the event of an unlikely tie Python # will select first entry in the dictionary) name = max(counts, key=counts.get) # update the list of names names.append(name) |
The purpose of the code block above is to identify faces. Here we:
- Check for matches (Lines 63 and 64).
- If matches are found we’ll use a voting system to determine whose face it most likely is (Lines 68-87). This method works by checking which person in the dataset has the most matches (in the event of a tie, the first entry in the dictionary is selected).
From there, we simply draw rectangles surrounding each face along with the predicted name of the person:
Raspberry Pi Face Recognition
Python
| 89 90 91 92 93 94 95 96 97 98 99 100 101 102 103 104 105 106 107 |
# loop over the recognized faces for ((top, right, bottom, left), name) in zip(boxes, names): # draw the predicted face name on the image cv2.rectangle(frame, (left, top), (right, bottom), (0, 255, 0), 2) y = top - 15 if top - 15 > 15 else top + 15 cv2.putText(frame, name, (left, y), cv2.FONT_HERSHEY_SIMPLEX, 0.75, (0, 255, 0), 2) # display the image to our screen cv2.imshow("Frame", frame) key = cv2.waitKey(1) & 0xFF # if the `q` key was pressed, break from the loop if key == ord("q"): break # update the FPS counter fps.update() |
After drawing the boxes and text, we display the image and check if the quit (“q”) key is pressed. We also update our fps counter.
And lastly. let’s clean up and write performance diagnostics to the terminal:
Raspberry Pi Face Recognition
Python
| 110 111 112 113 114 115 116 117 |
# stop the timer and display FPS information fps.stop() print("[INFO] elasped time: {:.2f}".format(fps.elapsed())) print("[INFO] approx. FPS: {:.2f}".format(fps.fps())) # do a bit of cleanup cv2.destroyAllWindows() vs.stop() |
Face recognition results
Be sure to use the “Downloads” section to grab the source code and example dataset for this blog post.
From there, open up your Raspberry Pi terminal and execute the following command:
Raspberry Pi Face Recognition
Shell
| 1 2 3 4 5 6 |
$ python pi_face_recognition.py --cascade haarcascade_frontalface_default.xml \ --encodings encodings.pickle [INFO] loading encodings + face detector... [INFO] starting video stream... [INFO] elasped time: 20.78 [INFO] approx. FPS: 1.21 |

I’ve included a demo video, along with additional commentary below, so be sure to take look:
Our face recognition pipeline is running at approximately 1-2 FPS. The vast majority of the computation is happening when a face is being recognized, not when it is being detected. Furthermore, the more faces in the dataset, the more comparisons are made for the voting process, resulting in slower facial recognition.
Therefore, you should consider computing the full face recognition (i.e., extracting the 128-d facial embedding) once every N frames (where N is user-defined variable) and then apply simple tracking algorithms (such as centroid tracking) to track the detected faces. Such a process will enable you to reach 8-10 FPS on the Raspberry Pi for face recognition.
We will be covering object tracking algorithms, including centroid tracking, in a future blog post.
Summary
In today’s blog post we learned how to perform face recognition using the Raspberry Pi, OpenCV, and deep learning.
Using this method we can obtain highly accurate face recognition, but unfortunately could not obtain higher than 1-2 FPS.
Realistically, there isn’t a whole lot we can do about speeding up the algorithm — the Raspberry Pi, while powerful for such a small device, is naturally limited in terms of computation power and memory (especially without a GPU).
If you would like to speedup face recognition on the Raspberry Pi I would suggest to:
- Take a look at the PyImageSearch Gurus course where we use algorithms such as Eigenfaces and LBPs to obtain faster frame rates of ~13 FPS.
- Train your own, shallower deep learning network for facial embedding. The downside here is that training your own facial embedding network is more of an advanced deep learning technique, to say the least. If you’re interested in learning the fundamentals of deep learning applied to computer vision tasks, be sure to refer to my book, Deep Learning for Computer Vision with Python.
I hope you enjoyed today’s post on face recognition!
To be notified when future blog posts are published here on PyImageSearch, just enter your email address in the form below!
Downloads:
![]() If you would like to download the code and images used in this post, please enter your email address in the form below. Not only will you get a .zip of the code, I’ll also send you a FREE 17-page Resource Guide on Computer Vision, OpenCV, and Deep Learning. Inside you'll find my hand-picked tutorials, books, courses, and libraries to help you master CV and DL! Sound good? If so, enter your email address and I’ll send you the code immediately!
If you would like to download the code and images used in this post, please enter your email address in the form below. Not only will you get a .zip of the code, I’ll also send you a FREE 17-page Resource Guide on Computer Vision, OpenCV, and Deep Learning. Inside you'll find my hand-picked tutorials, books, courses, and libraries to help you master CV and DL! Sound good? If so, enter your email address and I’ll send you the code immediately!