Face Recognition人脸识别库
这是世界上最简单的人脸识别库了。你可以通过Python引用或者命令行的形式使用它,来管理和识别人脸。
该软件包使用dlib中最先进的人脸识别深度学习算法,使得识别准确率在《Labled Faces in the world》测试基准下达到了99.38%。
它同时提供了一个叫face_recognition的命令行工具,以便你可以用命令行对一个文件夹中的图片进行识别操作。
特征
在图片中识别人脸
查找出现在图片中的所有面孔:
代码:
# -*- coding: utf-8 -*-
#  识别图片中的所有人脸并显示出来

# 导入pil模块 ,可用命令安装 apt-get install python-Imaging
from PIL import Image
# 导入face_recogntion模块,可用命令安装 pip install face_recognition
import face_recognition

# 将jpg文件加载到numpy 数组中
image = face_recognition.load_image_file("your_file.jpg")

# 使用默认的给予HOG模型查找图像中所有人脸
# 这个方法已经相当准确了,但还是不如CNN模型那么准确,因为没有使用GPU加速
face_locations = face_recognition.face_locations(image)

# 使用CNN模型
# face_locations = face_recognition.face_locations(image, number_of_times_to_upsample=0, model="cnn")

# 打印:我从图片中找到了 多少 张人脸
print("I found {} face(s) in this photograph.".format(len(face_locations)))

# 循环找到的所有人脸
for face_location in face_locations:
    # 打印每张脸的位置信息
    top, right, bottom, left = face_location
    print("A face is located at pixel location Top: {}, Left: {}, Bottom: {}, Right: {}".format(top, left, bottom, right))
# 指定人脸的位置信息,然后显示人脸图片
    face_image = image[top:bottom, left:right]
    pil_image = Image.fromarray(face_image)
    pil_image.show()
output:
I found 2 face(s) in this photograph.
A face is located at pixel location Top: 92, Left: 103, Bottom: 199, Right: 211
A face is located at pixel location Top: 116, Left: 748, Bottom: 223, Right: 856
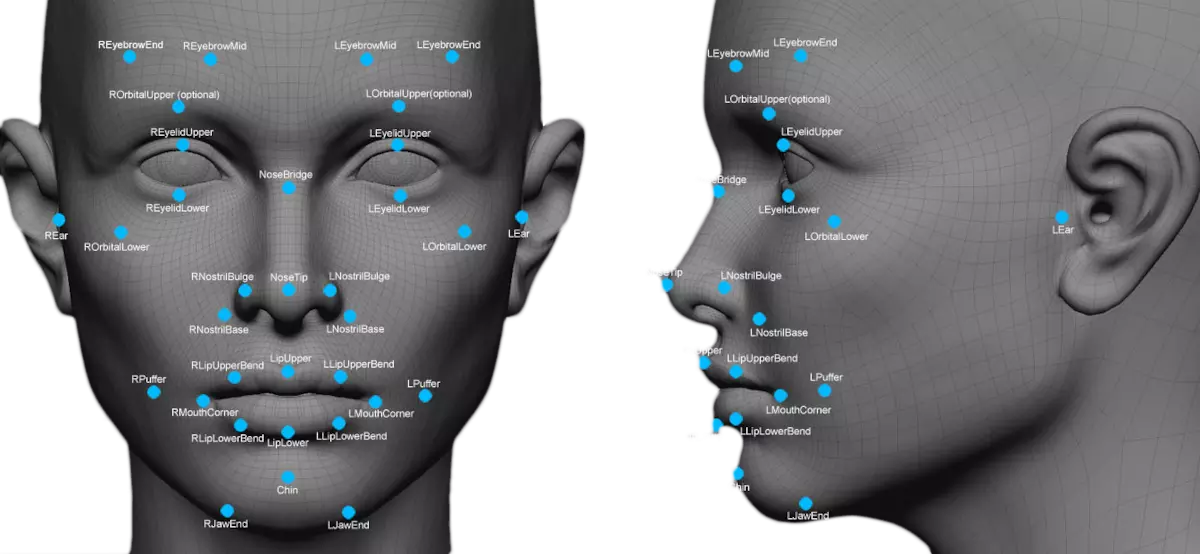
找到并操作图片中的脸部特征
获得图片中人类眼睛、鼻子、嘴、下巴的位置和轮廓:

代码:
# -*- coding: utf-8 -*-
# 自动识别人脸特征
from PIL import Image, ImageDraw
import face_recognition

# 将jpg文件加载到numpy 数组中
image = face_recognition.load_image_file("your_file.jpg")

#查找图像中所有面部的所有面部特征
face_landmarks_list = face_recognition.face_landmarks(image)

print("I found {} face(s) in this photograph.".format(len(face_landmarks_list)))

for face_landmarks in face_landmarks_list:

   #打印此图像中每个面部特征的位置
    facial_features = [
        'chin',
        'left_eyebrow',
        'right_eyebrow',
        'nose_bridge',
        'nose_tip',
        'left_eye',
        'right_eye',
        'top_lip',
        'bottom_lip'
    ]

    for facial_feature in facial_features:
        print("The {} in this face has the following points: {}".format(facial_feature, face_landmarks[facial_feature]))

   #让我们在图像中描绘出每个人脸特征!
    pil_image = Image.fromarray(image)
    d = ImageDraw.Draw(pil_image)

    for facial_feature in facial_features:
        d.line(face_landmarks[facial_feature], width=5)
    pil_image.show()
output:
I found 1 face(s) in this photograph.
The chin in this face has the following points: [(486, 235), (487, 259), (492, 285), (502, 310), (514, 334), (527, 358), (542, 382), (558, 404), (582, 410), (611, 406), (642, 391), (671, 371), (697, 346), (714, 314), (722, 279), (726, 242), (728, 204)]
The left_eyebrow in this face has the following points: [(479, 202), (487, 194), (500, 192), (515, 194), (529, 199)]
The right_eyebrow in this face has the following points: [(567, 194), (589, 184), (613, 179), (636, 180), (660, 185)]
The nose_bridge in this face has the following points: [(551, 222), (550, 242), (549, 264), (547, 285)]
The nose_tip in this face has the following points: [(541, 296), (548, 302), (557, 304), (567, 299), (577, 294)]
The left_eye in this face has the following points: [(499, 228), (507, 218), (521, 218), (535, 227), (521, 233), (507, 234)]
The right_eye in this face has the following points: [(591, 222), (601, 209), (617, 208), (633, 215), (620, 223), (604, 225)]
The top_lip in this face has the following points: [(542, 340), (543, 326), (552, 320), (561, 322), (572, 319), (592, 324), (613, 335), (604, 336), (574, 332), (563, 332), (554, 333), (548, 340)]
The bottom_lip in this face has the following points: [(613, 335), (597, 353), (579, 363), (567, 365), (556, 363), (547, 354), (542, 340), (548, 340), (555, 345), (564, 347), (575, 345), (604, 336)]
找到脸部特征有很多超级有用的应用场景,当然你也可以把它用在最显而易见的功能上:美颜功能 就像美图秀秀那样
识别未知图片
通过设定的人脸图片识别未知图片中的人脸

代码:
# -*- coding: utf-8 -*-
# 识别人脸鉴定是哪个人

import face_recognition

#将jpg文件加载到numpy数组中
chen_image = face_recognition.load_image_file("your_file.jpg")
#要识别的图片
unknown_image = face_recognition.load_image_file("Identifypicture.jpg")

#获取每个图像文件中每个面部的面部编码
#由于每个图像中可能有多个面,所以返回一个编码列表。
chen_face_encoding = face_recognition.face_encodings(chen_image)
unknown_face_encoding = face_recognition.face_encodings(unknown_image)[0]
# print("unknown_face_encoding :{}".format(unknown_face_encoding))

#结果是True/false的数组,未知面孔known_faces阵列中的任何人相匹配的结果
results = face_recognition.compare_faces(chen_face_encoding, unknown_face_encoding)
#识别出多少张脸就有多少个匹配结果
print("result :{}".format(results))
output:
result :[True, False]
结果有True,证明需要识别的人脸出现在该照片中
鉴定图片中的脸
通过调用电脑摄像头动态获取视频内的人脸,将其和我们指定的图片集进行匹配,可以告知我们视频内的人脸是否是我们设定好的

代码:
# -*- coding: utf-8 -*-
# 摄像头头像识别
import face_recognition
import cv2

video_capture = cv2.VideoCapture(0)

# 本地图像二
JackMa_image = face_recognition.load_image_file("1574499202821.jpg")
JackMa_face_encoding = face_recognition.face_encodings(JackMa_image)[0]

# 本地图片三
IvankaTrump_image = face_recognition.load_image_file("IvankaTrump.png")
IvankaTrump_face_encoding = face_recognition.face_encodings(IvankaTrump_image)[0]

# Create arrays of known face encodings and their names
# 脸部特征数据的集合
known_face_encodings = [
    JackMa_face_encoding,
    IvankaTrump_face_encoding,
]

# 人物名称的集合
known_face_names = [
    "JackMa",
    "IvankaTrump",
]

face_locations = []
face_encodings = []
face_names = []
process_this_frame = True

while True:
    # 读取摄像头画面
    ret, frame = video_capture.read()

    # 改变摄像头图像的大小,图像小,所做的计算就少
    small_frame = cv2.resize(frame, (0, 0), fx=0.25, fy=0.25)

    # opencv的图像是BGR格式的,而我们需要是的RGB格式的,因此需要进行一个转换。
    rgb_small_frame = small_frame[:, :, ::-1]

    # Only process every other frame of video to save time
    if process_this_frame:
        # 根据encoding来判断是不是同一个人,是就输出true,不是为flase
        face_locations = face_recognition.face_locations(rgb_small_frame)
        face_encodings = face_recognition.face_encodings(rgb_small_frame, face_locations)

        face_names = []
        for face_encoding in face_encodings:
            # 默认为unknown
            matches = face_recognition.compare_faces(known_face_encodings, face_encoding)
            name = "Unknown"

            # if match[0]:
            #     name = "michong"
            # If a match was found in known_face_encodings, just use the first one.
            if True in matches:
                first_match_index = matches.index(True)
                name = known_face_names[first_match_index]
            face_names.append(name)

    process_this_frame = not process_this_frame

    # 将捕捉到的人脸显示出来
    for (top, right, bottom, left), name in zip(face_locations, face_names):
        # Scale back up face locations since the frame we detected in was scaled to 1/4 size
        top *= 4
        right *= 4
        bottom *= 4
        left *= 4

        # 矩形框
        cv2.rectangle(frame, (left, top), (right, bottom), (0, 0, 255), 2)

        #加上标签
        cv2.rectangle(frame, (left, bottom - 35), (right, bottom), (0, 0, 255), cv2.FILLED)
        font = cv2.FONT_HERSHEY_DUPLEX
        cv2.putText(frame, name, (left + 6, bottom - 6), font, 1.0, (255, 255, 255), 1)

    # Display
    cv2.imshow('monitor', frame)

    # 按Q退出
    if cv2.waitKey(1) & 0xFF == ord('q'):
        break

video_capture.release()
cv2.destroyAllWindows()
