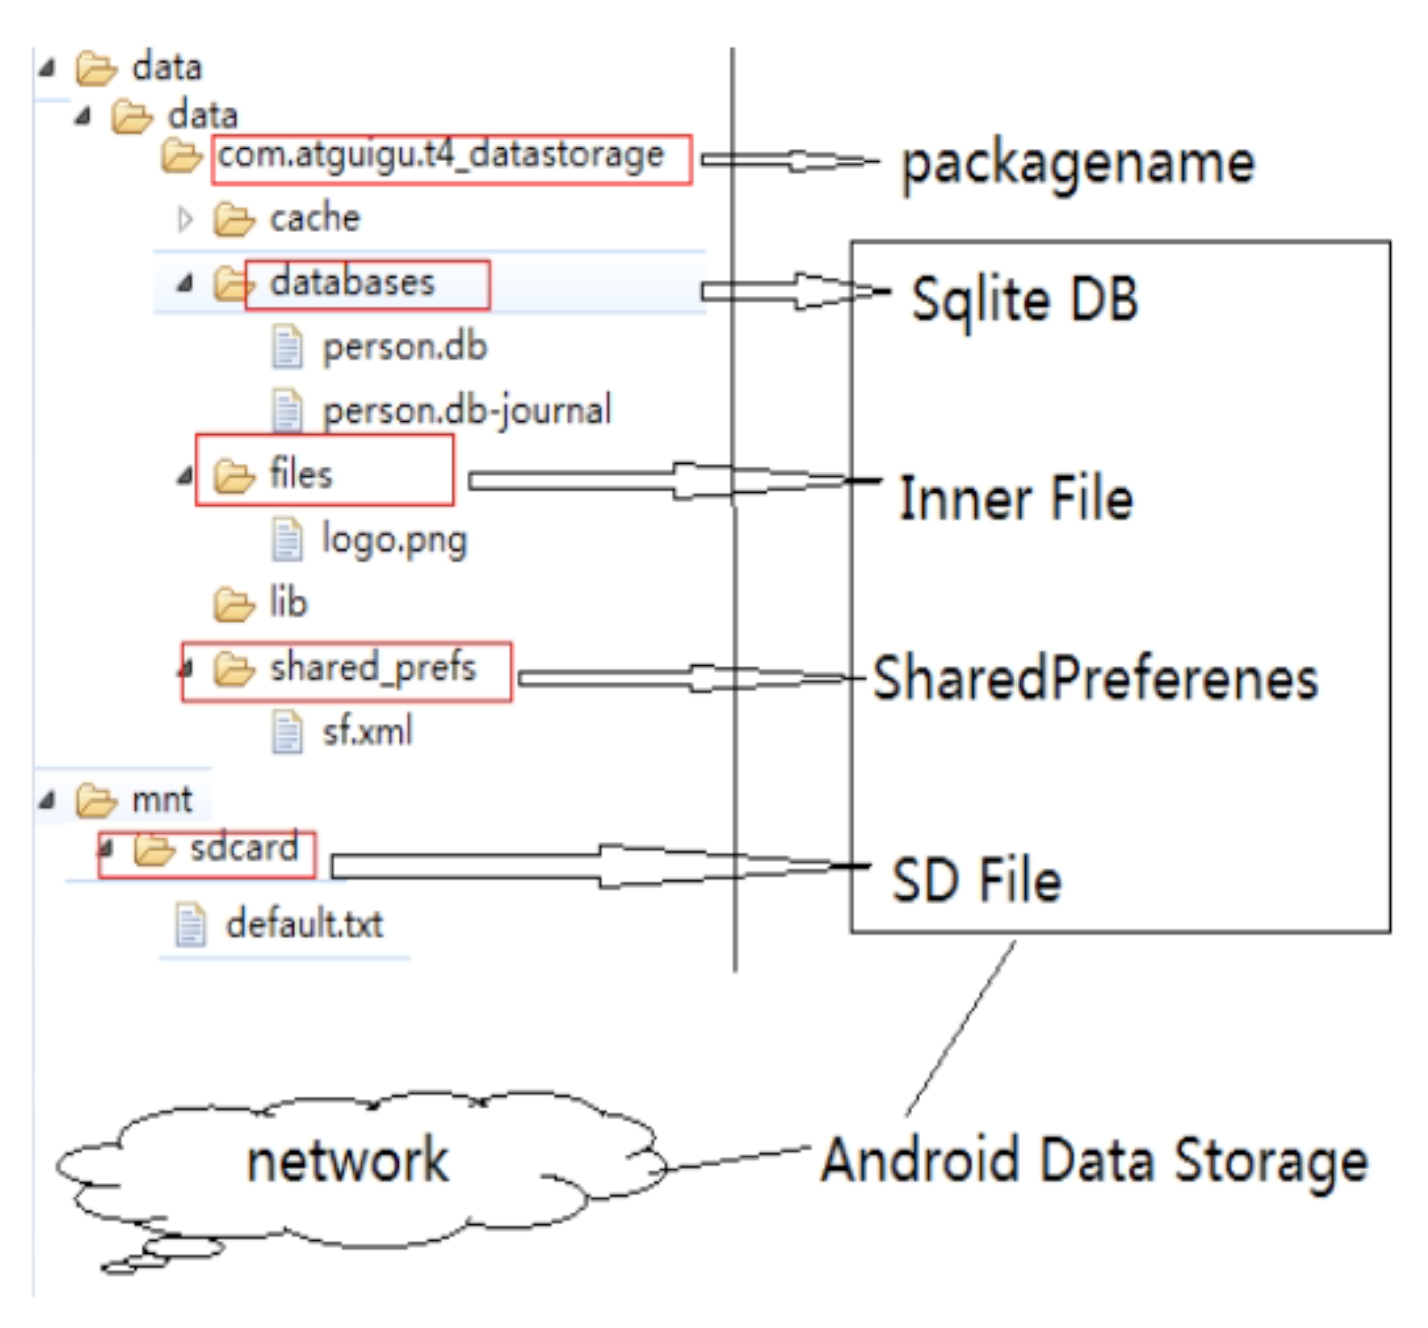
1. 理论概述
Android数据存储方式:
-
SharedPreferences存储
-
手机内部文件存储
-
手机外部文件存储
-
sqlite数据库存储
-
远程服务器存储
2. 数据存储开发
2.1 SharedPreferences存储
说明
-
SP存储专门用来存储一些单一的小数据
-
存储数据的类型:boolean,float,int,long,String
-
数据保存的路径:/data/data/packageName/shared_prefs/yyy.xml
-
可以设置数据只能是当前应用读取,而别的应用不可以
-
应用卸载时会删除数据
相关API
-
SharedPrefences:对应sp文件的接口
-
context.getSharedPreferences(String name,int mode):得到SP对象-
name:文件名(不带.xml)
-
mode:生成的文件模式(是否是私有的,即其它应用是否可以访问)
-
-
Editor sp.edit():得到Editor对象 -
Xxx sp.getXxx(name, defaultValue):根据name得到对应的数据
-
-
Editor:能更新SP文件的接口
-
Editor put(name, value):保存一个键值对,没有真正保存到文件中 -
Editor remove(name) -
commit():提交,数据真正保存到文件中
示例


<LinearLayout xmlns:android="http://schemas.android.com/apk/res/android"
    android:layout_width="fill_parent"
    android:layout_height="fill_parent"
    android:orientation="vertical" >

    <EditText
        android:id="@+id/et_sp_key"
        android:layout_width="match_parent"
        android:layout_height="wrap_content"
        android:hint="存储的key" />

    <EditText
        android:id="@+id/et_sp_value"
        android:layout_width="match_parent"
        android:layout_height="wrap_content"
        android:hint="存储的value" />

    <LinearLayout
        android:layout_width="match_parent"
        android:layout_height="wrap_content" >

        <Button
            android:layout_width="0dp"
            android:layout_height="wrap_content"
            android:layout_weight="1"
            android:onClick="save"
            android:text="保 存" />
        <Button
            android:layout_width="0dp"
            android:layout_height="wrap_content"
            android:layout_weight="1"
            android:onClick="read"
            android:text="读 取" />
    </LinearLayout>

</LinearLayout>
/**
 * 测试sp存储的界面
 */
public class SpActivity extends Activity {

    private EditText et_sp_key;
    private EditText et_sp_value;

    private SharedPreferences sp;

    @Override
    protected void onCreate(Bundle savedInstanceState) {
        super.onCreate(savedInstanceState);
        setContentView(R.layout.activity_sp);

        et_sp_key = (EditText) findViewById(R.id.et_sp_key);
        et_sp_value = (EditText) findViewById(R.id.et_sp_value);

        //1. 得到sp对象
        sp = getSharedPreferences("atguigu", Context.MODE_PRIVATE);
    }

    public void save(View v) {
        //2. 得到editor对象
        SharedPreferences.Editor edit = sp.edit();
        //3. 得到输入的key/value
        String key = et_sp_key.getText().toString();
        String value = et_sp_value.getText().toString();
        //4. 使用editor保存key-value
        edit.putString(key, value).commit();
        //5. 提示
        Toast.makeText(this, "保存完成!", 0).show();
    }

    public void read(View v) {
        //1. 得到输入的key
        String key = et_sp_key.getText().toString();
        //2. 根据key读取对应的value
        String value = sp.getString(key, null);
        //3. 显示
        if(value==null) {
            Toast.makeText(this, "没有找到对应的value", 0).show();
        } else {
            et_sp_value.setText(value);
        }
    }
}
package com.atguigu.l04_datastorage;

import android.app.Activity;
import android.content.Intent;
import android.os.Bundle;
import android.view.View;

public class MainActivity extends Activity {

    @Override
    protected void onCreate(Bundle savedInstanceState) {
        super.onCreate(savedInstanceState);
        setContentView(R.layout.activity_main);
    }

    // 测试sp存储
    public void onClickSP(View v) {
        startActivity(new Intent(this, SpActivity.class));
    }

    // 测试手机内部文件存储
    public void onClickIF(View v) {
        startActivity(new Intent(this, IFActivity.class));
    }

    // 测试手机外部文件存储
    public void onClickOF(View v) {
        startActivity(new Intent(this, OFActivity.class));
    }

    public void onClickDB(View v) {

    }

    public void onClickNW(View v) {

    }
}
说明
-
应用运行需要的一些较大的数据或图片可以用文件保存在手机内部
-
文件类型:任意
-
数据保存的路径:/data/data/projectPackage/files/
-
可以设置数据只能是当前应用读取,而别的应用不可以
-
应用卸载时会删除此数据
相关API
-
读取文件
-
FileInputStream fis = openFileInput("logo.png");
-
- 保存文件
FileOutputStream fos = openFileOutput("logo.png",MODE_PRIVATE);
- 得到files文件夹对象
File filesDir = getFilesDir();
- 操作asserts下的文件
-
- 得到Assetmanager:
context.getAssets();
- 得到Assetmanager:
-
- 读取文件:
InputStream open(filename);
- 读取文件:
- 加载图片文件
Bitmap BitmapFactory.decodeFile(String pathName)
<LinearLayout xmlns:android="http://schemas.android.com/apk/res/android"
    android:layout_width="fill_parent"
    android:layout_height="fill_parent"
    android:orientation="vertical" >

    <TextView
        android:id="@+id/textView1"
        android:layout_width="match_parent"
        android:layout_height="wrap_content"
        android:padding="5dp"
        android:text="1. 将asserts下的logo.png保存到手机内部\n2. 读取手机内部图片文件显示"
        android:textColor="#ff0000"
        android:textSize="15sp" />

    <LinearLayout
        android:layout_width="match_parent"
        android:layout_height="wrap_content" >

        <Button
            android:id="@+id/btn_if_save"
            android:layout_width="0dp"
            android:layout_height="wrap_content"
            android:layout_weight="1"
            android:onClick="save"
            android:text="保 存" />

        <Button
            android:id="@+id/btn_if_read"
            android:layout_width="0dp"
            android:layout_height="wrap_content"
            android:layout_weight="1"
            android:onClick="read"
            android:text="读 取" />
    </LinearLayout>

    <ImageView
        android:id="@+id/iv_if"
        android:layout_width="wrap_content"
        android:layout_height="wrap_content"
        android:src="@drawable/ic_launcher" />

</LinearLayout>
package com.atguigu.l04_datastorage;

import android.app.Activity;
import android.content.Context;
import android.content.res.AssetManager;
import android.graphics.Bitmap;
import android.graphics.BitmapFactory;
import android.os.Bundle;
import android.view.View;
import android.widget.ImageView;
import android.widget.Toast;

import java.io.FileOutputStream;
import java.io.IOException;
import java.io.InputStream;

/**
 * 测试手机内部文件存储
 */
public class IFActivity extends Activity {

    private ImageView iv_if;

    @Override
    protected void onCreate(Bundle savedInstanceState) {
        super.onCreate(savedInstanceState);
        setContentView(R.layout.activity_if);

        iv_if = findViewById(R.id.iv_if);
    }

    public void save(View view) throws IOException {
        //1.得到InputStream ->读取assets下的logo.png
        //得到AssetManager
        AssetManager manager = getAssets();
        //读取文件
        InputStream is = manager.open("logo.png");
        //2.得到OutputStream->/data/data/packageName/files/logo.png
        FileOutputStream fos = openFileOutput("logo.png", Context.MODE_PRIVATE);
        //3.边读边写
        byte[] buffer = new byte[1024];
        int len = 1;
        while((len = is.read(buffer)) != -1){
            fos.write(buffer,0,len);
        }
        fos.close();
        is.close();
        //4.提示
        Toast.makeText(this,"保存完成",Toast.LENGTH_SHORT).show();
    }

    //  /data/data/packageName/files/logo.png
    public void read(View view){
        //1. 得到图片文件的路径  /data/data/packageName/files
        String filesPath = getFilesDir().getAbsolutePath();
        String imagePath = filesPath + "/logo.png";
        //2.读取加载图片文件得到bitmap对象
        Bitmap bitmap = BitmapFactory.decodeFile(imagePath);
        //3.将其设置到imageView中显示
        iv_if.setImageBitmap(bitmap);
    }
}
2.3 手机外部file存储
说明
-
应用运行用到的数据文件(如图片)可以保存到sd卡中
-
文件类型:任意
-
数据保存的路径:
-
路径1:/storage/sdcard/Android/data/packageName/files/
-
路径2:/storage/sdcard/xx/
-
-
路径1:其它应用可以访问,应用卸载时删除
-
路径2:共它应用可以访问,应用卸载时不会删除
-
必须保证sd卡挂载在手机上才能读写,否则不能操作
相关API
-
-
得到SD卡的状态:Environment.getExternalStorageState()
-
提到SD卡的路径:Environment.getExternalStorageDirectory()
-
SD卡可读写的挂载状态值:Enviroment.MEDIA_MOUNTED
-
-
context.getExternalFilesDir():
-
得到/mnt/sdcard/Android/data/package_name/files/xxx.txt
-
-
操作SD卡的权限:
-
android.permission.WRITE_EXTERNAL_STORAGE
<LinearLayout xmlns:android="http://schemas.android.com/apk/res/android"
    android:layout_width="fill_parent"
    android:layout_height="fill_parent"
    android:orientation="vertical" >

    <EditText
        android:id="@+id/et_of_name"
        android:layout_width="match_parent"
        android:layout_height="wrap_content"
        android:hint="存储的文件名" />

    <EditText
        android:id="@+id/et_of_content"
        android:layout_width="match_parent"
        android:layout_height="wrap_content"
        android:hint="存储的文件内容" />

    <LinearLayout
        android:layout_width="match_parent"
        android:layout_height="wrap_content" >

        <Button
            android:layout_width="0dp"
            android:layout_height="wrap_content"
            android:layout_weight="1"
            android:onClick="save"
            android:text="保 存" />
        <Button
            android:layout_width="0dp"
            android:layout_height="wrap_content"
            android:layout_weight="1"
            android:onClick="read"
            android:text="读 取" />
    </LinearLayout>

    <LinearLayout
        android:layout_width="match_parent"
        android:layout_height="wrap_content" >

        <Button
            android:layout_width="0dp"
            android:layout_height="wrap_content"
            android:layout_weight="1"
            android:onClick="save2"
            android:text="保 存2" />
        <Button
            android:layout_width="0dp"
            android:layout_height="wrap_content"
            android:layout_weight="1"
            android:onClick="read2"
            android:text="读 取2" />
    </LinearLayout>

</LinearLayout>
package com.atguigu.l04_datastorage;

import java.io.ByteArrayOutputStream;
import java.io.File;
import java.io.FileInputStream;
import java.io.FileNotFoundException;
import java.io.FileOutputStream;
import java.io.IOException;

import android.app.Activity;
import android.os.Bundle;
import android.os.Environment;
import android.view.View;
import android.widget.EditText;
import android.widget.Toast;

/**
 * 测试手机外部文件存储
 */
public class OFActivity extends Activity {

    private EditText et_of_name;
    private EditText et_of_content;

    @Override
    protected void onCreate(Bundle savedInstanceState) {
        super.onCreate(savedInstanceState);
        setContentView(R.layout.activity_of);

        et_of_name = (EditText) findViewById(R.id.et_of_name);
        et_of_content = (EditText) findViewById(R.id.et_of_content);
    }

    public void save(View v) throws IOException {
        //1. 判断sd卡状态, 如果是挂载的状态才继续, 否则提示
        if(Environment.getExternalStorageState().equals(Environment.MEDIA_MOUNTED)) {
            //2. 读取输入的文件名/内容
            String fileName = et_of_name.getText().toString();
            String content = et_of_content.getText().toString();
            //3. 得到指定文件的OutputStream
                //1).得到sd卡下的files路径
            String filesPath = getExternalFilesDir(null).getAbsolutePath();
                //2).组成完整路径
            String filePath = filesPath+"/"+fileName;
                //3). 创建FileOutputStream
            FileOutputStream fos = new FileOutputStream(filePath);
            //4. 写数据
            fos.write(content.getBytes("utf-8"));
            fos.close();
            //5. 提示
            Toast.makeText(this, "保存完成", Toast.LENGTH_SHORT).show();
        } else {
            Toast.makeText(this, "sd卡没有挂载", Toast.LENGTH_SHORT).show();
        }

    }

    public void read(View v) throws Exception {

        // 1. 判断sd卡状态, 如果是挂载的状态才继续, 否则提示
        if (Environment.getExternalStorageState().equals(
                Environment.MEDIA_MOUNTED)) {
            // 2. 读取输入的文件名
            String fileName = et_of_name.getText().toString();
            // 3. 得到指定文件的InputStream
                // 1).得到sd卡下的files路径
            String filesPath = getExternalFilesDir(null).getAbsolutePath();
                // 2).组成完整路径
            String filePath = filesPath + "/" + fileName;
                // 3). 创建FileInputStream
            FileInputStream fis = new FileInputStream(filePath);
            // 4. 读取数据, 成String
            ByteArrayOutputStream baos = new ByteArrayOutputStream();
            byte[] buffer = new byte[1024];
            int len = -1;
            while((len=fis.read(buffer))!=-1) {
                baos.write(buffer, 0, len);
            }
            String content = baos.toString();

            // 5. 显示
            et_of_content.setText(content);
        } else {
            Toast.makeText(this, "sd卡没有挂载", Toast.LENGTH_SHORT).show();
        }
    }

    //  /storage/sdcard/atguigu/xxx.txt
    public void save2(View v) throws IOException {
        //1. 判断sd卡状态, 如果是挂载的状态才继续, 否则提示
        if(Environment.getExternalStorageState().equals(Environment.MEDIA_MOUNTED)) {
            //2. 读取输入的文件名/内容
            String fileName = et_of_name.getText().toString();
            String content = et_of_content.getText().toString();
            //3. 得到指定文件的OutputStream
                //1). /storage/sdcard/
            String sdPath = Environment.getExternalStorageDirectory().getAbsolutePath();
                //2). /storage/sdcard/atguigu/(创建文件夹)
            File file = new File(sdPath+"/atguigu");
            if(!file.exists()) {
                file.mkdirs();//创建文件夹
            }
                //3). /storage/sdcard/atguigu/xxx.txt
            String filePath = sdPath+"/atguigu/"+fileName;
                //4). 创建输出流
            FileOutputStream fos = new FileOutputStream(filePath);
            //4. 写数据
            fos.write(content.getBytes("utf-8"));
            fos.close();
            //5. 提示
            Toast.makeText(this, "保存完成", Toast.LENGTH_SHORT).show();
        } else {
            Toast.makeText(this, "sd卡没有挂载", Toast.LENGTH_SHORT).show();
        }
    }

    public void read2(View v) throws Exception {
        // 1. 判断sd卡状态, 如果是挂载的状态才继续, 否则提示
        if (Environment.getExternalStorageState().equals(
                Environment.MEDIA_MOUNTED)) {
            // 2. 读取输入的文件名
            String fileName = et_of_name.getText().toString();
            // 3. 得到指定文件的InputStream
            String sdPath = Environment.getExternalStorageDirectory().getAbsolutePath();
            String filePath = sdPath+"/atguigu/"+fileName;
            FileInputStream fis = new FileInputStream(filePath);
            // 4. 读取数据, 成String
            ByteArrayOutputStream baos = new ByteArrayOutputStream();
            byte[] buffer = new byte[1024];
            int len = -1;
            while((len=fis.read(buffer))!=-1) {
                baos.write(buffer, 0, len);
            }
            String content = baos.toString();
            fis.close();
            // 5. 显示
            et_of_content.setText(content);
        } else {
            Toast.makeText(this, "sd卡没有挂载", Toast.LENGTH_SHORT).show();
        }
    }
}
比较内部文件与外部文件存储?
-
-
是否是私有的
-
应用卸载是否自动删除
2.4 SQLite数据库存储
说明
-
应用运行需要保存一系列有一定结构的数据,比如说公司员工信息
-
文件类型:db
-
数据保存的路径 :/data/data/projectPackage/databases/xxx.db
-
默认情况下其它应用不能访问,当前应用可以通过ContentProvider提供其它应用操作
-
应用卸载时会删除此数据
SQLite数据库
SQLite(http://www.sqlite.org),是一款轻型的关系型数据库服务器,移动设备的数据库存储都使用SQLite,它的特点:
-
安装文件小:最小只有几百K,Android系统已经安装
-
支持多操作系统:Android,WP,IOS,Windows,Linux等
-
支持多语言:比如Java、PHP、C#等
-
处理速度快:处理速度比Mysql,Oracle,SQLServer都要快(数据量不是特别大)
-
SQLite中的一个数据库就是一个.db文件(本质上.db的后缀都可以不指定)
SQLite数据库命令行
-
adb shell 进入系统根目录
-
cd data/data/…/databases:进入包含数据库文件的文件夹下
-
sqlite3 contacts2.db:使用sqlite3命令连接指定的数据库文件,进入连接模式
-
help:查看命令列表
-
tables:查看所有表的列表
-
执行 insert/delete/update/select语句
-
exit:退出数据库连接模式
-
Ctrl+C:直接退出shell模式
数据类型
-
INT/INTEGER:整数
-
FLOAT/DOUBLE:小数
-
CHAR/VARCHAR/TEXT:字符串文本
-
BLOB:文件
-
DATE/DATETIME:日期/日期时间
SQLite建表
SQLite操作数据库的sql语句基本与mysql一样,但需要注意下面2点:
-
最大的不同在于创建表时可以不用指定字段类型,sqlite可以适时的自动转换,但除varchar类型外最好指定类型
-
sqlite中的主键名称建议使用_id
create table employee(
  _id integer primary key autoincrement,/*主键,自增长*/
  name varchar,                         /* 字符串*/
  salary double,                        /* 小数 */
  birthday date                       /* 日期,可直接插入日期格式字符串*/
)
SQLite的CRUD语句
/*插入*/
INSERT INTO employee(name,salary,birthday) VALUES('Tom',8000,'1988-09-21');
/*删除*/
DELETE FROM employee WHERE _id=2
/*更新*/
UPDATE employee SET name='Jack',salary=salary+1000 WHERE _id=1
/*查找*/
SELECT * FROM employee WHERE _id=3
相关API
- SQLiteOpenHepler:数据库操作的抽象帮助类
-
SQLiteOpenHelper(Context context,String name, CursorFactory
-
factory, int version):构造方法,指定数据库文件名和版本号
-
abstract void onCreate(SQLiteDatabases db):用于创建表
-
abstract void onUpgrade():用于版本更新
-
SqliteDatabase getReadableDatabase():得到数据库连接
-
-
sqliteDatabase:代表与数据库的连接的类
-
long insert():用于执行insert SQL,返回id值
-
int update():用于执行update SQL
-
int delete():用于执行delete SQL
-
Cursor query():用于执行select SQL,返回包含查询结果数据的Cursor
-
void execSql(sql):执行sql语句
-
beginTransaction():开启事务
-
setTransactionSuccessful():设置事务是成功的
-
endTransaction():结束事务,可能提交事务或回滚事务
-
openDatabase(String path, CursorFactory factory, int flags):得到数据库连接
-
-
Cursor:包含所有查询结果记录的结果集对象(光标,游标)
-
int getCount():匹配的总记录数
-
boolean moveToNext():将游标移动到下一条记录的前面
-
Xxx getXxx(columnIndex):根据字段下标得到对应值
-
-
<LinearLayout xmlns:android="http://schemas.android.com/apk/res/android"
    android:layout_width="fill_parent"
    android:layout_height="fill_parent"
    android:orientation="vertical" >

    <Button
        android:layout_width="match_parent"
        android:layout_height="wrap_content"
        android:onClick="testCreateDB"
        android:text="Create DB" />

    <Button
        android:layout_width="match_parent"
        android:layout_height="wrap_content"
        android:onClick="testUpdateDB"
        android:text="Update DB" />

    <Button
        android:layout_width="match_parent"
        android:layout_height="wrap_content"
        android:onClick="testInsert"
        android:text="Insert" />

    <Button
        android:layout_width="match_parent"
        android:layout_height="wrap_content"
        android:onClick="testUpdate"
        android:text="Update" />

    <Button
        android:layout_width="match_parent"
        android:layout_height="wrap_content"
        android:onClick="testDelete"
        android:text="Delete" />

    <Button
        android:layout_width="match_parent"
        android:layout_height="wrap_content"
        android:onClick="testQuery"
        android:text="query" />

    <Button
        android:layout_width="match_parent"
        android:layout_height="wrap_content"
        android:onClick="testTransaction"
        android:text="Test Transaction" />

</LinearLayout>
package com.atguigu.l04_datastorage;

import android.app.Activity;
import android.content.ContentValues;
import android.database.Cursor;
import android.database.sqlite.SQLiteDatabase;
import android.os.Bundle;
import android.util.Log;
import android.view.View;
import android.widget.Toast;

/**
 * 测试Sqlite数据库存储
 *
 */
public class DBActivity extends Activity {

    @Override
    protected void onCreate(Bundle savedInstanceState) {
        super.onCreate(savedInstanceState);
        setContentView(R.layout.activity_db);
    }

    /*
     * 创建库
     */
    public void testCreateDB(View v) {
        DBHelper dbHelper = new DBHelper(this, 1);
        //获取连接
        SQLiteDatabase database = dbHelper.getReadableDatabase();

        Toast.makeText(this, "创建数据库", 0).show();
    }

    /*
     * 更新库
     */
    public void testUpdateDB(View v) {
        DBHelper dbHelper = new DBHelper(this, 2);
        //获取连接
        SQLiteDatabase database = dbHelper.getReadableDatabase();

        Toast.makeText(this, "更新数据库", 0).show();
    }

    /*
     * 添加记录
     */
    public void testInsert(View v) {
        //1. 得到连接
        DBHelper dbHelper = new DBHelper(this, 2);
        SQLiteDatabase database = dbHelper.getReadableDatabase();
        //2. 执行insert  insert into person(name, age) values('Tom', 12)
        ContentValues values = new ContentValues();
        values.put("name", "Tom");
        values.put("age", 12);
        long id = database.insert("person", null, values);
        //3. 关闭
        database.close();
        //4. 提示
        Toast.makeText(this, "id="+id, 1).show();
    }

    /*
     * 更新
     */
    public void testUpdate(View v) {
        DBHelper dbHelper = new DBHelper(this, 2);
        SQLiteDatabase database = dbHelper.getReadableDatabase();
        //执行update  update person set name=Jack, age=13 where _id=4
        ContentValues values = new ContentValues();
        values.put("name", "jack");
        values.put("age", 13);
        int updateCount = database.update("person", values , "_id=?", new String[]{"4"});
        database.close();
        Toast.makeText(this, "updateCount="+updateCount, 1).show();
    }

    /*
     * 删除
     */
    public void testDelete(View v) {
        // 1. 得到连接
        DBHelper dbHelper = new DBHelper(this, 2);
        SQLiteDatabase database = dbHelper.getReadableDatabase();
        // 2. 执行delete delete from person where _id=2
        int deleteCount = database.delete("person", "_id=2", null);
        // 3. 关闭
        database.close();
        // 4. 提示
        Toast.makeText(this, "deleteCount=" + deleteCount, 1).show();
    }

    /*
     * 查询
     */
    public void testQuery(View v) {
        // 1. 得到连接
        DBHelper dbHelper = new DBHelper(this, 2);
        SQLiteDatabase database = dbHelper.getReadableDatabase();
        // 2. 执行query select * from person
        Cursor cursor = database.query("person", null, null, null, null, null, null);
        //cursor = database.query("person", null, "_id=?", new String[]{"3"}, null, null, null);
        //得到匹配的总记录数
        int count = cursor.getCount();

        //取出cursor中所有的数据
        while(cursor.moveToNext()) {
            //_id
            int id = cursor.getInt(0);
            //name
            String name = cursor.getString(1);
            //age
            int age = cursor.getInt(cursor.getColumnIndex("age"));
            Log.e("TAG", id+"-"+name+"-"+age);
        }
        // 3. 关闭
        cursor.close();
        database.close();
        // 4. 提示
        Toast.makeText(this, "count=" + count, 1).show();
    }

    /*
     * 测试事务处理
     * update person set age=16 where _id=1
     * update person set age=17 where _id=3
     *
     * 一个功能中对数据库进行的多个操作: 要就是都成功要就都失败
     * 事务处理的3步:
     * 1. 开启事务(获取连接后)
     * 2. 设置事务成功(在全部正常执行完后)
     * 3. 结束事务(finally中)
     */
    public void testTransaction(View v) {

        SQLiteDatabase database = null;
        try{
            DBHelper dbHelper = new DBHelper(this, 2);
            database = dbHelper.getReadableDatabase();

            //1. 开启事务(获取连接后)
            database.beginTransaction();

            //执行update  update person set age=16 where _id=1
            ContentValues values = new ContentValues();
            values.put("age", 16);
            int updateCount = database.update("person", values , "_id=?", new String[]{"1"});
            Log.e("TAG", "updateCount="+updateCount);

            //出了异常
            boolean flag = true;
            if(flag) {
                throw new RuntimeException("出异常啦!!!");
            }

            //执行update  update person set age=17 where _id=3
            values = new ContentValues();
            values.put("age", 17);
            int updateCount2 = database.update("person", values , "_id=?", new String[]{"3"});
            Log.e("TAG", "updateCount2="+updateCount2);

            //2. 设置事务成功(在全部正常执行完后)
            database.setTransactionSuccessful();

        } catch(Exception e) {
            e.printStackTrace();
            Toast.makeText(this, "出异常啦!!!", 1).show();
        } finally {
            //3. 结束事务(finally中)
            if(database!=null) {
                database.endTransaction();
                database.close();
            }
        }

    }

}
package com.atguigu.l04_datastorage;

import android.content.Context;
import android.database.sqlite.SQLiteDatabase;
import android.database.sqlite.SQLiteOpenHelper;
import android.util.Log;

/**
 * 数据库操作的帮助类
 */
public class DBHelper extends SQLiteOpenHelper {

    public DBHelper(Context context,int version) {
        super(context, "atguigu.db", null, version);
    }

    /**
     * 什么时候才会创建数据库文件?
     *     1). 数据库文件不存在
     *  2). 连接数据库
     *
     * 什么时候调用?
     *     当数据库文件创建时调用(1次)
     * 在此方法中做什么?
     *     建表
     *     插入一些初始化数据
     */
    @Override
    public void onCreate(SQLiteDatabase db) {
        Log.e("TAG", "DBHelper onCreate()");
        //建表
        String sql = "create table person(_id integer primary key autoincrement, name varchar,age int)";
        db.execSQL(sql);
        //插入一些初始化数据
        db.execSQL("insert into person (name, age) values ('Tom1', 11)");
        db.execSQL("insert into person (name, age) values ('Tom2', 12)");
        db.execSQL("insert into person (name, age) values ('Tom3', 13)");
    }

    //当传入的版本号大于数据库的版本号时调用
    @Override
    public void onUpgrade(SQLiteDatabase db, int oldVersion, int newVersion) {
        Log.e("TAG", "DBHelper onUpgrade()");
    }

}
Android中的Junit测试
1. 添加配置信息
<application>
    <!-- 使用android测试包 -->
    <uses-library android:name="android.test.runner" />
</application>

<!-- android:targetPackage的值应与manifest的package的值一致 -->
<instrumentation
      android:name="android.test.InstrumentationTestRunner"
      android:targetPackage="com.atguigu.app04_sqlite" />
2. 编写测试类
class StudentTest extends AndroidTestCase
2.5 远程服务器存储
3. 应用练习
3.1 修改防盗名称
3.2 手机黑名单管理
黑名单的管理
-
功能描述:
-
黑名单添加
-
显示所有黑名单列表
-
删除指定黑名单
-
修改黑名单
-
-
关键技术点:
-
SQLite数据库的操作
-
ListView列表显示
-
AlertDialog的使用
-
-
1. 界面布局
	ListView
2. DBHelper
	数据库
	表
3. 实体类
4. DAO并单元测试
5. 显示列表
6. 添加
	1. 显示添加的dialog(带输入框)
	2. 在确定的回调方法实现:
		1). 保存数据表中
		2). 保存数据到List
		3). 通知更新列表
	问题1: 新添加的没有显示在第一行
		add到集合中的第一位
	问题2: 初始显示的列表顺序不对
		查询根据_id倒序
7. 删除
	1. 显示ContextMenu
	2. 响应对item的选择
		1). 删除数据表对应的数据
		2). 删除List对应的数据
		3). 通知更新列表
	问题: 如何得到长按的position?
8. 更新
	1. 显示更新的Dialog
	2. 点击确定的响应
		1). 更新数据表对应的数据
		2). 更新List对应的数据
		3). 通知更新列表

9. 使用ListActivity优化功能
	1. extends ListActivity
	2. 布局文件中的<ListView>的id必须是系统定义的id: list
	3. 如果想在没有数据时显示一个提示文本, 可以在布局中定义 一个<TextView>(id必须为empty)

/*
一个功能的主要工作
*/
	1. 内存的操作(集合)
	2. 存储的操作(sp/数据库/文件)
	3. 界面的操作(列表)
<LinearLayout xmlns:android="http://schemas.android.com/apk/res/android"
    android:layout_width="fill_parent"
    android:layout_height="fill_parent"
    android:orientation="vertical" >

    <ListView
        android:id="@android:id/list"
        android:layout_width="match_parent"
        android:layout_height="0dp"
        android:layout_weight="1">
    </ListView>

    <TextView
        android:id="@android:id/empty"
        android:layout_width="fill_parent"
        android:layout_height="0dp"
        android:layout_weight="1"
        android:text="还没有一个黑名单"
        android:gravity="center"/>

    <Button
        android:layout_width="fill_parent"
        android:layout_height="wrap_content"
        android:text="添  加"
        android:onClick="add"/>

</LinearLayout>
package com.atguigu.app04_sqlite;

import android.content.Context;
import android.database.sqlite.SQLiteDatabase;
import android.database.sqlite.SQLiteOpenHelper;
import android.util.Log;

/**
 * 数据库操作的帮助类
 *
 */
public class DBHelper extends SQLiteOpenHelper {

    public DBHelper(Context context) {
        super(context, "atguigu.db", null, 1);
    }

    @Override
    public void onCreate(SQLiteDatabase db) {
        Log.i("TAG", "DBHelper onCreate()");
        //创建表
        db.execSQL("create table black_number(_id integer primary key autoincrement, number varchar)");
    }

    @Override
    public void onUpgrade(SQLiteDatabase db, int oldVersion, int newVersion) {

    }

}
实体类BlackNumber.java
package com.atguigu.app04_sqlite;

/**
 * black_number表对应的实体类
 */
public class BlackNumber {

    private int id;
    private String number;

    public BlackNumber(int id, String number) {
        super();
        this.id = id;
        this.number = number;
    }

    public BlackNumber() {
        super();
    }

    public int getId() {
        return id;
    }

    public void setId(int id) {
        this.id = id;
    }

    public String getNumber() {
        return number;
    }

    public void setNumber(String number) {
        this.number = number;
    }

    @Override
    public String toString() {
        return "BlackNumber [id=" + id + ", number=" + number + "]";
    }

}
package com.atguigu.app04_sqlite;

import java.util.ArrayList;
import java.util.List;

import android.content.ContentValues;
import android.content.Context;
import android.database.Cursor;
import android.database.sqlite.SQLiteDatabase;
import android.util.Log;

/**
 * 操作black_number表的DAO类
 *
 */
public class BlackNumberDao {

    private DBHelper dbHelper;

    public BlackNumberDao(Context context) {
        dbHelper = new DBHelper(context);
    }
    /**
     * 添加一条记录
     * @param blackNumber
     */
    public void add(BlackNumber blackNumber) {
        //1. 得到连接
        SQLiteDatabase database = dbHelper.getReadableDatabase();
        //2. 执行insert insert into black_number (number) values(xxx)
        ContentValues values = new ContentValues();
        values.put("number", blackNumber.getNumber());
        long id = database.insert("black_number", null, values);
        Log.i("TAG", "id="+id);

        //设置id
        blackNumber.setId((int) id);
        //3. 关闭
        database.close();
    }

    /**
     * 根据id删除一条记录
     */
    public void deleteById(int id) {
        //1. 得到连接
        SQLiteDatabase database = dbHelper.getReadableDatabase();
        //2. 执行delete delete from black_number where _id=id
        int deleteCount = database.delete("black_number", "_id=?", new String[]{id+""});
        Log.i("TAG", "deleteCount="+deleteCount);
        //3. 关闭
        database.close();
    }

    /**
     * 更新一条记录
     */
    public void update(BlackNumber blackNumber) {
        //1. 得到连接
        SQLiteDatabase database = dbHelper.getReadableDatabase();
        //2. 执行update update black_number set number=xxx where _id=id
        ContentValues values = new ContentValues();
        values.put("number", blackNumber.getNumber());
        int updateCount = database.update("black_number", values , "_id="+blackNumber.getId(), null);
        Log.i("TAG", "updateCount="+updateCount);
        //3. 关闭
        database.close();
    }

    /**
     * 查询所有记录封装成List<BLackNumber>
     */
    public List<BlackNumber> getAll() {

        List<BlackNumber> list = new ArrayList<BlackNumber>();
        //1. 得到连接
        SQLiteDatabase database = dbHelper.getReadableDatabase();
        //2. 执行query select * from black_number
        Cursor cursor = database.query("black_number", null, null, null, null, null, "_id desc");
        //3. 从cursor中取出所有数据并封装到List中
        while(cursor.moveToNext()) {
            //id
            int id = cursor.getInt(0);
            //number
            String number = cursor.getString(1);
            list.add(new BlackNumber(id, number));
        }
        //4. 关闭
        cursor.close();
        database.close();

        return list;
    }
}
配置android测试包
<?xml version="1.0" encoding="utf-8"?>
<manifest xmlns:android="http://schemas.android.com/apk/res/android"
    package="com.atguigu.app04_sqlite"
    android:versionCode="1"
    android:versionName="1.0" >

    <uses-sdk
        android:minSdkVersion="18"
        android:targetSdkVersion="18" />

    <application
        android:allowBackup="true"
        android:icon="@drawable/ic_launcher"
        android:label="@string/app_name"
        android:theme="@style/AppTheme" >

        <!-- 使用android测试包 -->
        <uses-library android:name="android.test.runner" />

        <activity
            android:name=".MainActivity"
            android:label="@string/app_name" >
            <intent-filter>
                <action android:name="android.intent.action.MAIN" />

                <category android:name="android.intent.category.LAUNCHER" />
            </intent-filter>
        </activity>
    </application>

    <!-- android:targetPackage的值应与manifest的package的值一致 -->
    <instrumentation
        android:name="android.test.InstrumentationTestRunner"
        android:targetPackage="com.atguigu.app04_sqlite" />

</manifest>
测试用例
package com.atguigu.app04_sqlite.test;

import java.util.List;

import com.atguigu.app04_sqlite.BlackNumber;
import com.atguigu.app04_sqlite.BlackNumberDao;

import android.test.AndroidTestCase;
import android.util.Log;

/**
 * BlackNumberDao的单元测试类
 *
 */
public class BlackNumberDaoTest extends AndroidTestCase {

    public void testAdd() {
        // 创建dao对象
        BlackNumberDao dao = new BlackNumberDao(getContext());
        // 调用方法
        dao.add(new BlackNumber(-1, "123"));
    }

    public void testGetAll() {
        // 创建dao对象
        BlackNumberDao dao = new BlackNumberDao(getContext());
        // 调用方法
        List<BlackNumber> list = dao.getAll();
        Log.i("TAG", list.toString());
    }

    public void testUpdate() {
        // 创建dao对象
        BlackNumberDao dao = new BlackNumberDao(getContext());
        // 调用方法
        dao.update(new BlackNumber(2, "321"));
    }

    public void testDeleteById() {
        // 创建dao对象
        BlackNumberDao dao = new BlackNumberDao(getContext());
        // 调用方法
        dao.deleteById(2);
    }
}
package com.atguigu.app04_sqlite;

import java.util.List;

import android.app.AlertDialog;
import android.app.ListActivity;
import android.content.DialogInterface;
import android.os.Bundle;
import android.view.ContextMenu;
import android.view.ContextMenu.ContextMenuInfo;
import android.view.MenuItem;
import android.view.View;
import android.view.ViewGroup;
import android.widget.AdapterView.AdapterContextMenuInfo;
import android.widget.BaseAdapter;
import android.widget.EditText;
import android.widget.ListView;
import android.widget.TextView;

public class MainActivity extends ListActivity {

    private ListView lv_main;
    private BlackNumberAdapter adapter;
    private BlackNumberDao dao;
    private List<BlackNumber> data;
    private int position;

    @Override
    protected void onCreate(Bundle savedInstanceState) {
        super.onCreate(savedInstanceState);
        setContentView(R.layout.activity_main);

        lv_main = getListView();
        adapter = new BlackNumberAdapter();
        dao = new BlackNumberDao(this);
        data = dao.getAll();

        lv_main.setAdapter(adapter);

        //给listView设置创建contextMenu的监听
        lv_main.setOnCreateContextMenuListener(this);
    }

    @Override
    public void onCreateContextMenu(ContextMenu menu, View v,
            ContextMenuInfo menuInfo) {
        super.onCreateContextMenu(menu, v, menuInfo);
        //添加2个item
        menu.add(0, 1, 0, "更新");
        menu.add(0, 2, 0, "删除");

        //得到长按的position
        AdapterContextMenuInfo info = (AdapterContextMenuInfo) menuInfo;
        position = info.position;
    }

    @Override
    public boolean onContextItemSelected(MenuItem item) {

        //得到对应的BlackNumber对象
        BlackNumber blackNumber = data.get(position);
        switch (item.getItemId()) {
        case 1://更新
            //1. 显示更新的Dialog
            showUpdateDialog(blackNumber);
            break;
        case 2://删除
            //1). 删除数据表对应的数据
            dao.deleteById(blackNumber.getId());
            //2). 删除List对应的数据
            data.remove(position);
            //3). 通知更新列表
            adapter.notifyDataSetChanged();
            break;

        default:
            break;
        }


        return super.onContextItemSelected(item);
    }

    /**
     * 显示更新的Dialog
     * @param blackNumber
     */
    private void showUpdateDialog(final BlackNumber blackNumber) {
        final EditText editText = new EditText(this);
        editText.setHint(blackNumber.getNumber());
        new AlertDialog.Builder(this)
            .setTitle("更新黑名单")
            .setView(editText)
            .setPositiveButton("更新", new DialogInterface.OnClickListener() {
                @Override
                public void onClick(DialogInterface dialog, int which) {
                    //1). 更新List对应的数据
                    String newNumber = editText.getText().toString();
                    blackNumber.setNumber(newNumber);

                    //2). 更新数据表对应的数据
                    dao.update(blackNumber);

                    //3). 通知更新列表
                    adapter.notifyDataSetChanged();
                }
            })
            .setNegativeButton("取消", null)
            .show();
    }

    public void add(View v) {

        //1. 显示添加的dialog(带输入框)
        final EditText editText = new EditText(this);
        editText.setHint("输入黑名单号");
        new AlertDialog.Builder(this)
            .setTitle("添加黑名单")
            .setView(editText)
            .setPositiveButton("添加", new DialogInterface.OnClickListener() {
                @Override
                public void onClick(DialogInterface dialog, int which) {
                    //1). 保存数据表中
                    String number = editText.getText().toString();
                    BlackNumber blackNumber = new BlackNumber(-1, number);
                    dao.add(blackNumber);
                    //2). 保存数据到List
                    //data.add(blackNumber);//已经有id了
                    data.add(0, blackNumber);
                    //3). 通知更新列表
                    adapter.notifyDataSetChanged();
                }
            })
            .setNegativeButton("取消", null)
            .show();
    }

    class BlackNumberAdapter extends BaseAdapter {

        @Override
        public int getCount() {
            return data.size();
        }

        @Override
        public Object getItem(int position) {
            return data.get(position);
        }

        @Override
        public long getItemId(int position) {
            return 0;
        }

        @Override
        public View getView(int position, View convertView, ViewGroup parent) {

            if(convertView==null) {
                convertView = View.inflate(MainActivity.this, android.R.layout.simple_list_item_1, null);
            }

            BlackNumber blackNumber = data.get(position);
            TextView textView = (TextView) convertView.findViewById(android.R.id.text1);
            textView.setText(blackNumber.getNumber());

            return convertView;
        }
    }
}
package com.atguigu.app04_sqlite;

import java.util.List;

import android.app.Activity;
import android.app.AlertDialog;
import android.content.DialogInterface;
import android.os.Bundle;
import android.view.ContextMenu;
import android.view.MenuItem;
import android.view.View;
import android.view.ViewGroup;
import android.view.ContextMenu.ContextMenuInfo;
import android.widget.BaseAdapter;
import android.widget.EditText;
import android.widget.ListView;
import android.widget.TextView;
import android.widget.AdapterView.AdapterContextMenuInfo;

public class MainActivity1 extends Activity {

    private ListView lv_main;
    private BlackNumberAdapter adapter;
    private BlackNumberDao dao;
    private List<BlackNumber> data;
    private int position;

    @Override
    protected void onCreate(Bundle savedInstanceState) {
        super.onCreate(savedInstanceState);
        setContentView(R.layout.activity_main);

        //lv_main = (ListView) findViewById(R.id.lv_main);
        adapter = new BlackNumberAdapter();
        dao = new BlackNumberDao(this);
        data = dao.getAll();

        lv_main.setAdapter(adapter);

        //给listView设置创建contextMenu的监听
        lv_main.setOnCreateContextMenuListener(this);
    }

    @Override
    public void onCreateContextMenu(ContextMenu menu, View v,
            ContextMenuInfo menuInfo) {
        super.onCreateContextMenu(menu, v, menuInfo);
        //添加2个item
        menu.add(0, 1, 0, "更新");
        menu.add(0, 2, 0, "删除");

        //得到长按的position
        AdapterContextMenuInfo info = (AdapterContextMenuInfo) menuInfo;
        position = info.position;
    }

    @Override
    public boolean onContextItemSelected(MenuItem item) {

        //得到对应的BlackNumber对象
        BlackNumber blackNumber = data.get(position);
        switch (item.getItemId()) {
        case 1://更新
            //1. 显示更新的Dialog
            showUpdateDialog(blackNumber);
            break;
        case 2://删除
            //1). 删除数据表对应的数据
            dao.deleteById(blackNumber.getId());
            //2). 删除List对应的数据
            data.remove(position);
            //3). 通知更新列表
            adapter.notifyDataSetChanged();
            break;

        default:
            break;
        }


        return super.onContextItemSelected(item);
    }

    /**
     * 显示更新的Dialog
     * @param blackNumber
     */
    private void showUpdateDialog(final BlackNumber blackNumber) {
        final EditText editText = new EditText(this);
        editText.setHint(blackNumber.getNumber());
        new AlertDialog.Builder(this)
            .setTitle("更新黑名单")
            .setView(editText)
            .setPositiveButton("更新", new DialogInterface.OnClickListener() {
                @Override
                public void onClick(DialogInterface dialog, int which) {
                    //1). 更新List对应的数据
                    String newNumber = editText.getText().toString();
                    blackNumber.setNumber(newNumber);

                    //2). 更新数据表对应的数据
                    dao.update(blackNumber);

                    //3). 通知更新列表
                    adapter.notifyDataSetChanged();
                }
            })
            .setNegativeButton("取消", null)
            .show();
    }

    public void add(View v) {

        //1. 显示添加的dialog(带输入框)
        final EditText editText = new EditText(this);
        editText.setHint("输入黑名单号");
        new AlertDialog.Builder(this)
            .setTitle("添加黑名单")
            .setView(editText)
            .setPositiveButton("添加", new DialogInterface.OnClickListener() {
                @Override
                public void onClick(DialogInterface dialog, int which) {
                    //1). 保存数据表中
                    String number = editText.getText().toString();
                    BlackNumber blackNumber = new BlackNumber(-1, number);
                    dao.add(blackNumber);
                    //2). 保存数据到List
                    //data.add(blackNumber);//已经有id了
                    data.add(0, blackNumber);
                    //3). 通知更新列表
                    adapter.notifyDataSetChanged();
                }
            })
            .setNegativeButton("取消", null)
            .show();
    }

    class BlackNumberAdapter extends BaseAdapter {

        @Override
        public int getCount() {
            return data.size();
        }

        @Override
        public Object getItem(int position) {
            return data.get(position);
        }

        @Override
        public long getItemId(int position) {
            return 0;
        }

        @Override
        public View getView(int position, View convertView, ViewGroup parent) {

            if(convertView==null) {
                convertView = View.inflate(MainActivity1.this, android.R.layout.simple_list_item_1, null);
            }

            BlackNumber blackNumber = data.get(position);
            TextView textView = (TextView) convertView.findViewById(android.R.id.text1);
            textView.setText(blackNumber.getNumber());

            return convertView;
        }
    }
}
3.3 最新APK下载安装