这是关于消息中间件ActiveMQ的文章,将涵盖JMS、ActiveMQ的初步入门及API详细使用、两种经典的消息模式(PTP and Pub/Sub)、与Spring整合等,时间关系就不深入ActiveMQ集群、监控与配置优化了。话不多说,我们来一起瞧一瞧!
JMS
JMS,即Java Message Service,通过面向消息中间件(MOM:Message Oriented Middleware)的方式很好的解决了上面的问题。大致的过程是这样的:发送者把消息发送给消息服务器,消息服务器将消息存放在若干队列/主题中,在合适的时候,消息服务器会将消息转发给接受者。
为什么要学JMS
import javax.jms.*;包下的Message,可见都是一些接口,没有具体实现。JMS只给出接口,然后由具体的中间件去实现,比如ActiveMQ就是实现了JMS的一种Provider,还有阿里巴巴的RocketMQ。

应用场景
举个例子,一个应用程序A部署在印度,另一个应用程序部署在美国,然后每当A触发某件事后,B想从A获取一些更新信息。当然,也有可能不止一个B对A的更新信息感兴趣,可能会有N个类似B的应用程序想从A中获取更新的信息。在这种情况下,JAVA提供了最佳的解决方案-JMS,完美解决了上面讨论的问题。
这里要提一嘴我最近在干啥了。我最近就是在解决如何将一个程序处理的数据手动的发送给另一个程序或者前端。虽然还是我还是选择了用常规的数据库做中间件处理,还是优秀的消息中间件还是值得了解的。
JMS的优势
- 异步:JMS是异步的,客户端获取消息的时候,不需要主动发送请求,消息会自动发送给可用的客户端。
- 可靠:JMS保证消息只会递送一次。大家都遇到过重复创建消息问题,而JMS能帮你避免该问题,只是避免而不是杜绝,所以在一些糟糕的环境下还是有可能会出现重复。
两种交互方式
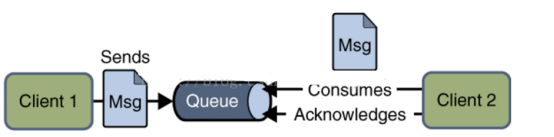
点对点
-
每个消息只有一个接受者(自己测试了一下,可以有多个接受者,但是当有多个接收者时,每个接收者只能获取随机的几条信息)
-
消息发送者和消息接受者并没有时间依赖性。
-
当消息发送者发送消息的时候,无论接收者程序在不在运行,都能获取到消息;
-
当接收者收到消息的时候,会发送确认收到通知(acknowledgement)。
点对点消息模型图:

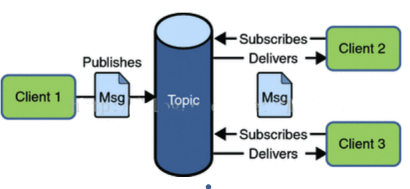
发布/订阅
- 一个消息可以传递给多个订阅者
-
发布者和订阅者有时间依赖性,只有当客户端创建订阅后才能接受消息,且订阅者需一直保持活动状态以接收消息。
-
为了缓和这样严格的时间相关性,JMS允许订阅者创建一个可持久化的订阅。这样,即使订阅者没有被激活(运行),它也能接收到发布者的消息。
发布/订阅消息模型图:
ActiveMQ
ActiveMQ 是Apache出品,最流行的,能力强劲的开源消息总线。ActiveMQ 是一个完全支持JMS1.1和J2EE 1.4规范的 JMS Provider实现,尽管JMS规范出台已经是很久的事情了,但是JMS在当今的J2EE应用中间仍然扮演着特殊的地位。
ActiveMQ的下载
主页:http://activemq.apache.org/
开发包及源码下载地址:http://activemq.apache.org/activemq-5111-release.html
ActiveMQ 服务启动地址:http://127.0.0.1:8161/admin/ 用户名/密码admin/admin
文件结构:

除了在windows下当然还可以是linux的等。这里需要注意几个文件夹
- bin 下面有32位和64位的,看自己的电脑选择合适的使用

- data 目录下是ActiveMQ进行消息持久化存放的地方,默认采用的是kahadb,当然我们可以采用leveldb,或者采用JDBC存储到MySQL,或者干脆不使用持久化机制。
- conf 各种配置文件

查看页面:

基本概论
-
Provider/MessageProvider:生产者
-
Consumer/MessageConsumer:消费者
-
PTP:Point To Point,点对点通信消息模型
-
Pub/Sub:Publish/Subscribe,发布订阅消息模型
-
Queue:队列,目标类型之一,和PTP结合
-
Topic:主题,目标类型之一,和Pub/Sub结合
-
ConnectionFactory:连接工厂,JMS用它创建连接
-
Connnection:JMS Client到JMS Provider的连接
-
Destination:消息目的地,由Session创建
-
Broker,消息代理,表示消息队列服务器实体,接受客户端连接,提供消息通信的核心服务。
入门使用
以下分为三块来介绍,“普通Java程序使用”,“和Spring整合使用”,“和Ajax交互使用”。
整合pom文件:
pom.xml
    <dependencies>
        <dependency>
            <groupId>org.springframework</groupId>
            <artifactId>spring-test</artifactId>
            <version>4.3.1.RELEASE</version>
        </dependency>
        <dependency>
            <groupId>org.apache.activemq</groupId>
            <artifactId>activemq-all</artifactId>
            <version>5.15.2</version>
        </dependency>
        <dependency>
            <groupId>org.springframework</groupId>
            <artifactId>spring-jms</artifactId>
            <version>4.3.10.RELEASE</version>
        </dependency>
        <dependency>
            <groupId>org.apache.activemq</groupId>
            <artifactId>activemq-pool</artifactId>
            <version>5.15.0</version>
        </dependency>
        <dependency>
            <groupId>junit</groupId>
            <artifactId>junit</artifactId>
            <version>4.12</version>
            <scope>test</scope>
        </dependency>

    </dependencies>
Java点对点使用

JMSProducer.java
public class JMSProducer {
private static final String USERNAME= ActiveMQConnection.DEFAULT_USER; // 默认的连接用户名
private static final String PASSWORD=ActiveMQConnection.DEFAULT_PASSWORD; // 默认的连接密码
private static final String BROKEURL=ActiveMQConnection.DEFAULT_BROKER_URL; // 默认的连接地址
public static void main(String[] args) {
ConnectionFactory connectionFactory;//连接工厂
Connection connection = null;//连接
Session session;//会话
Topic destination;//消息目的地
MessageProducer messageProducer;//消息生产者
connectionFactory = new ActiveMQConnectionFactory(USERNAME,PASSWORD,BROKEURL);
try {
connection = connectionFactory.createConnection();//通过工厂获取连接
connection.start();//启动连接
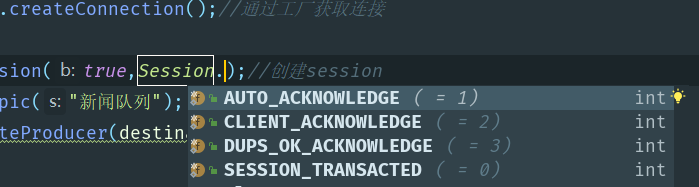
session = connection.createSession(true,Session.AUTO_ACKNOWLEDGE);//创建session
destination = session.createTopic("新闻队列");
messageProducer = session.createProducer(destination);//创建消息生产者
//发送消息
for(int i=0;i<10;i++){
TextMessage msg = session.createTextMessage("xianglei:" + (i + 1) +"号");
messageProducer.send(destination,msg);
}
session.commit();
}catch (Exception e){
e.printStackTrace();
}finally {
if(connection!=null){
try {
connection.close();
} catch (JMSException e) {
// TODO Auto-generated catch block
e.printStackTrace();
}
}
}
}
}
细节解说:
说说session 签收模式
通俗点说,就是消费者接受到消息后,需要告诉消息服务器,我收到消息了。当消息服务器收到回执后,本条消息将失效。因此签收将对PTP模式产生很大影响。如果消费者收到消息后,并不签收,那么本条消息继续有效,很可能会被其他消费者消费掉!
Session,用于发送和接受消息,而且是单线程的,支持事务的。如果Session开启事务支持,那么Session将保存一组信息,要么commit到MQ,要么回滚这些消息。
-
AUTO_ACKNOWLEDGE:表示在消费者receive消息的时候自动的签收
-
CLIENT_ACKNOWLEDGE:表示消费者receive消息后必须手动的调用acknowledge()方法进行签收
-
DUPS_OK_ACKNOWLEDGE:签不签收无所谓了,只要消费者能够容忍重复的消息接受,当然这样会降低Session的开销
在实际中,我们应该采用哪种签收模式呢?CLIENT_ACKNOWLEDGE,采用手动的方式较自动的方式可能更好些,因为接收到了消息,并不意味着成功的处理了消息,假设我们采用手动签收的方式,只有在消息成功处理的前提下才进行签收,那么只要消息处理失败,那么消息还有效,仍然会继续消费,直至成功处理!
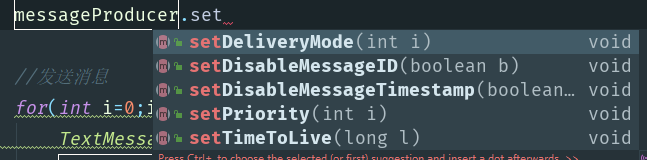
其次是MessageProducer

这里可以设置消息的存活时间,优先级等这里send指定了消息发送的目的地,当然你可以通过判断分支选择不同的目的地。
持久化:

最后必须close connection,只有这样ActiveMQ才会释放资源!
JMSConsumer.java
 public static void main(String[] args) {


        ConnectionFactory connectionFactory;//连接工厂
        Connection connection = null;//连接
        Session session;//会话
        Queue destination;//消息目的地
        MessageConsumer consumer;//消息消费者

        connectionFactory = new ActiveMQConnectionFactory(USERNAME, PASSWORD, BROKEURL);

        try {
            connection = connectionFactory.createConnection();//通过工厂获取连接
            connection.start();//启动连接
            session = connection.createSession(true, Session.AUTO_ACKNOWLEDGE);//创建session
            destination = session.createQueue("新闻队列");
            consumer = session.createConsumer(destination);//创建消息消费者

            //发送消息
            while (true) {
                TextMessage message = (TextMessage) consumer.receive(10000);
                if (message != null) {
                    System.out.println(message.getText());//获取消息
                }
            }


        } catch (Exception e) {
            e.printStackTrace();
        }
    }
}
测试:

Java发布订阅
发布:
public class JMSProducer {

    private static final String USERNAME= ActiveMQConnection.DEFAULT_USER; // 默认的连接用户名
    private static final String PASSWORD=ActiveMQConnection.DEFAULT_PASSWORD; // 默认的连接密码
    private static final String BROKEURL=ActiveMQConnection.DEFAULT_BROKER_URL; // 默认的连接地址

    public static void main(String[] args) {


        ConnectionFactory connectionFactory;//连接工厂
        Connection connection = null;//连接
        Session session;//会话
        Topic destination;//消息目的地
        MessageProducer messageProducer;//消息生产者

        connectionFactory = new ActiveMQConnectionFactory(USERNAME,PASSWORD,BROKEURL);

        try {
            connection = connectionFactory.createConnection();//通过工厂获取连接
            connection.start();//启动连接
            session = connection.createSession(true,Session.AUTO_ACKNOWLEDGE);//创建session

            destination = session.createTopic("新闻队列");
            messageProducer = session.createProducer(destination);//创建消息生产者


            //发送消息
            for(int i=0;i<10;i++){
                TextMessage msg = session.createTextMessage("xianglei:" + (i + 1) +"号");
                messageProducer.send(destination,msg);

            }

            session.commit();

        }catch (Exception e){
            e.printStackTrace();
        }finally {
            if(connection!=null){
                try {
                    connection.close();
                } catch (JMSException e) {
                    // TODO Auto-generated catch block
                    e.printStackTrace();
                }
            }
        }
    }
}
订阅:
模拟两个订阅者
public class JMSConsumer {

    private static final String USERNAME = ActiveMQConnection.DEFAULT_USER; // 默认的连接用户名
    private static final String PASSWORD = ActiveMQConnection.DEFAULT_PASSWORD; // 默认的连接密码
    private static final String BROKEURL = ActiveMQConnection.DEFAULT_BROKER_URL; // 默认的连接地址

    public static void main(String[] args) {


        ConnectionFactory connectionFactory;//连接工厂
        Connection connection = null;//连接
        Session session;//会话
        Topic destination;//消息目的地
        MessageConsumer consumer;//消息消费者

        connectionFactory = new ActiveMQConnectionFactory(USERNAME, PASSWORD, BROKEURL);

        try {
            connection = connectionFactory.createConnection();//通过工厂获取连接
            connection.start();//启动连接
            session = connection.createSession(true, Session.AUTO_ACKNOWLEDGE);//创建session
            destination = session.createTopic("新闻队列");
            consumer = session.createConsumer(destination);//创建消息消费者

            //发送消息
            while (true) {
                TextMessage message = (TextMessage) consumer.receive(10000);
                if (message != null) {
                    System.out.println(message.getText());//获取消息
                }
            }


        } catch (Exception e) {
            e.printStackTrace();
        }
    }
}
public class JMSConsumer2 {

    private static final String USERNAME = ActiveMQConnection.DEFAULT_USER; // 默认的连接用户名
    private static final String PASSWORD = ActiveMQConnection.DEFAULT_PASSWORD; // 默认的连接密码
    private static final String BROKEURL = ActiveMQConnection.DEFAULT_BROKER_URL; // 默认的连接地址

    public static void main(String[] args) {


        ConnectionFactory connectionFactory;//连接工厂
        Connection connection = null;//连接
        Session session;//会话
        Topic destination;//消息目的地
        MessageConsumer consumer;//消息消费者

        connectionFactory = new ActiveMQConnectionFactory(USERNAME, PASSWORD, BROKEURL);

        try {
            connection = connectionFactory.createConnection();//通过工厂获取连接
            connection.start();//启动连接
            session = connection.createSession(true, Session.AUTO_ACKNOWLEDGE);//创建session
            destination = session.createTopic("新闻队列");
            consumer = session.createConsumer(destination);//创建消息消费者

            //发送消息
            while (true) {
                TextMessage message = (TextMessage) consumer.receive(10000);
                if (message != null) {
                    System.out.println(message.getText());//获取消息
                }
            }


        } catch (Exception e) {
            e.printStackTrace();
        }
    }
}
测试

没有太多不同,就是换成了 destination = session.createTopic(“新闻队列”);
整合Spring
点对点
applicationContext-jms-producer.xml
<?xml version="1.0" encoding="UTF-8"?>
<beans xmlns="http://www.springframework.org/schema/beans"
       xmlns:xsi="http://www.w3.org/2001/XMLSchema-instance"
       xmlns:context="http://www.springframework.org/schema/context"
       xsi:schemaLocation="http://www.springframework.org/schema/beans http://www.springframework.org/schema/beans/spring-beans.xsd http://www.springframework.org/schema/context http://www.springframework.org/schema/context/spring-context.xsd">
<!--Spring 骚包范围-->
    <context:component-scan base-package="springactivemq"/>

    <!-- 真正可以产生Connection的ConnectionFactory,由对应的 JMS服务厂商提供-->
    <bean id="targetConnectionFactory" class="org.apache.activemq.ActiveMQConnectionFactory">
        <property name="brokerURL" value="tcp://localhost:61616"/>
    </bean>
    <!-- Spring用于管理真正的ConnectionFactory的ConnectionFactory -->
    <bean id="connectionFactory" class="org.springframework.jms.connection.SingleConnectionFactory">
        <!-- 目标ConnectionFactory对应真实的可以产生JMS Connection的ConnectionFactory -->
        <property name="targetConnectionFactory" ref="targetConnectionFactory"/>
    </bean>
    <!-- Spring提供的JMS工具类,它可以进行消息发送、接收等 -->
    <bean id="jmsTemplate" class="org.springframework.jms.core.JmsTemplate">
        <!-- 这个connectionFactory对应的是我们定义的Spring提供的那个ConnectionFactory对象 -->
        <property name="connectionFactory" ref="connectionFactory"/>
    </bean>
    <!--这个是队列目的地,点对点的  文本信息-->
   <bean id="queueTextDestination" class="org.apache.activemq.command.ActiveMQQueue">
        <constructor-arg value="queue_text"/>
    </bean>
    <!--这个是订阅模式  文本信息-->
    <!--<bean id="topicTextDestination" class="org.apache.activemq.command.ActiveMQTopic">-->
        <!--<constructor-arg value="topic_text"/>-->
    <!--</bean>-->

</beans>
applicationContext-jms-consumer-topic.xml
<?xml version="1.0" encoding="UTF-8"?>
<beans xmlns="http://www.springframework.org/schema/beans"
       xmlns:xsi="http://www.w3.org/2001/XMLSchema-instance"
       xsi:schemaLocation="http://www.springframework.org/schema/beans http://www.springframework.org/schema/beans/spring-beans.xsd">

    <!-- 真正可以产生Connection的ConnectionFactory,由对应的 JMS服务厂商提供-->
    <bean id="targetConnectionFactory" class="org.apache.activemq.ActiveMQConnectionFactory">
        <property name="brokerURL" value="tcp://localhost:61616"/>
    </bean>
    <!-- Spring用于管理真正的ConnectionFactory的ConnectionFactory -->
    <bean id="connectionFactory" class="org.springframework.jms.connection.SingleConnectionFactory">
        <!-- 目标ConnectionFactory对应真实的可以产生JMS Connection的ConnectionFactory -->
        <property name="targetConnectionFactory" ref="targetConnectionFactory"/>
    </bean>
    <!--这个是队列目的地,点对点的  文本信息-->
    <bean id="queueTextDestination" class="org.apache.activemq.command.ActiveMQQueue">
        <constructor-arg value="queue_text"/>
    </bean>
    <!-- 我的监听类 -->
    <bean id="myMessageListener" class="springactivemq.listener.MyMessageListener"/>


    <!-- 消息监听容器 -->
    <bean class="org.springframework.jms.listener.DefaultMessageListenerContainer">
        <property name="connectionFactory" ref="connectionFactory" />
        <property name="destination" ref="queueTextDestination" />
        <property name="messageListener" ref="myMessageListener" />
    </bean>


</beans>
MyMessageListener
public class MyMessageListener implements MessageListener {

    public void onMessage(Message message) {
        TextMessage textMessage=(TextMessage)message;
        try {
            System.out.println("接收到消息:"+textMessage.getText());
        } catch (JMSException e) {
            e.printStackTrace();
        }
    }
}
QueueProducer
@Component
public class QueueProducer {

    @Autowired
    private JmsTemplate jmsTemplate;

    @Autowired
    private Destination queueTextDestination;//配置文件applicationContext-jms-producer.xml点对点文本信息bean的id

    /**
     * 发送文本消息
     * @param text
     */
    public void sendTextMessage(final String text){
        jmsTemplate.send(queueTextDestination, new MessageCreator() {

            public Message createMessage(Session session) throws JMSException {
                return session.createTextMessage(text);
            }
        });
    }

}
测试
@RunWith(SpringJUnit4ClassRunner.class)
@ContextConfiguration(locations="classpath:applicationContext-jms-producer.xml")
public class AppTest {
    @Autowired
    private QueueProducer queueProducer;
    @Test
    public void testSend(){
        queueProducer.sendTextMessage("SpringJms-点对点");
    }
}
@RunWith(SpringJUnit4ClassRunner.class)
@ContextConfiguration(locations="classpath:applicationContext-jms-consumer-queue.xml")
public class Test2 {
    @Test
    public void testQueue(){
        try {
            System.in.read();

        } catch (IOException e) {
            e.printStackTrace();
        }
    }
}

发布订阅
applicationContext-jms-producer.xml
<?xml version="1.0" encoding="UTF-8"?>
<beans xmlns="http://www.springframework.org/schema/beans"
       xmlns:xsi="http://www.w3.org/2001/XMLSchema-instance"
       xmlns:context="http://www.springframework.org/schema/context"
       xsi:schemaLocation="http://www.springframework.org/schema/beans http://www.springframework.org/schema/beans/spring-beans.xsd http://www.springframework.org/schema/context http://www.springframework.org/schema/context/spring-context.xsd">
<!--Spring 骚包范围-->
    <context:component-scan base-package="springactivemq"/>

    <!-- 真正可以产生Connection的ConnectionFactory,由对应的 JMS服务厂商提供-->
    <bean id="targetConnectionFactory" class="org.apache.activemq.ActiveMQConnectionFactory">
        <property name="brokerURL" value="tcp://localhost:61616"/>
    </bean>
    <!-- Spring用于管理真正的ConnectionFactory的ConnectionFactory -->
    <bean id="connectionFactory" class="org.springframework.jms.connection.SingleConnectionFactory">
        <!-- 目标ConnectionFactory对应真实的可以产生JMS Connection的ConnectionFactory -->
        <property name="targetConnectionFactory" ref="targetConnectionFactory"/>
    </bean>
    <!-- Spring提供的JMS工具类,它可以进行消息发送、接收等 -->
    <bean id="jmsTemplate" class="org.springframework.jms.core.JmsTemplate">
        <!-- 这个connectionFactory对应的是我们定义的Spring提供的那个ConnectionFactory对象 -->
        <property name="connectionFactory" ref="connectionFactory"/>
    </bean>
    <!--这个是队列目的地,点对点的  文本信息-->
   <!--<bean id="queueTextDestination" class="org.apache.activemq.command.ActiveMQQueue">-->
        <!--<constructor-arg value="queue_text"/>-->
    <!--</bean>-->
    <!--这个是订阅模式  文本信息-->
    <bean id="topicTextDestination" class="org.apache.activemq.command.ActiveMQTopic">
        <constructor-arg value="topic_text"/>
    </bean>

</beans>
applicationContext-jms-consumer-topic.xml
<?xml version="1.0" encoding="UTF-8"?>
<beans xmlns="http://www.springframework.org/schema/beans"
       xmlns:xsi="http://www.w3.org/2001/XMLSchema-instance"
       xsi:schemaLocation="http://www.springframework.org/schema/beans http://www.springframework.org/schema/beans/spring-beans.xsd">

    <!-- 真正可以产生Connection的ConnectionFactory,由对应的 JMS服务厂商提供-->
    <bean id="targetConnectionFactory" class="org.apache.activemq.ActiveMQConnectionFactory">
        <property name="brokerURL" value="tcp://localhost:61616"/>
    </bean>
    <!-- Spring用于管理真正的ConnectionFactory的ConnectionFactory -->
    <bean id="connectionFactory" class="org.springframework.jms.connection.SingleConnectionFactory">
        <!-- 目标ConnectionFactory对应真实的可以产生JMS Connection的ConnectionFactory -->
        <property name="targetConnectionFactory" ref="targetConnectionFactory"/>
    </bean>
    <!--这个是队列目的地,点对点的  文本信息-->
    <bean id="topicTextDestination" class="org.apache.activemq.command.ActiveMQTopic">
        <constructor-arg value="topic_text"/>
    </bean>
    <!-- 我的监听类 -->
    <bean id="myMessageListener" class="springactivemq.listener.MyMessageListener"/>
    <!-- 消息监听容器 -->
    <bean class="org.springframework.jms.listener.DefaultMessageListenerContainer">
        <property name="connectionFactory" ref="connectionFactory"/>
        <property name="destination" ref="topicTextDestination"/>
        <property name="messageListener" ref="myMessageListener"/>
    </bean>

</beans>
TopicProducer
@Component
public class TopicProducer {
    @Autowired
    private JmsTemplate jmsTemplate;

    @Autowired
    private Destination topicTextDestination;

    /**
     * 发送文本消息
     * @param text
     */
    public void sendTextMessage(final String text){
        jmsTemplate.send(topicTextDestination, new MessageCreator() {
            public Message createMessage(Session session) throws JMSException {
                return session.createTextMessage(text);
            }
        });
    }
}
MyMessageListener
public class MyMessageListener implements MessageListener {

    public void onMessage(Message message) {
        TextMessage textMessage=(TextMessage)message;
        try {
            System.out.println("接收到消息:"+textMessage.getText());
        } catch (JMSException e) {
            e.printStackTrace();
        }
    }
}
测试
@RunWith(SpringJUnit4ClassRunner.class)
@ContextConfiguration(locations="classpath:applicationContext-jms-consumer-topic.xml")
public class TopicRegiTest {
        @Test
        public void testTopic(){
            try {
                System.in.read();
            } catch (IOException e) {
                e.printStackTrace();
            }
        }

}
@RunWith(SpringJUnit4ClassRunner.class)
@ContextConfiguration(locations="classpath:applicationContext-jms-producer.xml")
public class TopicSubTest {


        @Autowired
        private TopicProducer topicProducer;
        @Test
        public void sendTextQueue(){
            topicProducer.sendTextMessage("我是发布订阅");
        }

}

Demo源码:https://github.com/Xxianglei/ActiveMQ 附上