HAproxy介绍
- HAProxy是一个使用C语言编写的自由及开放源代码软件,其提供高可用性、负载均衡,以及基于TCP和HTTP的应用程序代理。
- HAProxy特别适用于那些负载特大的web站点,这些站点通常又需要会话保持或七层处理。HAProxy运行在当前的硬件上,完全可以支持数以万计的并发连接。并且它的运行模式使得它可以很简单安全的整合进您当前的架构中, 同时可以保护你的web服务器不被暴露到网络上。
- HAProxy实现了一种事件驱动, 单一进程模型,此模型支持非常大的并发连接数。多进程或多线程模型受内存限制 、系统调度器限制以及无处不在的锁限制,很少能处理数千并发连接。事件驱动模型因为在有更好的资源和时间管理的用户空间(User-Space) 实现所有这些任务,所以没有这些问题。此模型的弊端是,在多核系统上,这些程序通常扩展性较差。这就是为什么他们必须进行优化以 使每个CPU时间片(Cycle)做更多的工作。
安装配置HAproxy
实验环境均为redhat 6.5
安装HAproxy
[root@server1 ~]# tar zxf haproxy-1.7.3.tar.gz 		#解压
[root@server1 ~]# ls
anaconda-ks.cfg  haproxy-1.7.3.tar.gz  install.log.syslog
haproxy-1.7.3    install.log
[root@server1 ~]# cd haproxy-1.7.3
[root@server1 haproxy-1.7.3]# find . -name *.spec
##命令find -name *.spec有这个文件表示可以用rpm安装
./examples/haproxy.spec
[root@server1 yum.repos.d]# yum install rpm-build pcre-devel gcc -y
[root@server1 ~]# rpmbuild -tb haproxy-1.7.3.tar.gz 		#将包打为rpm格式
[root@server1 ~]# cd /root/rpmbuild/RPMS/x86_64/
[root@server1 x86_64]# ls
haproxy-1.7.3-1.x86_64.rpm
[root@server1 x86_64]# rpm -ivh haproxy-1.7.3-1.x86_64.rpm
Preparing...                ########################################### [100%]
   1:haproxy                ########################################### [100%]
配置HAproxy环境
找到haproxy的配置文件,并复制到/etc/haproxy目录下
[root@server1 ~]# cd haproxy-1.7.3/
[root@server1 haproxy-1.7.3]# cd examples/
[root@server1 examples]# ls
acl-content-sw.cfg     debugfind              seamless_reload.txt
auth.cfg               errorfiles             ssl.cfg
check                  haproxy.init           stats_haproxy.sh
check.conf             haproxy.spec           transparent_proxy.cfg
content-sw-sample.cfg  haproxy.vim            wurfl-example.cfg
debug2ansi             init.haproxy
debug2html             option-http_proxy.cfg
[root@server1 examples]# cp content-sw-sample.cfg /etc/haproxy/haproxy.cfg
[root@server1 examples]# cd /etc/haproxy/
[root@server1 haproxy]# ls
haproxy.cfg
负载均衡
提供haproxy服务的是server1,我们的后端是web服务器(sever2 server3)
- harpoxy端配置:
编辑haproxy的配置文件
haproxy的配置文件由两部分组成:全局设定和对代理的设定,共分为五段:global,defaults,frontend,backend,listen。
“global”配置段,用于设定全局配置参数;
“defaults”段用于为所有其它配置段提供默认参数,这配置默认配置参数可由下一个“defaults”所重新设定。
“frontend”段用于定义一系列监听的套接字,这些套接字可接受客户端请求并与之建立连接。
“backend”段用于定义一系列“后端”服务器,代理将会将对应客户端的请求转发至这些服务器。
“listen”段通过关联“frontend”和“backend”定义了一个完整的代理,通常只对TCP流量有用。所有代理的名称只能使用大写字母、小写字母、数字、-(中线)、_(下划线)、.(点号)和:(冒号)。此外,ACL名称会区分字母大小写。
[root@server1 haproxy]# vim haproxy.cfg
global
maxconn 10000 #设定每个haproxy进程所接受的最大并发连接数
stats socket /var/run/haproxy.stat mode 600 level admin
log 127.0.0.1 local0 #定义全局的syslog服务器,最多可以定义两个
uid 200
gid 200 #以指定的GID运行haproxy
chroot /var/empty #修改haproxy的工作目录至指定的目录
daemon
defaults #默认条件
mode http
log global
option httplog
option dontlognull
monitor-uri /monitoruri
maxconn 8000
timeout client 30s
stats uri /admin/stats
option prefer-last-server
retries 2
option redispatch
timeout connect 5s
timeout server 5s
# The public 'www' address in the DMZ
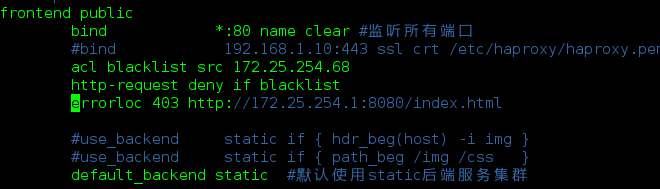
frontend public
bind *:80 name clear #监听所有端口
#bind 192.168.1.10:443 ssl crt /etc/haproxy/haproxy.pem
#use_backend static if { hdr_beg(host) -i img }
#use_backend static if { path_beg /img /css }
default_backend static #默认使用static后端服务集群
# The static backend backend for 'Host: img', /img and /css.
backend static
balance roundrobin # balance定义负载均衡算法,roundrobin基于权重进行轮叫,在服
务器的处理时间保持均匀分布时,这是最平衡、最公平的算法
server statsrv1 172.25.254.2:80 check inter 1000
server statsrv2 172.25.254.3:80 check inter 1000
-后端服务器(server2 server3)
[root@server2 yum.repos.d]# yum install httpd -y
[root@server2 yum.repos.d]# vim /var/www/html/index.html
[root@server2 yum.repos.d]# cat /var/www/html/index.html
<h1>server2.example.com</h1>
[root@server2 yum.repos.d]# /etc/init.d/httpd start
Starting httpd: httpd: apr_sockaddr_info_get() failed for server2.localdomain
httpd: Could not reliably determine the server's fully qualified domain name, using 127.0.0.1 for ServerName
                                                           [  OK  ]
server3同上
- 测试
在haproxy端打开服务
[root@server1 haproxy]# /etc/init.d/haproxy start
用物理机访问
[root@foundation68 ~]# curl 172.25.254.1
<h1>server3.example.com</h1>
[root@foundation68 ~]# curl 172.25.254.1
<h1>server2.example.com</h1>
[root@foundation68 ~]# curl 172.25.254.1
<h1>server3.example.com</h1>
[root@foundation68 ~]# curl 172.25.254.1
<h1>server2.example.com</h1>
在浏览器输入http://172.25.79.1/monitoruri(查看)

在浏览器输入http://172.25.79.1/admin/stats(看其stats状态页)

从安全角度考虑,我们设置状态页认证(用户名和密码)
编辑配置文件,写在defaults模块
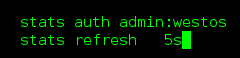
重启服务,再次访问状态页
 认证成功,会看到页面5秒就会更新一次

创建指定日志存放目录
修改日志服务配置文件从而修改日志存储位置
[root@server1 haproxy]# vim /etc/rsyslog.conf
 ##打开13,14行的注释
 13 $ModLoad imudp
 14 $UDPServerRun 514
 ##添加日志存储位置
 63 local0.* /var/log/haproxy.log
 ##重启日志服务
 [root@server1 haproxy]# /etc/init.d/rsyslog restart
- 测试(可以看到每条记录相差5秒)

基于TCP和HTTP的应用程序代理
访问控制
编辑haproxy的配置文件,写入
重启服务
在server1上安装httpd,编写默认页面,并将端口该为8080
- 测试


动静分离
编辑配置文件
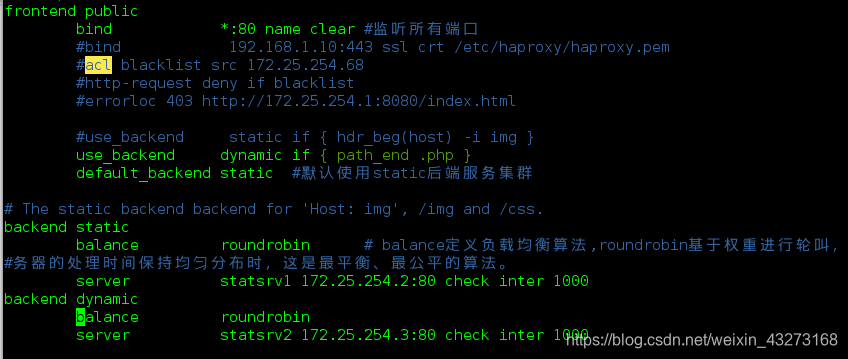
重启haproxy
在server3上安装php,编辑默认发布文件,重启apache
- 测试

看到默认访问的是server2,但当我们访问动态页面时访问serevr3
读写分离
1 server1编辑配置文件,如果有写入操作,访问动态server3主机
[root@server1 haproxy]# vim haproxy.cfg
#在defaults模块中写入
#读参数
    	acl write method POST
        acl write method PUT
#写参数
        acl read method POST
        acl read method HEAD
#在frontend模块中写入
 		use_backend     dynamic if write
 		use_backend     static      if read

#backend模块
      backend static
        balance         roundrobin
        server          statsrv1 172.25.254.2:80 check inter 1000
	  backend dynamic
        balance         roundrobin
        server          statsrv2 172.25.254.3:80 check inter 1000
2 在server3中的httpd默认发布目录,放进去index.php(选择图片的静态页面)和upload_file.php(上传图片的动态页面),存放上传图片的目录upload目录。
[root@server3 html]# ll
total 16
-rw-r–r-- 1 root root 29 Apr 24 19:51 index.html
-rw-r–r-- 1 root root 257 Apr 30 11:10 index.php
drwxrwxrwx 2 root root 4096 Apr 30 11:00 upload
-rw-r–r-- 1 root root 929 Apr 30 11:14 upload_file.php
- index.php 文件内容 ( 选择图片的静态页面 )
<html>
<body>

<form action="upload_file.php" method="post"
enctype="multipart/form-data">
<label for="file">Filename:</label>
<input type="file" name="file" id="file" />
<br />
<input type="submit" name="submit" value="Submit" />
</form>

</body>
</html>
- upload_file.php 文件内容(上传图片的动态页面)
<?php
if ((($_FILES["file"]["type"] == "image/gif")
|| ($_FILES["file"]["type"] == "image/jpeg")
|| ($_FILES["file"]["type"] == "image/pjpeg"))
&& ($_FILES["file"]["size"] < 20000))
  {
  if ($_FILES["file"]["error"] > 0)
    {
    echo "Return Code: " . $_FILES["file"]["error"] . "<br />";
    }
  else
    {
    echo "Upload: " . $_FILES["file"]["name"] . "<br />";
    echo "Type: " . $_FILES["file"]["type"] . "<br />";
    echo "Size: " . ($_FILES["file"]["size"] / 1024) . " Kb<br />";
    echo "Temp file: " . $_FILES["file"]["tmp_name"] . "<br />";

    if (file_exists("upload/" . $_FILES["file"]["name"]))
      {
      echo $_FILES["file"]["name"] . " already exists. ";
      }
    else
      {
      move_uploaded_file($_FILES["file"]["tmp_name"],
      "upload/" . $_FILES["file"]["name"]);
      echo "Stored in: " . "upload/" . $_FILES["file"]["name"];
      }
    }
  }
else
  {
  echo "Invalid file";
  }
?>
修改上传的大小限制
5 && ($_FILES["file"]["size"] < 2000000)) ##修改为2000000
3 将编写好的upload相关文件传到server2上
[root@server2 html]# ll
total 16
-rw-r--r-- 1 root root   29 Apr 30 11:16 index.html
-rw-r--r-- 1 root root  257 Apr 30 11:17 index.php
drwxrwxrwx 2 root root 4096 Apr 30 11:17 upload
-rw-r--r-- 1 root root  929 Apr 30 11:17 upload_file.php
4 在server2上安装php,并重启httpd
[root@server2 ~]# yum install php -y
[root@server2 ~]# /etc/init.d/httpd restart
- 测试
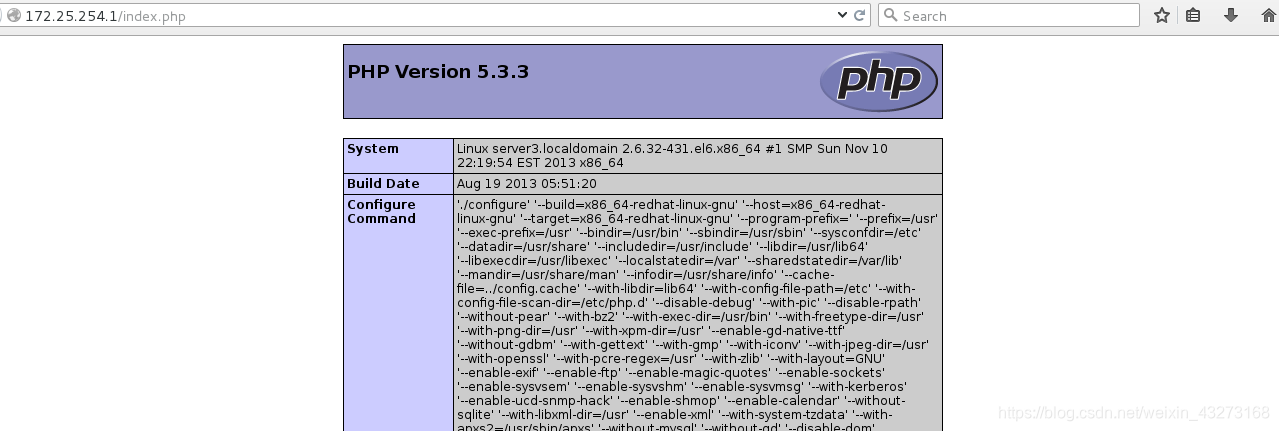
浏览器输入:http://172.25.254.1/index.php
显示以下界面,点击Browse…

上传一个图片
上传成功显示如下
可以看到上传的图片上传到了server3上