前言:接上篇简单的用户自定义拦截,登录后。我们实现shiro的安全认证与授权
工具:idea
准备:删除之前的 interceptor 文件夹(即删除自定义拦截器)
在pom.xml中引入shiro所需jar包
<!--Apache Shiro所需的jar包 -->
		<dependency>
			<groupId>org.apache.shiro</groupId>
			<artifactId>shiro-spring</artifactId>
			<version>1.2.4</version>
		</dependency>
		<dependency>
			<groupId>org.apache.shiro</groupId>
			<artifactId>shiro-ehcache</artifactId>
			<version>1.2.4</version>
		</dependency>
		<dependency>
			<groupId>org.apache.shiro</groupId>
			<artifactId>shiro-cas</artifactId>
			<version>1.2.4</version>
		</dependency>
修改之前的loginController的loginUser,logout方法
package com.example.controller;

import com.example.service.UserService;
import org.apache.shiro.SecurityUtils;
import org.apache.shiro.authc.DisabledAccountException;
import org.apache.shiro.authc.IncorrectCredentialsException;
import org.apache.shiro.authc.LockedAccountException;
import org.apache.shiro.authc.UnknownAccountException;
import org.apache.shiro.authc.UsernamePasswordToken;
import org.apache.shiro.subject.Subject;
import org.springframework.beans.factory.annotation.Autowired;
import org.springframework.stereotype.Controller;
import org.springframework.web.bind.annotation.RequestMapping;
import org.springframework.web.bind.annotation.ResponseBody;


/**
 * @author zhaozeren
 * @version 1.0
 * @date 2019/3/18
 */
@Controller
@RequestMapping("login")
public class LoginController {

    @Autowired
    private UserService userService;

    /**
     * 登录页面
     *
     * @return
     */
    @RequestMapping("login")
    public String login() {
        return "login";
    }

    /**
     * 登录验证
     *
     * @return
     */
    @RequestMapping("loginUser")
    @ResponseBody
    public String loginUser(String userName, String passWord) {
       //获取shiro大管家
        Subject subject = SecurityUtils.getSubject();
        //获取token,将前台传入的用户名和密码放入UsernamePasswordToken
        UsernamePasswordToken usernamePasswordToken = new UsernamePasswordToken(userName, passWord);
        try {
            subject.login(usernamePasswordToken);
            return "success";
        } catch (UnknownAccountException e){
            return "没找到帐号";
        } catch (IncorrectCredentialsException e){
            return "密码错误";
        } catch (LockedAccountException e){
            return "账号被锁定";
        }catch (DisabledAccountException e){
            return "禁用的账号";
        } catch (Exception e){
            return "登录失败";
        }
    }

    @RequestMapping("logout")
    public String logout() {
        Subject subject = SecurityUtils.getSubject();
        subject.logout();
        return "login";
    }

    @RequestMapping("unauthorized")
    public String unauthorized() {
        return "unauthorized";
    }
}
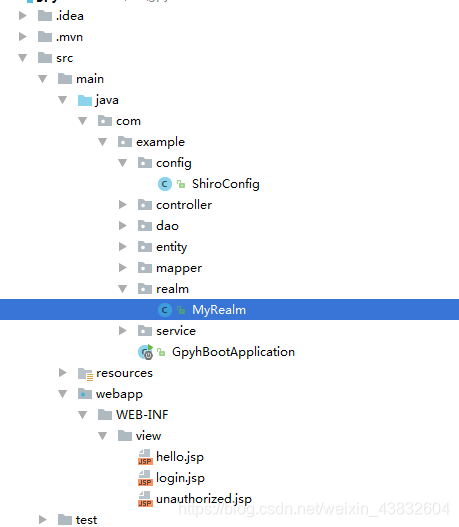
重点:编写用户自定义MyRealm类,继承shiro的 AuthorizingRealm类
编写 自定义ShiroConfig 用来配置全局的shiro配置
MyRealm:
package com.example.realm;
import com.example.entity.User;
import com.example.service.UserService;
import org.apache.shiro.SecurityUtils;
import org.apache.shiro.authc.AuthenticationException;
import org.apache.shiro.authc.AuthenticationInfo;
import org.apache.shiro.authc.AuthenticationToken;
import org.apache.shiro.authc.LockedAccountException;
import org.apache.shiro.authc.SimpleAuthenticationInfo;
import org.apache.shiro.authc.UnknownAccountException;
import org.apache.shiro.authc.UsernamePasswordToken;
import org.apache.shiro.authz.AuthorizationInfo;
import org.apache.shiro.authz.SimpleAuthorizationInfo;
import org.apache.shiro.realm.AuthorizingRealm;
import org.apache.shiro.subject.PrincipalCollection;
import org.springframework.beans.factory.annotation.Autowired;
/**
* @author zhaozeren
* @version 1.0
* @date 2019/3/18
*/
public class MyRealm extends AuthorizingRealm {
@Autowired
private UserService userService;
@Override
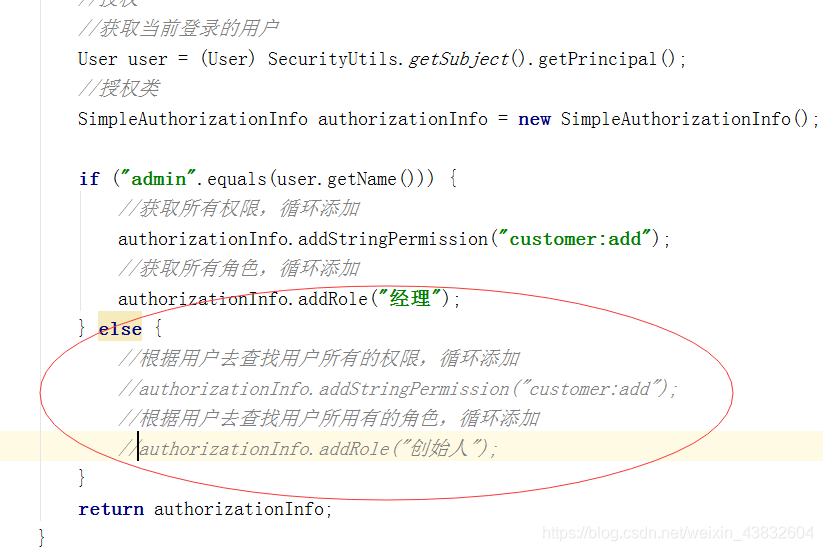
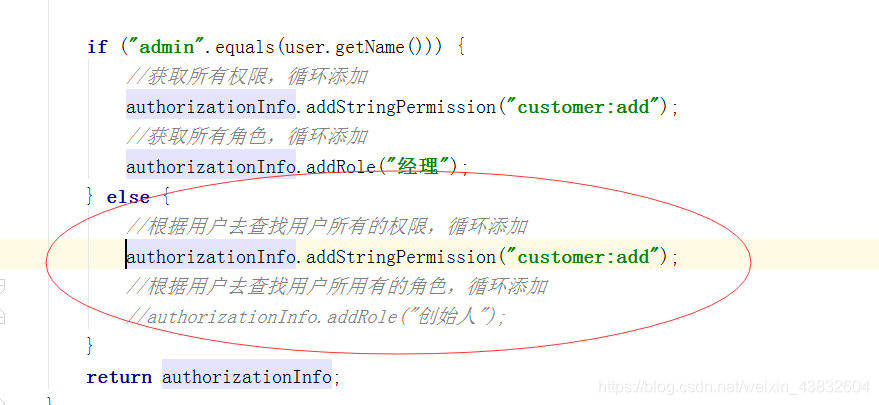
protected AuthorizationInfo doGetAuthorizationInfo(PrincipalCollection principals) {
//授权
//获取当前登录的用户
User user = (User) SecurityUtils.getSubject().getPrincipal();
//授权类
SimpleAuthorizationInfo authorizationInfo = new SimpleAuthorizationInfo();
if ("admin".equals(user.getName())) {
//获取所有权限,循环添加
authorizationInfo.addStringPermission("customer:add");
//获取所有角色,循环添加
authorizationInfo.addRole("经理");
} else {
//根据用户去查找用户所有的权限,循环添加
// authorizationInfo.addStringPermission("customer:add");
//根据用户去查找用户所用有的角色,循环添加
//authorizationInfo.addRole("创始人");
}
return authorizationInfo;
}
@Override
protected AuthenticationInfo doGetAuthenticationInfo(AuthenticationToken token) throws AuthenticationException {
//用户的认证
UsernamePasswordToken usernamePasswordToken = (UsernamePasswordToken) token;
//用户所输入的同户名
String username = usernamePasswordToken.getUsername();
//根据用户名去数据库查找
User user = userService.getUserByName(username);
if (user == null) {// 没找到帐号
throw new UnknownAccountException();
}
if (user.getStatus() == 0) {// 帐号未启用(或账号被锁定)
throw new LockedAccountException();
}
SimpleAuthenticationInfo simpleAuthenticationInfo = new SimpleAuthenticationInfo(user, user.getPassword(), super.getName());
return simpleAuthenticationInfo;
}
}
ShiroConfig :
package com.example.config;
import com.example.realm.MyRealm;
import org.apache.shiro.cache.ehcache.EhCacheManager;
import org.apache.shiro.mgt.SecurityManager;
import org.apache.shiro.spring.security.interceptor.AuthorizationAttributeSourceAdvisor;
import org.apache.shiro.spring.web.ShiroFilterFactoryBean;
import org.apache.shiro.web.mgt.DefaultWebSecurityManager;
import org.springframework.aop.framework.autoproxy.DefaultAdvisorAutoProxyCreator;
import org.springframework.context.annotation.Bean;
import org.springframework.context.annotation.Configuration;
import java.util.LinkedHashMap;
import java.util.Map;
/**
* @author zhaozeren
* @version 1.0
* @date 2019/3/18
*/
@Configuration
public class ShiroConfig {
@Bean
public ShiroFilterFactoryBean shirFilter(SecurityManager securityManager) {
System.out.println("--------------------shiro filter-------------------");
ShiroFilterFactoryBean shiroFilterFactoryBean = new ShiroFilterFactoryBean();
shiroFilterFactoryBean.setSecurityManager(securityManager);
Map<String, String> filterChainDefinitionMap = new LinkedHashMap<>();
//注意过滤器配置顺序 不能颠倒
//配置退出 过滤器,其中的具体的退出代码Shiro已经替我们实现了,登出后跳转配置的loginUrl
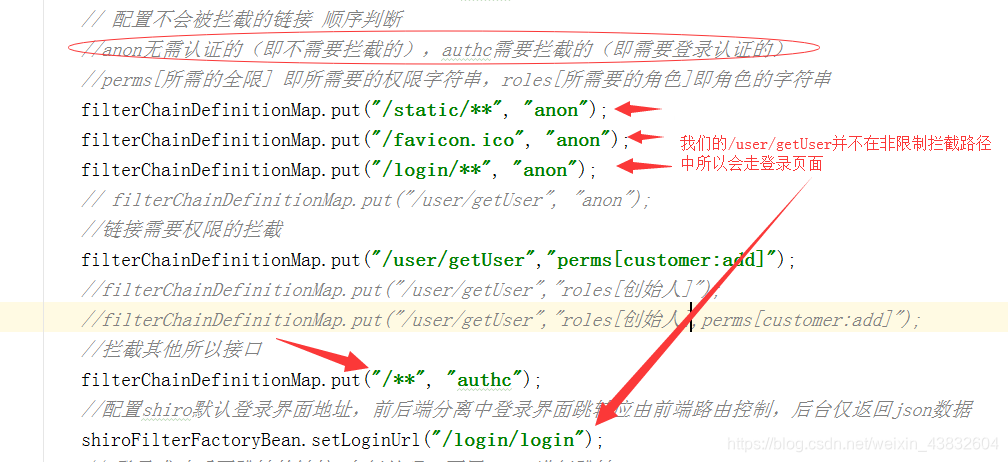
// 配置不会被拦截的链接 顺序判断
//anon无需认证的(即不需要拦截的),authc需要拦截的(即需要登录认证的)
//perms[所需的全限] 即所需要的权限字符串,roles[所需要的角色]即角色的字符串
filterChainDefinitionMap.put("/static/**", "anon");
filterChainDefinitionMap.put("/favicon.ico", "anon");
filterChainDefinitionMap.put("/login/**", "anon");
// filterChainDefinitionMap.put("/user/getUser", "anon");
//链接需要权限的拦截
filterChainDefinitionMap.put("/user/getUser","perms[customer:add]");
//filterChainDefinitionMap.put("/user/getUser","roles[创始人]");
//filterChainDefinitionMap.put("/user/getUser","roles[创始人],perms[customer:add]");
//拦截其他所以接口
filterChainDefinitionMap.put("/**", "authc");
//配置shiro默认登录界面地址,前后端分离中登录界面跳转应由前端路由控制,后台仅返回json数据
shiroFilterFactoryBean.setLoginUrl("/login/login");
// 登录成功后要跳转的链接 自行处理。不用shiro进行跳转
// shiroFilterFactoryBean.setSuccessUrl("user/index");
//未授权界面;
shiroFilterFactoryBean.setUnauthorizedUrl("/login/unauthorized");
shiroFilterFactoryBean.setFilterChainDefinitionMap(filterChainDefinitionMap);
return shiroFilterFactoryBean;
}
/**
* shiro 用户数据注入
*
* @return
*/
@Bean
public MyRealm shiroRealm() {
MyRealm shiroRealm = new MyRealm();
return shiroRealm;
}
/**
* 配置管理层。即安全控制层
*
* @return
*/
@Bean
public SecurityManager securityManager() {
DefaultWebSecurityManager securityManager = new DefaultWebSecurityManager();
securityManager.setRealm(shiroRealm());
return securityManager;
}
}
配置完成进行访问:http://localhost:8888/user/getUser
会被拦截到登录页面。

因为我们配置了全局的路径拦截:
我们输入正确的用户名,密码登录成功后:
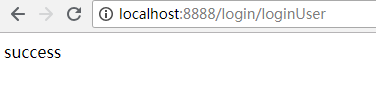
再次访问http://localhost:8888/user/getUser
得到结果
以上是对认证,用户的登录做的限制
授权,我们对登录用户的权限限制
修改 shiroConfig
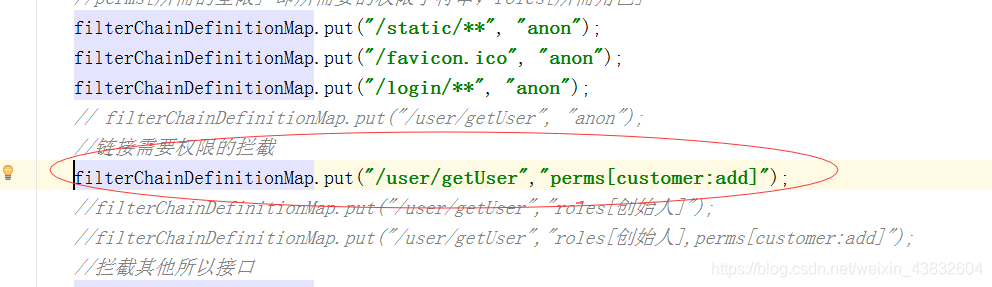
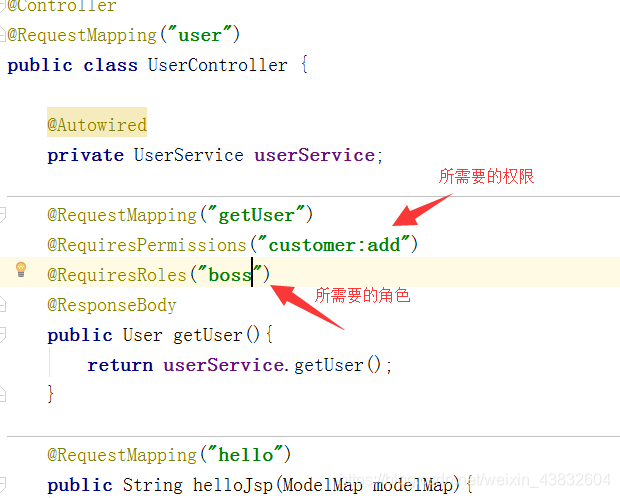
我们对/user/getUser 进行授权,必须有customer:add的权限才能访问
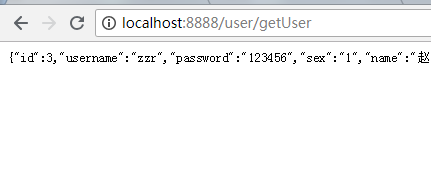
重启项目,成功登录后访问http://localhost:8888/user/getUser
返回
分析:
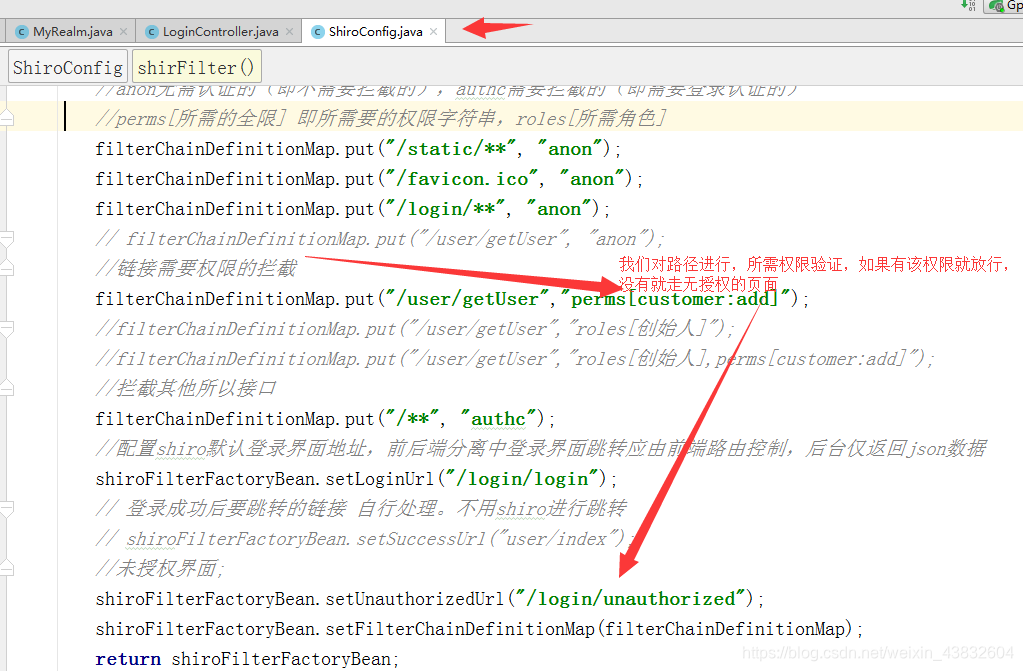
首先我们访问/user/getUser时我们设置了权限认证,shiro会到我们的myReaml中查询当前登录用户的所有权限跟,customer:add做对比
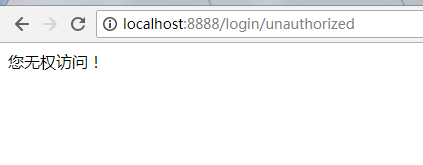
可是此时我们登录用户的权限什么都没有:
所以跳转到没有授权的页面。
我们给登录的用户添加权限
成功登录后再次访问http://localhost:8888/user/getUser
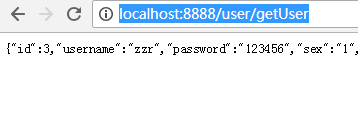
访问成功!
用户角色的认证道理同上,不在做多说。
我们真实开发中要拦截的路径有很多,如果一个个都写在shiroConfig中,太多而且杂乱。此时我们采取注解方式。将所要拦截的路径,所需的权限或角色添加在方法上。即:
实现:在我们的shirConfig 中开始 aop 注解支持
 /**
     * 开启shiro aop注解支持. 使用代理方式;所以需要开启代码支持;
     *
     * @param securityManager
     * @return
     */
    @Bean
    public AuthorizationAttributeSourceAdvisor authorizationAttributeSourceAdvisor(SecurityManager securityManager) {
        AuthorizationAttributeSourceAdvisor authorizationAttributeSourceAdvisor = new AuthorizationAttributeSourceAdvisor();
        authorizationAttributeSourceAdvisor.setSecurityManager(securityManager);
        return authorizationAttributeSourceAdvisor;
    }

    @Bean
    public DefaultAdvisorAutoProxyCreator advisorAutoProxyCreator() {
        DefaultAdvisorAutoProxyCreator advisorAutoProxyCreator = new DefaultAdvisorAutoProxyCreator();
        advisorAutoProxyCreator.setProxyTargetClass(true);
        return advisorAutoProxyCreator;
    }
在我们所需要的拦截路径方法上写上@RequiresPermissions(“customer:add”)或@RequiresRoles(“boss”)标签即可
进一步优化,添加ehcache缓存处理
理由:真实开发一个项目的上线,用户的访问极大。但是我们每访问一个链接,都去查一次用户拥有什么权限,或角色,对数据库的压力和服务器压力太大。所以我们用缓存来解决,用户登录只查询一次权限,角色。退出后清空,在登录再查。
我们之前已经引入了ehcache的jar包无需再次引入,
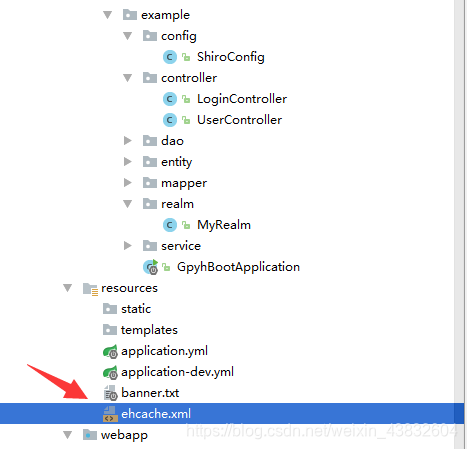
在resources下编写ehcache.xml
ehcache.xml :
<?xml version="1.0" encoding="UTF-8"?>
<ehcache name="es">
    <diskStore path="java.io.tmpdir"/>
    <!--
       name:缓存名称。
       maxElementsInMemory:缓存最大数目
       maxElementsOnDisk:硬盘最大缓存个数。
       eternal:对象是否永久有效,一但设置了,timeout将不起作用。
       overflowToDisk:是否保存到磁盘,当系统当机时
       timeToIdleSeconds:设置对象在失效前的允许闲置时间(单位:秒)。仅当eternal=false对象不是永久有效时使用,可选属性,默认值是0,也就是可闲置时间无穷大。
       timeToLiveSeconds:设置对象在失效前允许存活时间(单位:秒)。最大时间介于创建时间和失效时间之间。仅当eternal=false对象不是永久有效时使用,默认是0.,也就是对象存活时间无穷大。
       diskPersistent:是否缓存虚拟机重启期数据 Whether the disk store persists between restarts of the Virtual Machine. The default value is false.
       diskSpoolBufferSizeMB:这个参数设置DiskStore(磁盘缓存)的缓存区大小。默认是30MB。每个Cache都应该有自己的一个缓冲区。
       diskExpiryThreadIntervalSeconds:磁盘失效线程运行时间间隔,默认是120秒。
       memoryStoreEvictionPolicy:当达到maxElementsInMemory限制时,Ehcache将会根据指定的策略去清理内存。默认策略是LRU(最近最少使用)。你可以设置为FIFO(先进先出)或是LFU(较少使用)。
        clearOnFlush:内存数量最大时是否清除。
         memoryStoreEvictionPolicy:
            Ehcache的三种清空策略;
            FIFO,first in first out,这个是大家最熟的,先进先出。
            LFU, Less Frequently Used,就是上面例子中使用的策略,直白一点就是讲一直以来最少被使用的。如上面所讲,缓存的元素有一个hit属性,hit值最小的将会被清出缓存。
            LRU,Least Recently Used,最近最少使用的,缓存的元素有一个时间戳,当缓存容量满了,而又需要腾出地方来缓存新的元素的时候,那么现有缓存元素中时间戳离当前时间最远的元素将被清出缓存。
    -->
    <defaultCache
            maxElementsInMemory="10000"
            eternal="false"
            timeToIdleSeconds="120"
            timeToLiveSeconds="120"
            overflowToDisk="false"
            diskPersistent="false"
            diskExpiryThreadIntervalSeconds="120"
    />
    <!-- 登录记录缓存锁定10分钟 -->
    <cache name="passwordRetryCache"
           maxEntriesLocalHeap="2000"
           eternal="false"
           timeToIdleSeconds="3600"
           timeToLiveSeconds="0"
           overflowToDisk="false"
           statistics="true">
    </cache>
</ehcache>
修改shiroConfig:
添加
  /**
     * 配置ehcache
     * @return
     */
    @Bean
    public EhCacheManager ehCacheManager() {
        System.out.println("ShiroConfiguration.getEhCacheManager()");
        EhCacheManager ehCacheManager = new EhCacheManager();
        ehCacheManager.setCacheManagerConfigFile("classpath:ehcache.xml");
        return ehCacheManager;
    }
将缓存注入shiro管理器

此时我们再去查询,我们只会查询一次权限或角色。
整体的shiroConfig :
package com.example.config;

import com.example.realm.MyRealm;
import org.apache.shiro.cache.ehcache.EhCacheManager;
import org.apache.shiro.mgt.SecurityManager;
import org.apache.shiro.spring.security.interceptor.AuthorizationAttributeSourceAdvisor;
import org.apache.shiro.spring.web.ShiroFilterFactoryBean;
import org.apache.shiro.web.mgt.DefaultWebSecurityManager;
import org.springframework.aop.framework.autoproxy.DefaultAdvisorAutoProxyCreator;
import org.springframework.context.annotation.Bean;
import org.springframework.context.annotation.Configuration;

import java.util.LinkedHashMap;
import java.util.Map;

/**
 * @author zhaozeren
 * @version 1.0
 * @date 2019/3/18
 */
@Configuration
public class ShiroConfig {
    @Bean
    public ShiroFilterFactoryBean shirFilter(SecurityManager securityManager) {
        System.out.println("--------------------shiro filter-------------------");
        ShiroFilterFactoryBean shiroFilterFactoryBean = new ShiroFilterFactoryBean();
        shiroFilterFactoryBean.setSecurityManager(securityManager);
        Map<String, String> filterChainDefinitionMap = new LinkedHashMap<>();
        //注意过滤器配置顺序 不能颠倒
        //配置退出 过滤器,其中的具体的退出代码Shiro已经替我们实现了,登出后跳转配置的loginUrl
        // 配置不会被拦截的链接 顺序判断
        //anon无需认证的(即不需要拦截的),authc需要拦截的(即需要登录认证的)
        //perms[所需的全限] 即所需要的权限字符串,roles[所需角色]
        filterChainDefinitionMap.put("/static/**", "anon");
        filterChainDefinitionMap.put("/favicon.ico", "anon");
        filterChainDefinitionMap.put("/login/**", "anon");
        // filterChainDefinitionMap.put("/user/getUser", "anon");
        //链接需要权限的拦截
        //filterChainDefinitionMap.put("/user/getUser","perms[customer:add]");
        //filterChainDefinitionMap.put("/user/getUser","roles[创始人]");
        //filterChainDefinitionMap.put("/user/getUser","roles[创始人],perms[customer:add]");
        //拦截其他所以接口
        filterChainDefinitionMap.put("/**", "authc");
        //配置shiro默认登录界面地址,前后端分离中登录界面跳转应由前端路由控制,后台仅返回json数据
        shiroFilterFactoryBean.setLoginUrl("/login/login");
        // 登录成功后要跳转的链接 自行处理。不用shiro进行跳转
        // shiroFilterFactoryBean.setSuccessUrl("user/index");
        //未授权界面;
        shiroFilterFactoryBean.setUnauthorizedUrl("/login/unauthorized");
        shiroFilterFactoryBean.setFilterChainDefinitionMap(filterChainDefinitionMap);
        return shiroFilterFactoryBean;
    }

    /**
     * shiro 用户数据注入
     *
     * @return
     */
    @Bean
    public MyRealm shiroRealm() {
        MyRealm shiroRealm = new MyRealm();
        return shiroRealm;
    }

    /**
     * 配置ehcache
     * @return
     */
    @Bean
    public EhCacheManager ehCacheManager() {
        System.out.println("ShiroConfiguration.getEhCacheManager()");
        EhCacheManager ehCacheManager = new EhCacheManager();
        ehCacheManager.setCacheManagerConfigFile("classpath:ehcache.xml");
        return ehCacheManager;
    }


    /**
     * 配置管理层。即安全控制层
     *
     * @return
     */
    @Bean
    public SecurityManager securityManager() {
        DefaultWebSecurityManager securityManager = new DefaultWebSecurityManager();
        securityManager.setRealm(shiroRealm());
        //自定义缓存实现
        securityManager.setCacheManager(ehCacheManager());
        return securityManager;
    }

    /**
     * 开启shiro aop注解支持. 使用代理方式;所以需要开启代码支持;
     *
     * @param securityManager
     * @return
     */
    @Bean
    public AuthorizationAttributeSourceAdvisor authorizationAttributeSourceAdvisor(SecurityManager securityManager) {
        AuthorizationAttributeSourceAdvisor authorizationAttributeSourceAdvisor = new AuthorizationAttributeSourceAdvisor();
        authorizationAttributeSourceAdvisor.setSecurityManager(securityManager);
        return authorizationAttributeSourceAdvisor;
    }

    @Bean
    public DefaultAdvisorAutoProxyCreator advisorAutoProxyCreator() {
        DefaultAdvisorAutoProxyCreator advisorAutoProxyCreator = new DefaultAdvisorAutoProxyCreator();
        advisorAutoProxyCreator.setProxyTargetClass(true);
        return advisorAutoProxyCreator;
    }
}
事后踩的坑,当我们编写自定义myRealm时,我用的是 userService去查询用户了,此时会存在一个坑,就是整个userService的事务会失效。详解见引起事务失效的原因
不过我推荐解决的最简单方法是,将userService改为userDao.
我们直接在到层操作。
以上是boot整合shiro+ehcache缓存的简单实现。如果对您有用,点个赞,让我更有动力写下去。互相学习