版权声明:转载请注明出版 https://blog.csdn.net/matt45m/article/details/85697858
一、概述
前面看到如何使用HOG去提取一张图像的中的局部目标的特征,那么得到了这些特征之后,用来做什么,OpencCV的官方给了一个使用HOG进行行人检测的样例。所加载的分类器是官方已经训练好的,而OpenCV官方自带的分类器是利用Navneet Dalal和Bill Triggs提供的样本进行训练的,并利用线性SVM作为分类器,从而实现行人检测。
二.代码实现
#pragma once

#include <iostream>
#include <string>
#include <opencv2/core/core.hpp>
#include <opencv2/highgui/highgui.hpp>
#include <opencv2/imgproc/imgproc.hpp>
#include <opencv2/objdetect/objdetect.hpp>
#include <opencv2/ml/ml.hpp>
#include <opencv2\opencv.hpp>
#include<ctime>

using namespace std;
using namespace cv;
using namespace cv::ml;

class HogDetection
{
public:
	HogDetection();
	HogDetection(Mat _src);
	~HogDetection();
	Mat hogSvm();
private:
	Mat src;
};
实现文件:
#include "HogDetection.h"
#include <opencv2\xfeatures2d\nonfree.hpp>


HogDetection::HogDetection()
{

}

HogDetection::HogDetection(Mat _src)
{
	src = _src;
}

HogDetection::~HogDetection()
{
}

Mat HogDetection::hogSvm()
{
	//外接矩形数组
	vector<Rect> found, found_filtered;
	clock_t start, end;
	start = clock();
	//HOG特征检测器
	HOGDescriptor hog;
	//设置SVM分类器为默认参数
	hog.setSVMDetector(HOGDescriptor::getDefaultPeopleDetector());
	//对图像进行多尺度检测,检测窗口移动步长为(8,8)
	hog.detectMultiScale(src, found, 0, Size(2, 2), Size(0, 0), 1.05, 2);
	end = (double)(1000 * (clock() - start) / CLOCKS_PER_SEC);
	cout << "HOG Detection time: "<<end << "ms!" << endl;
	//找出所有没有嵌套的矩形框r,并放入found_filtered中,如果有嵌套的话,则取外面最大的那个矩形框放入found_filtered中
	for (int i = 0; i < found.size(); i++)
	{
		Rect r = found[i];
		int j = 0;
		for (; j < found.size(); j++)
		{
			if (j != i && (r & found[j]) == r)
			{
				break;
			}
		}
		if (j == found.size())
		{
			found_filtered.push_back(r);
		}
	}

	//画矩形框,因为hog检测出的矩形框比实际人体框要稍微大些,所以这里需要做一些调整
	for (int i = 0; i<found_filtered.size(); i++)
	{
		Rect r = found_filtered[i];
		r.x += cvRound(r.width*0.1);
		r.width = cvRound(r.width*0.8);
		r.y += cvRound(r.height*0.07);
		r.height = cvRound(r.height*0.8);
		rectangle(src, r.tl(), r.br(), Scalar(0, 0, 255), 3);
	}
	return src;
}
主函数:
#include "HogDetection.h"

using namespace std;
using namespace cv;
using namespace cv::ml;

int main(void)
{
	Mat src = imread("C:/Users/matt/Desktop/demo/05.jpg");
	namedWindow("src", WINDOW_NORMAL);
	imshow("src", src);

	HogDetection hogDet(src);
	Mat svm_dst = hogDet.hogSvm();

	namedWindow("HOGSVM", WINDOW_NORMAL);
	imshow("HOGSVM", svm_dst);
	waitKey(0);
	return 0;
}
运行结果:
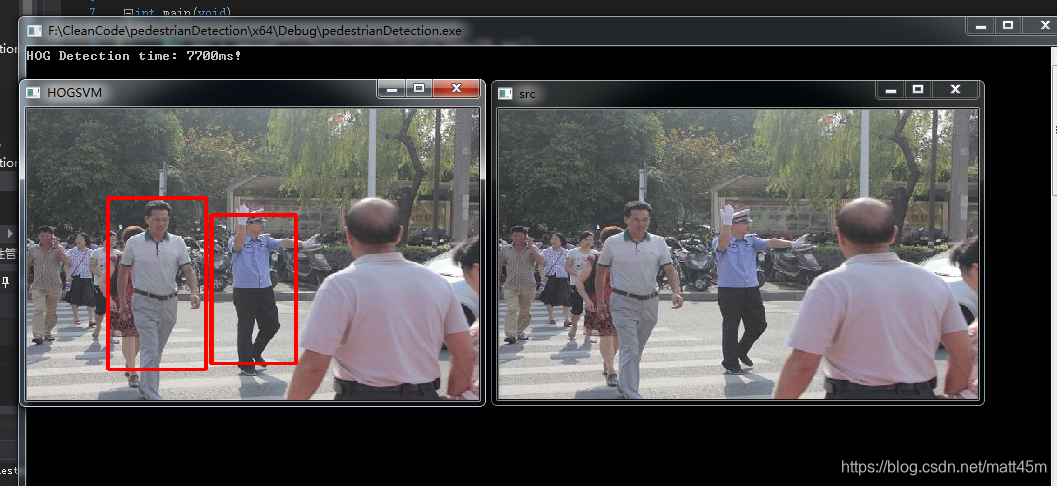
3.运行得到的结果并不见得都能适用个人项目的应用场合。因此,针对个人的特定应用场景,有时候很有必要进行重新训练得到适合自己使用的分类器。
后记
1.关于整个工程的源码,运行程序时的bug,或者有如何优代码的想法都可以加这个群(487350510)互相讨论学习。