前言
在前面的博文中,我们也看到,在进行训练的样本比较少,每个种类的样本只有120张,迭代次数为100代,训练得到的模型在测试那些特征不那么明显图像时,准确率达不到我们想要的效果。如果下图:

测试的结果如下:

这个测试结果是不准确的,像这种概率是根本无法在项目中应用。一般深度学习的库都要求样本量尽量在在1万个以上,但有时候我们的样本又达不到这个数量,什么办呢,这里就要用到别的用户的训练好的成熟的数据模型进行微调(fine-tuning),借用训练好的参数,可以更快的收敛,达到比原来样本小的时候训练效果要好一些。但使用的网络必须一样。
图像分类这块,caffe团队用ImageNet进行训练,迭代30多万次,训练出来一个model。这个model将图片分为1000类,应该是目前为止最好的图片分类model了,这里就会用caffe的官方模型来进行迁移学习。
一、数据准备
在data这个文件夹下新建立一个,把上次转换的数据,均值文件文件都移到到这个文件夹,然后把caffe的图像分类官方模型下载到当前文件夹,下载地址是:http://dl.caffe.berkeleyvision.org/bvlc_reference_caffenet.caffemodel。
当前文件夹所包含的文件如下图:

所有包含的文件,不能少,如果没有这些文件,可以往回看我之前写的博文,如何生成这几个文件的。
2.数据处理
二、更改代码
修改配置三个文件的,这里我贴出我的文件,路径是我电脑上的,可能参考,是于参数的说明,可能看上一个博文。
1.修改solever.prototxt文件
net: "E:/LIB/caffe-windows/data/fine_tuning/train_val.prototxt"
test_iter: 4
test_interval: 8
base_lr: 0.001
lr_policy: "step"
gamma: 0.1
stepsize: 160
display: 20
max_iter: 800
momentum: 0.9
weight_decay: 0.0005
snapshot: 5000
snapshot_prefix: "E:/LIB/caffe-windows/data/fine_tuning/train"
solver_mode: CPU
2.train_val.prototxt文件
name: "CaffeNet"
layer {
  name: "data"
  type: "Data"
  top: "data"
  top: "label"
  include {
    phase: TRAIN
  }
  transform_param {
    mirror: true
    crop_size: 227
    mean_file: "data/fine_tuning/train_mean.binaryproto" #均值文件路径
  }
# mean pixel / channel-wise mean instead of mean image
#  transform_param {
#    crop_size: 227
#    mean_value: 104
#    mean_value: 117
#    mean_value: 123
#    mirror: true
#  }
  data_param {
    source: "data/fine_tuning/train_leveldb" #转换文件路径
    batch_size: 60
    backend: LEVELDB #数据类型
  }
}
layer {
  name: "data"
  type: "Data"
  top: "data"
  top: "label"
  include {
    phase: TEST
  }
  transform_param {
    mirror: false
    crop_size: 227
    mean_file: "data/fine_tuning/test_mean.binaryproto" #均值文件路径
  }
# mean pixel / channel-wise mean instead of mean image
#  transform_param {
#    crop_size: 227
#    mean_value: 104
#    mean_value: 117
#    mean_value: 123
#    mirror: false
#  }
  data_param {
    source: "data/fine_tuning/test_leveldb" #转换文件路径
    batch_size: 25
    backend: LEVELDB
  }
}
layer {
  name: "conv1"
  type: "Convolution"
  bottom: "data"
  top: "conv1"
  param {
    lr_mult: 1
    decay_mult: 1
  }
  param {
    lr_mult: 2
    decay_mult: 0
  }
  convolution_param {
    num_output: 96
    kernel_size: 11
    stride: 4
    weight_filler {
      type: "gaussian"
      std: 0.01
    }
    bias_filler {
      type: "constant"
      value: 0
    }
  }
}
layer {
  name: "relu1"
  type: "ReLU"
  bottom: "conv1"
  top: "conv1"
}
layer {
  name: "pool1"
  type: "Pooling"
  bottom: "conv1"
  top: "pool1"
  pooling_param {
    pool: MAX
    kernel_size: 3
    stride: 2
  }
}
layer {
  name: "norm1"
  type: "LRN"
  bottom: "pool1"
  top: "norm1"
  lrn_param {
    local_size: 5
    alpha: 0.0001
    beta: 0.75
  }
}
layer {
  name: "conv2"
  type: "Convolution"
  bottom: "norm1"
  top: "conv2"
  param {
    lr_mult: 1
    decay_mult: 1
  }
  param {
    lr_mult: 2
    decay_mult: 0
  }
  convolution_param {
    num_output: 256
    pad: 2
    kernel_size: 5
    group: 2
    weight_filler {
      type: "gaussian"
      std: 0.01
    }
    bias_filler {
      type: "constant"
      value: 1
    }
  }
}
layer {
  name: "relu2"
  type: "ReLU"
  bottom: "conv2"
  top: "conv2"
}
layer {
  name: "pool2"
  type: "Pooling"
  bottom: "conv2"
  top: "pool2"
  pooling_param {
    pool: MAX
    kernel_size: 3
    stride: 2
  }
}
layer {
  name: "norm2"
  type: "LRN"
  bottom: "pool2"
  top: "norm2"
  lrn_param {
    local_size: 5
    alpha: 0.0001
    beta: 0.75
  }
}
layer {
  name: "conv3"
  type: "Convolution"
  bottom: "norm2"
  top: "conv3"
  param {
    lr_mult: 1
    decay_mult: 1
  }
  param {
    lr_mult: 2
    decay_mult: 0
  }
  convolution_param {
    num_output: 384
    pad: 1
    kernel_size: 3
    weight_filler {
      type: "gaussian"
      std: 0.01
    }
    bias_filler {
      type: "constant"
      value: 0
    }
  }
}
layer {
  name: "relu3"
  type: "ReLU"
  bottom: "conv3"
  top: "conv3"
}
layer {
  name: "conv4"
  type: "Convolution"
  bottom: "conv3"
  top: "conv4"
  param {
    lr_mult: 1
    decay_mult: 1
  }
  param {
    lr_mult: 2
    decay_mult: 0
  }
  convolution_param {
    num_output: 384
    pad: 1
    kernel_size: 3
    group: 2
    weight_filler {
      type: "gaussian"
      std: 0.01
    }
    bias_filler {
      type: "constant"
      value: 1
    }
  }
}
layer {
  name: "relu4"
  type: "ReLU"
  bottom: "conv4"
  top: "conv4"
}
layer {
  name: "conv5"
  type: "Convolution"
  bottom: "conv4"
  top: "conv5"
  param {
    lr_mult: 1
    decay_mult: 1
  }
  param {
    lr_mult: 2
    decay_mult: 0
  }
  convolution_param {
    num_output: 256
    pad: 1
    kernel_size: 3
    group: 2
    weight_filler {
      type: "gaussian"
      std: 0.01
    }
    bias_filler {
      type: "constant"
      value: 1
    }
  }
}
layer {
  name: "relu5"
  type: "ReLU"
  bottom: "conv5"
  top: "conv5"
}
layer {
  name: "pool5"
  type: "Pooling"
  bottom: "conv5"
  top: "pool5"
  pooling_param {
    pool: MAX
    kernel_size: 3
    stride: 2
  }
}
layer {
  name: "fc6"
  type: "InnerProduct"
  bottom: "pool5"
  top: "fc6"
  param {
    lr_mult: 1
    decay_mult: 1
  }
  param {
    lr_mult: 2
    decay_mult: 0
  }
  inner_product_param {
    num_output: 4096
    weight_filler {
      type: "gaussian"
      std: 0.005
    }
    bias_filler {
      type: "constant"
      value: 1
    }
  }
}
layer {
  name: "relu6"
  type: "ReLU"
  bottom: "fc6"
  top: "fc6"
}
layer {
  name: "drop6"
  type: "Dropout"
  bottom: "fc6"
  top: "fc6"
  dropout_param {
    dropout_ratio: 0.5
  }
}
layer {
  name: "fc7"
  type: "InnerProduct"
  bottom: "fc6"
  top: "fc7"
  param {
    lr_mult: 1
    decay_mult: 1
  }
  param {
    lr_mult: 2
    decay_mult: 0
  }
  inner_product_param {
    num_output: 4096
    weight_filler {
      type: "gaussian"
      std: 0.005
    }
    bias_filler {
      type: "constant"
      value: 1
    }
  }
}
layer {
  name: "relu7"
  type: "ReLU"
  bottom: "fc7"
  top: "fc7"
}
layer {
  name: "drop7"
  type: "Dropout"
  bottom: "fc7"
  top: "fc7"
  dropout_param {
    dropout_ratio: 0.5
  }
}
layer {
  name: "fc8-re"   #要改的位置
  type: "InnerProduct"
  bottom: "fc7"
  top: "fc8"
  param {
    lr_mult: 1
    decay_mult: 1
  }
  param {
    lr_mult: 2
    decay_mult: 0
  }
  inner_product_param {
    num_output: 4  #训练的种类
    weight_filler {
      type: "gaussian"
      std: 0.01
    }
    bias_filler {
      type: "constant"
      value: 0
    }
  }
}
layer {
  name: "accuracy"
  type: "Accuracy"
  bottom: "fc8"
  bottom: "label"
  top: "accuracy"
  include {
    phase: TEST
  }
}
layer {
  name: "loss"
  type: "SoftmaxWithLoss"
  bottom: "fc8"
  bottom: "label"
  top: "loss"
}
3.deploy.prototxt文件
name: "CaffeNet"
layer {
  name: "data"
  type: "Input"
  top: "data"
  input_param {
  shape: {
  dim: 10 	#一批的数量(bach of image)
  dim: 3 		#图像通道数量(channels 彩色图是3通道RGB)
  dim: 227	#图像的高度
  dim: 227 	#图像的宽度
  } }
}
layer {
  name: "conv1"  				#层的名称
  type: "Convolution"		#层的类型
  bottom: "data"				#层的输入(对应上面的data)
  top: "conv1"					#层的输出(对应的是本层卷积的结果)
  convolution_param {		#卷积的参数
    num_output: 96			#过滤器的个数,可以看做的是卷积和的个数吧
    kernel_size: 11			#卷积核的大小
    stride: 4						#图像中的间隔多少进行卷积(一次窗口滑动的步长)
  }
}
layer {
  name: "relu1"
  type: "ReLU"
  bottom: "conv1"
  top: "conv1"
}
layer {
  name: "pool1"
  type: "Pooling"
  bottom: "conv1"
  top: "pool1"
  pooling_param {
    pool: MAX				#使用最大池化
    kernel_size: 3
    stride: 2
  }
}
layer {
  name: "norm1"
  type: "LRN"
  bottom: "pool1"
  top: "norm1"
  lrn_param {
    local_size: 5
    alpha: 0.0001
    beta: 0.75
  }
}
layer {
  name: "conv2"
  type: "Convolution"
  bottom: "norm1"
  top: "conv2"
  convolution_param {
    num_output: 256
    pad: 2				#边界处补2个行和2个列
    kernel_size: 5
    group: 2			#卷积分组
  }
}
layer {
  name: "relu2"
  type: "ReLU"			#激活函数
  bottom: "conv2"
  top: "conv2"
}
layer {
  name: "pool2"
  type: "Pooling"
  bottom: "conv2"
  top: "pool2"
  pooling_param {
    pool: MAX
    kernel_size: 3
    stride: 2
  }
}
layer {
  name: "norm2"
  type: "LRN"						#侧抑制
  bottom: "pool2"
  top: "norm2"
  lrn_param {           #主要是LRN的三个主要的参数
    local_size: 5
    alpha: 0.0001
    beta: 0.75
  }
}
layer {
  name: "conv3"
  type: "Convolution"
  bottom: "norm2"
  top: "conv3"
  convolution_param {
    num_output: 384
    pad: 1
    kernel_size: 3
  }
}
layer {
  name: "relu3"
  type: "ReLU"
  bottom: "conv3"
  top: "conv3"
}
layer {
  name: "conv4"
  type: "Convolution"
  bottom: "conv3"
  top: "conv4"
  convolution_param {
    num_output: 384
    pad: 1
    kernel_size: 3
    group: 2
  }
}
layer {
  name: "relu4"
  type: "ReLU"
  bottom: "conv4"
  top: "conv4"
}
layer {
  name: "conv5"
  type: "Convolution"
  bottom: "conv4"
  top: "conv5"
  convolution_param {
    num_output: 256
    pad: 1					#对图像进行补充像素的设置(在图像的高和宽进行补充)
    kernel_size: 3
    group: 2
  }
}
layer {
  name: "relu5"
  type: "ReLU"
  bottom: "conv5"
  top: "conv5"
}
layer {
  name: "pool5"
  type: "Pooling"
  bottom: "conv5"
  top: "pool5"
  pooling_param {
    pool: MAX
    kernel_size: 3
    stride: 2
  }
}
layer {
  name: "fc6"
  type: "InnerProduct"
  bottom: "pool5"
  top: "fc6"
  inner_product_param {
    num_output: 4096
  }
}
layer {
  name: "relu6"
  type: "ReLU"
  bottom: "fc6"
  top: "fc6"
}
layer {
  name: "drop6"
  type: "Dropout"
  bottom: "fc6"
  top: "fc6"
  dropout_param {
    dropout_ratio: 0.5   #使用的drop进行网络的参数的隐藏时的参数
  }
}
layer {
  name: "fc7"
  type: "InnerProduct"
  bottom: "fc6"
  top: "fc7"
  inner_product_param {
    num_output: 4096     #过滤器的个数(输出的个数)
  }
}
layer {
  name: "relu7"
  type: "ReLU"          #relu的激活函数
  bottom: "fc7"
  top: "fc7"
}
layer {
  name: "drop7"
  type: "Dropout" 			#dropout将一部分的权重置零不参与运算
  bottom: "fc7"
  top: "fc7"
  dropout_param {
    dropout_ratio: 0.5
  }
}
layer {
  name: "fc8-re"				#要改的位置
  type: "InnerProduct"    #内积(全连接层)
  bottom: "fc7"
  top: "fc8"
  inner_product_param {
    num_output: 4			#输出的类别(要改成对应的)
  }
}
layer {
  name: "prob"
  type: "Softmax"					#Softmax分类层
  bottom: "fc8"
  top: "prob"
}
三、开始训练
1.编写脚本train.bat
cd ../../
E:/LIB/caffe-windows/build/tools/Release/caffe.exe train --solver=data/fine_tuning/solver.prototxt --weights=data/fine_tuning/bvlc_reference_caffenet.caffemodel
pause
2.运行脚本

完成之后会多出两个文件,如下,代表训练成功。

四、测试数据
1.新建labels.txt文件,写上以下内容:
0 cat
1 dog
2 flower
3 cartoon
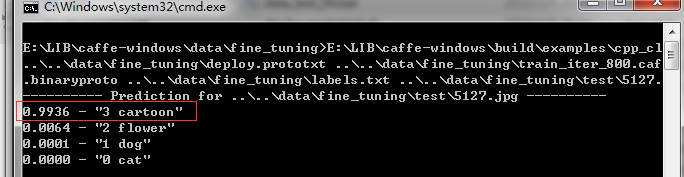
2.新建data_test.bat文件
E:\LIB\caffe-windows\build\examples\cpp_classification\Release\classification.exe ..\..\data\fine_tuning\deploy.prototxt ..\..\data\fine_tuning\train_iter_800.caffemodel ..\..\data\fine_tuning\test_mean.binaryproto ..\..\data\fine_tuning\labels.txt ..\..\data\fine_tuning\test\5127.jpg
pause
保存,点击运行,还是测试文章开头的那张图像,我们来看看测试结果明显提高了.
后记
1.以上所有的图像分类的训练已经完成,之后就是如何在在项目中使用训练好的模型。
2.有兴趣讨论学习可以加群:487350510。