face_recognition实现简单的人脸识别
分别实现从图片,视频和摄像头中进行人脸识别,并对人脸区域进行标注。
三种方式的实现方法本质上是一样的,区别只在于对opencv的调用上存在一点区别。
下面以图片中识别人脸的代码为例:
#实现从图片中进行人脸识别
#导入face_recognition 和 cv2 库
import face_recognition
import cv2
import numpy as np
#读入图片
frame = cv2.imread('D:/test/3face.jpg')
#进行图片缩放,这个十分重要,影响到识别是正确率和速度
#大图片进行适当的缩小能明显提高识别速度(在摄像头和视频识别中非常有效)(指数型)
#小图片进行适当放大之后,可以明显提高识别成功率
frame = cv2.resize(frame,(0,0),fx=0.25,fy=0.25)
#cv2的图片排列方式为BGR,需要先转变为RGB模式,face_recognition库才能正常运行
rgb_frame = cv2.cvtColor(frame,cv2.COLOR_BGR2RGB)
#执行face_locations,识别出图片中人脸的位置(左上点,右下点)
face_locations = face_recognition.face_locations(rgb_frame)
for face_location in face_locations:
top = face_location[0]
right = face_location[1]
bottom = face_location[2]
left = face_location[3]
#画出矩形框
cv2.rectangle(frame, (left, top), (right, bottom), (0, 0, 255), 2)
cv2.imshow('img', frame)
cv2.imwrite('3faceout.jpg', frame)
cv2.waitKey(0)
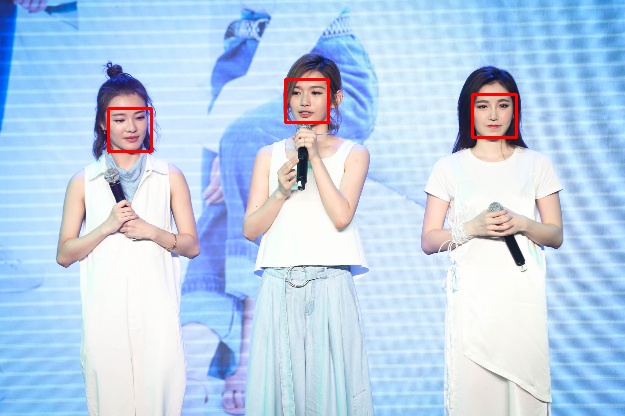
cv2.destroyAllWindows()原图片如下:


效果图如下:
单人脸识别:

多人脸识别:
其他详细代码(视频,摄像头)和效果展示请见:https://github.com/1647790440/deeplearning/tree/master/face_recognition